A successful Git branching model
Note of reflection (March 5, 2020)
This model was conceived in 2010, now more than 10 years ago, and not very long after Git itself came into being. In those 10 years, git-flow (the branching model laid out in this article) has become hugely popular in many a software team to the point where people have started treating it like a standard of sorts — but unfortunately also as a dogma or panacea.
During those 10 years, Git itself has taken the world by a storm, and the most popular type of software that is being developed with Git is shifting more towards web apps — at least in my filter bubble. Web apps are typically continuously delivered, not rolled back, and you don't have to support multiple versions of the software running in the wild.
This is not the class of software that I had in mind when I wrote the blog post 10 years ago. If your team is doing continuous delivery of software, I would suggest to adopt a much simpler workflow (like GitHub flow) instead of trying to shoehorn git-flow into your team.
If, however, you are building software that is explicitly versioned, or if you need to support multiple versions of your software in the wild, then git-flow may still be as good of a fit to your team as it has been to people in the last 10 years. In that case, please read on.
To conclude, always remember that panaceas don't exist. Consider your own context. Don't be hating. Decide for yourself.
In this post I present the development model that I’ve introduced for some of my projects (both at work and private) about a year ago, and which has turned out to be very successful. I’ve been meaning to write about it for a while now, but I’ve never really found the time to do so thoroughly, until now. I won’t talk about any of the projects’ details, merely about the branching strategy and release management.

Why git?
For a thorough discussion on the pros and cons of Git compared to centralized source code control systems, see the web. There are plenty of flame wars going on there. As a developer, I prefer Git above all other tools around today. Git really changed the way developers think of merging and branching. From the classic CVS/Subversion world I came from, merging/branching has always been considered a bit scary (“beware of merge conflicts, they bite you!”) and something you only do every once in a while.
But with Git, these actions are extremely cheap and simple, and they are considered one of the core parts of your daily workflow, really. For example, in CVS/Subversion books, branching and merging is first discussed in the later chapters (for advanced users), while in every Git book, it’s already covered in chapter 3 (basics).
As a consequence of its simplicity and repetitive nature, branching and merging are no longer something to be afraid of. Version control tools are supposed to assist in branching/merging more than anything else.
Enough about the tools, let’s head onto the development model. The model that I’m going to present here is essentially no more than a set of procedures that every team member has to follow in order to come to a managed software development process.
Decentralized but centralized
The repository setup that we use and that works well with this branching model, is that with a central “truth” repo. Note that this repo is only considered to be the central one (since Git is a DVCS, there is no such thing as a central repo at a technical level). We will refer to this repo as origin, since this name is familiar to all Git users.
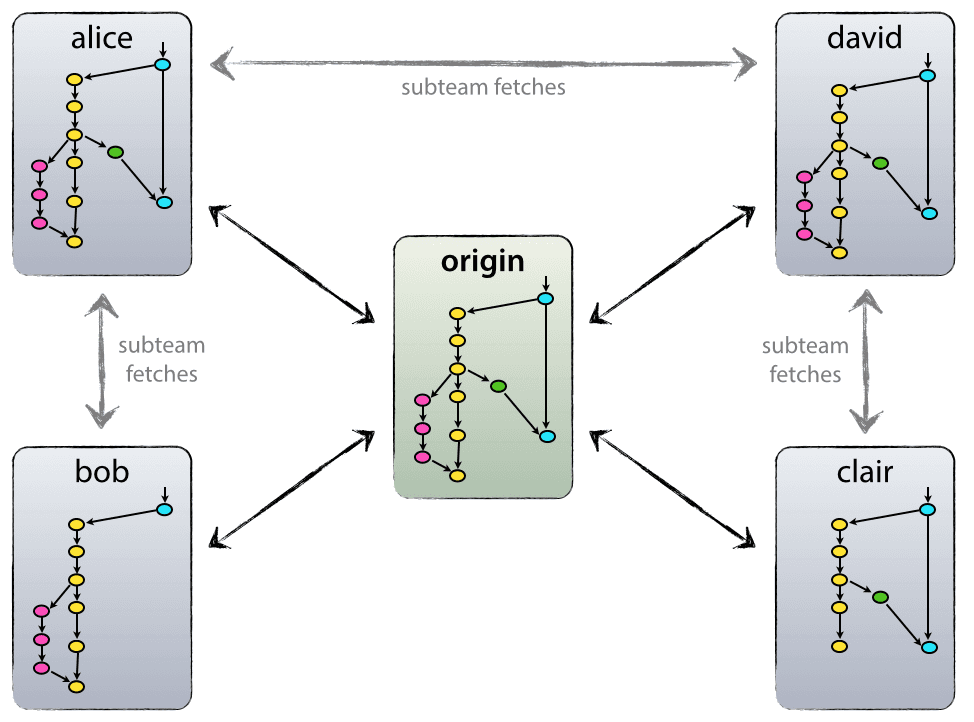
Each developer pulls and pushes to origin. But besides the centralized push-pull relationships, each developer may also pull changes from other peers to form sub teams. For example, this might be useful to work together with two or more developers on a big new feature, before pushing the work in progress to origin prematurely. In the figure above, there are subteams of Alice and Bob, Alice and David, and Clair and David.
Technically, this means nothing more than that Alice has defined a Git remote, named bob, pointing to Bob’s repository, and vice versa.
The main branches
At the core, the development model is greatly inspired by existing models out there. The central repo holds two main branches with an infinite lifetime:
masterdevelop
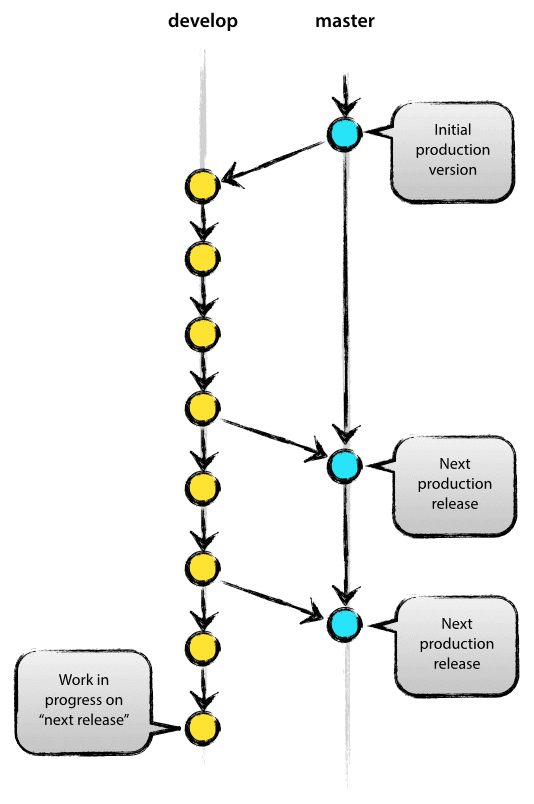
The master branch at origin should be familiar to every Git user. Parallel to the master branch, another branch exists called develop.
We consider origin/master to be the main branch where the source code of HEAD always reflects a production-ready state.
We consider origin/develop to be the main branch where the source code of HEAD always reflects a state with the latest delivered development changes for the next release. Some would call this the “integration branch”. This is where any automatic nightly builds are built from.
When the source code in the develop branch reaches a stable point and is ready to be released, all of the changes should be merged back into master somehow and then tagged with a release number. How this is done in detail will be discussed further on.
Therefore, each time when changes are merged back into master, this is a new production release by definition. We tend to be very strict at this, so that theoretically, we could use a Git hook script to automatically build and roll-out our software to our production servers everytime there was a commit on master.
Supporting branches
Next to the main branches master and develop, our development model uses a variety of supporting branches to aid parallel development between team members, ease tracking of features, prepare for production releases and to assist in quickly fixing live production problems. Unlike the main branches, these branches always have a limited life time, since they will be removed eventually.
The different types of branches we may use are:
- Feature branches
- Release branches
- Hotfix branches
Each of these branches have a specific purpose and are bound to strict rules as to which branches may be their originating branch and which branches must be their merge targets. We will walk through them in a minute.
By no means are these branches “special” from a technical perspective. The branch types are categorized by how we use them. They are of course plain old Git branches.
Feature branches
- May branch off from:
develop- Must merge back into:
develop- Branch naming convention:
- anything except
master,develop,release-*, orhotfix-*
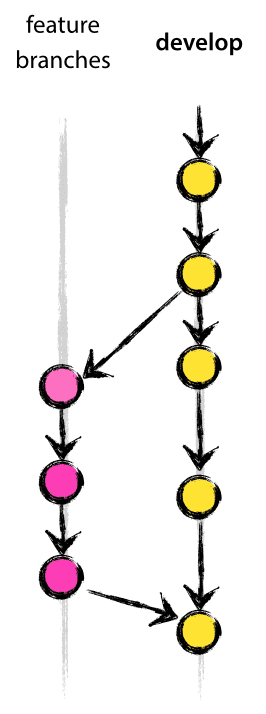
Feature branches (or sometimes called topic branches) are used to develop new features for the upcoming or a distant future release. When starting development of a feature, the target release in which this feature will be incorporated may well be unknown at that point. The essence of a feature branch is that it exists as long as the feature is in development, but will eventually be merged back into develop (to definitely add the new feature to the upcoming release) or discarded (in case of a disappointing experiment).
Feature branches typically exist in developer repos only, not in origin.
Creating a feature branch
When starting work on a new feature, branch off from the develop branch.
$ git checkout -b myfeature develop
Switched to a new branch "myfeature"
Incorporating a finished feature on develop
Finished features may be merged into the develop branch to definitely add them to the upcoming release:
$ git checkout develop
Switched to branch 'develop'
$ git merge --no-ff myfeature
Updating ea1b82a..05e9557
(Summary of changes)
$ git branch -d myfeature
Deleted branch myfeature (was 05e9557).
$ git push origin develop
The --no-ff flag causes the merge to always create a new commit object, even if the merge could be performed with a fast-forward. This avoids losing information about the historical existence of a feature branch and groups together all commits that together added the feature. Compare:
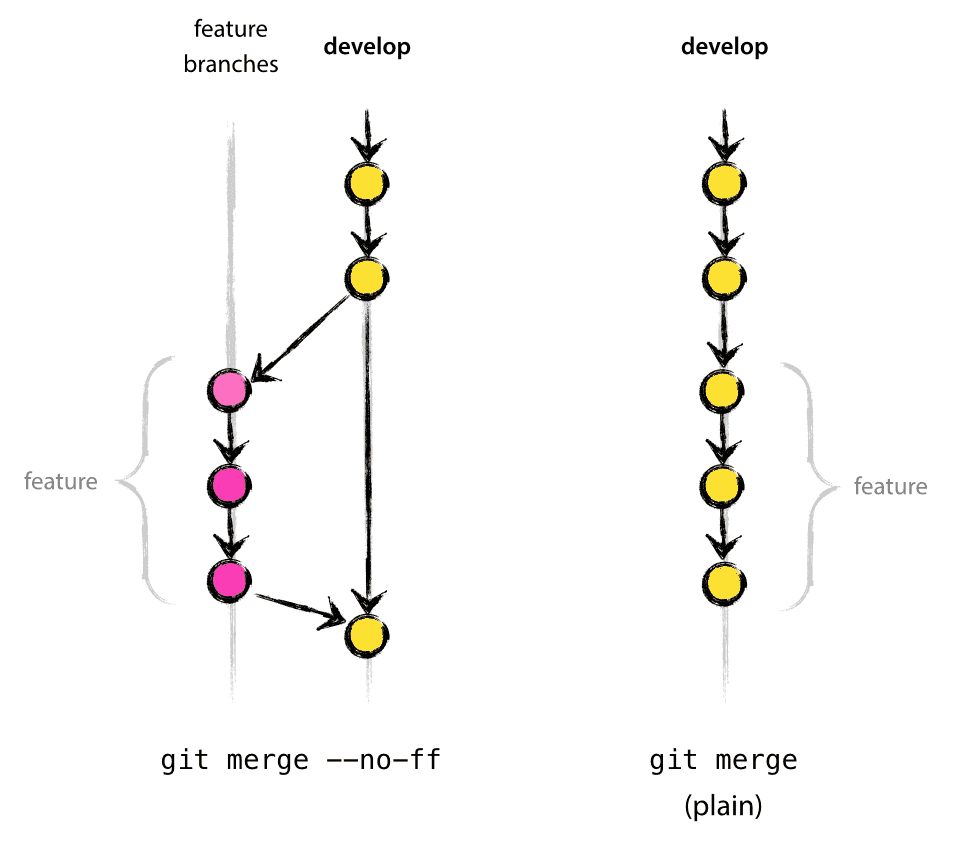
In the latter case, it is impossible to see from the Git history which of the commit objects together have implemented a feature—you would have to manually read all the log messages. Reverting a whole feature (i.e. a group of commits), is a true headache in the latter situation, whereas it is easily done if the --no-ff flag was used.
Yes, it will create a few more (empty) commit objects, but the gain is much bigger than the cost.
Release branches
- May branch off from:
develop- Must merge back into:
developandmaster- Branch naming convention:
release-*
Release branches support preparation of a new production release. They allow for last-minute dotting of i’s and crossing t’s. Furthermore, they allow for minor bug fixes and preparing meta-data for a release (version number, build dates, etc.). By doing all of this work on a release branch, the develop branch is cleared to receive features for the next big release.
The key moment to branch off a new release branch from develop is when develop (almost) reflects the desired state of the new release. At least all features that are targeted for the release-to-be-built must be merged in to develop at this point in time. All features targeted at future releases may not—they must wait until after the release branch is branched off.
It is exactly at the start of a release branch that the upcoming release gets assigned a version number—not any earlier. Up until that moment, the develop branch reflected changes for the “next release”, but it is unclear whether that “next release” will eventually become 0.3 or 1.0, until the release branch is started. That decision is made on the start of the release branch and is carried out by the project’s rules on version number bumping.
Creating a release branch
Release branches are created from the develop branch. For example, say version 1.1.5 is the current production release and we have a big release coming up. The state of develop is ready for the “next release” and we have decided that this will become version 1.2 (rather than 1.1.6 or 2.0). So we branch off and give the release branch a name reflecting the new version number:
$ git checkout -b release-1.2 develop
Switched to a new branch "release-1.2"
$ ./bump-version.sh 1.2
Files modified successfully, version bumped to 1.2.
$ git commit -a -m "Bumped version number to 1.2"
[release-1.2 74d9424] Bumped version number to 1.2
1 files changed, 1 insertions(+), 1 deletions(-)
After creating a new branch and switching to it, we bump the version number. Here, bump-version.sh is a fictional shell script that changes some files in the working copy to reflect the new version. (This can of course be a manual change—the point being that some files change.) Then, the bumped version number is committed.
This new branch may exist there for a while, until the release may be rolled out definitely. During that time, bug fixes may be applied in this branch (rather than on the develop branch). Adding large new features here is strictly prohibited. They must be merged into develop, and therefore, wait for the next big release.
Finishing a release branch
When the state of the release branch is ready to become a real release, some actions need to be carried out. First, the release branch is merged into master (since every commit on master is a new release by definition, remember). Next, that commit on master must be tagged for easy future reference to this historical version. Finally, the changes made on the release branch need to be merged back into develop, so that future releases also contain these bug fixes.
The first two steps in Git:
$ git checkout master
Switched to branch 'master'
$ git merge --no-ff release-1.2
Merge made by recursive.
(Summary of changes)
$ git tag -a 1.2
The release is now done, and tagged for future reference.
Edit: You might as well want to use the
-sor-u <key>flags to sign your tag cryptographically.
To keep the changes made in the release branch, we need to merge those back into develop, though. In Git:
$ git checkout develop
Switched to branch 'develop'
$ git merge --no-ff release-1.2
Merge made by recursive.
(Summary of changes)
This step may well lead to a merge conflict (probably even, since we have changed the version number). If so, fix it and commit.
Now we are really done and the release branch may be removed, since we don’t need it anymore:
$ git branch -d release-1.2
Deleted branch release-1.2 (was ff452fe).
Hotfix branches
- May branch off from:
master- Must merge back into:
developandmaster- Branch naming convention:
hotfix-*
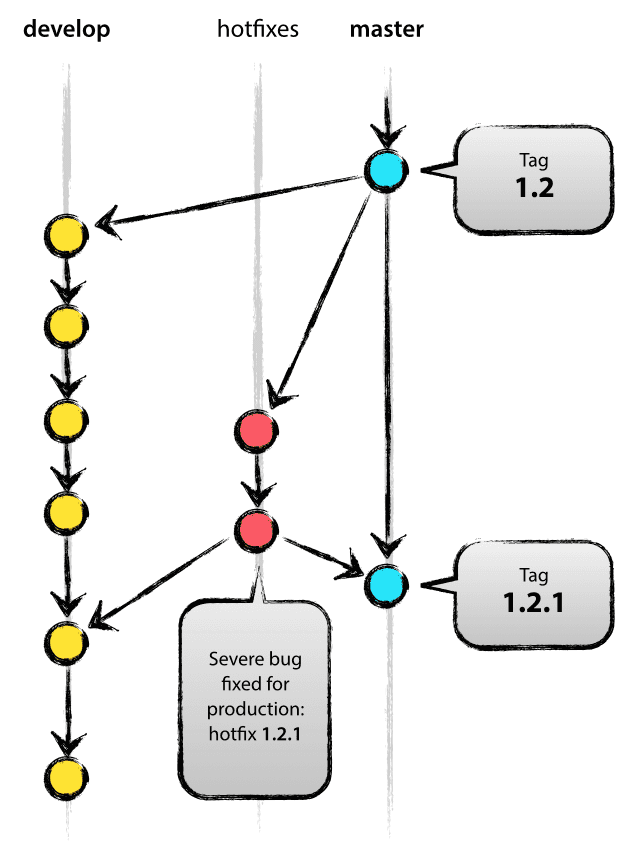
Hotfix branches are very much like release branches in that they are also meant to prepare for a new production release, albeit unplanned. They arise from the necessity to act immediately upon an undesired state of a live production version. When a critical bug in a production version must be resolved immediately, a hotfix branch may be branched off from the corresponding tag on the master branch that marks the production version.
The essence is that work of team members (on the develop branch) can continue, while another person is preparing a quick production fix.
Creating the hotfix branch
Hotfix branches are created from the master branch. For example, say version 1.2 is the current production release running live and causing troubles due to a severe bug. But changes on develop are yet unstable. We may then branch off a hotfix branch and start fixing the problem:
$ git checkout -b hotfix-1.2.1 master
Switched to a new branch "hotfix-1.2.1"
$ ./bump-version.sh 1.2.1
Files modified successfully, version bumped to 1.2.1.
$ git commit -a -m "Bumped version number to 1.2.1"
[hotfix-1.2.1 41e61bb] Bumped version number to 1.2.1
1 files changed, 1 insertions(+), 1 deletions(-)
Don’t forget to bump the version number after branching off!
Then, fix the bug and commit the fix in one or more separate commits.
$ git commit -m "Fixed severe production problem"
[hotfix-1.2.1 abbe5d6] Fixed severe production problem
5 files changed, 32 insertions(+), 17 deletions(-)
Finishing a hotfix branch
When finished, the bugfix needs to be merged back into master, but also needs to be merged back into develop, in order to safeguard that the bugfix is included in the next release as well. This is completely similar to how release branches are finished.
First, update master and tag the release.
$ git checkout master
Switched to branch 'master'
$ git merge --no-ff hotfix-1.2.1
Merge made by recursive.
(Summary of changes)
$ git tag -a 1.2.1
Edit: You might as well want to use the
-sor-u <key>flags to sign your tag cryptographically.
Next, include the bugfix in develop, too:
$ git checkout develop
Switched to branch 'develop'
$ git merge --no-ff hotfix-1.2.1
Merge made by recursive.
(Summary of changes)
The one exception to the rule here is that, when a release branch currently exists, the hotfix changes need to be merged into that release branch, instead of develop. Back-merging the bugfix into the release branch will eventually result in the bugfix being merged into develop too, when the release branch is finished. (If work in develop immediately requires this bugfix and cannot wait for the release branch to be finished, you may safely merge the bugfix into develop now already as well.)
Finally, remove the temporary branch:
$ git branch -d hotfix-1.2.1
Deleted branch hotfix-1.2.1 (was abbe5d6).
Summary
While there is nothing really shocking new to this branching model, the “big picture” figure that this post began with has turned out to be tremendously useful in our projects. It forms an elegant mental model that is easy to comprehend and allows team members to develop a shared understanding of the branching and releasing processes.
A high-quality PDF version of the figure is provided here. Go ahead and hang it on the wall for quick reference at any time.
Update: And for anyone who requested it: here’s the gitflow-model.src.key of the main diagram image (Apple Keynote).

Other posts on this blog
Git轻松入门2:分支篇
什么是分支

在玩剧情类游戏时,不同的选择会触发不同的剧情路线,每条剧情路线都会独立发展,最终走向不同的结局。
Git中所谓的“分支(branch)”就如同游戏中的剧情路线,用户可以为项目建立不同的分支,使得项目能在不同的分支里独立进行,并且互不干预。
当用户初始化一个仓库时,Git会自动为其建立一条主分支,默认称其为master。若用户没有创建其他分支,那么项目发展的各个版本就默认存储在这条 master 分支上。
分支指令介绍
分支的新建和切换
假设你正在项目上工作,并且在 master 分支上已经有了如下的提交。
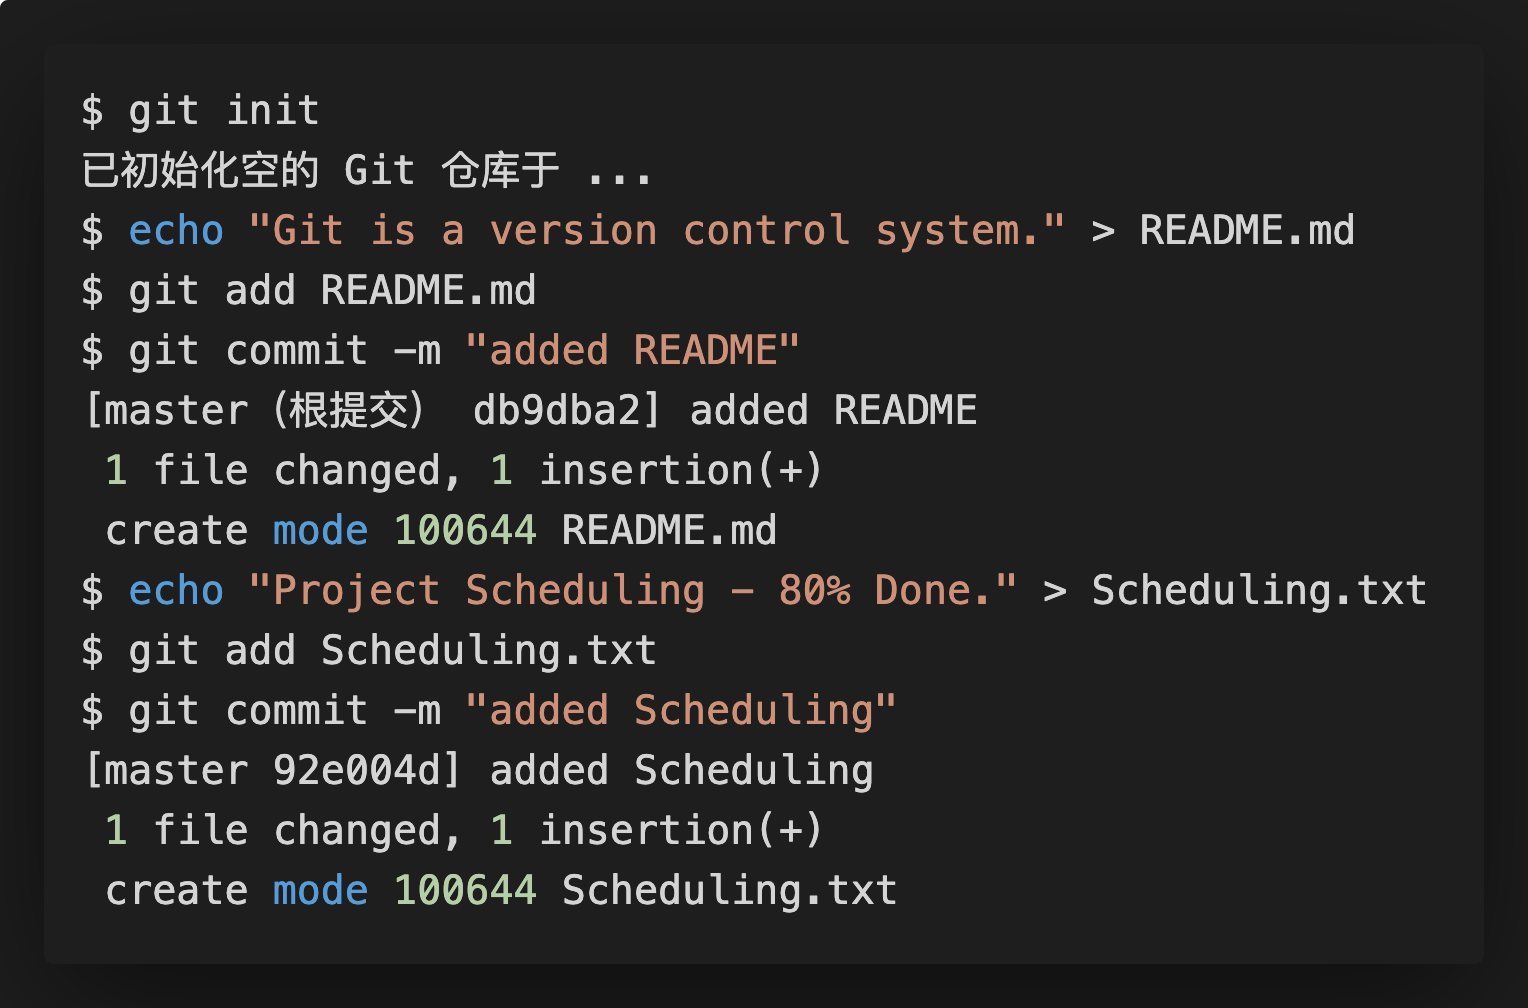
对应的图即为如下:
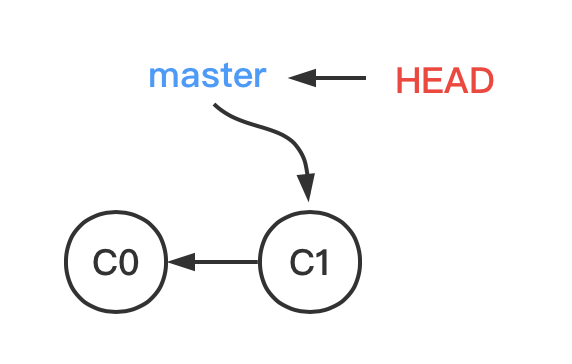
master 指针指向该分支上最新的提交; HEAD 指针指向的是当前所在分支。
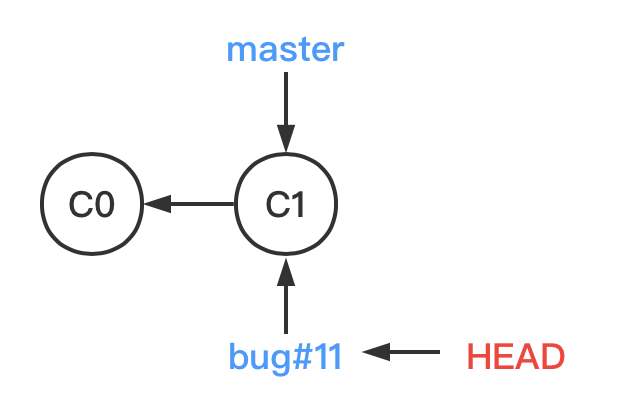
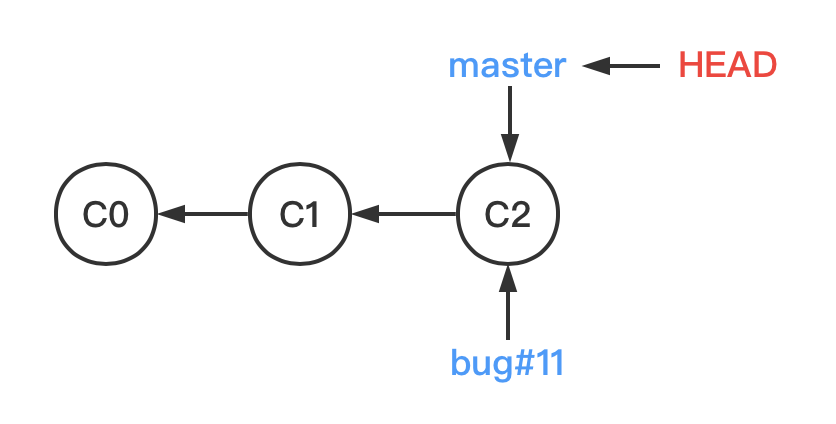
此时你发现了项目中有一个代号为#11的bug需要你解决。你决定专门新建一个分支,在那条分支上把该问题解决。于是你敲入了新建分支的指令。

上面两行命令可以仅用一条命令替代:$ git branch -b bug#11。
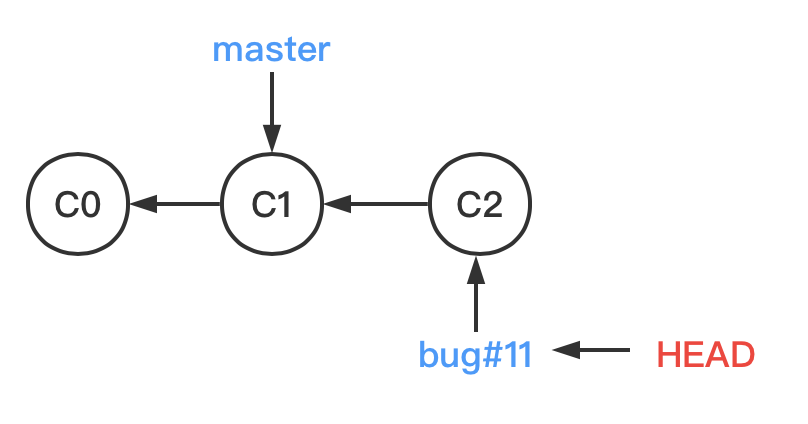
当我们在创建新的分支时,实际上是创建一个新的指针。它会指向 master 此时指向的提交。当我们切换到分支 bug#11时,HEAD 指针就会指向 bug#11,如下图所示。
此外,我们可以用如下命令查看了目前仓库中存在的分支。
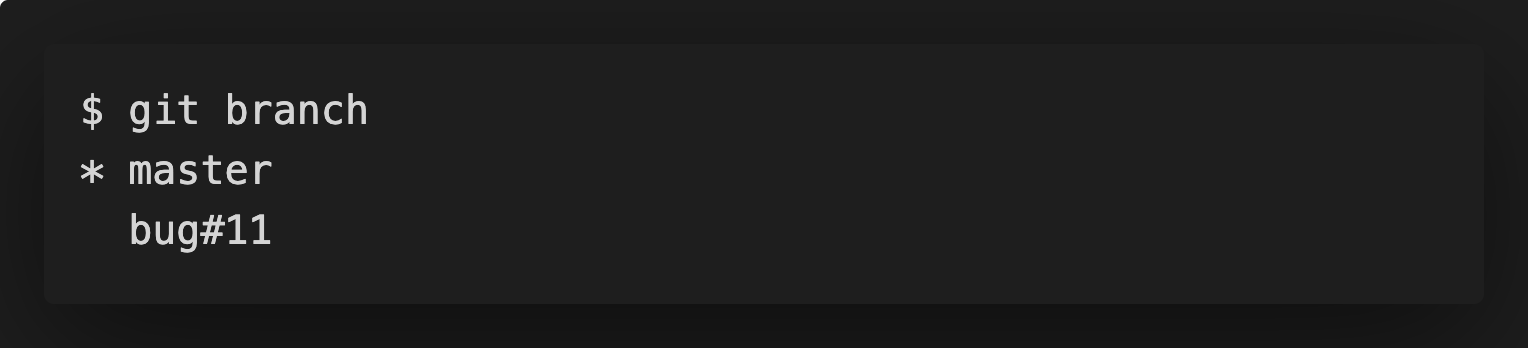
可以看到目前共存在2个分支,其中带*号的是目前所在分支:master。
分支的作用
于是你开始在 bug#11 这条分支上工作,并作出了如下的提交(commit)。
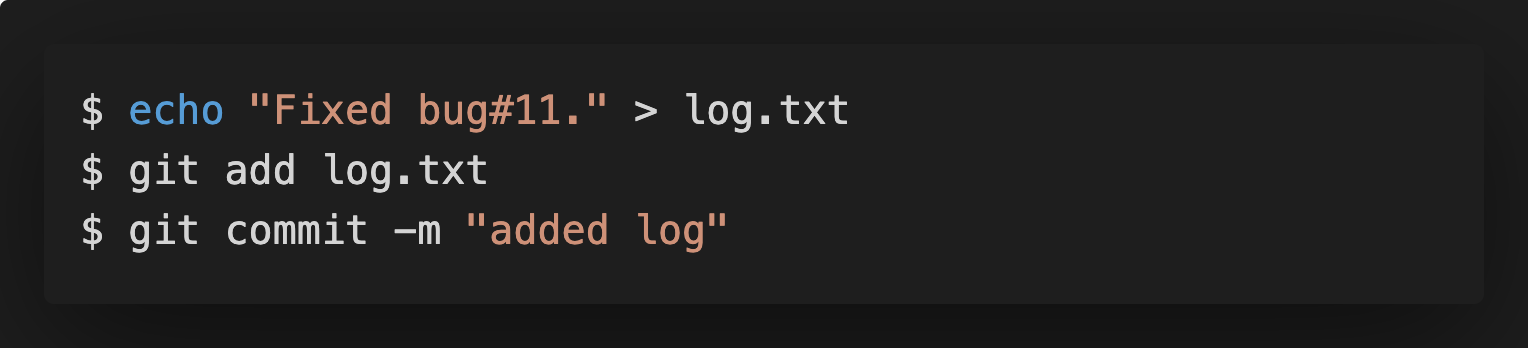
于是 bug#11 指针往前移动了一步,而 master 指针还是留在原地。
这时,当你用 $ git checkout master 命令切换回 master 分支时,你发现刚才在 bug#11 分支上新建的 log.txt 文件不见了,当前的工作目录和你开始在 bug#11 分支工作前一模一样。
这就是分支的好处,它将工作切分开来,让工作多线独立发展。
合并分支
我们将介绍在合并分支时会遇到的3种情况。
Fast-Forward
此时,你已经把 #bug11 修复完毕,你决定把这项修复合并到主线 master 中。于是,你使用了 $ git merge 命令来实现这个目的。
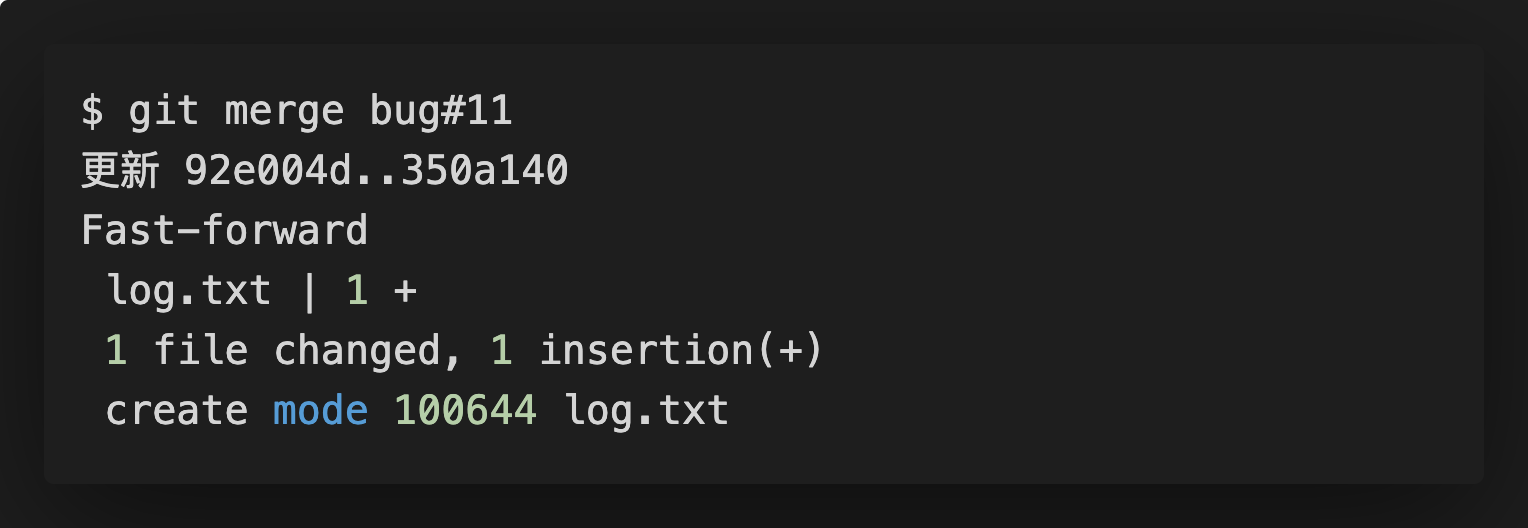
在合并的时候,你注意到了“快进(Fast-forward)”这个词。当你试图合并两个分支时, 如果顺着一个分支走下去能够到达另一个分支,那么 Git 在合并两者的时候, 只会简单的将指针向前推进,因为这种情况下的合并操作没有需要解决的分歧——这就叫做 “快进(fast-forward)”,如图所示。
此时合并完成,所以你也不再需要 bug#11 分支了。你可以使用带 -d 选项的 $ git branch 命令来删除分支:

'recursive' strategy
此时,你又发现了项目中有一个代号为 bug#31 的漏洞需要修复,于是你先用 $ git branch bug#31 命令新建了一个分支。
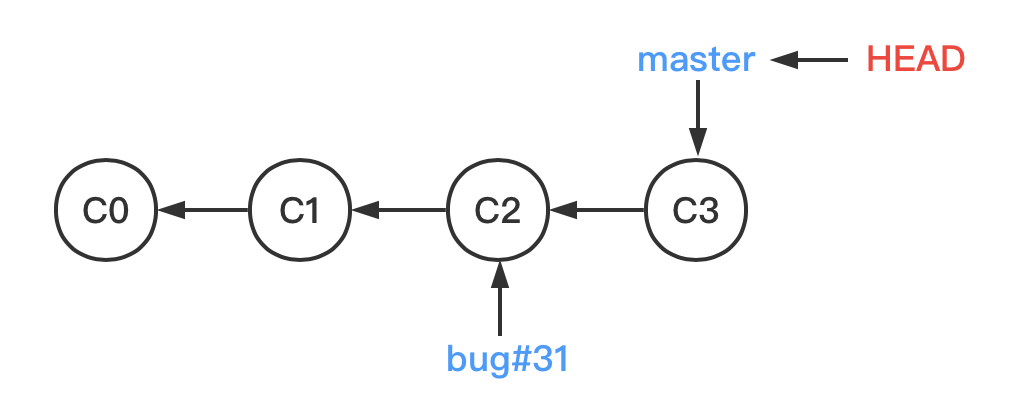
现在的你还在 master 这条分支上工作:你将 Scheduling.txt 的文件内容修改为 Project Scheduling - 85% Done., 然后commit这次的修改。
此时,对应的图为如下:
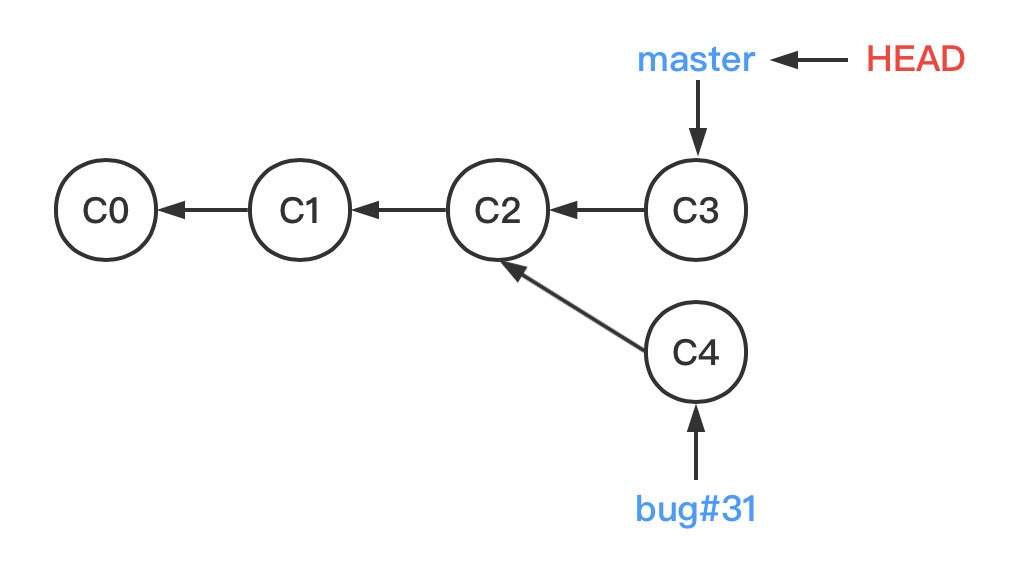
现在的你感到心满意足,决心切换到 bug#31 分支上开始修复 bug#31。于是你先用 $ git checkout bug#31 命令切换到了该分支。
接着你辛辛苦苦了一整天,总算把 bug#31 修复完了。于是你修改了 log.txt 文件里的内容,加上了一行Fixed bug#31. ,并commit这次的修改,此时的图对应如下:
现在,你决定把对 bug#31 的修复应用到 master 分支中来,于是你切换回 master 分支,然后再次调用了 $ git merge 命令:
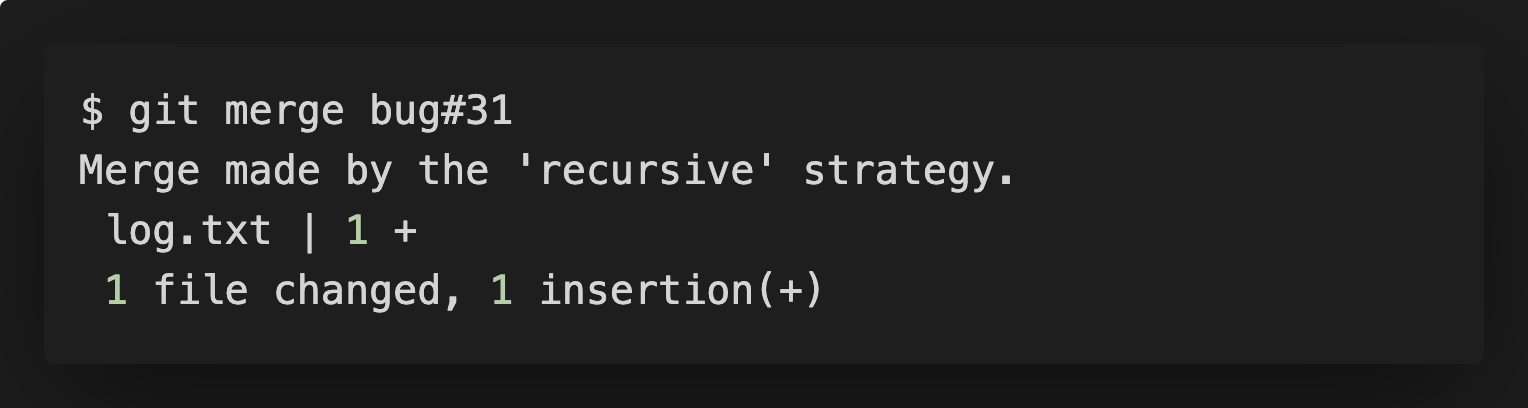
你发现这次提示的和之前在合并 bug#11 分支时提示的不太一样。因为此时,你想合并的 bug#31 指向的最新提交 C4 并不是 master 指向的最新提交 C3 的直接后继(换句话说,C3 不能顺着一条路走到 C4)。所以Git没法再那么通过简单的移动指针来完成合并了。
Git会找到 C3 和 C4 的共同祖先 C2,然后做一个三方合并。
那么什么是三方合并呢?
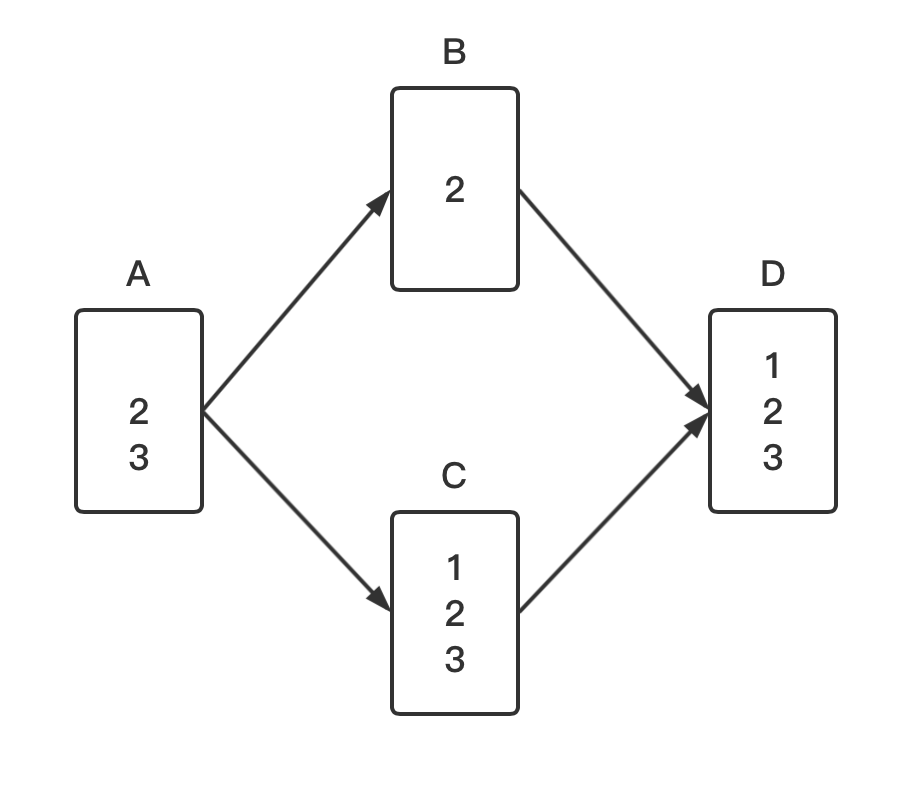
例子1:A是B和C的共同祖先。B相对A的改动是删掉了3,C相对A的改动是增加了1。那么B和C合并的结果就是123。
例子2:A是B和C的共同祖先。B相对A的改动是删掉了1,C相对A的改动是增加了3。那么B和C合并的结果就是23。
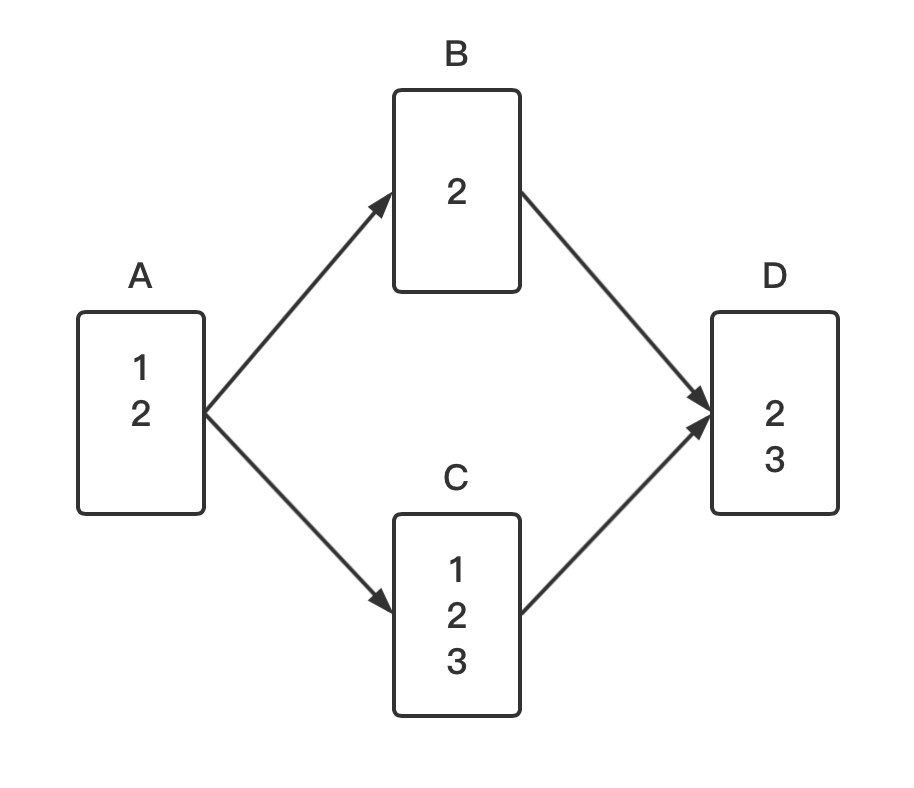
所以简单来说,三方合并就是把B方和C方相对于共同祖先A方的改动分别应用到合并结果上。
刚才,C3 相对于 C2 的改动是修改了 Scheduling.txt 文件的内容,而 C4 相对于 C2 的改动是修改了 log.txt 文件里的内容,将这两项改动都应用到合并结果中,就得到了一个既修改了 Scheduling.txt 又修改了 log.txt 的 C5 。

遇到冲突时的合并
有时候合并操作不会如此顺利。 如果你在两个不同的分支中,对同一个文件进行了不同的修改,Git 就没法干净的合并它们。
例如:你在 bug#31 分支中在 README.md 文件中添加了一行 I like Git.;在 master 分支中对 README.md 文件添加了一行 Git is good.,然后再执行 $ git merge 命令:
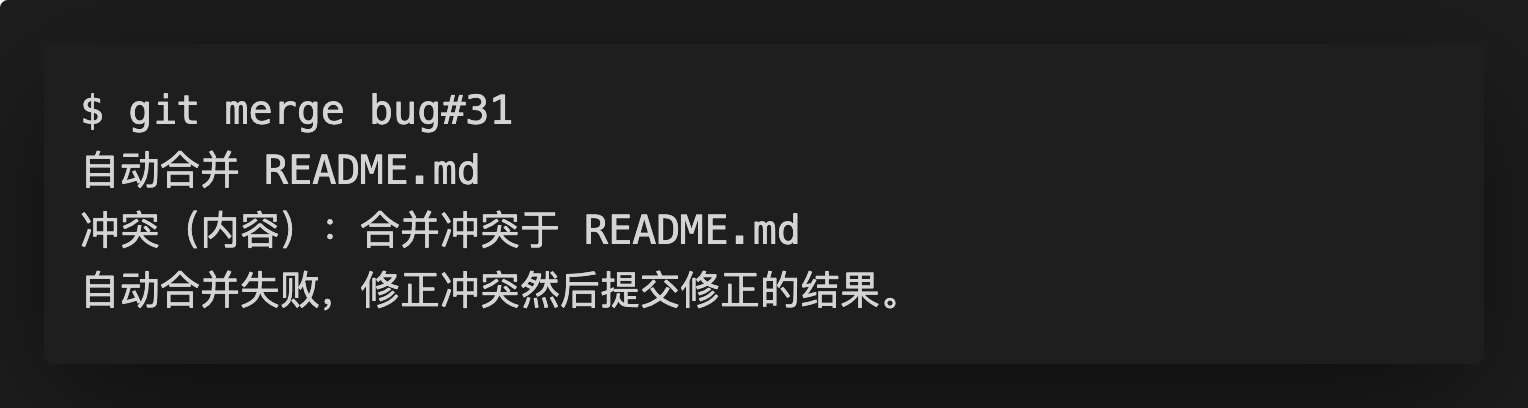
在两个分支中,你都对 README.md 文件进行了修改,因此就会产生合并冲突。
打开 README.md 文件会看到如下内容,其中 <<<<<<< HEAD 到 ======= 之间的内容是 HEAD 指向分支里的内容,即 master;======= 到 >>>>>>> bug#31 之间的是 bug#31 分支里的内容。
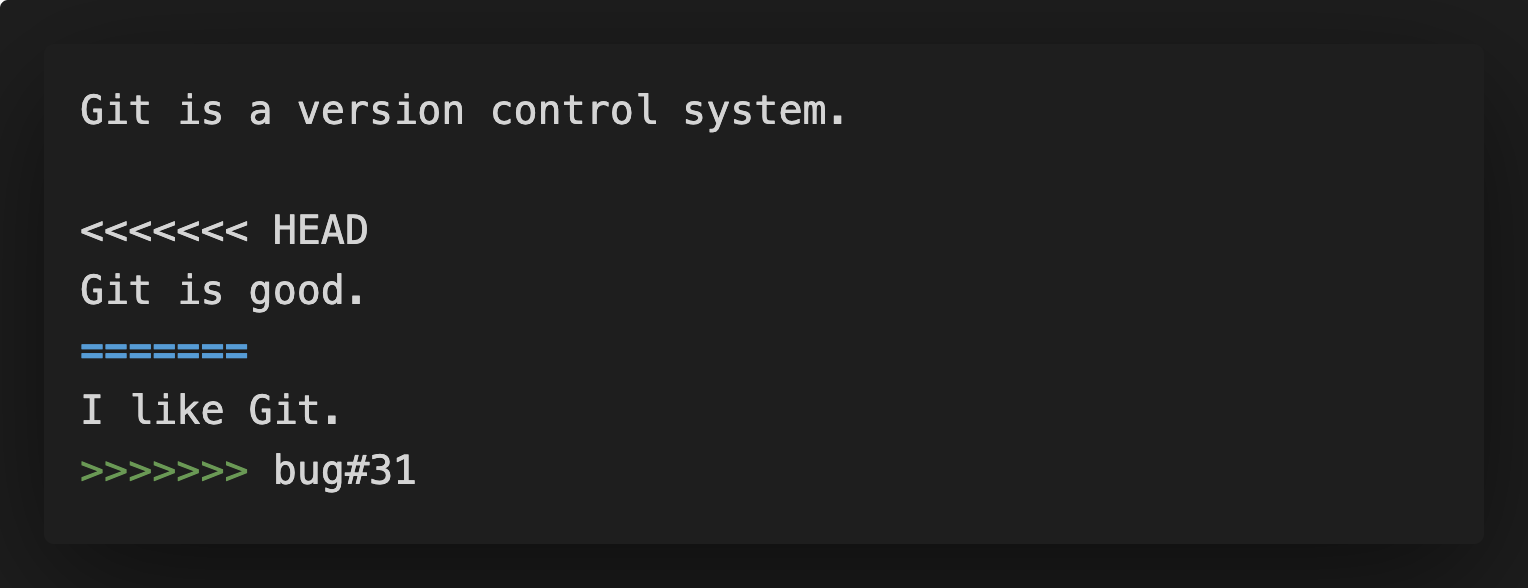
你手动修改了这个文件,修改后的内容如下。
在Git轻松入门1:本地仓库篇,我们提到过,文件修改后,需要执行 $ git add 和 $ git commit 两个步骤。所以现在,你同样需要执行这两个步骤,而当你敲完命令,你会发现提示合并成功。

总结
总结一下今天出现过的几个Git命令:
# 列出该仓库存在的分支,当前分支的前面会带有*号
$ git branch

# 创建分支
$ git branch [branch-name]

# 切换分支
$ git checkout [branch-name]

# 创建分支并立刻切换到该分支下
$ git checkout -b [branch-name]

# 删除分支
$ git branch -d [branch-name]

# 合并分支
$ git merge [branch-name]
分支的作用在于将工作切分开来,使得工作可以多线独立发展。以上是本讲关于分支命令的概括。此外,本讲还介绍了Git采取的3种合并策略:Fast-forward(直接移动指针),recursive strategy(采取三方合并)以及merge conflict(手动修改存在冲突的文件)。