从Visual Studio 2010开始,有一个Modeling Project的项目模板,允许应用程序设计人员通过该项目完成统一的UML模型设计。与Visual Studio 2008 DSLTools相比,通过Modeling Project创建出来的UML模型对象,能够被使用到各个不同的UML视图中,这一功能是由UML Model Explorer维护的。我们可以看到,相同的UML模型对象,可以同时在Class Diagram以及Sequence Diagram中引用。从Visual Studio 2010开始,基于Visual Studio 2010 SDK的Visual Studio Visualization & Modeling SDK允许开发人员通过Domain Specific Language(DSL) Designer来设计开发自己的DSL,不过本文不会从Visualization & Modeling SDK着手来创建一个新的DSL,而是通过已有的Modeling Project来实现DSL的定制。
谈起DSL,或许有些朋友还不太了解。其实DSL就是一种应用于特定场景的语言,比如Entity Framework,它有一个Designer Surface,也就是我们平时所说的设计器,我们可以在设计器上设计各种类型以及类之间的关系,而整个设计器是面向Entity Framework这个特定应用场景的,例如我们可以在类的图形上设置这个类需要映射到数据库的哪张表,还可以在类的某个属性上标注它可以被映射到表里的哪个字段等等;相比之下,用于设计企业组织结构的设计器,就不会出现数据库、数据表、字段等这些概念,因为这些内容与企业组织结构扯不上什么关系。在Apworks框架开发的过程中,我意识到一个问题,就是能否通过使用Microsoft Visual Studio的功能,来图形化地设计我们的Domain Model,然后根据Domain Model来产生所需的C#/VB.NET代码。这样一来基于Apworks框架开发的Domain Model就可以根据图形化设计来自动生成代码。
通过本文的学习,你将了解到,如何使用Visual Studio 2010的Modeling Project来为自己的开发框架定制图形化的设计器并自动产生代码。在本文中,我将以Apworks为例,向大家介绍DSL的定制与代码自动化生成的过程。在开始学习以前,请确保你的电脑安装了Visual Studio 2010、Visual Studio 2010 SDK以及Visual Studio 2010 Visualization & Modeling SDK。
自定义UML Model的Profile以及stereotype
在图形元素上应用stereotype,就使得该元素能够表述一种特定的语义。例如,在一个图形元素上应用<<table>>这个stereotype,那么就可以认为该元素是一张数据表。在Visual Studio 2010 Modeling Project中,stereotype是在UML Model的Profile中定义的,而Profile最终会被应用在UML Model上。一个UML Model允许应用多个Profile。Visual Studio 2010 Modeling Project默认自带三种Profile:C# Profile、Standard Profile L2以及Standard Profile L3,如下图所示:
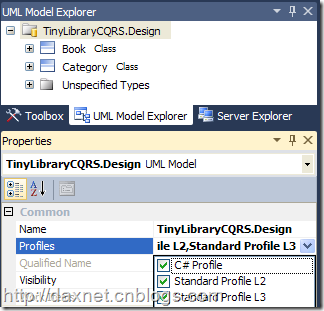
如果你需要使用VS2010 Visualization & Modeling Feature Pack提供的Generate Code命令来产生C#代码,那么你就需要在UML Model Explorer上对选中的Model采用C# Profile,并在表示“类”的图形上应用C# class这个stereotype。
现在,让我们考虑一下,基于Apworks框架的Domain Model,会有哪些种类的元素出现,比如,一个类可能会是一个聚合根,或者会是一个实体,或者会是一个领域事件;而类中的方法,可以是领域事件的处理过程。为了让Modeling Project能够支持针对Apworks框架的建模功能,我们需要新建一个Profile,并在Profile里定义一些必须的stereotype:Aggregate Root、Entity、Domain Event以及Domain Event Handler。Profile的新建非常简单,它本身就是一个扩展名为.Profile的XML文件,在此,我们可以为Apworks创建如下的Profile文件:
01 |
<?xml version="1.0" encoding="utf-8"?> |
04 |
name="ApworksDomainModelProfile" |
05 |
displayName="Apworks Domain Model Profile"> |
07 |
<stereotype name="entity" displayName="Entity"> |
09 |
<metaclassMoniker name="/ApworksDomainModelProfile/Microsoft.VisualStudio.Uml.Classes.IClass"/> |
12 |
<stereotype name="sourcedAggregateRoot" displayName="Sourced Aggregate Root"> |
14 |
<metaclassMoniker name="/ApworksDomainModelProfile/Microsoft.VisualStudio.Uml.Classes.IClass"/> |
17 |
<stereotype name="domainEvent" displayName="Domain Event"> |
19 |
<metaclassMoniker name="/ApworksDomainModelProfile/Microsoft.VisualStudio.Uml.Classes.IClass"/> |
22 |
<stereotype name="aggregateRoot" displayName="Aggregate Root"> |
24 |
<metaclassMoniker name="/ApworksDomainModelProfile/Microsoft.VisualStudio.Uml.Classes.IClass"/> |
27 |
<stereotype name="domainEventHandler" displayName="Domain Event Handler"> |
29 |
<metaclassMoniker name="/ApworksDomainModelProfile/Microsoft.VisualStudio.Uml.Classes.IOperation"/> |
32 |
<property name="eventType" displayName="Event Type"> |
34 |
<externalTypeMoniker name="/ApworksDomainModelProfile/System.String" /> |
42 |
<metaclass name="Microsoft.VisualStudio.Uml.Classes.IClass"/> |
43 |
<metaclass name="Microsoft.VisualStudio.Uml.Classes.IOperation" /> |
47 |
<externalType name="System.String" /> |
Profile文件主要包含stereotypes、metaclasses以及propertyTypes三个子节点。stereotypes下定义了整个Profile包含的所有stereotype,每个stereotype通过metaclassMoniker指定了它能够被应用到哪些类型的设计图元素上,同时,还可以在stereotype中设置一些属性,比如上面的Domain Event Handler stereotype就有一个Event Type的属性,用来表示当前的Domain Event Handler所处理的事件类型。metacalsses节点包含了当前Profile中被用到的所有metaclass,而propertyTypes节点下则包含了当前Profile中所使用的所有属性类型。
Profile文件的部署与应用
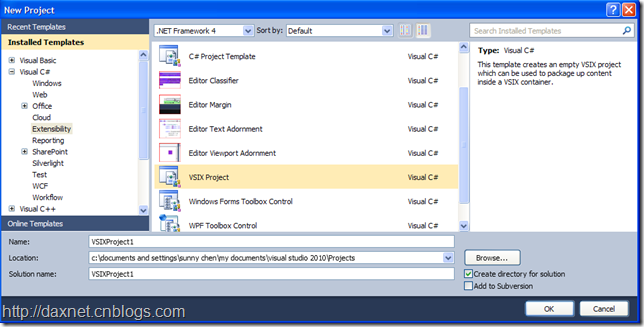
在创建好Profile之后,我们需要将其部署到Visual Studio中,以便能够在UML Model上使用。这个过程我们可以通过创建Visual Studio Extension来完成。在Visual Studio 2010上选择File | New | Project菜单,在弹出的New Project对话框中选择Visual C# | Extensibility | VSIX Project模板,在Name文本框中输入项目名称然后单击OK按钮完成项目的创建。
在创建好的项目上单击右键,选择Add | Existing Item菜单,然后选中刚才我们新建的Profile文件,并将其Copy to Output Directory属性设置为Copy Always。在已打开的VSIX编辑器里输入必要的信息,如下:
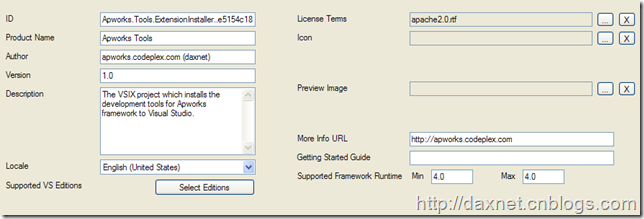
在Content部分,单击Add Content按钮,在打开的Add Content对话框中:Select a content type选Custom Extension Type,Type文本框中输入Microsoft.VisualStudio.UmlProfile,Select a source中选File in project,然后选择刚才的Profile文件,并单击OK按钮将其添加进来。
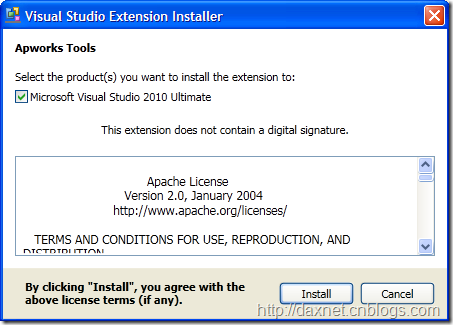
编译VSIX项目,在编译输出目录下,找到.vsix文件并双击,此时会将我们创建的Visual Studio Extension安装到系统中:
重新启动Visual Studio 2010,新建一个Model Project,在UML Model的Profiles属性上单击下拉箭头,你将看到我们刚刚新建的Apworks Domain Model Profile:
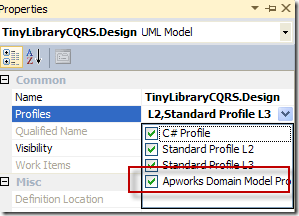
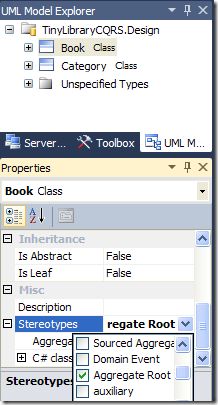
现在,让我们选中Apworks Domain Model Profile,然后开始创建我们的Domain Model。为了节省篇幅,我简单地描述一下这个过程。比如需要创建一个名为Book的Aggregate Root,那么我们就在UML Model Explorer的UML Model上单击右键,选择 Add | Class 菜单,将新建的Class命名为Book,在其Stereotypes属性中同时选中C# class以及Aggregate Root:
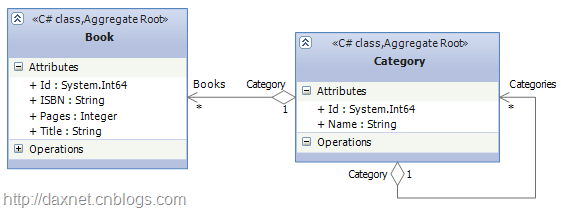
之后,我们用相同的方法在UML Model中创建其它的元素,并将这些元素拖放到Class Diagram中,同时设置好各元素之间的关系(Visual Studio Modeling Project支持如下几种关系:关联、聚合、组合、依赖、继承以及包导入)。在完成了这些工作以后,我们得到了如下这样一个简单的Domain Model。从图中我们可以看到,Book和Category都被冠以Aggregate Root的stereotype。
基于T4的自动化代码生成
现在我们有了Domain Model,接下来就是自动化代码生成。我们可以使用T4来实现这一功能。在项目中单击右键,选择Add | New Item菜单,在打开的Add New Item对话框中,选择Visual C# Items | Text Template项目,输入名称后,单击Add按钮将其添加到项目中,同时将如下Assembly添加到项目引用中:Apworks.dll、Microsoft.VisualStudio.ArchitectureTools.Extensibility.dll以及Microsoft.VisualStudio.Uml.Interfaces.dll。
在T4文件中输入如下代码:
01 |
<#@ template debug="true" hostspecific="true" language="C#" #> |
02 |
<#@ output extension=".cs" #> |
03 |
<#@ Assembly Name="System.Core" #> |
04 |
<#@ Assembly Name="Microsoft.VisualStudio.ArchitectureTools.Extensibility.dll" #> |
05 |
<#@ Assembly Name="Microsoft.VisualStudio.Uml.Interfaces.dll" #> |
06 |
<#@ Import Namespace="Microsoft.VisualStudio.ArchitectureTools.Extensibility" #> |
07 |
<#@ Import Namespace="Microsoft.VisualStudio.Uml.Classes" #> |
08 |
<#@ Import Namespace="Microsoft.VisualStudio.ArchitectureTools.Extensibility.Uml" #> |
09 |
<#@ Import Namespace="System.Linq" #> |
10 |
<#@ Import Namespace="System.Text" #> |
13 |
string modelPath = this.Host.ResolvePath(@"..\TinyLibraryCQRS\DomainModel.modelproj"); |
14 |
using (IModelingProjectReader reader = ModelingProject.LoadReadOnly(modelPath)) |
16 |
IModelStore store = reader.Store; |
17 |
foreach (IElement element in store.Root.OwnedElements) |
19 |
if (element is IClass) |
21 |
IClass classElement = element as IClass; |
23 |
<#= GetClassModifier(classElement) #> |
25 |
// TODO: Dump the attributes and operations... |
31 |
private string GetClassModifier(IClass clz) |
33 |
System.Text.StringBuilder sb = new System.Text.StringBuilder(); |
35 |
if (Convert.ToBoolean(clz.AppliedStereotypes |
36 |
.Where(p => p.Name == "class") |
39 |
.Where(p => p.Name == "IsPartial").First().Value) == true) |
41 |
sb.Append("partial "); |
45 |
if (clz.AppliedStereotypes.Any(p => p.Name == "aggregateRoot")) |
47 |
sb.Append(" : Apworks.AggregateRoot"); |
将代码保存后,就会相应地生成类似如下的C#代码:
1 |
public partial class Book : Apworks.AggregateRoot |
6 |
public class Category : Apworks.AggregateRoot |
有兴趣的读者可以继续完善上面的T4文本,进而根据Modeling Project生成类的字段、属性以及类与类之间的关联属性等。
基于CodeDom的自动化代码生成
T4的代码生成比较便捷,无需编写繁琐的CodeDom代码,但T4也有其限制,比如无法动态设置modelproj的位置,同一时间只能面向一种.NET语言,而且产品工具化也比较困难。为此,Apworks采用了基于CodeDom的源代码生成工具gcgc.exe(一个专为Apworks框架设计的代码产生工具,General Source Code Generator Collection),它能够根据XML生成配置代码,根据XSD生成类(类似xsd.exe工具的作用),也可以根据Modeling Project生成Domain Model的源代码。使用CodeDom的一个好处是,它使得开发工具能够同时支持多种.NET语言,而且部署起来会变得非常简单。gcgc.exe核心部分采用了我之前开发的Adaptive Console Framework,使得该应用程序能够非常方便地支持各种不同的源代码自动化生成引擎。以下是使用gcgc.exe根据Modeling Project来产生Domain Model源代码的使用情况:

产生的test.cs代码如下:
014 |
public partial class Book : Apworks.AggregateRoot { |
016 |
private long idField; |
018 |
private string titleField; |
020 |
private string iSBNField; |
022 |
private int pagesField; |
025 |
public virtual long Id { |
030 |
this.idField = value; |
035 |
public virtual string Title { |
037 |
return this.titleField; |
040 |
this.titleField = value; |
045 |
public virtual string ISBN { |
047 |
return this.iSBNField; |
050 |
this.iSBNField = value; |
055 |
public virtual int Pages { |
057 |
return this.pagesField; |
060 |
this.pagesField = value; |
066 |
public class Category : Apworks.AggregateRoot { |
068 |
private long idField; |
070 |
private string nameField; |
072 |
private System.Collections.Generic.List<Category> categoriesField; |
074 |
private System.Collections.Generic.List<Book> booksField; |
077 |
public virtual long Id { |
082 |
this.idField = value; |
087 |
public virtual string Name { |
089 |
return this.nameField; |
092 |
this.nameField = value; |
097 |
public virtual System.Collections.Generic.List<Category> Categories { |
099 |
return this.categoriesField; |
104 |
public virtual System.Collections.Generic.List<Book> Books { |
106 |
return this.booksField; |
总结
本文简要地介绍了通过使用Visual Studio 2010 Modeling Project来定制DSL的过程,并对Modeling Project的自动化代码生成作了简要介绍。在引入这种技术后,开发人员可以很方便地使用Modeling Project开发出基于Apworks框架的领域模型,源代码可由T4或者Apworks工具gcgc.exe代为产生,从而减少了繁杂的代码录入工作,提高了软件项目的生产率。


