使用Beetle.Express简单构建高吞吐的TCP&UDP应用
在Beetle.Express1.2中加了UDP支持,而整体的设计结构也做了调整.只需要通过简单的配置就能实现高吐的TCP&UDP应用.由于组件引用UDP服务同样也支持会话状态所以对于服务是TCP或UDP对使用者来说完全是透明的.使用者只需要关心以下几个接口即可:IServer(服务描述接口),IChannel(通道会话),IData(发送数据描述),IReceiveData(数据接收描述)和IServerHandler(服务处理接口).而使用在使用组件的时候只需要实现IServerHandler.
IServerHandler
该接口主要用于描述相关服务的工作,包括连接接入,连接释放,数据接收,数据发送完成和处理错误等过程.
|
1
2
3
4
5
6
7
8
9
10
11
12
13
14
15
16
17
18
19
20
21
22
23
24
25
26
27
28
29
30
31
32
33
34
35
|
/// <summary> /// 服务处理描述接口 /// </summary> public interface IServerHandler { /// <summary> /// 连接创建处理过程 /// </summary> /// <param name="server">对应的Tcp&UDP服务对象</param><br> /// <param name="e">连接详细信息</param> void Connect(IServer server, ChannelConnectEventArgs e); /// <summary> /// 连接断开处理过程 /// </summary> /// <param name="server">对应的Tcp&UDP服务对象</param><br> /// <param name="e">连接详细信息</param> void Disposed(IServer server, ChannelEventArgs e); /// <summary> /// 错误处理过程 /// </summary> /// <param name="server">对应的Tcp&UDP服务对象</param> /// <param name="e">详细错误信息</param> void Error(IServer server, ErrorEventArgs e); /// <summary> /// 数据接收处理过程 /// </summary> /// <param name="server">对应的Tcp&UDP服务对象</param> /// <param name="e">接收数据详细信息</param> void Receive(IServer server, ChannelReceiveEventArgs e); /// <summary> /// 数据发送情况处理过程 /// </summary> /// <param name="server">对应的Tcp&UDP服务对象</param><br> /// <param name="e">数据发送状态信息</param> void SendCompleted(IServer server, ChannelSendEventArgs e); } |
使用Beetle.Express构建TCP或UDP服务,只实现以上接口即可.完全不需要其他工作.
|
1
2
3
4
5
6
7
8
9
10
11
12
13
14
15
16
17
18
19
20
21
22
23
24
25
26
27
28
29
30
31
32
33
34
|
class Program:IServerHandler { public void Connect(IServer server, ChannelConnectEventArgs e) { Console.WriteLine("{0} connected @{1}", e.Channel.EndPoint,server.Name); } public void Disposed(IServer server, ChannelEventArgs e) { Console.WriteLine("{0} disposed", e.Channel.EndPoint); } public void Error(IServer server, ErrorEventArgs e) { Console.WriteLine("{0} error:{1}", e.Channel.EndPoint, e.Error.Message); } public void Receive(IServer server, ChannelReceiveEventArgs e) { string command = e.Data.ToString(Encoding.UTF8); Console.WriteLine("receive:{0}\t@{1}",command,server.Name); Data data = new Data(64); data.Write(server.Name, Encoding.UTF8); server.Send(data, e.Channel); } public void SendCompleted(IServer server, ChannelSendEventArgs e) { } } |
以上是实现一个网络处理服务,对以上代码来说可以是一个TCP服务也可以是一个UDP服务.由于IServerHandler统一管理服务处理,因此这个实现是TCP或UDP服务取决于ServerFactory加载的配置信息.实际上可以N个TCP服务和UDP服务同时绑定到该Handler上.
绑定服务
组件是通过配置来描服务,可以同时描述多个TCP和UDP服务,下以配置在同一IServerHandler上同量启动TCP和UDP服务.
|
1
2
3
4
5
6
7
8
9
10
11
12
|
<?xml version="1.0"?><configuration> <configSections> <section name="serverSection" type="Beetle.Express.ServerSection, Beetle.Express"/> </configSections> <serverSection xmlns="urn:Beetle.Express"> <listens> <add name="TEST_TCP" type="TCP" port="8088" handler="Beetle.Express.Sample.Program,Beetle.Express.Sample"/> <add name="TEST_UDP" type="UDP" port="8089" handler="Beetle.Express.Sample.Program,Beetle.Express.Sample"/> </listens> </serverSection><startup><supportedRuntime version="v4.0" sku=".NETFramework,Version=v4.0"/></startup></configuration> |
以上配置是在同一个handler上分别在8088端口上打开TCP服务和在8089打开UDP服务.配置完成后只需要ServerFactory加载即可.
|
1
2
3
4
5
6
7
8
9
10
11
|
static ServerFactory mFactory;static void Main(string[] args){ mFactory = new ServerFactory("serverSection"); foreach (IServer item in mFactory.Servers) { Console.WriteLine("{0} start @{1}", item.Name, item.Port); } System.Threading.Thread.Sleep(-1);} |
通过Beetle.Express可以非常方便就能构建TCP和UDP服务,而在购建的过程是完全不需要关心Socket相关细节,对于连接的处理和数据收发的细节对使用者来说都是完全透明的.组件还提供了基于LRU算法的连接清除对象,可以更方便地控制连接资源.
ActiveMQ-超越昨天的自己系列(1)
ActiveMQ(1)
扯个淡:
自己想个系列然后坚持下去,其实是个很不错的自我督促的学习方法。
《我们到底能走多远系列》已经挤出了25篇啦。在弄一个系列玩玩,主要用于提醒自己不断的学习新东西,可能都是入门级别的,只是为了拒绝停滞,或退步,为了让今天的自己比昨天的自己棒。
不要和别人比,和昨天的自己比就可以了。
最近读《ActiveMQ in action》,整理学习后,记录下来。
附上自己的想法和问题,希望一起交流。
直接使用ActiveMQ:helloWord!
包结构:(注意对log4j和sl4f包的依赖问题)
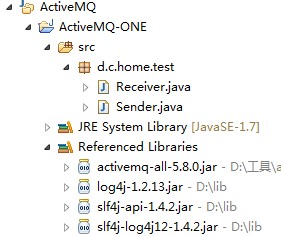
Receive:

package d.c.home.test;

import javax.jms.Connection;
import javax.jms.ConnectionFactory;
import javax.jms.Destination;
import javax.jms.MessageConsumer;
import javax.jms.Session;
import javax.jms.TextMessage;
import org.apache.activemq.ActiveMQConnection;
import org.apache.activemq.ActiveMQConnectionFactory;

public class Receiver {
    public static void main(String[] args) {
        // ConnectionFactory :连接工厂,JMS 用它创建连接
        ConnectionFactory connectionFactory;
        // Connection :JMS 客户端到JMS Provider 的连接
        Connection connection = null;
        // Session: 一个发送或接收消息的线程
        Session session;
        // Destination :消息的目的地;消息发送给谁.
        Destination destination;
        // 消费者,消息接收者
        MessageConsumer consumer;
        connectionFactory = new ActiveMQConnectionFactory(
                ActiveMQConnection.DEFAULT_USER,
                ActiveMQConnection.DEFAULT_PASSWORD,
                "tcp://localhost:61616");
        try {
            // 构造从工厂得到连接对象
            connection = connectionFactory.createConnection();
            // 启动
            connection.start();
            // 获取操作连接
            session = connection.createSession(Boolean.FALSE,
                    Session.AUTO_ACKNOWLEDGE);
            // 获取session注意参数值xingbo.xu-queue是一个服务器的queue,须在在ActiveMq的console配置
            destination = session.createQueue("FirstQueue");
            consumer = session.createConsumer(destination);
            while (true) {
                //设置接收者接收消息的时间,为了便于测试,这里谁定为100s
                TextMessage message = (TextMessage) consumer.receive(100000);
                if (null != message) {
                    System.out.println("收到消息" + message.getText());
                } else {
                    break;
                }
            }
        } catch (Exception e) {
            e.printStackTrace();
        } finally {
            try {
                if (null != connection)
                    connection.close();
            } catch (Throwable ignore) {
            }
        }
    }
}
Sender:
package d.c.home.test;

import javax.jms.Connection;
import javax.jms.ConnectionFactory;
import javax.jms.DeliveryMode;
import javax.jms.Destination;
import javax.jms.MessageProducer;
import javax.jms.Session;
import javax.jms.TextMessage;
import org.apache.activemq.ActiveMQConnection;
import org.apache.activemq.ActiveMQConnectionFactory;

public class Sender {
    private static final int SEND_NUMBER = 5;

    public static void main(String[] args) {
        // ConnectionFactory :连接工厂,JMS 用它创建连接
        ConnectionFactory connectionFactory;
        // Connection :JMS 客户端到JMS Provider 的连接
        Connection connection = null;
        // Session: 一个发送或接收消息的线程
        Session session;
        // Destination :消息的目的地;消息发送给谁.
        Destination destination;
        // MessageProducer:消息发送者
        MessageProducer producer;
        // TextMessage message;
        // 构造ConnectionFactory实例对象,此处采用ActiveMq的实现jar
        connectionFactory = new ActiveMQConnectionFactory(
                ActiveMQConnection.DEFAULT_USER,
                ActiveMQConnection.DEFAULT_PASSWORD,
                "tcp://localhost:61616");
        try {
            // 构造从工厂得到连接对象
            connection = connectionFactory.createConnection();
            // 启动
            connection.start();
            // 获取操作连接
            session = connection.createSession(Boolean.TRUE,
                    Session.AUTO_ACKNOWLEDGE);
            // 获取session注意参数值FirstQueue是一个服务器的queue,须在在ActiveMq的console配置
            destination = session.createQueue("FirstQueue");
            // 得到消息生成者【发送者】
            producer = session.createProducer(destination);
            // 设置不持久化,此处学习,实际根据项目决定
            producer.setDeliveryMode(DeliveryMode.NON_PERSISTENT);
            // 构造消息,此处写死,项目就是参数,或者方法获取
            sendMessage(session, producer);
            session.commit();
        } catch (Exception e) {
            e.printStackTrace();
        } finally {
            try {
                if (null != connection)
                    connection.close();
            } catch (Throwable ignore) {
            }
        }
    }

    public static void sendMessage(Session session, MessageProducer producer)
            throws Exception {
        for (int i = 1; i <= SEND_NUMBER; i++) {
            TextMessage message = session
                    .createTextMessage("ActiveMq 发送的消息" + i);
            // 发送消息到目的地方
            System.out.println("发送消息:" + "ActiveMq 发送的消息" + i);
            producer.send(message);
        }
    }
}
启动两个main 就可以实现 hello world啦!
1,了解下ActiveMQ是做什么的?
没用前:
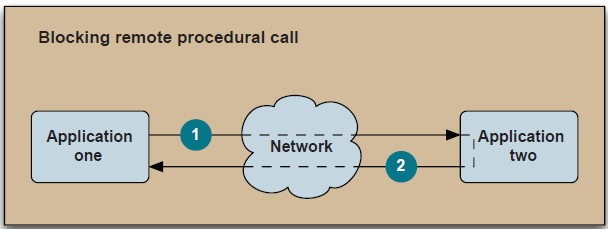
有了ActiveMQ后:
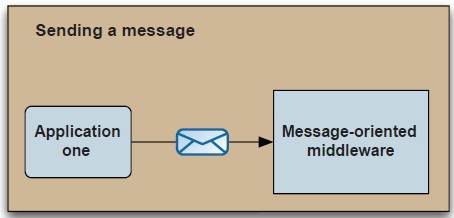
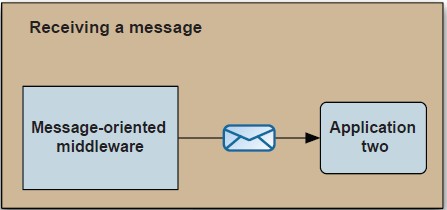
好吧,很容易理解,图片果然来得不叫快。
2,什么情况下可以用呢?
- 鉴于ActiveMQ支持多语言,除了支持java外还支持C/C++, .NET, Perl, PHP, Python, Ruby,所以,哈哈,多语言平台的交互!
- 远程方法调用,RMI,很强大,但是如果你不想用,ActiveMQ会是一个可选的替代品!
- 解耦,对于一个越来越庞大,复杂的产品来说,是必经之路。一般,把一个个模块分出去,弄成应用级别,然后通过异步交互的方式实现解耦,ActiveMQ可以帮你实现
- 异步处理,web应用的同步执行高并发达到极限,只有通过异步的方式,来使性能再上台阶。
- 共用模块的实现,比如发邮件,发短信,log持久化,等这些功能呢个可能在多个应用中都有使用,只要写一个处理器,专门接受远程的message,然后实现功能。多个应用在开发这些功能时只要组装出一个message,扔给它就可以了。
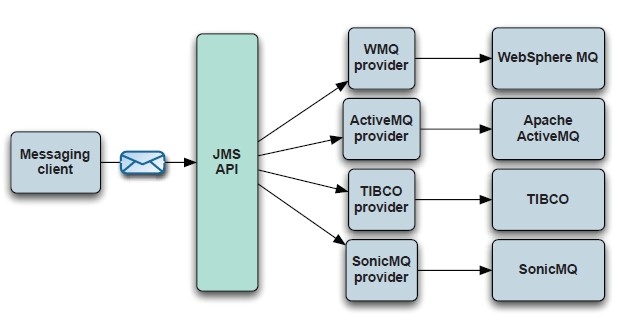
3,关于message-oriented middleware(MOM)面向对象的中间件 和 JMS
面向对象的中间件,是为了解决应用之间通过message形式交互提供的解决方案。这种中间件有很多,比如:WebSphere MQ,jboss的hornetQ
而ActiveMQ就也这些中间件中的一员。
JMS 为这种中间提供商提供了统一的API接口,来定义一个消息的发送和接受的规范。
所有中间商可以实现这些接口以达到自己提供的jms服务,如此统一,有利于减少同提供商之间交互出现的不兼容。
JMS的作用:
JMS规定了什么东西?既然中间件都直线了这些接口,我想只要熟悉了JMS规范,也差不多熟悉了所有的中间件了吧。
1-message producers
使用MessageProducer,向目标发送message,也可以通过MessageProducer来设置一些信息
MessageProducer :
public interface MessageProducer {
void setDisableMessageID(boolean value) throws JMSException;
boolean getDisableMessageID() throws JMSException;
void setDisableMessageTimestamp(boolean value) throws JMSException;
boolean getDisableMessageTimestamp() throws JMSException;
void setDeliveryMode(int deliveryMode) throws JMSException;
int getDeliveryMode() throws JMSException;
void setPriority(int defaultPriority) throws JMSException;
int getPriority() throws JMSException;
void setTimeToLive(long timeToLive) throws JMSException;
long getTimeToLive() throws JMSException;
Destination getDestination() throws JMSException;
void close() throws JMSException;
void send(Message message) throws JMSException;
void send(Message message, int deliveryMode, int priority,
long timeToLive)
throws JMSException;
void send(Destination destination, Message message)
throws JMSException;
void send(
Destination destination,
Message message,
int deliveryMode,
int priority,
long timeToLive)
throws JMSException;
}
2-MessageConsumer用来消费消息,
public interface MessageConsumer {
String getMessageSelector() throws JMSException;
MessageListener getMessageListener() throws JMSException;
void setMessageListener(MessageListener listener) throws JMSException;
Message receive() throws JMSException;
Message receive(long timeout) throws JMSException;
Message receiveNoWait() throws JMSException;
void close() throws JMSException;
}
3-Message 传递的内容信息对象
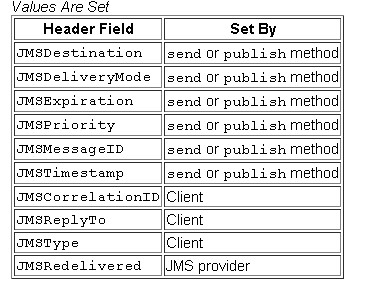
Message有head和body组成,head可以通过属性的设置来改变Message的一些特性:
body的话,是通过键值对的方式来设置的,Message接口定义了不同数据类型的设置和取得的方法:
public interface Message {
boolean getBooleanProperty(String name) throws JMSException;
byte getByteProperty(String name) throws JMSException;
short getShortProperty(String name) throws JMSException;
int getIntProperty(String name) throws JMSException;
long getLongProperty(String name) throws JMSException;
float getFloatProperty(String name) throws JMSException;
double getDoubleProperty(String name) throws JMSException;
String getStringProperty(String name) throws JMSException;
Object getObjectProperty(String name) throws JMSException;
Enumeration getPropertyNames() throws JMSException;
boolean propertyExists(String name) throws JMSException;
void setBooleanProperty(String name, boolean value) throws JMSException;
void setByteProperty(String name, byte value) throws JMSException;
void setShortProperty(String name, short value) throws JMSException;
void setIntProperty(String name, int value) throws JMSException;
void setLongProperty(String name, long value) throws JMSException;
void setFloatProperty(String name, float value) throws JMSException;
void setDoubleProperty(String name, double value) throws JMSException;
void setStringProperty(String name, String value) throws JMSException;
void setObjectProperty(String name, Object value) throws JMSException;
 }
而Message下分为不同形式:
