silverlight的数据校验大体分成3种类型:
- 数据是非必填的但是需要满足相应数据格式的
- 数据是必填的且可能需要进行数据格式校验的
- 其他(如数据的联动校验)
以下的数据校验方式针对第二种:
- 在相应的控件绑定上加上NotifyOnValidationError=True,ValidatesOnDataErrors=True
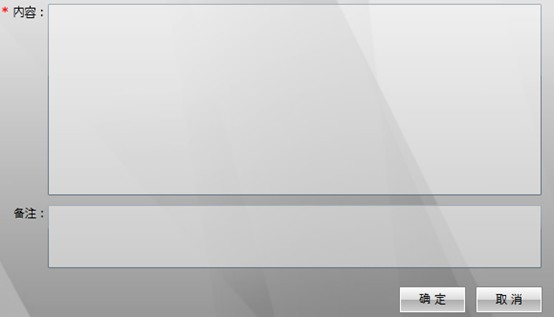
<TextBox Grid.Row="5"Grid.Column="1"Grid.ColumnSpan="2"Width="286"HorizontalAlignment="Left"Text="{Binding EventContent,Mode=TwoWay,NotifyOnValidationError=True,ValidatesOnDataErrors=True}" />该属性的功能,是当验证错误出现时是否激活BindingValidationError事件;该属性是Silverlight独有的验证属性之一,经常和ValidatesOnExceptions属性配合使用。
ValidatesOnDataErrors属性
获取或设置一个值,该值指示是否包含 DataErrorValidationRule。 DataErrorValidationRule 是内置的验证规则,它检查由源对象的 IDataErrorInfo实现所引发的错误。 如果引发错误,则绑定引擎将对该错误创建一个 ValidationError 并将其添加到绑定元素的 Validation.Errors 集合中。 如果不存在错误,将清除此验证反馈,除非另一条规则引发验证问题。
- 在包含所有校验项的父级控件上加上:BindingValidationError,比如Grid

<Grid x:Name="LayoutRoot"
              Grid.Row="0"
              Grid.Column="0"
              BindingValidationError="LayoutRoot_BindingValidationError">
...
</Grid>
该事件是一个路由事件,当数据验证错误出现时,将绑定该错误到数据源;也可以简单的理解为绑定错误到数据源的一个行为。该事件可在控件本身调用,也可在其父控件中调用。例如,在TextBox中,可以声明调用BindingValidationError,或者可以该TextBox的父容器控件Grid,StackPanel中调用BindingValidationError事件。这里需要注意的是,如果在Silverlight的MVVM设计模式下,仅在被验证的控件本身激活BindingValidationError事件,才能正常的被UI捕获到错误信息,不支持在父控件中对BindingValidationError事件进行调用。
- 后台.cs文件中BindingValidationError的具体事件
指定当发现验证错误信息增加时,设定控件的背景色为黄色,否则为白色。privatevoidLayoutRoot_BindingValidationError(objectsender, ValidationErrorEventArgs e){if(e.Action == ValidationErrorEventAction.Added){var control = e.OriginalSourceasControl;if(control !=null)control.Background =newSolidColorBrush(Colors.Yellow);}if(e.Action == ValidationErrorEventAction.Removed){var control = e.OriginalSourceasControl;if(control !=null)control.Background =newSolidColorBrush(Colors.White);}} - 在对应的属性上加上,Reuired部分可改成相应的正则表达式
[Required(ErrorMessage = "事件内容必填")]
        [Display(Name = "事件内容")]
        public string EventContent
        {
            get { return _eventContent; }
            set
            {
                ClearError();
                _eventContent = value;
                RaisePropertyChanged("EventContent");
            }
        }
- 子窗口点击提交按钮的命令中加上If(Validate())
 private ICommand _submitCommand;

        public ICommand SubmitCommand
        {
            get
            {
                return _submitCommand ?? (_submitCommand = new RelayCommand(() =>
                    {
                        if (Validate())
                        SubmitEvent();
                    }));
            }
            set { _submitCommand = value; }
        }
数据校验Region,可写在基类中。
 View Code
 - 效果
点击确定时: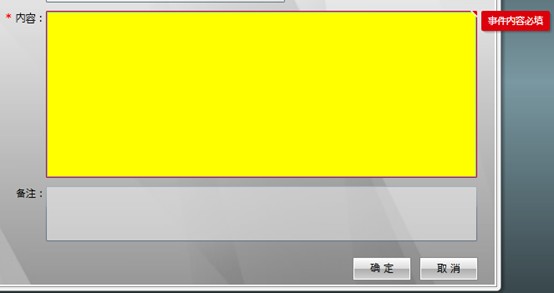
学习ExtJS4 常用控件
ExtJS组件配置方式介绍
1.使用逗号分隔参数列表配置组件
首先来看一个简单的逗号分隔参数列表的例子。这个例子非常简单,它用来显示信息提示框。
2.使用Json对象配置组件
接下来看一个使用Json对象配置组件的例子,很多地方习惯性称之为配置对象。
    <script>
        Ext.onReady(function () {
            //使用逗号配置
            Ext.Msg.alert('提示', '逗号分隔参数列表');
            //使用Json对象配置
            var config = {
                title: '使用Json对象配置',
                msg:'这里是提示信息!'
            };
            Ext.Msg.show(config);
        });
    </script>

ExtKS开放了大量配置项以满足程序员在实际项目中的不同需求,熟悉各个配置项的配置方式以及效果是我们快速掌握EXTJS的一个捷径。
信息提示框组件介绍
Ext.window.MessageBox是一个工具类,用来生成各种风格的信息提示框。其实例对象可以通过Ext.MessageBox或Ext.Msg来访问,两者具有相同的效果,后者提供更简便的调用方式。
Ext.MessageBox提供的信息对话框显示的文本不仅支持纯文本显示还支持HTML格式文本,采用HTML格式文本进行排版,效果更加丰富多彩。
Javascript中标准的alert会阻塞浏览器脚本的执行,但是Ext.MessageBox不会,它是异步调用。
1.Ext.MessageBox.alert是一个只读信息提示框,可以为其提供一个回调函数,该函数将在单击按钮后被调用(不包括右上角的退出按钮),所单击按钮的ID将作为唯一的参数传递到回调函数中。
    <script>
        Ext.onReady(function () {
            Ext.Msg.alert('提示',"<b>提示信息</b>");
        });
    </script>

2.Ext.MessageBox.confirm确认对话框,支持传入回调函数,与Ext.MessageBox.alert一致。
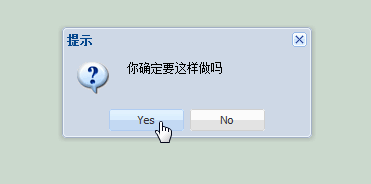
    <script>
        Ext.onReady(function () {
            Ext.Msg.confirm('提示', '你确定要这样做吗',callback);
            function callback(id) {
                alert("你点击了:"+id);
            }
        });
    </script>
3.Ext.MessageBox.prompt显示用户输入信息的对话框。支持传入回调函数,所单击的按钮id以及文本框的内容将作为参数传递到回调函数中。
    <script>
        Ext.onReady(function () {
            //true表示多行文本输入框
            Ext.Msg.prompt("提示", "请输入信息",callback,true,'默认值');
            function callback(id, msg) {
                alert("点击按钮:"+id+" 输入信息:"+msg);
            }
        });
    </script>

4.Ext.MessageBox.wait()显示一个自动滚动的进度框。它被用在一个耗时的交互操作中,它不能定义一个时间间隔自动关闭,需要手动关闭。
    <script>
        Ext.onReady(function () {
            Ext.Msg.wait("请等待", "温馨提示", {
                text:'进度条上的文字'
            });
        });
    </script>

5.Ext.MessageBox.show()基于配置显示新的信息提示框或重置一个已经存在的信息提示框。前面介绍的3个方法内部调用的都是它,尽管调用简捷,但是它不支持所有的配置项,要建立更加强大、个性化的提示框还需要掌握Ext.MessageBox.show方法做起。配置项太多,碍于篇幅,不列出,需要的人去查阅ExtJSAPI。该提示框是异步执行的,使用时请注意。
<script>
        Ext.onReady(function () {
            function callback(id, msg) {
                alert("点击的按钮:"+id+" 信息:"+msg);
            }
            Ext.Msg.show({
                title: '温馨提示',
                msg: '三个按钮和一个文本区',
                modal: true,//模态
                prompt: true,//含输入框
                value: '请输入',//输入框默认值
                fn: callback,//回调函数
                buttons: Ext.Msg.YESNOCANCEL,//可用按钮
                icon:Ext.Msg.QUESTION
            });
        });
    </script>

6.Ext.MessageBox其他功能
(1) 改变默认的按钮文字
    <script>
        Ext.onReady(function () {
            //ok
            Ext.Msg.msgButtons[0].setText('按钮一');
            //yes
            Ext.Msg.msgButtons[1].setText('按钮二');
            //no
            Ext.Msg.msgButtons[2].setText('按钮三');
            //cancel
            Ext.Msg.msgButtons[3].setText('按钮四');

            Ext.Msg.show({
                title: '提示',
                msg: '防火防盗防校长',
                modal: true,
                buttons:Ext.Msg.YESNOCANCEL
            });
        });
    </script>

(2) 动态更新信息提示框
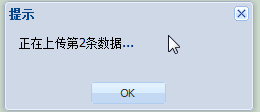
    <script>
        Ext.onReady(function () {
            var msgBox = Ext.MessageBox.show({
                title: '提示',
                msg: '动态更新的信息文字',
                modal: true,
                buttons: Ext.Msg.OK,
                fn: function () {//回调函数
                    //停止定时任务
                    Ext.TaskManager.stop(task);
                }
            });
            //Ext.TaskManager是一个功能类,用来执行定时程序
            var count = 1;
            var task = {
                run: function () {
                    msgBox.updateText("正在上传第" + count + "条数据...");
                    count++;
                },
                interval:1000
            };
            Ext.TaskManager.start(task);
        });
    </script>
(3) 更新进度以及提示信息
 <script>
        Ext.onReady(function () {
            var msgBox = Ext.Msg.show({
                title: '显示',
                msg: '信息',
                modal: true,
                 300,
                progress: true //使用进度条
            });
            var count = 0;//滚动条刷新的次数
            var percentage = 0;//进度百分比
            var progressText = '';//进度条信息
            var task = {
                run: function () {
                    count++;
                    //计算进度
                    percentage = count / 10;
                    //生成进度条上的文字
                    progressText = '当前完成度:' + percentage * 100 + '%';
                    //更新信息提示对话框
                    msgBox.updateProgress(percentage, progressText, '当前时间:' + Ext.util.Format.date(new Date(), 'Y-m-d g:i:s A'));
                    //刷新10次关闭信息提示对话框
                    if (count > 10) {
                        Ext.TaskManager.stop(task);
                        msgBox.hide();
                    }
                },
                interval:1000
            };
            Ext.TaskManager.start(task);
        });
    </script>

进度条组件介绍
Ext.ProgressBar是一个可更新的进度条组件,该进度条具有手工模式和自动模式。手工模式下,需要自己控制进度条的显示,自动模式下,只要调用wait方法,进度条就会无限制的滚动下去,它适合为那么耗时长的同步操作进行提示。
    <script>
        Ext.onReady(function () {
            var ProgressBar = new Ext.ProgressBar({
                title: '进度条',
                 300,
                text:'请等待...',
                //使用htmlbody作为渲染容器
                //renderTo:Ext.getBody()
                renderTo: 'div'
            });
        });
    </script>
![]()
手工模式的进度条是通过调用进度条的updateProgress()方法来实现的。手工更新的进度条非常适合可以掌握程序的执行状态的长时间操作。例如文件的上传进度,如果有些操作无法实时获取进度,只能采用自动更新的进度条信息。
 <script>
        Ext.onReady(function () {
            var progressbar = new Ext.ProgressBar({
                 300,
                renderTo:'div'
            });
            var count = 0;//滚动条更新次数
            var percentage = 0;//进度条百分比
            var progressText = '';//进度条信息
            Ext.TaskManager.start({
                run: function () {
                    count++;
                    if (count >= 10)
                        progressbar.hide();
                    //计算进度
                    percentage = count / 10;
                    progressText = percentage * 100 + '%';
                    //更新信息 参数含义:百分比,进度条文字,是否使用动画效果
                    progressbar.updateProgress(percentage,progressText,true);
                },
                interval: 1000,//方法执行时间间隔
                repeat:6 //设置执行次数
            });
        });
    </script>
![]()
创建一个自动模式的进度条并不复杂,只用调用进度条的wait方法,进行必要的配置即可得到一个理想状态的自动更新的进度条了。
  <script>
        Ext.onReady(function () {
            var ProgressBar = new Ext.ProgressBar({
                text: '正在处理,请稍后...',
                 300,
                renderTo: 'ProgressBar'
            });
            ProgressBar.wait({
                duration: 10000,//进度条持续更新10秒
                interval: 1000,//每1秒更新一次
                increment: 10,//进度条分10次更新完毕
                text: 'waiting',//进度条上的文字
                scope: this,//回调函数的执行fanw
                fn: function () {
                    Ext.Msg.alert('提示', '更新完毕');
                }
            });
        });
    </script>

通过cls配置改变进度条的样式。
    <style type="text/css">
        .custom .x-progress-inner
        {
            height: 17px;
            background: #fff;
        }

        .custom .x-progress-bar
        {
            height: 15px;
            background: transparent url(images/custom-bar-red.gif) repeat-x 0 0;
            border-top: 1px solid #BEBEBE;
            border-bottom: 1px solid #EFEFEF;
            border-right: 0;
        }
    </style>
    <script>
        Ext.onReady(function () {
            var ProgressBar = new Ext.ProgressBar({
                 300,//设定进度条的宽度
                renderTo: 'ProgressBar',
                cls: 'custom'//使用自定义样式
            });
            ProgressBar.wait({
                duration: 10000,//进度条持续更新10秒钟
                interval: 1000,//每1秒钟更新一次
                increment: 10//进度条分10次更新完毕
            });
        });
    </script>

实现工具和菜单栏
Ext.toolbar.Toolbar是工具栏的基础组件,它相当于容器,在其中可以放置各种工具栏元素,主要包括按钮、文字和菜单组件。
toolbar1![]()
toolbar2
Ext.menu.Menu菜单
作为我们编写的第一个菜单栏,它以熟悉的文本编辑软件菜单栏为原型,主要分为文件菜单和编辑菜单,在文件下拉菜单中有3个菜单选项,分别是新建、打开、关闭,在编辑下拉菜单中包含复制、粘帖、剪切。
    <script>
        Ext.onReady(function () {
            function onMenuItem(item) {
                alert(item.text);
            }
            var toolbar = new Ext.toolbar.Toolbar({
                renderTo: 'toolbar',
                 300
            });
            var fileMenu = new Ext.menu.Menu({
                shadow: 'frame',//设置菜单四条边都有阴影
                allowOtherMenus: true,
                items: [
                    new Ext.menu.Item({
                        text: '新建',
                        handler: onMenuItem
                    }),//添加菜单项
                    { text: '打开', handler: onMenuItem },
                    { text: '关闭', handler: onMenuItem }
                ]
            });
            var editorMenu = new Ext.menu.Menu({
                shadow: 'drop',//设置菜单在右下有阴影
                allowOtherMenus: true,
                items: [
                     { text: '复制', handler: onMenuItem },
                     { text: '粘帖', handler: onMenuItem },
                     { text: '剪切', handler: onMenuItem }
                ]
            });
            toolbar.add(
                {
                    text: '文件',
                    menu:fileMenu
                },
                {
                    text: '编辑',
                    menu:editorMenu
                }
                );
        });
    </script>

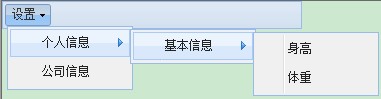
接下来看多级菜单的实现方式,在以下示例中是通过Ext.menu.Item的menu配置项来完成多级菜单的关联。
 <script>
        Ext.onReady(function () {
            function handleItem(item) {
                alert(item.text);
            }
            var Toolbar = new Ext.toolbar.Toolbar({
                renderTo: 'toolbar',
                 300
            });
            var infoMenu = new Ext.menu.Menu({
                ignoreParentClicks: true, //忽略父菜单的点击事件
                plain: true,
                items: [
                    {
                        text: '个人信息',
                        menu: new Ext.menu.Menu({
                            ignoreParentClicks: true,
                            items: [
                                {
                                    text: '基本信息',
                                    menu: new Ext.menu.Menu(
                                        {
                                            items: [
                                                {
                                                    text: '身高',
                                                    handler: handleItem
                                                },
                                                {
                                                    text: '体重',
                                                    handler: handleItem
                                                }
                                            ]
                                        }
                                        )
                                }
                            ]
                        })
                    },
                    {
                        text: '公司信息'
                    }
                ]
            });
            Toolbar.add(
                {
                    text: '设置',
                    menu: infoMenu
                }
                );
        });
    </script>
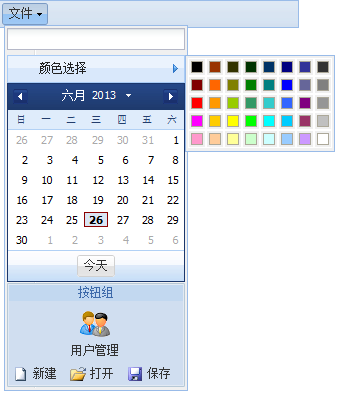
将更多组件加入菜单。再以上2个示例中介绍了简单菜单和多级菜单的创建,示例中菜单项都是Ext.menu.Menu对象,其表现形式中规中矩,下面演示一下向菜单栏
中添加丰富的组件。
    <style type="text/css">
        .userManagerIcon
        {
            background-image: url(images/userManager.gif) !important;
        }

        .newIcon
        {
            background-image: url(images/new.gif) !important;
        }

        .openIcon
        {
            background-image: url(images/open.gif) !important;
        }

        .saveIcon
        {
            background-image: url(images/save.gif) !important;
        }
    </style>
    <script>
        Ext.onReady(function () {

            var Toolbar = new Ext.toolbar.Toolbar({//创建工具栏
                renderTo: 'toolbar',
                 300
            });

            var fileMenu = new Ext.menu.Menu({//文件创建菜单
                items: [{
                    xtype: 'textfield',//创建表单字段
                    hideLabel: true,
                     100
                }, {
                    text: "颜色选择",
                    menu: new Ext.menu.ColorPicker()
                },
                    { xtype: 'datepicker' },//添加日期选择器组件
                    {
                        xtype: 'buttongroup',//添加按钮组组件
                        columns: 3,
                        title: '按钮组',
                        items: [{
                            text: '用户管理',
                            scale: 'large',
                            colspan: 3,
                             170,
                            iconCls: 'userManagerIcon',
                            iconAlign: 'top'
                        }, {
                            text: '新建', iconCls: 'newIcon'
                        }, {
                            text: '打开', iconCls: 'openIcon'
                        }, {
                            text: '保存', iconCls: 'saveIcon'
                        }]
                    }
                ]
            });

            Toolbar.add(
                { text: '文件', menu: fileMenu }//将菜单加入工具栏
            );
        });
    </script>
文中示例代码下载