SpringMVC整合Mongodb开发 架构搭建
系统环境:
操作系统: windows xp
数 据 库: mongodb2.0.6
驱 动 包: Spring3.1.2 + mongodb2.7.3 + spring-data-mongodb1.0.1
说明: 对于xp系统用户,在执行mongod.exe安装mongodb时 出现,无法定位程序输入点 InterlockedCompareExchange64 于动态链接库KERNEL32.dll上,这是因为最新的开发分支已经不再支持xp.也就是说你的mongodb安装包不支持xp系统.V2.0.6是最新也是最后一个新版本支持xp.所以笔者使用数据库为2.0.6
项目结构: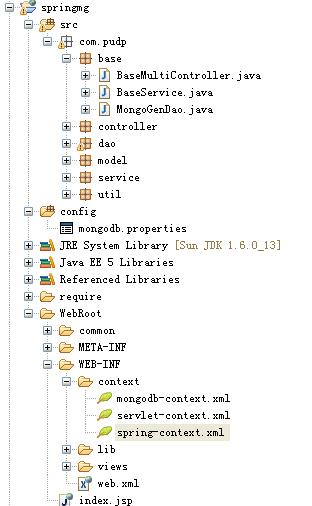
配置说明:
Web.xml文件配置spring相关与springmvc相关.

<?xml version="1.0" encoding="UTF-8"?>
<web-app version="2.5"
    xmlns="http://java.sun.com/xml/ns/javaee"
    xmlns:xsi="http://www.w3.org/2001/XMLSchema-instance"
    xsi:schemaLocation="http://java.sun.com/xml/ns/javaee
    http://java.sun.com/xml/ns/javaee/web-app_2_5.xsd">

      <!-- spring配置 -->
    <context-param>
        <param-name>contextConfigLocation</param-name>
        <param-value>/WEB-INF/context/spring-context.xml</param-value>
    </context-param>

    <listener>
        <listener-class>org.springframework.web.context.ContextLoaderListener</listener-class>
    </listener>

    <!-- spring MVC配置 -->
    <servlet>
        <servlet-name>springmvc</servlet-name>
        <servlet-class>org.springframework.web.servlet.DispatcherServlet</servlet-class>
        <init-param>
            <param-name>contextConfigLocation</param-name>
            <param-value>/WEB-INF/context/servlet-context.xml</param-value>  <!--指定XML文件位置-->
        </init-param>
        <load-on-startup>4</load-on-startup>

    </servlet>
    <servlet-mapping>
        <servlet-name>springmvc</servlet-name>
        <url-pattern>/</url-pattern>
    </servlet-mapping>

  <welcome-file-list>
    <welcome-file>index.jsp</welcome-file>
  </welcome-file-list>
</web-app>
Springmvc的配置文件servlet-context.xml
<?xml version="1.0" encoding="UTF-8"?>
<beans xmlns="http://www.springframework.org/schema/beans"
    xmlns:xsi="http://www.w3.org/2001/XMLSchema-instance"
    xmlns:util="http://www.springframework.org/schema/util"
    xmlns:p="http://www.springframework.org/schema/p"
    xmlns:aop="http://www.springframework.org/schema/aop"
    xmlns:tx="http://www.springframework.org/schema/tx"
    xmlns:mvc="http://www.springframework.org/schema/mvc"
    xmlns:context="http://www.springframework.org/schema/context"
    xsi:schemaLocation="
    http://www.springframework.org/schema/beans http://www.springframework.org/schema/beans/spring-beans-3.1.xsd
    http://www.springframework.org/schema/util http://www.springframework.org/schema/util/spring-util-3.1.xsd
    http://www.springframework.org/schema/tx http://www.springframework.org/schema/tx/spring-tx-3.1.xsd
    http://www.springframework.org/schema/aop http://www.springframework.org/schema/aop/spring-aop-3.1.xsd
    http://www.springframework.org/schema/mvc http://www.springframework.org/schema/mvc/spring-mvc-3.1.xsd
    http://www.springframework.org/schema/context
    http://www.springframework.org/schema/context/spring-context-3.1.xsd">

    <!-- DispatcherServlet Context: defines this servlet's request-processing infrastructure -->

    <!-- Enables the Spring MVC @Controller programming model -->
    <mvc:annotation-driven />

    <context:component-scan base-package="com.pudp" />


    <!-- 配置基于Session的处理,将提交上来的locale参数进行处理 -->
    <bean id="localeResolver" class="org.springframework.web.servlet.i18n.SessionLocaleResolver">
        <!-- 该属性可以不用配置 -->
        <property name="defaultLocale" value="ja"></property>
    </bean>

    <!-- Resolves views selected for rendering by @Controllers to .jsp resources in the /WEB-INF/views directory -->
    <bean class="org.springframework.web.servlet.view.InternalResourceViewResolver">
        <property name="prefix" value="/WEB-INF/views/" />
        <property name="suffix" value=".jsp" />
    </bean>


</beans>
spring配置文件Spring-context.xml
<?xml version="1.0" encoding="UTF-8"?>
<beans xmlns="http://www.springframework.org/schema/beans"
    xmlns:xsi="http://www.w3.org/2001/XMLSchema-instance"
    xmlns:util="http://www.springframework.org/schema/util"
    xmlns:p="http://www.springframework.org/schema/p"
    xmlns:aop="http://www.springframework.org/schema/aop"
    xmlns:tx="http://www.springframework.org/schema/tx"
    xmlns:context="http://www.springframework.org/schema/context"
    xsi:schemaLocation="
    http://www.springframework.org/schema/beans http://www.springframework.org/schema/beans/spring-beans-3.1.xsd
    http://www.springframework.org/schema/util http://www.springframework.org/schema/util/spring-util-3.1.xsd
    http://www.springframework.org/schema/tx http://www.springframework.org/schema/tx/spring-tx-3.1.xsd
    http://www.springframework.org/schema/aop http://www.springframework.org/schema/aop/spring-aop-3.1.xsd
    http://www.springframework.org/schema/context
    http://www.springframework.org/schema/context/spring-context-3.1.xsd">


   <context:annotation-config />
   <context:component-scan base-package="com.pudp" />

   <!-- 导入mongodb的配置文件 -->
   <import resource="mongodb-context.xml"/>

</beans>
mongodb的配置文件mongodb-context.xml
<?xml version="1.0" encoding="UTF-8"?>
<beans xmlns="http://www.springframework.org/schema/beans"
    xmlns:xsi="http://www.w3.org/2001/XMLSchema-instance"
    xmlns:context="http://www.springframework.org/schema/context"
    xmlns:mongo="http://www.springframework.org/schema/data/mongo"
    xsi:schemaLocation="http://www.springframework.org/schema/context
          http://www.springframework.org/schema/context/spring-context-3.0.xsd
          http://www.springframework.org/schema/data/mongo
          http://www.springframework.org/schema/data/mongo/spring-mongo-1.0.xsd
          http://www.springframework.org/schema/beans
          http://www.springframework.org/schema/beans/spring-beans-3.0.xsd">

    <!-- 加载mongodb的属性配置文件 -->
    <context:property-placeholder location="classpath:mongodb.properties" />

    <!-- 定义mongo对象,对应的是mongodb官方jar包中的Mongo,replica-set设置集群副本的ip地址和端口 -->
    <mongo:mongo id="mongo" replica-set="${mongo.hostport}">
        <!-- 一些连接属性的设置 -->
        <mongo:options
             connections-per-host="${mongo.connectionsPerHost}"
             threads-allowed-to-block-for-connection-multiplier="${mongo.threadsAllowedToBlockForConnectionMultiplier}"
             connect-timeout="${mongo.connectTimeout}"
             max-wait-time="${mongo.maxWaitTime}"
             auto-connect-retry="${mongo.autoConnectRetry}"
             socket-keep-alive="${mongo.socketKeepAlive}"
             socket-timeout="${mongo.socketTimeout}"
             slave-ok="${mongo.slaveOk}"
             write-number="1"
             write-timeout="0"
             write-fsync="true"/>
    </mongo:mongo>
    <mongo:db-factory dbname="database" mongo-ref="mongo" />

    <bean id="mongoTemplate" class="org.springframework.data.mongodb.core.MongoTemplate">
        <constructor-arg ref="mongo" />
        <constructor-arg name="databaseName" value="db_mongo" />
    </bean>

</beans>
mongodb的属性配置文件mongodb.properties
mongo.hostport=127.0.0.1:27017
mongo.connectionsPerHost=8
mongo.threadsAllowedToBlockForConnectionMultiplier=4
#连接超时时间
mongo.connectTimeout=1000
#等待时间
mongo.maxWaitTime=1500
mongo.autoConnectRetry=true
mongo.socketKeepAlive=true
#Socket超时时间
mongo.socketTimeout=1500
mongo.slaveOk=true
编写Controller、Service、Dao相关.这里我们测试以下Spring-data-mong中对Collection的实现机制. 我们创建不同的实体类型Member、Article
然后编写对应的Service、Dao实现.这里我们侧重点持久层实现
持久层的操作实现
ArticleDao
package com.pudp.dao;

import org.springframework.stereotype.Repository;

import com.pudp.base.MongoGenDao;
import com.pudp.model.Article;

/**
 * description:
 *
 * @author <a href='mailto:dennisit@163.com'> Cn.苏若年 (En.dennisit)</a> Copy Right since 2013-10-16
 *
 * com.pudp.dao.ArticleDao.java
 *
 */

@Repository
public class ArticleDao extends MongoGenDao<Article>{

    /**
     * 实现钩子方法,返回反射的类型
     * @author <a href='mailto:dennisit@163.com'>Cn.苏若年(En.dennisit)</a> Copy Right since 2013-10-13
     *
     * @return
     */
    @Override
    protected Class<Article> getEntityClass() {
        return Article.class;
    }

}
MemberDao
package com.pudp.dao;

import org.springframework.stereotype.Repository;

import com.pudp.base.MongoGenDao;
import com.pudp.model.Member;

/**
 * description:
 *
 * @author <a href='mailto:dennisit@163.com'> Cn.苏若年 (En.dennisit)</a> Copy Right since 2013-10-13
 *
 * com.pudp.dao.MemberDao.java
 *
 */
@Repository
public class MemberDao extends MongoGenDao<Member>{

    /**
     * 实现钩子方法,返回反射的类型
     * @author <a href='mailto:dennisit@163.com'>Cn.苏若年(En.dennisit)</a> Copy Right since 2013-10-13
     *
     * @return
     */
    @Override
    protected Class<Member> getEntityClass() {
        return Member.class;
    }
}
MongoGenDao中我们实现了对库中添加数据
package com.pudp.base;

import org.springframework.beans.factory.annotation.Autowired;
import org.springframework.data.mongodb.core.MongoTemplate;

/**
 * description:
 *
 * @author <a href='mailto:dennisit@163.com'> Cn.苏若年 (En.dennisit)</a> Copy Right since 2013-10-13
 *
 * com.pudp.base.MongoGenDao.java
 *
 */

public abstract class MongoGenDao<T> {

    @Autowired
    protected MongoTemplate mongoTemplate;


    /**
     * 保存一个对象
     *
     * @author <a href='mailto:dennisit@163.com'>Cn.苏若年(En.dennisit)</a> Copy Right since 2013-10-13 下午03:37:28
     *
     * @param t
     * @return
     */
    public void save(T t){
        this.mongoTemplate.save(t);
    }

    /**
     * 为属性自动注入bean服务
     *
     * @author <a href='mailto:dennisit@163.com'>Cn.pudp(En.dennisit)</a> Copy Right since 2013-10-13 下午03:21:23
     *
     * @param mongoTemplate
     */
    public void setMongoTemplate(MongoTemplate mongoTemplate) {
        this.mongoTemplate = mongoTemplate;
    }

}
这里需要说明的是MongoTemplate对库的管理。
MongoTemplate对库Collection的管理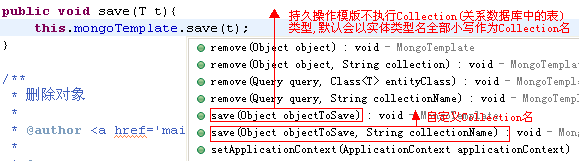
我们使用MongoTemplate操作持久层.这里如果我们没有指定CollectionName的话,会依实体类型的类名作为库中的集合名,当我们执行数据入库操作之后,从数据库中查看到如下信息.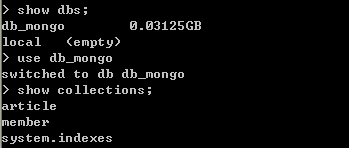
当然,如果我们想自己定义数据库的Collection名的化,可以在持久层Dao中指定. 关于Mongodb的可以Mongodb相关的内容. 后续将介绍SpringMVC+ Mongodb 的CRUD + 分页实现.
转载请注明出处:[http://www.cnblogs.com/dennisit/p/3372568.html]
AngularJS框架研究(一)
|
1
2
3
4
5
6
7
8
9
10
11
|
//try to bind to jquery now so that one can write angular.element().read() //but we will rebind on bootstrap again. bindJQuery(); publishExternalAPI(angular); <span style="color: #ff0000;">jqLite(document).ready(function() { angularInit(document, bootstrap); });</span>})(window, document); |
红色部分标出的正是AngularJS的入口。AngularJS内置了jQuery的轻量版本jqLite,具体代码见src/jqLite.js。bindJquery函数会尝试去绑定jQuery库,如果没有找到,就用内置的jqLite。DOM加载完毕后,执行angularInit函数,作准备工作。
|
1
2
3
4
5
6
7
8
9
10
11
12
13
14
15
16
17
18
19
20
21
22
23
24
25
26
27
28
29
30
31
32
33
34
35
36
37
38
39
40
41
42
43
|
function <strong>angularInit</strong>(element, bootstrap) { var elements = [element], appElement, module, names = ['ng:app', 'ng-app', 'x-ng-app', 'data-ng-app'], NG_APP_CLASS_REGEXP = /sng[:-]app(:s*([wd_]+);?)?s/; function append(element) { element && elements.push(element); } forEach(names, function(name) { names[name] = true; append(document.getElementById(name)); name = name.replace(':', '\:'); if (element.querySelectorAll) { forEach(element.querySelectorAll('.' + name), append); forEach(element.querySelectorAll('.' + name + '\:'), append); forEach(element.querySelectorAll('[' + name + ']'), append); } }); forEach(elements, function(element) { if (!appElement) { var className = ' ' + element.className + ' '; var match = NG_APP_CLASS_REGEXP.exec(className); if (match) { appElement = element; module = (match[2] || '').replace(/s+/g, ','); } else { forEach(element.attributes, function(attr) { if (!appElement && names[attr.name]) { appElement = element; module = attr.value; } }); } } }); if (appElement) { <span style="color: #ff0000;">bootstrap</span>(appElement, module ? [module] : []); }} |
angularInit函数主要用来寻找主程序入口。如果在DOM中找到了ng-app标记,则调用bootstrap开始初始化框架。如果没有定义app标记,则需要手动调用angular.bootstrap来初始化。app标记一般在html节点,也可以放置在任意的节点上,app节点所在的DOM树都会被AngularJS框架遍历解析。
ng-app属性如果有值,即自定义module,也会被解析出来,前提是我们必须先创建module,用来管理全局的injector行为和对象。如果没有值,则会创建默认的module。
|
1
2
3
4
5
6
7
8
9
10
11
12
13
14
15
16
17
18
19
20
21
22
23
24
25
26
27
28
29
30
31
32
33
34
35
36
37
38
39
40
41
|
function <strong>bootstrap</strong>(element, modules) { var doBootstrap = function() { element = jqLite(element); if (element.injector()) { var tag = (element[0] === document) ? 'document' : startingTag(element); throw ngMinErr('btstrpd', "App Already Bootstrapped with this Element '{0}'", tag); } modules = modules || []; modules.unshift(['$provide', function($provide) { $provide.value('$rootElement', element); }]); modules.unshift('ng'); var injector = createInjector(modules); injector.invoke(['$rootScope', '$rootElement', '$compile', '$injector', '$animate', function(scope, element, compile, injector, animate) { scope.$apply(function() { element.data('$injector', injector); compile(element)(scope); }); animate.enabled(true); }] ); return injector; }; var NG_DEFER_BOOTSTRAP = /^NG_DEFER_BOOTSTRAP!/; if (window && !NG_DEFER_BOOTSTRAP.test(window.name)) { return doBootstrap(); } window.name = window.name.replace(NG_DEFER_BOOTSTRAP, ''); angular.resumeBootstrap = function(extraModules) { forEach(extraModules, function(module) { modules.push(module); }); doBootstrap(); };} |
按照官方文档描述,bootstrap步骤分为三步:首先加载module,然后创建全局injector对象,最后执行compile动作,对应的正是上面的代码。
AngularJS会为每个应用程序创建唯一的injector对象,它可以看作是一个对象池,依靠键值来存取实例,比如存放数据的model,和后端交互的service等,而实例的创建则由module来决定。
在AngularJS框架中,应用程序被看作是由多个module组成的一个结合体,而一个module,往往是相似功能块的组合。在一个大型应用程序中,我们习惯将程序切分为多个模块并行开发,这也是AngularJS的推荐做法。在module中,可以定义和View层打交道的Controller,和后台交互的Service,也可以自定义依赖注入行为,解析特殊的DOM数据。
从上面的代码可以看到,初始化时会加载内置的模块,比如“ng”。在ng模块中定义了AngularJS的核心功能,包括解析DOM树中的以“ng”为前缀的自定义节点, 比如ng-model,ng-class,ng-repeat等等。
compile,编译,顾名思义,就是将DOM中的ng标记和其他自定义标记解析为真正的View, Model和Controller等。
--------------------
到这里为止,对AngularJS的运行机制还处于一知半解,不得不吐槽下,想要弄懂AngularJS的运行机制实在不是件容易的事。
最后再补充一点:有一款名为"Batarang"的Chrome扩展插件一定不能错过,AngularJS开发调试必备。用过后,才知道官网上一些截图是怎么来的了~