本文篇幅较长,建议合理利用右上角目录进行查看(如果没有目录请刷新)。
本文主要总结于刘增辉的《MyBatisc从入门到精通》一书,有兴趣的朋友可以自行研读
建议仔细研读官方文档:
http://www.mybatis.org/mybatis-3/zh/
http://www.mybatis.org/spring/zh/
http://www.mybatis.org/spring-boot-starter/mybatis-spring-boot-autoconfigure/
一、MyBatis简介
什么是MyBatis:
- 一个数据持久化框架
- 支持定制化 SQL、存储过程以及高级映射
- 能讲Java的POJO映射为数据库记录
- Mybatis对比其他持久化框架,优点在于SQL容易控制,方便优化
MyBatis基本原理:
- 通过XML文件,根据MyBatis提供的语法,编写增删改查的代码
- 创建实体和接口,与XML文件映射
- 系统调用实体和接口进行编程
- 从而实现了SQL语句到实体和接口的映射
二、MyBatis的基本用法
本例子用RBAC(Role-Based Access Control 基于角色的权限访问控制)系统作为例子来介绍MyBatis的XML基本用法:
2.1、先增加几个数据库表


DROP TABLE IF EXISTS `sys_user`;
CREATE TABLE `sys_user` (
  `id` bigint(20) NOT NULL AUTO_INCREMENT COMMENT '用户ID',
  `user_name` varchar(50) DEFAULT NULL COMMENT '用户名',
  `user_password` varchar(50) DEFAULT NULL COMMENT '密码',
  `user_email` varchar(50) DEFAULT 'test@mybatis.tk' COMMENT '邮箱',
  `user_info` text COMMENT '简介',
  `head_img` blob COMMENT '头像',
  `create_time` datetime DEFAULT NULL COMMENT '创建时间',
  PRIMARY KEY (`id`)
) ENGINE=InnoDB AUTO_INCREMENT=1035 DEFAULT CHARSET=utf8 COMMENT='用户表';

DROP TABLE IF EXISTS `sys_role`;
CREATE TABLE `sys_role` (
  `id` bigint(20) NOT NULL AUTO_INCREMENT COMMENT '角色ID',
  `role_name` varchar(50) DEFAULT NULL COMMENT '角色名',
  `enabled` int(11) DEFAULT NULL COMMENT '有效标志',
  `create_by` bigint(20) DEFAULT NULL COMMENT '创建人',
  `create_time` datetime DEFAULT NULL COMMENT '创建时间',
  PRIMARY KEY (`id`)
) ENGINE=InnoDB AUTO_INCREMENT=3 DEFAULT CHARSET=utf8 COMMENT='角色表';

DROP TABLE IF EXISTS `sys_privilege`;
CREATE TABLE `sys_privilege` (
  `id` bigint(20) NOT NULL AUTO_INCREMENT COMMENT '权限ID',
  `privilege_name` varchar(50) DEFAULT NULL COMMENT '权限名称',
  `privilege_url` varchar(200) DEFAULT NULL COMMENT '权限URL',
  PRIMARY KEY (`id`)
) ENGINE=InnoDB AUTO_INCREMENT=6 DEFAULT CHARSET=utf8 COMMENT='权限表';

DROP TABLE IF EXISTS `sys_user_role`;
CREATE TABLE `sys_user_role` (
  `user_id` bigint(20) DEFAULT NULL COMMENT '用户ID',
  `role_id` bigint(20) DEFAULT NULL COMMENT '角色ID'
) ENGINE=InnoDB DEFAULT CHARSET=utf8 COMMENT='用户角色关联表';

DROP TABLE IF EXISTS `sys_role_privilege`;
CREATE TABLE `sys_role_privilege` (
  `role_id` bigint(20) DEFAULT NULL COMMENT '角色ID',
  `privilege_id` bigint(20) DEFAULT NULL COMMENT '权限ID'
) ENGINE=InnoDB DEFAULT CHARSET=utf8 COMMENT='角色权限关联表';
2.2、插入测试数据
INSERT INTO `sys_privilege` VALUES ('1', '用户管理', '/users');
INSERT INTO `sys_privilege` VALUES ('2', '角色管理', '/roles');
INSERT INTO `sys_privilege` VALUES ('3', '系统日志', '/logs');
INSERT INTO `sys_privilege` VALUES ('4', '人员维护', '/persons');
INSERT INTO `sys_privilege` VALUES ('5', '单位维护', '/companies');
INSERT INTO `sys_role` VALUES ('1', '管理员', '1', '1', '2016-04-01 17:02:14');
INSERT INTO `sys_role` VALUES ('2', '普通用户', '1', '1', '2016-04-01 17:02:34');
INSERT INTO `sys_role_privilege` VALUES ('1', '1');
INSERT INTO `sys_role_privilege` VALUES ('1', '3');
INSERT INTO `sys_role_privilege` VALUES ('1', '2');
INSERT INTO `sys_role_privilege` VALUES ('2', '4');
INSERT INTO `sys_role_privilege` VALUES ('2', '5');
INSERT INTO `sys_user` VALUES ('1', 'admin', '123456', 'admin@mybatis.tk', '管理员用户', 0x1231231230, '2016-06-07 01:11:12');
INSERT INTO `sys_user` VALUES ('1001', 'test', '123456', 'test@mybatis.tk', '测试用户', 0x1231231230, '2016-06-07 00:00:00');
INSERT INTO `sys_user_role` VALUES ('1', '1');
INSERT INTO `sys_user_role` VALUES ('1', '2');
INSERT INTO `sys_user_role` VALUES ('1001', '2');
2.3、创建实体类
开发中创建实体类可以使用MyBatis Generator工具来根据数据库表来生成实体类
package tk.mybatis.simple.model;

import java.io.Serializable;

/**
 * 权限表
 */
public class SysPrivilege implements Serializable {
    private static final long serialVersionUID = 6315662516417216377L;
    /**
     * 权限ID
     */
    private Long id;
    /**
     * 权限名称
     */
    private String privilegeName;
    /**
     * 权限URL
     */
    private String privilegeUrl;

    public Long getId() {
        return id;
    }

    public void setId(Long id) {
        this.id = id;
    }

    public String getPrivilegeName() {
        return privilegeName;
    }

    public void setPrivilegeName(String privilegeName) {
        this.privilegeName = privilegeName;
    }

    public String getPrivilegeUrl() {
        return privilegeUrl;
    }

    public void setPrivilegeUrl(String privilegeUrl) {
        this.privilegeUrl = privilegeUrl;
    }

}
package tk.mybatis.simple.model;

import java.io.Serializable;
import java.util.Date;
import java.util.List;

import tk.mybatis.simple.type.Enabled;

/**
 * 角色表
 */
public class SysRole implements Serializable {
    private static final long serialVersionUID = 6320941908222932112L;
    /**
     * 角色ID
     */
    private Long id;
    /**
     * 角色名
     */
    private String roleName;
    /**
     * 有效标志
     */
    private Enabled enabled;
    /**
     * 创建人
     */
    private String createBy;
    /**
     * 创建时间
     */
    private Date createTime;
    /**
     * 用户信息
     */
    private SysUser user;
    /**
     * 创建信息
     */
    private CreateInfo createInfo;

    public CreateInfo getCreateInfo() {
        return createInfo;
    }

    public void setCreateInfo(CreateInfo createInfo) {
        this.createInfo = createInfo;
    }

    /**
     * 角色包含的权限列表
     */
    List<SysPrivilege> privilegeList;

    public List<SysPrivilege> getPrivilegeList() {
        return privilegeList;
    }

    public void setPrivilegeList(List<SysPrivilege> privilegeList) {
        this.privilegeList = privilegeList;
    }

    public Long getId() {
        return id;
    }

    public void setId(Long id) {
        this.id = id;
    }

    public String getRoleName() {
        return roleName;
    }

    public void setRoleName(String roleName) {
        this.roleName = roleName;
    }

    public Enabled getEnabled() {
        return enabled;
    }

    public void setEnabled(Enabled enabled) {
        this.enabled = enabled;
    }

    public String getCreateBy() {
        return createBy;
    }

    public void setCreateBy(String createBy) {
        this.createBy = createBy;
    }

    public Date getCreateTime() {
        return createTime;
    }

    public void setCreateTime(Date createTime) {
        this.createTime = createTime;
    }

    public SysUser getUser() {
        return user;
    }

    public void setUser(SysUser user) {
        this.user = user;
    }

}
package tk.mybatis.simple.model;

/**
 * 角色权限关联表
 */
public class SysRolePrivilege {
    /**
     * 角色ID
     */
    private Long roleId;
    /**
     * 权限ID
     */
    private Long privilegeId;

    public Long getRoleId() {
        return roleId;
    }

    public void setRoleId(Long roleId) {
        this.roleId = roleId;
    }

    public Long getPrivilegeId() {
        return privilegeId;
    }

    public void setPrivilegeId(Long privilegeId) {
        this.privilegeId = privilegeId;
    }

}
package tk.mybatis.simple.model;

import java.io.Serializable;
import java.util.Date;
import java.util.List;

/**
 * 用户表
 */
public class SysUser implements Serializable {
    private static final long serialVersionUID = -328602757171077630L;
    /**
     * 用户ID
     */
    private Long id;
    /**
     * 用户名
     */
    private String userName;
    /**
     * 密码
     */
    private String userPassword;
    /**
     * 邮箱
     */
    private String userEmail;
    /**
     * 简介
     */
    private String userInfo;
    /**
     * 头像
     */
    private byte[] headImg;
    /**
     * 创建时间
     */
    private Date createTime;

    /**
     * 用户角色
     */
    private SysRole role;

    /**
     * 用户的角色集合
     */
    private List<SysRole> roleList;

    public Long getId() {
        return id;
    }

    public void setId(Long id) {
        this.id = id;
    }

    public String getUserName() {
        return userName;
    }

    public void setUserName(String userName) {
        this.userName = userName;
    }

    public String getUserPassword() {
        return userPassword;
    }

    public void setUserPassword(String userPassword) {
        this.userPassword = userPassword;
    }

    public String getUserEmail() {
        return userEmail;
    }

    public void setUserEmail(String userEmail) {
        this.userEmail = userEmail;
    }

    public String getUserInfo() {
        return userInfo;
    }

    public void setUserInfo(String userInfo) {
        this.userInfo = userInfo;
    }

    public byte[] getHeadImg() {
        return headImg;
    }

    public void setHeadImg(byte[] headImg) {
        this.headImg = headImg;
    }

    public Date getCreateTime() {
        return createTime;
    }

    public void setCreateTime(Date createTime) {
        this.createTime = createTime;
    }

    public SysRole getRole() {
        return role;
    }

    public void setRole(SysRole role) {
        this.role = role;
    }

    public List<SysRole> getRoleList() {
        return roleList;
    }

    public void setRoleList(List<SysRole> roleList) {
        this.roleList = roleList;
    }

}
package tk.mybatis.simple.model;

/**
 * 用户角色关联表
 */
public class SysUserRole {
    /**
     * 用户ID
     */
    private Long userId;
    /**
     * 角色ID
     */
    private Long roleId;

    public Long getUserId() {
        return userId;
    }

    public void setUserId(Long userId) {
        this.userId = userId;
    }

    public Long getRoleId() {
        return roleId;
    }

    public void setRoleId(Long roleId) {
        this.roleId = roleId;
    }

}
2.4、创建Mapper.xml和对应接口类
在 src/main/resources 的 tk.mybatis.simple.mapper 目录下创建 5 个表各自对应的 XML 文件,分别为 UserMapper.xml 、 RoleMapper.xml 、 PrivilegeMapper.xml 、 UserRoleMapper.xml 和RolePrivilegeMapper.xml 。
在 src/main/java下面创建包 tk.mybatis.simple.mapper 。接着,在该包下创建 XML 文件对应的接口类,分别为 UserMapper.java 、 RoleMapper.java 、 PrivilegeMapper.java 、UserRoleMapper.java 和 RolePrivilegeMapper.java
下面以User表对应的XML文件和接口类设计为例介绍如何实现
UserMapper.java
package tk.mybatis.simple.mapper;

public interface UserMapper {
}
UserMapper.xml
此文件用全限定的类名,把接口和XML文件关联起来
<?xml version="1.0" encoding="UTF-8" ?>
<!DOCTYPE mapper PUBLIC "-//mybatis.org//DTD Mapper 3.0//EN"
                    "http://mybatis.org/dtd/mybatis-3-mapper.dtd" >
<mapper namespace="tk.mybatis.simple.mapper.UserMapper">

</mapper>
2.5、创建MyBatis配置文件
mybatis-config.xml
把UserMapper配置到mybatis里面去,有2种方法:
1、通过接口配置
<mappers>
    <package name="tk.mybatis.simple.mapper" />
</mappers>
2、通过xml文件配置
<mappers>
    <mapper resource="tk/mybatis/simple/mapper/UserMapper.xml" />
</mappers>
建议通过接口配置,因为只需要指定接口所在的包,MyBatis会扫描所有接口对应的Mapper
这种方式的运行流程如下:
- 1、判断接口对应的命名空间是否已经存在,如果不存在就抛出异常,存在就继续进行接下来的操作
- 2、加载接口对应的XML映射文件,将接口全限定名转换为路径,例如,将接口tk.mybatis.simple.mapper.UserMapper转换为tk/mybatis/simple/mapper/UserMapper.xml,以.xml为后缀搜索XML资源,如果找到就解析XML
- 3、处理接口中的注解方法
三、MyBatis的XML语法
3.1、select用法
使用纯粹的JDBC时,需要写查询语句,并且对结果集进行手动处理,将结果映射到对象的属性中
使用 MyBatis 时,只需要在XML中添加一个select元素,写一个SQL,再做一些简单的配置,就可以将查询的结果直接映射到对象中
下面以用id查找用户为例,讲解select用法:
1、添加对应接口方法selectById
public interface UserMapper {

    /**
     * 通过 id 查询用户
     *
     * @param id
     * @return
     */
    SysUser selectById(Long id);
}
2、添加对应XML代码
<?xml version="1.0" encoding="UTF-8" ?>
<!DOCTYPE mapper PUBLIC "-//mybatis.org//DTD Mapper 3.0//EN"
                    "http://mybatis.org/dtd/mybatis-3-mapper.dtd" >
<mapper namespace="tk.mybatis.simple.mapper.UserMapper">
    <resultMap id="userMap" type="tk.mybatis.simple.model.SysUser">
        <id property="id" column="id" />
        <result property="userName" column="user_name" />
        <result property="userPassword" column="user_password" />
        <result property="userEmail" column="user_email" />
        <result property="userInfo" column="user_info" />
        <result property="headImg" column="head_img" jdbcType="BLOB" />
        <result property="createTime" column="create_time" jdbcType="TIMESTAMP" />
    </resultMap>

    <select id="selectById" resultMap="userMap">
        select * from sys_user where
        id = #{id}
    </select>
</mapper>
- 接口与XML的关联:通过XML的<mapper>标签的namespace值设置为接口的全限定名称进行关联
- 接口中方法与XML的关联:通过XML的<select>标签的id值设置为接口方法名称进行关联
3、XML的设计规则
- a、只使用XML而不使用接口时,namespace的值可以设置为任意不重复的值
- b、标签的 id 属性值在任何时候都不能出现英文句号 “.” ,并且同一个命名空间下不能出现重复的id
- c、因为接口方法是可以重载的,所以接口中可以出现多个同名但参数不同的方法,但是 XML 中 id 的值不能重复,因而接口中的所有同名方法会对应着 XML 中的同一个 id 的方法。最常见的用法就是,同名方法中其中一个方法增加一个 RowBound 类型的参数用于实现分页查询
4、XML的标签与属性
<select>标签:
映射查询语句使用的标签
- id:命名空间中的唯一标识符,可用来代表这条语句
- resultMap:用于设置返回值的类型和映射关系
- resultType:直接自动影射为某对象
- select * from sys_user where id=#{id} 是查询语句
- #{id}:MyBatis SQL中使用预编译参数的一种方式,大括号中的 id 是传入的参数名
- 在上面的select中,使用resultMap设置返回值的类型,这里的userMap就是上面<resultMap>中的id属性值,通过id引用需要的<resultMap>
<resultMap>标签:
用于配置Java对象的属性和查询结果列的对应关系,通过resultMap中配置的column和property可以将查询列的值映射到type对象的属性上,因此当我们使用select*查询所有列的时候,MyBatis也可以将结果正确地映射到SysUser对象上
- id:必填,并且唯一。在select标签中,resultMap指定的值即为此处id所设置的值
- type:必填,用于配置查询列所映射到的Java对象类型
- extends:选填,可以配置当前的resultMap继承自其他的resultMap,属性值为继承resultMap的id
- autoMapping:选填,可选值为true或false,用于是否启用非映射字段(没有在resultMap中的字段)的自动映射功能,该可以覆盖全局的autoMappingBehavior
<resultMap>下的标签:
- <constructor>标签:配置使用构造方法注入结果,包含以下两个子标签
- <idArg>标签:id参数,标记结果作为id(唯一值),可以帮助提高整体性能。
- <arg>标签:注入到构造方法的一个普通结果。
- <id>标签:一个id结果,标记结果作为id(唯一值),可以帮助提高整体性能。
- <result>标签:注入到Java对象属性的普通结果。
- <idArg>、<arg>和<id>、<result>的含义相同,不同在于前者是通过类的构造函数注入,后者是通过属性的setter方法注入
- <association>标签:一个复杂的类型关联,许多结果将包成这种类型。
- <collection>标签:复杂类型的集合。
- <discriminator>标签:根据结果值来决定使用哪个结果映射。
- <case>标签:基于某些值的结果映射。
<id>和<result>里面的属性:
- column:从数据库中得到的列名,或者是列的别名。
- property:映射到列结果的属性。可以映射简单的如“username”这样的属性,也可以映射一些复杂对象中的属性,例如“address.street.number”,这会通过“.”方式的属性嵌套赋值。
- javaType:一个Java类的完全限定名,或一个类型别名(通过typeAlias配置或者默认的类型)。如果映射到一个JavaBean,MyBatis通常可以自动判断属性的类型。如果映射到HashMap,则需要明确地指定javaType属性。
- jdbcType:列对应的数据库类型。JDBC类型仅仅需要对插入、更新、删除操作可能为空的列进行处理。这是JDBCjdbcType的需要,而不是MyBatis的需要。
- typeHandler:使用这个属性可以覆盖默认的类型处理器。这个属性值是类的完全限定名或类型别名
如何定义返回值
- resultMap:用resultMap来设置映射
- resultType:根据读取结果和对应类自动映射,可以在select中使用别名,来和类的属性名对应
5、多结果查询例子
接口方法
    /**
     * 查询全部用户
     *
     * @return
     */
    List<SysUser> selectAll();
XML设置
<select id="selectAll" resultType="tk.mybatis.simple.model.SysUser">
    select id,
    user_name userName,
    user_password userPassword,
    user_email userEmail,
    user_info userInfo,
    head_img headImg,
    create_time createTime
    from sys_user
</select>
这个例子中,select标签中直接使用resultType,以及使用字段别名,使sql的字段名与类的字段名对上,即可自动映射
6、名称映射规则
综上,有2种方式:1、在resultMap中配置property属性和column属性的映射;2、SQL中设置别名
property或者别名要与对象的属性名对应才能匹配,实际匹配时,是把字母都转换成大写来匹配的,所以不区分大小写;一般为了阅读,应该统一写法就OK
一种很常见的情况,数据库使用下划线命名方式,如user_Name;而Java中使用驼峰式命名,如userName
MyBatis提供了一个配置,自动将这2种方式进行匹配,在配置文件中设置即可,代码如下
<settings>
    <setting name="mapUnderscoreToCamelCase" value="true"/>
</settings>
7、添加单元测试代码
在src/test/java下的tk.mybatis.simple.mapper包中,添加基础测试类
package tk.mybatis.simple.mapper;

import java.io.IOException;
import java.io.Reader;

import org.apache.ibatis.io.Resources;
import org.apache.ibatis.session.SqlSession;
import org.apache.ibatis.session.SqlSessionFactory;
import org.apache.ibatis.session.SqlSessionFactoryBuilder;
import org.junit.BeforeClass;

/**
 * 基础测试类
 */
public class BaseMapperTest {
    private static SqlSessionFactory sqlSessionFactory;

    @BeforeClass
    public static void init(){
        try {
            Reader reader = Resources.getResourceAsReader("mybatis-config.xml");
            sqlSessionFactory = new SqlSessionFactoryBuilder().build(reader);
            reader.close();
        } catch (IOException ignore) {
            ignore.printStackTrace();
        }
    }

    public SqlSession getSqlSession(){
        return sqlSessionFactory.openSession();
    }

}
修改CountryMapperTest类
因为Country和User的Mapper中都有SelectAll,所以不在唯一,需要用全限定类名tk.mybatis.simple.mapper.CountryMapper.selectAll去调用
package tk.mybatis.simple.mapper;

import java.util.List;

import org.apache.ibatis.session.SqlSession;
import org.junit.Test;

import tk.mybatis.simple.model.Country;

public class CountryMapperTest extends BaseMapperTest {

    @Test
    public void testSelectAll() {
        SqlSession sqlSession = getSqlSession();
        try {
            List<Country> countryList = sqlSession.selectList("tk.mybatis.simple.mapper.CountryMapper.selectAll");
            printCountryList(countryList);
        } finally {
            sqlSession.close();
        }
    }

    private void printCountryList(List<Country> countryList) {
        for (Country country : countryList) {
            System.out.printf("%-4d%4s%4s
", country.getId(), country.getCountryname(), country.getCountrycode());
        }
    }
}
修改mybatis-config.xml,把CountryMapper.xml加入到Mapper配置中
<mappers>
    <mapper resource="tk/mybatis/simple/mapper/CountryMapper.xml" />
    <package name="tk.mybatis.simple.mapper" />
</mappers>
完成上面设置后即可进行单元测试
8、一些复杂用法
a、关联查找某个表的数据
接口方法
/**
 * 根据用户 id 获取角色信息
 *
 * @param userId
 * @return
 */
List<SysRole> selectRolesByUserId(Long userId);
XML配置
<select id="selectRolesByUserId" resultType="tk.mybatis.simple.model.SysRole">
    select
        r.id,
        r.role_name roleName,
        r.enabled,
        r.create_by createBy,
        r.create_time createTime,
        u.user_name as "user.userName",
        u.user_email as "user.userEmail"
    from sys_user u
    inner join sys_user_role ur on u.id = ur.user_id
    inner join sys_role r on ur.role_id = r.id
    where u.id = #{userId}
</select>
因为使用了自定义类型Enable,所以在mybatis-config.xml加入自定义类型处理器
<typeHandlers>
    <typeHandler
        javaType="tk.mybatis.simple.type.Enabled"
        handler="tk.mybatis.simple.type.EnabledTypeHandler"/>
</typeHandlers>
这种情况,虽然有关联表查询,但是只是一个实体的数据,所以只是sql中加入了join语句的不同,其它和单个表查询基本相同
b、关联查询多个表数据
例如a中,我不仅要查询角色,也要带上用户的信息,那就是要查询出2个表的信息了,那么可以如下这么做
第一种:把用户的信息增加到角色表中;不过这种方式不建议
package tk.mybatis.simple.model;

public class SysRoleExtend extends SysRole {
    private String userName;

    public String getUserName() {
        return userName;
    }

    public void setUserName(String userName) {
        this.userName = userName;
    }

}
第二种:把user表加到角色表中
public class SysRole implements Serializable {
    /**
     * 用户信息
     */
    private SysUser user;

        ......
修改mapper,使用“.”的方式增加user需要的信息
<select id="selectRolesByUserId" resultType="tk.mybatis.simple.model.SysRole">
    select
        r.id,
        r.role_name roleName,
        r.enabled,
        r.create_by createBy,
        r.create_time createTime,
        u.user_name as "user.userName",
        u.user_email as "user.userEmail"
    from sys_user u
    inner join sys_user_role ur on u.id = ur.user_id
    inner join sys_role r on ur.role_id = r.id
    where u.id = #{userId}
</select>
测试代码
    @Test
    public void testSelectRolesByUserId(){
        SqlSession sqlSession = getSqlSession();
        try {
            UserMapper userMapper = sqlSession.getMapper(UserMapper.class);
            //调用 selectRolesByUserId 方法查询用户的角色
            List<SysRole> roleList = userMapper.selectRolesByUserId(1L);
            //结果不为空
            Assert.assertNotNull(roleList);
            //角色数量大于 0 个
            Assert.assertTrue(roleList.size() > 0);
        } finally {
            //不要忘记关闭 sqlSession
            sqlSession.close();
        }
    }
2.3、MyBatis的XML基本用法——insert用法
insert比较简单,除了需要返回主键时,不同数据库的方式有所不同
1、简单用法
添加接口方法
/**
 * 新增用户
 *
 * @param sysUser
 * @return
 */
int insert(SysUser sysUser);
添加XML设置
<insert id="insert">
    insert into sys_user(
        user_name, user_password, user_email,
        user_info, head_img, create_time)
    values(
        #{userName}, #{userPassword}, #{userEmail},
        #{userInfo}, #{headImg, jdbcType=BLOB}, #{createTime, jdbcType=TIMESTAMP})
</insert>
测试代码
@Test
public void testInsert() {
    SqlSession sqlSession = getSqlSession();
    try {
        UserMapper userMapper = sqlSession.getMapper(UserMapper.class);
        // 创建一个 user 对象
        SysUser user = new SysUser();
        user.setUserName("test1");
        user.setUserPassword("123456");
        user.setUserEmail("test@mybatis.tk");
        user.setUserInfo("test info");
        // 正常情况下应该读入一张图片存到 byte 数组中
        user.setHeadImg(new byte[] { 1, 2, 3 });
        user.setCreateTime(new Date());
        // 将新建的对象插入数据库中,特别注意,这里的返回值 result 是执行的 SQL 影响的行数
        int result = userMapper.insert(user);
        // 只插入 1 条数据
        Assert.assertEquals(1, result);
        // id 为 null,我们没有给 id 赋值,并且没有配置回写 id 的值
        Assert.assertNull(user.getId());
    } finally {
        // 为了不影响数据库中的数据导致其他测试失败,这里选择回滚
        // 由于默认的 sqlSessionFactory.openSession() 是不自动提交的,
        // 因此不手动执行 commit 也不会提交到数据库
        sqlSession.rollback();
        // 不要忘记关闭 sqlSession
        sqlSession.close();
    }
}
<insert>标签包含如下属性:
- id:命名空间中的唯一标识符,可用来代表这条语句。
- parameterType:即将传入的语句参数的完全限定类名或别名。这个属性是可选的,因为MyBatis可以推断出传入语句的具体参数,因此不建议配置该属性。
- flushCache:默认值为true,任何时候只要语句被调用,都会清空一级缓存和二级缓存。
- timeout:设置在抛出异常之前,驱动程序等待数据库返回请求结果的秒数。
- statementType:对于STATEMENT、PREPARED、CALLABLE,MyBatis会分别使用对应的Statement、PreparedStatement、CallableStatement,默认值为PREPARED。
- useGeneratedKeys:默认值为false。如果设置为true,MyBatis会使用JDBC的getGeneratedKeys方法来取出由数据库内部生成的主键。
- keyProperty:MyBatis通过getGeneratedKeys获取主键值后将要赋值的属性名。如果希望得到多个数据库自动生成的列,属性值也可以是以逗号分隔的属性名称列表。
- keyColumn:仅对INSERT和UPDATE有用。通过生成的键值设置表中的列名,这个设置仅在某些数据库(如PostgreSQL)中是必须的,当主键列不是表中的第一列时需要设置。如果希望得到多个生成的列,也可以是逗号分隔的属性名称列表。
- databaseId:如果配置了databaseIdProvider(4.6节有详细配置方法),MyBatis会加载所有的不带databaseId的或匹配当前databaseId的语句。如果同时存在带databaseId和不带databaseId的语句,后者会被忽略。
- 此处<insert>中的SQL就是一个简单的INSERT语句,将所有的列都列举出来,在values中通过#{property}方式从参数中取出属性的值。
- 为了防止类型错误,对于一些特殊的数据类型,建议指定具体的jdbcType值。例如headImg指定BLOB类型,createTime指定TIMESTAMP类型。
- 特别说明!
- BLOB对应的类型是ByteArrayInputStream,就是二进制数据流。
- 由于数据库区分date、time、datetime类型,但是Java中一般都使用java.util.Date类型。因此为了保证数据类型的正确,需要手动指定日期类型,date、time、datetime对应的JDBC类型分别为DATE、TIME、TIMESTAMP。
2、使用JDBC方式返回主键自增的值
适用于数据库本身可以设置字段为自增的情况
接口方法
/**
 * 新增用户 - 使用 useGeneratedKeys 方式
 *
 * @param sysUser
 * @return
 */
int insert2(SysUser sysUser);
XML配置,主要和上面例子增加了useGeneratedKeys="true" keyProperty="id"
<insert id="insert2" useGeneratedKeys="true" keyProperty="id">
    insert into sys_user(
        user_name, user_password, user_email,
        user_info, head_img, create_time)
    values(
        #{userName}, #{userPassword}, #{userEmail},
        #{userInfo}, #{headImg, jdbcType=BLOB}, #{createTime, jdbcType=TIMESTAMP})
</insert>
useGeneratedKeys设置为true后,MyBatis会使用JDBC的getGeneratedKeys方法来取出由数据库内部生成的主键。获得主键值后将其赋值给keyProperty配置的id属性。当需要设置多个属性时,使用逗号隔开,这种情况下通常还需要设置keyColumn属性,按顺序指定数据库的列,这里列的值会和keyProperty配置的属性一一对应
测试代码
@Test
public void testInsert2() {
    SqlSession sqlSession = getSqlSession();
    try {
        UserMapper userMapper = sqlSession.getMapper(UserMapper.class);
        // 创建一个 user 对象
        SysUser user = new SysUser();
        user.setUserName("test1");
        user.setUserPassword("123456");
        user.setUserEmail("test@mybatis.tk");
        user.setUserInfo("test info");
        user.setHeadImg(new byte[] { 1, 2, 3 });
        user.setCreateTime(new Date());
        int result = userMapper.insert2(user);
        // 只插入 1 条数据
        Assert.assertEquals(1, result);
        // 因为 id 回写,所以 id 不为 null
        Assert.assertNotNull(user.getId());

    } finally {
        sqlSession.commit();
        // 不要忘记关闭 sqlSession
        sqlSession.close();
    }
}
3、使用selectKey返回主键的值
这种方式既适用于2的情况,更适用于数据库不支持自增列,而是通过序列得到一个值,然后赋值给id再插入数据库的情况
接口方法
/**
 * 新增用户 - 使用 selectKey 方式
 *
 * @param sysUser
 * @return
 */
int insert3(SysUser sysUser);
XML配置
MySQL数据库
<insert id="insert3">
    insert into sys_user(
        user_name, user_password, user_email,
        user_info, head_img, create_time)
    values(
        #{userName}, #{userPassword}, #{userEmail},
        #{userInfo}, #{headImg, jdbcType=BLOB}, #{createTime, jdbcType=TIMESTAMP})
    <selectKey keyColumn="id" resultType="long" keyProperty="id" order="AFTER">
        SELECT LAST_INSERT_ID()
    </selectKey>
</insert>
Oracle数据库
<!-- Oracle 的例子,查询多个列的时候需要 keyColumn -->
<insert id="insertOracle">
    <selectKey keyColumn="id" resultType="long" keyProperty="id" order="BEFORE">
        SELECT SEQ_USER.nextval from dual
    </selectKey>
    insert into sys_user(
        id, user_name, user_password, user_email,
        user_info, head_img, create_time)
    values(
        #{id}, #{userName}, #{userPassword}, #{userEmail},
        #{userInfo}, #{headImg, jdbcType=BLOB}, #{createTime, jdbcType=TIMESTAMP})
</insert>
selectKey标签的keyColumn、keyProperty和上面useGeneratedKeys的用法含义相同,这里的resultType用于设置返回值类型。order属性的设置和使用的数据库有关。在MySQL数据库中,order属性设置的值是AFTER,因为当前记录的主键值在insert语句执行成功后才能获取到。而在Oracle数据库中,order的值要设置为BEFORE,这是因为Oracle中需要先从序列获取值,然后将值作为主键插入到数据库中
Oracle方式的INSERT语句中明确写出了id列和值#{id},因为执行selectKey中的语句后id就有值了,我们需要把这个序列值作为主键值插入到数据库中,所以必须指定id列,如果不指定这一列,数据库就会因为主键不能为空而抛出异常
而selectKey标签的写法在前后并无所谓,影响执行顺序的只是order
不同数据库生成id的语句不同
- DB2使用VALUESIDENTITY_VAL_LOCAL()。
- MYSQL使用SELECTLAST_INSERT_ID()。
- SQLSERVER使用SELECTSCOPE_IDENTITY()。
- CLOUDSCAPE使用VALUESIDENTITY_VAL_LOCAL()。
- DERBY使用VALUESIDENTITY_VAL_LOCAL()。
- HSQLDB使用CALLIDENTITY()。
- SYBASE使用SELECT@@IDENTITY。
- DB2_MF使用SELECTIDENTITY_VAL_LOCAL()FROMSYSIBM.SYSDUMMY1。
- INFORMIX使用selectdbinfo('sqlca.sqlerrd1')fromsystableswheretabid=1
2.4、MyBatis的XML基本用法——update用法
1、简单用法
接口方法
/**
 * 根据主键更新
 *
 * @param sysUser
 * @return
 */
int updateById(SysUser sysUser);
XML配置
<update id="updateById">
    update sys_user
    set user_name = #{userName},
        user_password = #{userPassword},
        user_email = #{userEmail},
        user_info = #{userInfo},
        head_img = #{headImg, jdbcType=BLOB},
        create_time = #{createTime, jdbcType=TIMESTAMP}
    where id = #{id}
</update>
测试代码
@Test
public void testUpdateById() {
    SqlSession sqlSession = getSqlSession();
    try {
        UserMapper userMapper = sqlSession.getMapper(UserMapper.class);
        // 从数据库查询 1 个 user 对象
        SysUser user = userMapper.selectById(1L);
        // 当前 userName 为 admin
        Assert.assertEquals("admin", user.getUserName());
        // 修改用户名
        user.setUserName("admin_test");
        // 修改邮箱
        user.setUserEmail("test@mybatis.tk");
        // 更新数据,特别注意,这里的返回值 result 是执行的 SQL 影响的行数
        int result = userMapper.updateById(user);
        // 只更新 1 条数据
        Assert.assertEquals(1, result);
        // 根据当前 id 查询修改后的数据
        user = userMapper.selectById(1L);
        // 修改后的名字 admin_test
        Assert.assertEquals("admin_test", user.getUserName());
    } finally {
        // 为了不影响数据库中的数据导致其他测试失败,这里选择回滚
        // 由于默认的 sqlSessionFactory.openSession() 是不自动提交的,
        // 因此不手动执行 commit 也不会提交到数据库
        sqlSession.rollback();
        // 不要忘记关闭 sqlSession
        sqlSession.close();
    }
}
update就介绍到这里,更复杂的就需要了解后面的动态sql用法了
2.5、MyBatis的XML基本用法——delete用法
1、简单用法
接口方法
/**
 * 通过主键删除
 *
 * @param id
 * @return
 */
int deleteById(Long id);

/**
 * 通过主键删除
 *
 * @param id
 * @return
 */
int deleteById(SysUser sysUser);
XML配置
<delete id="deleteById">
    delete from sys_user where id = #{id}
</delete>
测试代码
@Test
public void testDeleteById() {
    SqlSession sqlSession = getSqlSession();
    try {
        UserMapper userMapper = sqlSession.getMapper(UserMapper.class);
        // 从数据库查询 1 个 user 对象,根据 id = 1 查询
        SysUser user1 = userMapper.selectById(1L);
        // 现在还能查询出 user 对象
        Assert.assertNotNull(user1);
        // 调用方法删除
        Assert.assertEquals(1, userMapper.deleteById(1L));
        // 再次查询,这时应该没有值,为 null
        Assert.assertNull(userMapper.selectById(1L));

        // 使用 SysUser 参数再做一遍测试,根据 id = 1001 查询
        SysUser user2 = userMapper.selectById(1001L);
        // 现在还能查询出 user 对象
        Assert.assertNotNull(user2);
        // 调用方法删除,注意这里使用参数为 user2
        Assert.assertEquals(1, userMapper.deleteById(user2));
        // 再次查询,这时应该没有值,为 null
        Assert.assertNull(userMapper.selectById(1001L));
        // 使用 SysUser 参数再做一遍测试
    } finally {
        // 为了不影响数据库中的数据导致其他测试失败,这里选择回滚
        // 由于默认的 sqlSessionFactory.openSession() 是不自动提交的,
        // 因此不手动执行 commit 也不会提交到数据库
        sqlSession.rollback();
        // 不要忘记关闭 sqlSession
        sqlSession.close();
    }
}
delete用法也只讲到这里,更复杂的可学习动态sql
2.6、多个接口参数的用法
在前面的例子,所有接口方法都只有一个参数,比如一个string类型的id,或者是一个JavaBean如SysUser
当要传输多个参数的时候,有2种好用的方法:1、使用Map类型作为参数;2、使用@Param注解
使用Map类型作为参数的方法,就是在Map中通过key来映射XML中SQL使用的参数值名字,value用来存放参数值,需要多个参数时,通过Map的key-value方式传递参数值,由于这种方式还需要自己手动创建Map以及对参数进行赋值,其实并不简洁,所以对这种方式只做以上简单介绍,接下来着重讲解使用@Param注解的方式
1、一个错误的例子
接口方法
/**
 * 根据用户 id 和 角色的 enabled 状态获取用户的角色
 *
 * @param userId
 * @param enabled
 * @return
 */
List<SysRole> selectRolesByUserIdAndRoleEnabled(Long userId, Integer enabled);
XML配置
<select id="selectRolesByUserIdAndRoleEnabled" resultType="tk.mybatis.simple.model.SysRole">
    select
        r.id,
        r.role_name roleName,
        r.enabled,
        r.create_by createBy,
        r.create_time createTime
    from sys_user u
    inner join sys_user_role ur on u.id = ur.user_id
    inner join sys_role r on ur.role_id = r.id
    where u.id = #{userId} and r.enabled = #{enabled}
</select>
测试代码
@Test
public void testSelectRolesByUserIdAndRoleEnabled() {
    SqlSession sqlSession = getSqlSession();
    try {
        UserMapper userMapper = sqlSession.getMapper(UserMapper.class);
        // 调用 selectRolesByUserIdAndRoleEnabled 方法查询用户的角色
        List<SysRole> roleList = userMapper.selectRolesByUserIdAndRoleEnabled(1L, null);
        // 结果不为空
        Assert.assertNotNull(roleList);
        // 角色数量大于 0 个
        Assert.assertTrue(roleList.size() > 0);
    } finally {
        // 不要忘记关闭 sqlSession
        sqlSession.close();
    }
}
会报错Parameter 'userId' not found. Available parameters are [0, 1, param1, param2]
这个错误表示,XML可用的参数只有0、1、param1、param2,没有userId。0和1,param1和param2都是MyBatis根据参数位置自定义的名字,这时如果将XML中的#{userId}改为#{0}或#{param1},将#{enabled}改为#{1}或#{param2},这个方法就可以被正常调用了。这样讲只是为了让大家理解它们之间的关系,但实际上并不建议这么做
2、使用@Param注解
修改接口方法即可
/**
 * 根据用户 id 和 角色的 enabled 状态获取用户的角色
 *
 * @param userId
 * @param enabled
 * @return
 */
List<SysRole> selectRolesByUserIdAndRoleEnabled(@Param("userId") Long userId, @Param("enabled") Integer enabled);
修改后可以通过测试
这时的XML文件中对应的SQL的可用参数变成了[userId,enabled,param1,param2],如果把#{userId}改为#{param1},把#{enabled}改为#{param2},测试也可以通过
给参数配置@Param注解后,MyBatis就会自动将参数封装成Map类型,@Param注解值会作为Map中的key,因此在SQL部分就可以通过配置的注解值来使用参数。
到这里大家可能会有一个疑问:当只有一个参数(基本类型或拥有TypeHandler配置的类型)的时候,为什么可以不使用注解?这是因为在这种情况下(除集合和数组外),MyBatis不关心这个参数叫什么名字就会直接把这个唯一的参数值拿来使用。
当参数是JavaBean的时候,如
/**
 * 根据用户 id 和 角色的 enabled 状态获取用户的角色
 *
 * @param user
 * @param role
 * @return
 */
List<SysRole> selectRolesByUserAndRole(@Param("user")SysUser user, @Param("role")SysRole role);
这时,在XML中就不能直接使用#{userId}和#{enabled}了,而是要通过点取值方式使用#{user.id}和#{role.enabled}从两个JavaBean中取出指定属性的值。修改好对应的XML文件后,大家可以自行完善代码并进行测试。
除了以上常用的参数类型外,接口的参数还可能是集合或者数组,这种类型的参数暂不讨论
四、动态SQL
使用ORM的人都知道,根据不同条件拼装SQL时会遇到很多麻烦,例如缺少空格、去掉最后列名的逗号等问题
MyBatis采用 OGNL(Object-Graph Navigation Language)表达式实现动态SQL,更加简便
4.1、if标签
根据标签中的test表达式(下面会详细讲解),如果符合表达式,则拼接在语句中;否则忽略
用于Where条件
<select id="selectTestIf" parameterType="com.LTSolution.ShopApp.Model.Product" resultMap="BaseResultMap">
    select * from Product
    where 1=1
    <if test="name != null and name != ''">
        and Name like '%'+#{name}+'%'
    </if>
    <if test="code != null and code != ''">
        and Code like '%'+#{code}+'%'
    </if>
    order by code
</select>
注意:where 1=1 :当2个条件都没有时,如果不加1=1,会产生语句“select * from Product where”,是一个错误语句;可以使用Where标签解决(下面会讲解)
用于Update更新
<update id="updateTestIf">
    update Product set
    <if test="name != null and name != ''">
        Name = #{name},
    </if>
    <if test="brand != null and brand != ''">
        Brand = #{brand},
    </if>
    Code = #{code}
    where Code = #{code}
</update>
注意:赋值Code = #{code},也是为了防止拼装出来的语句有误;可以使用Where标签或者Set标签解决(下面会讲解)
用于Insert插入
动态插入,如果实体的值为空,则不插入,这样可以让字段的值使用数据库的默认值,而不是实体中带的空值。
<update id="insertTestIf" parameterType="com.LTSolution.ShopApp.Model.Product">
    insert into Product(
    Code,TypeId,
    <if test="brand != null and brand != ''">
        Brand,
    </if>
    Name)
    values(
    #{code},#{typeid},
    <if test="brand != null and brand != ''">
        #{brand},
    </if>
    #{name}
    )
</update>
注意,字段和数值都必须有对应的if,否则会报导致数值数量和字段数量不一致
4.2、choose标签
此标签提供了类似if...else...的功能;在此标签中必须至少包含一个when,0或1个otherwise
<select id="selectTestChoose" resultMap="BaseResultMap">
    select * from Product
    where 1=1
    <choose>
    <when test="code != null and code != ''">
        and Code = #{code}
    </when>
    <when test="name != null and name != ''">
        and Name = #{name}
    </when>
    <otherwise>
        and 1=2
    </otherwise>
    </choose>
    order by code
</select>
如果有编号,按编号查找;没有编号,按名称查找;都没有则查不到。
4.3、where、set 、 trim标签
他们都用来解决类似拼装时是否去掉第一个and,是否去掉最后一个逗号等问题
where标签
where 标签的作用:若标签中有内容,则自动插入一个where,否则不插入任何语句 ;如果 where 后面的字符串是以 AND 和 OR 开头的,就将它们剔除。
修改上面if标签中where例子,即可省掉where 1=1这个语句
<select id="selectTestIf" parameterType="com.LTSolution.ShopApp.Model.Product" resultMap="BaseResultMap">
    select * from Product
    <where>
        <if test="name != null and name != ''">
            and Name like '%'+#{name}+'%'
        </if>
        <if test="code != null and code != ''">
            and Code = #{code}
        </if>
    </where>
    order by code
</select>
set标签
set标签的作用:若标签中有内容,则自动插入一个set ;如果 set 后面的字符串是以逗号结尾的,就将这个逗号剔除。
修改上面if标签中update例子如下
<update id="updateTestIf">
    update Product
    <set>
        <if test="name != null and name != ''">
            Name = #{name},
        </if>
        <if test="brand != null and brand != ''">
            Brand = #{brand},
        </if>
        Code = #{code},
    </set>
    where Code = #{code}
</update>
trim标签
where和set标签的功能都可以用trim标签来实现,并且在底层就是通过TrimSqlNode实现的
-
用trim标签实现where和set
<select id="selectTestIf" parameterType="com.LTSolution.ShopApp.Model.Product" resultMap="BaseResultMap">
    select * from Product
    <trim prefix="WHERE" prefixOverrides="AND |OR ">
        <if test="name != null and name != ''">
            and Name like '%'+#{name}+'%'
        </if>
        <if test="code != null and code != ''">
            and Code = #{code}
        </if>
    </trim>
    order by code
</select>
这里的AND和OR后面的空格不能省略,为了避免匹配到andes、orders等单词。
实际的prefixeOverrides包含“AND”、“OR”、“AND ”、“OR ”、“AND ”、“OR ”、“AND ”、“OR ”,不仅仅是上面提到的两个带空格的前缀。
<update id="updateTestIf">
    update Product
    <trim prefix="SET" suffixOverrides=",">
        <if test="name != null and name != ''">
            Name = #{name},
        </if>
        <if test="brand != null and brand != ''">
            Brand = #{brand},
        </if>
        Code = #{code},
    </trim>
    where Code = #{code}
</update>
- trim标签有如下属性
- prefix:当trim元素内包含内容时,会给内容增加prefix指定的前缀。
- prefixOverrides:当trim元素内包含内容时,会把内容中匹配的前缀字符串去掉。
- suffix:当trim元素内包含内容时,会给内容增加suffix指定的后缀。
- suffixOverrides:当trim元素内包含内容时,会把内容中匹配的后缀字符串去掉。
4.4、foreach标签
SQL语句中有时会使用IN关键字,例如id in(1,2,3)。使用${ids}方式直接获取值的写法不能防止SQL注入;使用#{}加上foreach标签的写法,可以避免SQL注入。
foreach可以对数组、Map或实现了Iterable接口(如List、Set)的对象进行遍历。
数组在处理时会转换为List对象,因此foreach遍历的对象可以分为两大类:Iterable类型和Map类型。
- foreach包含以下属性:
- collection:必填,值为要迭代循环的属性名。这个属性值的情况有很多(下面讲解)。
- item:变量名,值为从迭代对象中取出的每一个值。
- index:索引的属性名,在集合数组情况下值为当前索引值,当迭代循环的对象是Map类型时,这个值为Map的key(键值)。
- open:整个循环内容开头的字符串。
- close:整个循环内容结尾的字符串。
- separator:每次循环的分隔符。
这两种类型在遍历循环时情况不一样,例子如下:
实现in集合或数组
例子:使用传入的编号集合查找对应商品
//接口
List<Product> selectTestForeach(List<String> idList);
<select id="selectTestForeach" resultMap="BaseResultMap">
    select * from Product
    where code in
    <foreach collection="list" open="(" close=")" separator="," item="id" index="i">
        #{id}
    </foreach>
    order by code
</select>
-
collection的设置:
- 1、只有一个数组参数或者集合参数
- 参数会先转换成Map类型,再进行处理
- 参数为集合时,转换成Map中一个key为colletion的值,此时写colletion="collection"
- 参数为List时,在上面基础上再添加一个key为list的值,此时写colletion="collection"或colletion="list"
- 参数为数组时,不同于上面2种情况,会转换成Map中一个key为array的值,此时写colletion="array"
- 但是推荐使用@Param来指定参数的名称,这样就可以写colletion="参数名"
- 2、多个参数
- 使用@param来命名,写colletion="参数名"
- 3、参数是Map类型
- 将collection指定为Map中的key
- 若要循环Map,可以使用@Param,然后colletion="参数名";或直接使用colletion="_parameter"
- 4、参数是一个对象
- colletion="对象属性名"
- 若对象多层嵌套,可以使用属性 . 属性(集合和数组可以使用下标取值)的方式,作为collection的值
批量插入
如果数据库支持批量插入,就可以通过foreach来实现。批量插入是SQL-92新增的特性,目前支持的数据库有DB2、SQLServer2008及以上版本、PostgreSQL8.2及以上版本、MySQL、SQLite3.7.11及以上版本、H2。
sql语法:insert into table1 (c1,c2,c3..) values (v1,v2,v3..),(v1,v2,v3..),(v1,v2,v3..)
<update id="insertTestForeach">
    insert into Product(Code,TypeId,Name)
    values
    <foreach collection="list" item="product" separator=",">
        (#{product.code},#{product.typeid},#{product.name})
    </foreach>
</update>
通过item指定了循环变量名后,在引用值的时候使用的是“属性.属性”的方式,如product.code
批量插入还可以返回自增主键id,这里不介绍
动态update
介绍当参数类型是Map的时候,如何用foreach进行动态update
// 接口
int updateTestForeach(Map<String, Object> map);
<update id="updateTestForeach">
    update Product set
    <foreach collection="_parameter" item="val" index="key" separator=",">
        ${key} = #{val}
    </foreach>
    where Code = #{code}
</update>
4.5、bind标签
bind标签可以使用OGNL表达式创建一个变量并绑定到上下文中
例如连接函数concat,不同数据库用法不同,可以改成用bind标签的OGNL来表示,即可消除不同数据库不同写法的影响,而且可以防止sql注入
bind标签有2个属性,name为给上下文引用的变量名,value为OGNL表达式
<select id="selectTestIf" parameterType="com.LTSolution.ShopApp.Model.Product"
    resultMap="BaseResultMap">
    select * from Product
    <where>
        <if test="name != null and name != ''">
            <bind name="nameLike" value="'%'+name+'%'" />
            and Name like #{nameLike}
        </if>
    </where>
    order by code
</select>
4.6、多数据库支持
使用if标签以及由MyBatis提供的databaseIdProvider数据库厂商标识配置
MyBatis根据映射语句中的databaseId属性,对不同的数据库执行对应的语句;MyBatis会加载不带databaseId属性以及匹配当前数据库databaseId属性的语句;如果同时找到同id,不带databaseId属性和带databaseId属性的语句,不带databaseId属性的语句会被舍弃掉。
设置
首先,需要在mybatis-config.xml文件中加入配置
<databaseIdProvider type="DB_VENDOR"/>
在这个设置下,系统通过DatabaseMetaData#getDatabaseProductName()方法获取数据库名称,但是根据不同数据库版本,返回的名称会不同,比较难管理,所以有以下方式
<databaseIdProvider type="DB_VENDOR">
  <property name="SQL Server" value="sqlserver"/>
  <property name="DB2" value="db2"/>
  <property name="Oracle" value="oracle" />
  <property name="MySQL" value="mysql"/>
  <property name="PostgreSQL" value="postgresql"/>
  <property name="Derby" value="derby"/>
  <property name="HSQL" value="hsqldb"/>
  <property name="H2" value="h2"/>
</databaseIdProvider>
通过配置,只要DatabaseMetaData#getDatabaseProductName()的返回值部分字符匹配某个属性的name,就会返回对应的value值
注意!Spring Boot中不可以使用使用配置文件的形式,应该添加一个Bean
package com.LTSolution.ShopApp;

import java.util.Properties;

import org.apache.ibatis.mapping.DatabaseIdProvider;
import org.apache.ibatis.mapping.VendorDatabaseIdProvider;
import org.springframework.context.annotation.Bean;
import org.springframework.context.annotation.Configuration;

@Configuration
public class MyBatisBean {
    @Bean
    public DatabaseIdProvider getDatabaseIdProvider() {
        DatabaseIdProvider databaseIdProvider = new VendorDatabaseIdProvider();
        Properties properties = new Properties();
        properties.setProperty("Oracle", "oracle");
        properties.setProperty("MySQL", "mysql");
        properties.setProperty("DB2", "db2");
        properties.setProperty("Derby", "derby");
        properties.setProperty("H2", "h2");
        properties.setProperty("HSQL", "hsql");
        properties.setProperty("Informix", "informix");
        properties.setProperty("SQL Server", "sqlserver");
        properties.setProperty("PostgreSQL", "postgresql");
        properties.setProperty("Sybase", "sybase");
        properties.setProperty("Hana", "hana");
        databaseIdProvider.setProperties(properties);
        return databaseIdProvider;
    }
}
修改语句
方式1:对select,insert,delete,update,selectKey,sql标签,设置databaseId属性。MyBatis会根据数据库执行对应的语句
<select id="selectTestIf" databaseId="mysql">
    ....
</select>
<select id="selectTestIf" databaseId="sqlserver">
    ....
</select>
方式2:使用_databaseId参数。为了避免大量重复的SQL,可以使用_databaseId参数进行对不同的部分进行判断。
<select id="selectTestIf" parameterType="com.LTSolution.ShopApp.Model.Product"
    resultMap="BaseResultMap">
    select * from Product
    <where>
        <if test="name != null and name != ''">
            <if test="_databaseId == 'mysql'">
                and Name like concat('%'+#{name}+'%')
            </if>
            <if test="_databaseId == 'sqlserver'">
                and Name like '%'+#{name}+'%'
            </if>
        </if>
    </where>
    order by code
</select>
4.7、OGNL用法
在MyBatis的动态SQL和${}形式的参数中都用到了OGNL表达式。MyBatis常用的OGNL表达式如下:
1.e1 or e2
2.e1 and e2
3.e1==e2或e1 eq e2
4.e1 !=e2或e1 neq e2
5.e1 lt e2:小于
6.e1 lte e2:小于等于,其他表示为gt(大于)、gte(大于等于)
7.e1+e2、e1*e2、e1/e2、e1-e2、e1%e2
8.!e或not e:非,取反
9.e.method( args ):=调用对象方法
10.e.property:对象属性值
11.e1[e2]:按索引取值( List、数组和Map)
12.@class@method(args):调用类的静态方法
13.@class@field:调用类的静态字段值
五、Mybatis插件开发——拦截器(未整理)
MyBatis允许在已映射语句执行过程中的某一点进行拦截调用。默认情况下,MyBatis可以拦截一下4个接口中的几个方法(括号内为该接口的方法名)。
- Executor(update、query、flushStatements、commit、rollback、getTransaction、close、isClosed)
- ParameterHandler(getParameterObject、setParameters)
- ResultSetHandler(handleResultSets、handleCursorResultSets、handleOutputParameters)
- StatementHandler(prepare、parameterize、batch、update、query)
这些都是比较底层的类和方法,修改得不好,可能会影响代码执行。所以拦截调用前一定要充分理解。
5.1、拦截器接口
MyBatis插件通过实现拦截器接口Interceptor(org.apache.ibatis.plugin.Interceptor),即可在实现类中对拦截对象和方法进行处理。
拦截器接口Interceptor:
public interface Interceptor {
  Object intercept(Invocation invocation) throws Throwable;
  Object plugin(Object target);
  void setProperties(Properties properties);
}
1、setProperties
2、plugin
3、intercept
5.2、拦截器签名
通过拦截器注解,来表明这个拦截器需要拦截的接口和方法
@Intercepts(org.apache.ibatis.plugin.Intercepts)和@Signature(org.apache.ibatis.plugin.Signature)
@Intercepts注解中的属性是一个@Signature(签名)数组,可以在同一个拦截器中同时拦截不同的接口和方法。
@Signature注解包含以下三个属性。
type:设置拦截的接口,可选值是前面提到的4个接口。
method:设置拦截接口中的方法名,可选值是前面4个接口对应的方法,需要和接口匹配。
args:设置拦截方法的参数类型数组,通过方法名和参数类型可以确定唯一一个方法。
0、签名的写法
type:接口类
method:方法名称
args:要拦截的方法的参数类
下面例子为Executor的update方法的签名写法
@Intercepts(
        @org.apache.ibatis.plugin.Signature(
                type = Executor.class,
                method = "update",
                args = { MappedStatement.class,Object.class }))
public class ResultSetInterceptor implements Interceptor {
1、Executor接口
int update(MappedStatement ms,Object parameter) throws SQLException
该方法会在所有的 INSERT 、 UPDATE 、 DELETE 执行时被调用,因此如果想要拦截这 3 类操作,可以拦截该方法
<E>List<E>query(MappedStatementms,Objectparameter,RowBoundsrowBounds,ResultHandlerresultHandler)throwsSQLException
该方法会在所有SELECT查询方法执行时被调用。通过这个接口参数可以获取很多有用的信息,因此这是最常被拦截的一个方法。使用该方法需要注意的是,虽然接口中还有一个参数更多的同名接口,但由于MyBatis的设计原因,这个参数多的接口不能被拦截
<E> Cursor <E> queryCursor(MappedStatement ms,Object parameter,RowBounds rowBounds) throws SQLException
该方法只有在查询的返回值类型为 Cursor 时被调用。
List <BatchResult > flushStatements() throws SQLException
该方法只在通过 SqlSession 方法调用 flushStatements 方法或执行的接口方法中带有 @Flush 注解时才被调用,
void commit(boolean required) throws SQLException
该方法只在通过 SqlSession 方法调用 commit 方法时才被调用,
void rollback(boolean required) throws SQLException
该方法只在通过 SqlSession 方法调用 rollback 方法时才被调用,
Transaction getTransaction()
该方法只在通过 SqlSession 方法获取数据库连接时才被调用,
void close(boolean forceRollback)
该方法只在延迟加载获取新的 Executor 后才会被执行,
boolean isClosed()
该方法只在延迟加载执行查询方法前被执行,
2、ParameterHandler 接口
Object getParameterObject()
该方法只在执行存储过程处理出参的时候被调用。
void setParameters(PreparedStatement ps) throws SQLException
该方法在所有数据库方法设置 SQL 参数时被调用。
3、ResultSetHandler接口
<E> List <E> handleResultSets(Statement stmt) throws SQLException
该方法会在除存储过程及返回值类型为Cursor<T>(org.apache.ibatis.cursor.Cursor<T>)以外的查询方法中被调用。
<E> Cursor <E> handleCursorResultSets(Statement stmt) throws SQLException;
该方法是 3.4.0 版本中新增加的,只会在返回值类型为 Cursor <T>的查询方法中被调用
void handleOutputParameters(CallableStatement cs) throws SQLException;
该方法只在使用存储过程处理出参时被调用,ResultSetHandler接口的第一个方法对于拦截处理MyBatis的查询结果非常有用,并且由于这个接口被调用的位置在处理二级缓存之前,因此通过这种方式处理的结果可以执行二级缓存。
4、StatementHandler接口
Statement prepare(Connection connection,Integer transactionTimeout) throws SQLException
该方法会在数据库执行前被调用,优先于当前接口中的其他方法而被执行
void parameterize(Statement statement) throws SQLException
该方法在prepare方法之后执行,用于处理参数信息
int batch(Statement statement) throws SQLException
在全局设置配置defaultExecutorType="BATCH"时,执行数据操作才会调用该方法
<E> List <E> query(Statement statement,ResultHandler resultHandler) throws SQLException
执行SELECT方法时调用
<E> Cursor <E> queryCursor(Statement statement) throws SQLException
该方法是 3.4.0 版本中新增加的,只会在返回值类型为Cursor<T>的查询中被调用
5.3、补充,Spring Boot下使用拦截器
Spring Boot下需要加入依赖
<plugin>
    <artifactId>maven-compiler-plugin</artifactId>
    <configuration>
        <source>${java.version}</source>
        <target>${java.version}</target>
    </configuration>
</plugin>
实例
1、基于Eclipse+Maven+SqlSession的实例
此用法比较底层,建议使用基于接口的用法。
本例子用Eclipse+Maven来创建这个实例,请先掌握Maven的相关知识
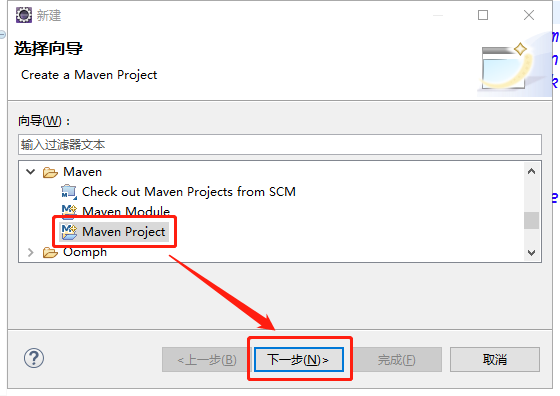
2.1、打开Eclipse,[File]->[New]->[Other],选择Maven Project,然后下一步
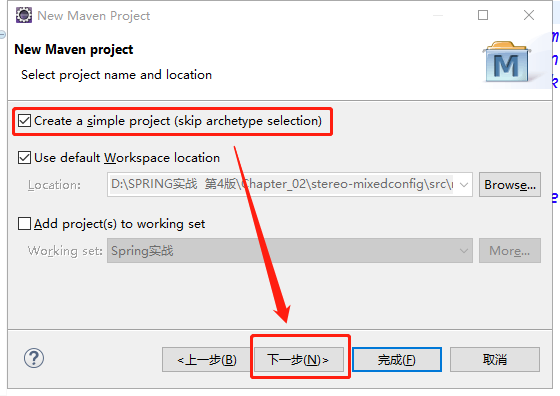
2、勾上简单项目选项,然后下一步
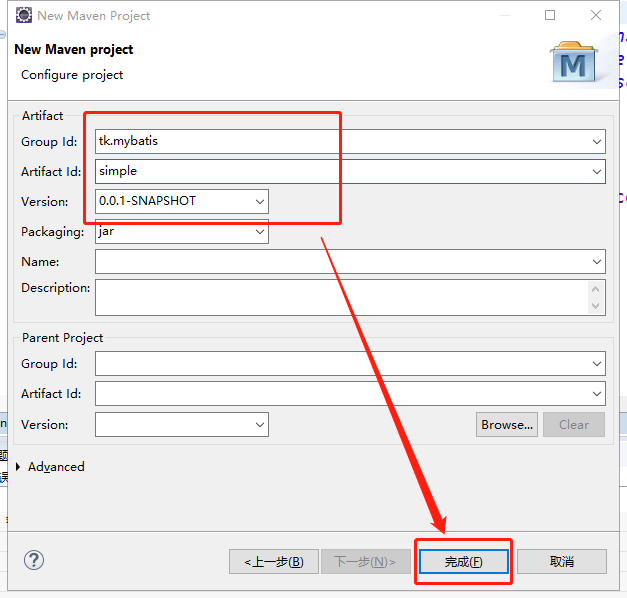
3、填入相关信息,然后点击完成
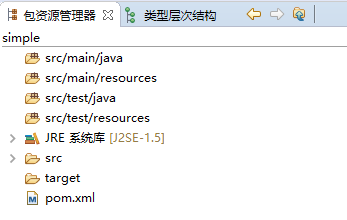
4、得到的项目结构如下
5、修改pom文件
<project xmlns="http://maven.apache.org/POM/4.0.0" xmlns:xsi="http://www.w3.org/2001/XMLSchema-instance"
    xsi:schemaLocation="http://maven.apache.org/POM/4.0.0 http://maven.apache.org/xsd/maven-4.0.0.xsd">
    <modelVersion>4.0.0</modelVersion>
    <groupId>tk.mybatis</groupId>
    <artifactId>simple</artifactId>
    <version>0.0.1-SNAPSHOT</version>

    <properties>
        <java.version>1.6</java.version>
        <project.build.sourceEncoding>UTF-8</project.build.sourceEncoding>
    </properties>

    <dependencies>
        <dependency>
            <groupId>junit</groupId>
            <artifactId>junit</artifactId>
            <version>4.12</version>
            <scope>test</scope>
        </dependency>
        <dependency>
            <groupId>org.mybatis</groupId>
            <artifactId>mybatis</artifactId>
            <version>3.3.0</version>
        </dependency>
        <dependency>
            <groupId>mysql</groupId>
            <artifactId>mysql-connector-java</artifactId>
            <version>5.1.38</version>
        </dependency>
        <dependency>
            <groupId>org.slf4j</groupId>
            <artifactId>slf4j-api</artifactId>
            <version>1.7.12</version>
        </dependency>
        <dependency>
            <groupId>org.slf4j</groupId>
            <artifactId>slf4j-log4j12</artifactId>
            <version>1.7.12</version>
        </dependency>
        <dependency>
            <groupId>log4j</groupId>
            <artifactId>log4j</artifactId>
            <version>1.2.17</version>
        </dependency>
    </dependencies>

    <build>
        <plugins>
            <plugin>
                <artifactId>maven-compiler-plugin</artifactId>
                <configuration>
                    <source>${java.version}</source>
                    <target>${java.version}</target>
                </configuration>
            </plugin>
        </plugins>
    </build>
</project>
6、准备数据库数据
CREATE DATABASE mybatis DEFAULT CHARACTER SET utf8 COLLATE utf8_general_ci;
DROP TABLE IF EXISTS `country`;
CREATE TABLE `country` (
  `id` int(11) NOT NULL AUTO_INCREMENT,
  `countryname` varchar(255) DEFAULT NULL,
  `countrycode` varchar(255) DEFAULT NULL,
  PRIMARY KEY (`id`)
) ENGINE=InnoDB AUTO_INCREMENT=6 DEFAULT CHARSET=utf8;
INSERT INTO `country` VALUES ('1', '中国', 'CN');
INSERT INTO `country` VALUES ('2', '美国', 'US');
INSERT INTO `country` VALUES ('3', '俄罗斯', 'RU');
INSERT INTO `country` VALUES ('4', '英国', 'GB');
INSERT INTO `country` VALUES ('5', '法国', 'FR');
7、使用XML配置MyBatis
src/main/resources下创建mybatis-config.xml,注意修改MySql的ip地址和帐号密码
<?xml version="1.0" encoding="UTF-8" ?>
<!DOCTYPE configuration
        PUBLIC "-//mybatis.org//DTD Config 3.0//EN"
        "http://mybatis.org/dtd/mybatis-3-config.dtd">
<configuration>
    <settings>
        <setting name="logImpl" value="LOG4J"/>
    </settings>

     <typeAliases>
        <package name="tk.mybatis.simple.model"/>
    </typeAliases>

    <environments default="development">
        <environment id="development">
            <transactionManager type="JDBC">
                <property name="" value=""/>
            </transactionManager>
            <dataSource type="UNPOOLED">
                <property name="driver" value="com.mysql.jdbc.Driver"/>
                <property name="url" value="jdbc:mysql://192.168.16.137:3306/mybatis"/>
                <property name="username" value="root"/>
                <property name="password" value=""/>
            </dataSource>
        </environment>
    </environments>

    <mappers>
        <mapper resource="tk/mybatis/simple/mapper/CountryMapper.xml"/>
    </mappers>
</configuration>
<settings> 中的 logImpl 属性配置指定使用 LOG4J 输出日志
<typeAliases> 元素下面配置了一个包的别名,通常确定一个类的时候需要使用类的全限定名称,例如 tk.mybatis.simple.model.Country 。在 MyBatis 中需要频繁用到类的全限定名称,为了方便使
用,我们配置了 tk.mybatis.simple.model 包,这样配置后,在使用类的时候不需要写包名的部分,只使用 Country 即可。
<environments> 环境配置中主要配置了数据库连接,数据库的 url 为 jdbc:mysql://localhost:3306/mybatis ,使用的是本机 MySQL 中的 mybatis 数据库,后面的 username 和 password 分别是数据库
的用户名和密码(如果你的数据库用户名及密码和这里的不一样,请修改为自己数据库可用的用户名和密码)
<mappers> 中配置了一个包含完整类路径的 CountryMapper.xml ,这是一个 MyBatis 的 SQL 语句和映射配置文件
8、创建实体类
在src/main/java下创建包tk.mybatis.simple.model
然后创建一个类
package tk.mybatis.simple.model;

public class Country {
    private Long id;
    private String countryname;
    private String countrycode;

    public Long getId() {
        return id;
    }

    public void setId(Long id) {
        this.id = id;
    }

    public String getCountryname() {
        return countryname;
    }

    public void setCountryname(String countryname) {
        this.countryname = countryname;
    }

    public String getCountrycode() {
        return countrycode;
    }

    public void setCountrycode(String countrycode) {
        this.countrycode = countrycode;
    }

}
9、添加Mapper文件
在src/main/resources下面创建tk/mybatis/simple/mapper目录,再在该目录下面创建CountryMapper.xml文件
<?xml version="1.0" encoding="UTF-8" ?>
<!DOCTYPE mapper PUBLIC "-//mybatis.org//DTD Mapper 3.0//EN"
                    "http://mybatis.org/dtd/mybatis-3-mapper.dtd" >
<mapper namespace="tk.mybatis.simple.mapper.CountryMapper">
    <select id="selectAll" resultType="Country">
        select id,countryname,countrycode from country
    </select>
</mapper>
SQL 定义在 CountryMapper.xml 文件中,里面的配置作用如下。
<mapper>: XML 的根元素,属性 namespace 定义了当前 XML 的命名空间。
<select>元素:我们所定义的一个 SELECT 查询。
id 属性:定义了当前 SELECT 查询的唯一一个 id 。
resultType :定义了当前查询的返回值类型,此处就是指实体类 Country ,前面配置中提到的别名主要用于这里,如果没有设置别名,此处就需要写成 resultType= " tk.mybatis.simple.model.Country
"。
· select id , ... :查询 SQL 语句。
10、配置log4j
在src/main/resources中添加log4j.properties配置文件
#u5168u5C40u914Du7F6E
log4j.rootLogger=ERROR, stdout

#MyBatis u65E5u5FD7u914Du7F6E
log4j.logger.tk.mybatis.simple.mapper=TRACE

#u63A7u5236u53F0u8F93u51FAu914Du7F6E
log4j.appender.stdout=org.apache.log4j.ConsoleAppender
log4j.appender.stdout.layout=org.apache.log4j.PatternLayout
log4j.appender.stdout.layout.ConversionPattern=%5p [%t] - %m%n
日志注意事项!
用过 Log4j 日志组件的人可能都会知道,配置中的 log4j.logger.tk.mybatis.simple.mapper 对应的是 tk.mybatis.simple.mapper 包,但是在这个例子中, Java 目录下并没有这个包名,只在资源目录下有
mapper 目录。
在 MyBatis 的日志实现中,所谓的包名实际上是 XML 配置中的 namespace 属性值的一部分。后面章节中介绍结合接口使用的相关内容时,由于 namespace 属性值必须和接口全限定类名相同,因此
才会真正对应到 Java 中的包。当使用纯注解方式时,使用的就是纯粹的包名。
MyBatis 日志的最低级别是 TRACE ,在这个日志级别下, MyBatis 会输出执行 SQL 过程中的详细信息,这个级别特别适合在开发时使用。
11、编写测试代码
首先在 src/test/java 中创建 tk.mybatis.simple.mapper 包,然后创建 CountryMapperTest 测试类
package tk.mybatis.simple.mapper;

import java.io.IOException;
import java.io.Reader;
import java.util.List;

import org.apache.ibatis.io.Resources;
import org.apache.ibatis.session.SqlSession;
import org.apache.ibatis.session.SqlSessionFactory;
import org.apache.ibatis.session.SqlSessionFactoryBuilder;
import org.junit.BeforeClass;
import org.junit.Test;

import tk.mybatis.simple.model.Country;

public class CountryMapperTest {

    private static SqlSessionFactory sqlSessionFactory;

    @BeforeClass
    public static void init(){
        try {
            Reader reader = Resources.getResourceAsReader("mybatis-config.xml");
            sqlSessionFactory = new SqlSessionFactoryBuilder().build(reader);
            reader.close();
        } catch (IOException ignore) {
            ignore.printStackTrace();
        }
    }

    @Test
    public void testSelectAll(){
        SqlSession sqlSession = sqlSessionFactory.openSession();
        try {
            List<Country> countryList = sqlSession.selectList("selectAll");
            printCountryList(countryList);
        } finally {
            sqlSession.close();
        }
    }

    private void printCountryList(List<Country> countryList){
        for(Country country : countryList){
            System.out.printf("%-4d%4s%4s
",country.getId(), country.getCountryname(), country.getCountrycode());
        }
    }
}
对上面这段代码做一个简单的说明,具体如下。
· 通过 Resources 工具类将 mybatis-config.xml 配置文件读入 Reader 。
· 再通过 SqlSessionFactoryBuilder 建造类使用 Reader 创建 SqlSessionFactory 工厂对象。在创建 SqlSessionFactory 对象的过程中,首先解析 mybatis-config.xml 配置文件,读取配置文件中的 mappers 配置后会
读取全部的 Mapper.xml 进行具体方法的解析,在这些解析完成后, SqlSessionFactory 就包含了所有的属性配置和执行 SQL 的信息。
· 使用时通过 SqlSessionFactory 工厂对象获取一个 SqlSession 。
· 通过 SqlSession 的 selectList 方法查找到 CountryMapper.xml 中 id= " selectAll "的方法,执行 SQL 查询。
· MyBatis 底层使用 JDBC 执行 SQL ,获得查询结果集 ResultSet 后,根据 resultType 的配置将结果映射为 Country 类型的集合,返回查询结果。
· 这样就得到了最后的查询结果 countryList ,简单将结果输出到控制台。
· 最后一定不要忘记关闭 SqlSession ,否则会因为连接没有关闭导致数据库连接数过多,造成系统崩溃。
12、测试
在testSelectAll方法上,右键,[Run as]->[JUnit],即可看到输出结果
DEBUG [main] - ==>  Preparing: select id,countryname,countrycode from country
DEBUG [main] - ==> Parameters:
TRACE [main] - <==    Columns: id, countryname, countrycode
TRACE [main] - <==        Row: 1, 中国, CN
TRACE [main] - <==        Row: 2, 美国, US
TRACE [main] - <==        Row: 3, 俄罗斯, RU
TRACE [main] - <==        Row: 4, 英国, GB
TRACE [main] - <==        Row: 5, 法国, FR
DEBUG [main] - <==      Total: 5
1     中国  CN
2     美国  US
3    俄罗斯  RU
4     英国  GB
5     法国  FR
至此,例子完成
2、基于Spring Boot+Maven+接口+代码生成器的实例
3、配置MyBatis
MyBatis的配置方式有以下几种:1、使用XML文件配置;2、使用Spring Bean配置;3、使用Java编码方式配置
这里仅介绍最常用的XML文件配置方式
1、在src/main/resources下创建mybatis-config.xml
2、该XML文件的一般格式
<?xml version="1.0" encoding="UTF-8" ?>
<!DOCTYPE configuration
        PUBLIC "-//mybatis.org//DTD Config 3.0//EN"
        "http://mybatis.org/dtd/mybatis-3-config.dtd">
<configuration>

    <settings>
        <!-- 当查询结果字段未null时,是否调用该字段的setter方法 -->
        <setting name="callSettersOnNulls" value="true" />
    </settings>

    <!--为类型创建别名 -->
    <typeAliases>
        <typeAlias alias="Integer" type="java.lang.Integer" />
        <typeAlias alias="Long" type="java.lang.Long" />
        <typeAlias alias="HashMap" type="java.util.HashMap" />
        <typeAlias alias="LinkedHashMap" type="java.util.LinkedHashMap" />
        <typeAlias alias="ArrayList" type="java.util.ArrayList" />
        <typeAlias alias="LinkedList" type="java.util.LinkedList" />
    </typeAliases>


    <!--插件 -->
    <plugins>
        <!-- PageHelper4.1.1 -->
        <!--<plugin interceptor="com.github.pagehelper.PageHelper"> </plugin> -->
        <plugin interceptor="com.github.pagehelper.PageInterceptor">
            <!-- 这里可以对pagehelper进行配置,分别输入参数名和参数的值,可以查看相关文档-->
            <property name="param1" value="value1" />
        </plugin>
    </plugins>
</configuration>
更详尽的配置可以查看:http://www.mybatis.org/mybatis-3/zh/configuration.html
1、动态传入Top参数时,报错
需要用括号把top后面的动态参数括起来
select top (#{pageSize}) from ...
4、【MyBatis】使用Eclipse插件的方式运行代码生成器MBG(MyBatis Generator)
一、MyBatis Generator运行方式
MyBatis Generator有以下几种运行方式:
a、Java代码
b、命令提示行
c、Maven插件
d、Eclipse插件
其中只有Eclipse插件支持代码合并,可以生成新代码的同时保留自己添加的代码。
二、Eclipse插件使用步骤
a、安装
下载插件: https:/github.com/mybatis/generator/releases
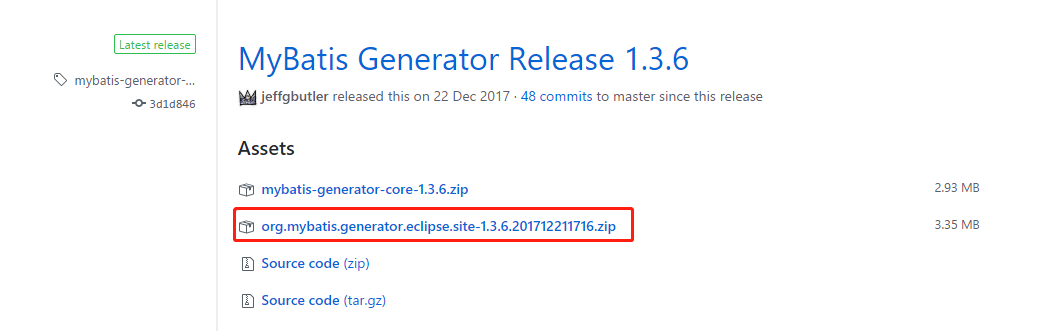
b、Eclipse中安装插件
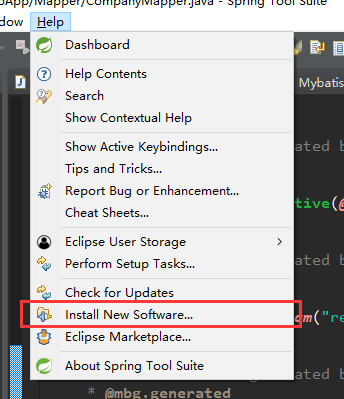
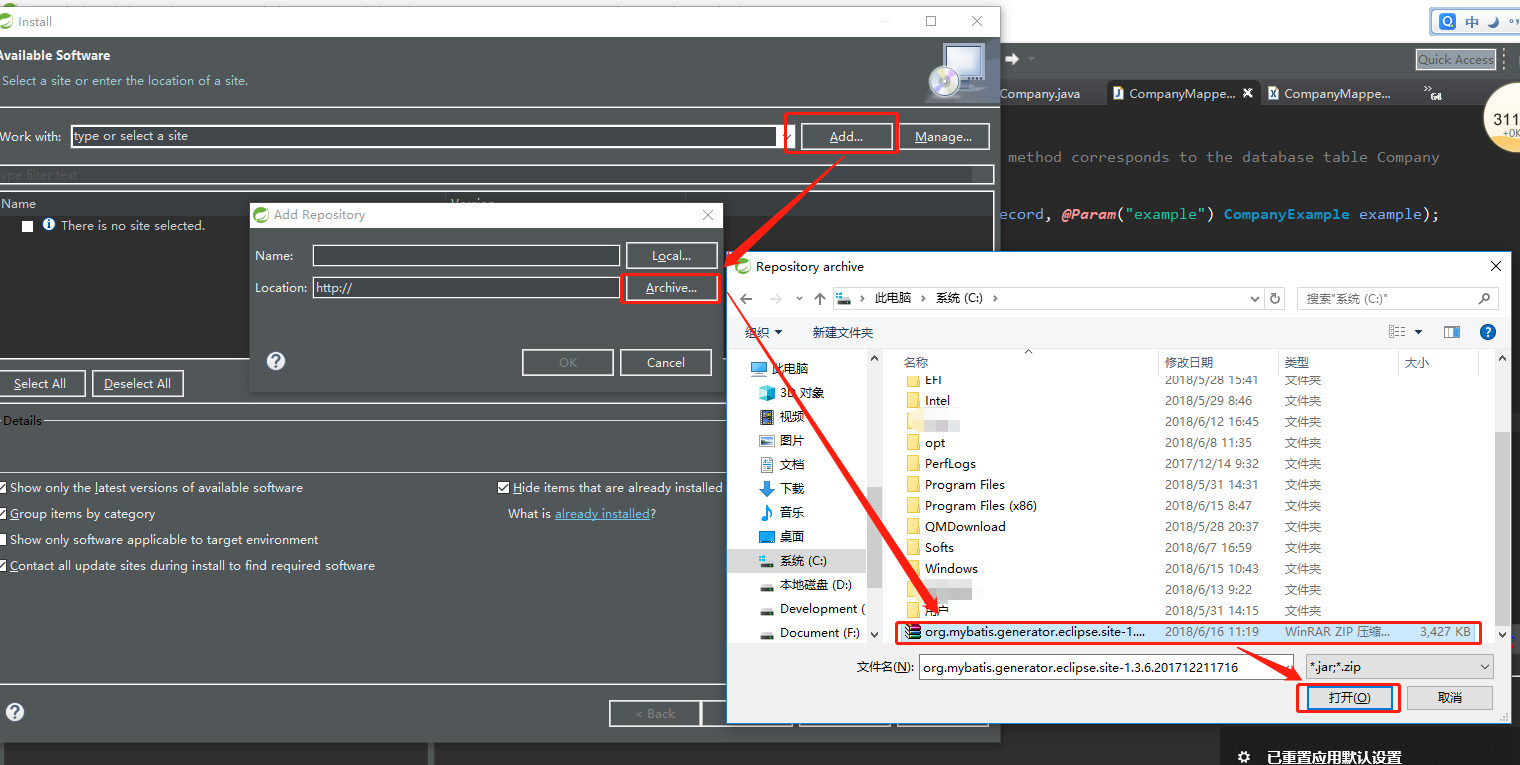
选择下载的压缩包,然后一直下一步到完成,然后重启Eclipse,即完成了安装。
三、使用MBG插件
添加配置文件
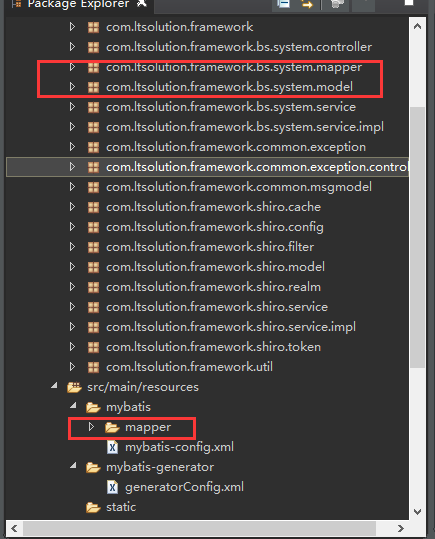
src/main/resources下添加一个文件夹mybatis-generator,添加一个配置文件generatorConfig.xml
<?xml version="1.0" encoding="UTF-8"?>
<!DOCTYPE generatorConfiguration
        PUBLIC "-//mybatis.org//DTD MyBatis Generator Configuration 1.0//EN"
        "http://mybatis.org/dtd/mybatis-generator-config_1_0.dtd">


<generatorConfiguration>
    <classPathEntry location="C:SoftsmavenRepositorycommicrosoftsqlserversqljdbc44.0sqljdbc4-4.0.jar"/>

    <context id="SqlServerContext" targetRuntime="MyBatis3" defaultModelType="flat">
        <property name="javaFileEncoding" value="UTF-8" />
        <property name="autoDelimitKeywords" value="true" />
        <property name="beginningDelimiter " value="[" />
        <property name="endingDelimiter " value="]" />

        <commentGenerator>
            <property name="suppressDate" value="true"/>
            <property name="addRemarkComments" value="true"/>
        </commentGenerator>

        <jdbcConnection driverClass="com.microsoft.sqlserver.jdbc.SQLServerDriver"
                        connectionURL="jdbc:sqlserver://127.0.0.1;database=db"
                        userId="sa"
                        password="psw">
        </jdbcConnection>

        <javaModelGenerator targetPackage="com.ltsolution.framework.bs.system.model" targetProject="frameworksrcmainjava">
            <property name="trimStrings" value="true" />
        </javaModelGenerator>

        <sqlMapGenerator targetPackage="mybatis.mapper"  targetProject="frameworksrcmain
esources"/>

        <javaClientGenerator type="XMLMAPPER" targetPackage="com.ltsolution.framework.bs.system.mapper"  targetProject="frameworksrcmainjava"/>

        <table tableName="Company">
            <generatedKey column="RowId" sqlStatement="SQLServer" identity="true"/>
        </table>
        <table tableName="Customer">
            <generatedKey column="RowId" sqlStatement="JDBC" identity="true"/>
            <columnOverride column="RowId" isGeneratedAlways="true"></columnOverride>
        </table>
        <table tableName="CustomerType">
            <generatedKey column="RowId" sqlStatement="JDBC" identity="true"/>
            <columnOverride column="RowId" isGeneratedAlways="true"></columnOverride>
        </table>
        <table tableName="Product">
            <generatedKey column="RowId" sqlStatement="JDBC" identity="true"/>
            <columnOverride column="RowId" isGeneratedAlways="true"></columnOverride>
        </table>
        <table tableName="ProductType">
            <generatedKey column="RowId" sqlStatement="JDBC" identity="true"/>
            <columnOverride column="RowId" isGeneratedAlways="true"></columnOverride>
        </table>
        <table tableName="SaleShipmentDetail">
            <generatedKey column="RowId" sqlStatement="SQLServer" identity="true"/>
        </table>
        <table tableName="SaleShipmentHead">
            <generatedKey column="RowId" sqlStatement="SQLServer" identity="true"/>
            <ignoreColumn column="RowId" />
        </table>
        <table tableName="Storage">
            <generatedKey column="RowId" sqlStatement="SQLServer" identity="true"/>
        </table>
        <table tableName="HeadNoPrefix">
            <generatedKey column="RowId" sqlStatement="SQLServer" identity="true"/>
            <ignoreColumn column="RowId" />
        </table>
        <table tableName="StorageQuantity">
            <generatedKey column="RowId" sqlStatement="SQLServer" identity="true"/>
            <ignoreColumn column="RowId" />
        </table>
    </context>
</generatorConfiguration>
主要修改几个地方
classPathEntry:设置数据库驱动的jar包位置
context-jdbcConnection:设置数据库信息
context-javaModelGenerator:设置model的生成位置
context-sqlMapGenerator:设置mapper.xml文件的生成位置
context-javaClientGenerator:设置mapper接口的生成位置
关于在SQL中使用的几个注意点,可以查看https://www.cnblogs.com/LiveYourLife/p/9000874.html这篇文章
其它的自行查阅详细资料
启动生成
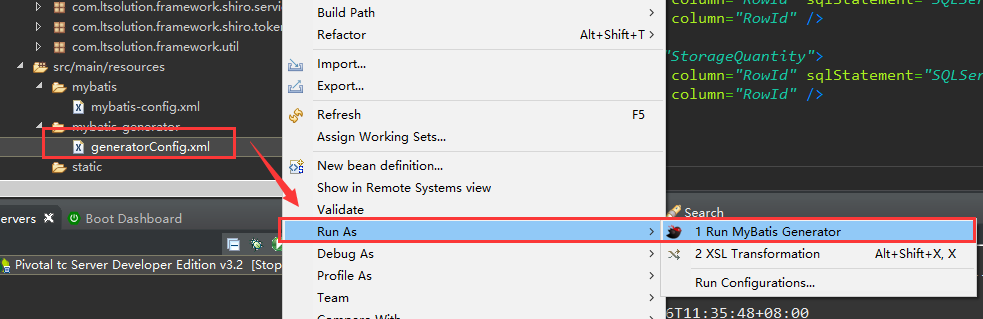
即可看到生成的结果
5、使用MyBatis的分页组件PageHelper时,多表关联下使用别名查询时,前台传参过来,根据参数排序的解决方案
场景:
使用SQLServer数据库
有2个表Customer、CustomerType,都有字段TypeId
后台SQL:select A.Name ,A.TypeId AS CTypeId, B.TypeName FROM Customer A LEFT JOIN CustomerType B ON A.TypeId = B.TypeId
传给前台的字段是:Name,CTypeId,TypeName
前台要求查询条件:要求按CTypeId字段排序,并且分页查询1~3条记录
有2个解决方式:
a、【此方法效率可能较低】使用子查询,先把整个表查出来,然后按照TypeName排序并分页(PageHelper的5.1.3版本是这样实现的)
生成sql如下,一个由3个查询组成
SELECT TOP 3 Name,CTypeId,TypeName FROM (
    SELECT ROW_NUMBER() OVER (ORDER BY CTypeId DESC)
    PAGE_ROW_NUMBER, Name, CTypeId, TypeName FROM (
        SELECT A.Name, A.TypeId AS CTypeId ,B.TypeName
        FROM Customer A LEFT JOIN CustomerType B ON A.TypeId = B.TypeId
    ) AS PAGE_TABLE_ALIAS
) AS PAGE_TABLE_ALIAS
WHERE PAGE_ROW_NUMBER > 0 ORDER BY PAGE_ROW_NUMBER
b、【我的解决方案】将前台传过来的字段,解析成对应字段(上面例子中,将TypeName解析成A.name),插入到语句中,即可得到分页结果
对应的sql,节省了一个查询
SELECT TOP 3 Name,CTypeId,TypeName FROM (
    SELECT ROW_NUMBER() OVER (ORDER BY A.TypeId DESC) PAGE_ROW_NUMBER,
    A.Name, A.TypeId AS CTypeId ,B.TypeName FROM
    Customer A LEFT JOIN CustomerType B ON A.TypeId = B.TypeId
) AS PAGE_TABLE_ALIAS
WHERE PAGE_ROW_NUMBER > 0 ORDER BY PAGE_ROW_NUMBER
实现:
1、使用5.1.3版本的源码
2、修改SqlServer对应的解析器
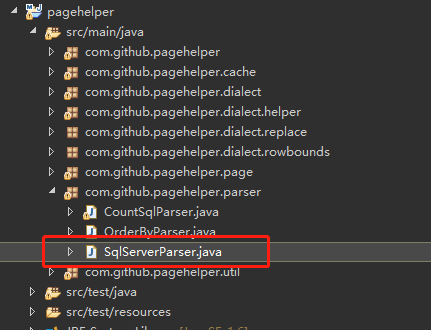
这个解析器我是从旧的版本(不记得是不是4.1.7)基础上修改的,那个版本还未支持上面第一种方式的排序分页,所以当时是不能排序并分页的
主要修改了addRowNumber方法,整个文件代码如下
/*
 * The MIT License (MIT)
 *
 * Copyright (c) 2014 abel533@gmail.com
 *
 * Permission is hereby granted, free of charge, to any person obtaining a copy
 * of this software and associated documentation files (the "Software"), to deal
 * in the Software without restriction, including without limitation the rights
 * to use, copy, modify, merge, publish, distribute, sublicense, and/or sell
 * copies of the Software, and to permit persons to whom the Software is
 * furnished to do so, subject to the following conditions:
 *
 * The above copyright notice and this permission notice shall be included in
 * all copies or substantial portions of the Software.
 *
 * THE SOFTWARE IS PROVIDED "AS IS", WITHOUT WARRANTY OF ANY KIND, EXPRESS OR
 * IMPLIED, INCLUDING BUT NOT LIMITED TO THE WARRANTIES OF MERCHANTABILITY,
 * FITNESS FOR A PARTICULAR PURPOSE AND NONINFRINGEMENT. IN NO EVENT SHALL THE
 * AUTHORS OR COPYRIGHT HOLDERS BE LIABLE FOR ANY CLAIM, DAMAGES OR OTHER
 * LIABILITY, WHETHER IN AN ACTION OF CONTRACT, TORT OR OTHERWISE, ARISING FROM,
 * OUT OF OR IN CONNECTION WITH THE SOFTWARE OR THE USE OR OTHER DEALINGS IN
 * THE SOFTWARE.
 */

package com.github.pagehelper.parser;

import java.util.ArrayList;
import java.util.List;
import java.util.Map;
import java.util.concurrent.ConcurrentHashMap;

import com.github.pagehelper.PageException;

import net.sf.jsqlparser.expression.Alias;
import net.sf.jsqlparser.expression.LongValue;
import net.sf.jsqlparser.expression.operators.relational.GreaterThan;
import net.sf.jsqlparser.parser.CCJSqlParserUtil;
import net.sf.jsqlparser.schema.Column;
import net.sf.jsqlparser.statement.Statement;
import net.sf.jsqlparser.statement.select.AllColumns;
import net.sf.jsqlparser.statement.select.AllTableColumns;
import net.sf.jsqlparser.statement.select.FromItem;
import net.sf.jsqlparser.statement.select.Join;
import net.sf.jsqlparser.statement.select.LateralSubSelect;
import net.sf.jsqlparser.statement.select.OrderByElement;
import net.sf.jsqlparser.statement.select.PlainSelect;
import net.sf.jsqlparser.statement.select.Select;
import net.sf.jsqlparser.statement.select.SelectBody;
import net.sf.jsqlparser.statement.select.SelectExpressionItem;
import net.sf.jsqlparser.statement.select.SelectItem;
import net.sf.jsqlparser.statement.select.SetOperationList;
import net.sf.jsqlparser.statement.select.SubJoin;
import net.sf.jsqlparser.statement.select.SubSelect;
import net.sf.jsqlparser.statement.select.Top;
import net.sf.jsqlparser.statement.select.ValuesList;
import net.sf.jsqlparser.statement.select.WithItem;

/**
 * 将sqlserver查询语句转换为分页语句<br>
 * 注意事项:<br>
 * <ol>
 * <li>请先保证你的SQL可以执行</li>
 * <li>sql中最好直接包含order by,可以自动从sql提取</li>
 * <li>如果没有order by,可以通过入参提供,但是需要自己保证正确</li>
 * <li>如果sql有order by,可以通过orderby参数覆盖sql中的order by</li>
 * <li>order by的列名不能使用别名</li>
 * <li>表和列使用别名的时候不要使用单引号(')</li>
 * </ol>
 * 该类设计为一个独立的工具类,依赖jsqlparser,可以独立使用
 *
 * @author liuzh
 */
public class SqlServerParser {
    // 缓存结果
    protected static final Map<String, String> CACHE = new ConcurrentHashMap<String, String>();
    // 开始行号
    protected static final String START_ROW = String.valueOf(Long.MIN_VALUE);
    // 结束行号
    protected static final String PAGE_SIZE = String.valueOf(Long.MAX_VALUE);
    // 外层包装表
    protected static final String WRAP_TABLE = "WRAP_OUTER_TABLE";
    // 表别名名字
    protected static final String PAGE_TABLE_NAME = "PAGE_TABLE_ALIAS";
    // protected
    public static final Alias PAGE_TABLE_ALIAS = new Alias(PAGE_TABLE_NAME);
    // 行号
    protected static final String PAGE_ROW_NUMBER = "PAGE_ROW_NUMBER";
    // 行号列
    protected static final Column PAGE_ROW_NUMBER_COLUMN = new Column(PAGE_ROW_NUMBER);
    // TOP 100 PERCENT
    protected static final Top TOP100_PERCENT;

    // 静态方法处理
    static {
        TOP100_PERCENT = new Top();
        TOP100_PERCENT.setExpression(new LongValue(100));
        TOP100_PERCENT.setPercentage(true);
    }

    /**
     * 转换为分页语句
     *
     * @param sql
     * @param offset
     * @param limit
     * @return
     */
    public String convertToPageSql(String sql, int offset, int limit) {
        String pageSql = CACHE.get(sql);
        if (pageSql == null) {
            // 解析SQL
            Statement stmt;
            try {
                stmt = CCJSqlParserUtil.parse(sql);
            } catch (Throwable e) {
                throw new RuntimeException("不支持该SQL转换为分页查询!");
            }
            if (!(stmt instanceof Select)) {
                throw new RuntimeException("分页语句必须是Select查询!");
            }
            // 获取分页查询的select
            Select pageSelect = getPageSelect((Select) stmt);
            pageSql = pageSelect.toString();
            CACHE.put(sql, pageSql);
        }
        pageSql = pageSql.replace(START_ROW, String.valueOf(offset));
        pageSql = pageSql.replace(PAGE_SIZE, String.valueOf(limit));
        return pageSql;
    }

    /**
     * 获取一个外层包装的TOP查询
     *
     * @param select
     * @return
     */
    protected Select getPageSelect(Select select) {
        SelectBody selectBody = select.getSelectBody();
        if (selectBody instanceof SetOperationList) {
            selectBody = wrapSetOperationList((SetOperationList) selectBody);
        }
        // 这里的selectBody一定是PlainSelect
        if (((PlainSelect) selectBody).getTop() != null) {
            throw new RuntimeException("被分页的语句已经包含了Top,不能再通过分页插件进行分页查询!");
        }
        // 获取查询列
        List<SelectItem> selectItems = getSelectItems((PlainSelect) selectBody);
        // 对一层的SQL增加ROW_NUMBER()
        addRowNumber((PlainSelect) selectBody);
        // 处理子语句中的order by
        processSelectBody(selectBody, 0);

        // 新建一个select
        Select newSelect = new Select();
        PlainSelect newSelectBody = new PlainSelect();
        // 设置top
        Top top = new Top();
        top.setExpression(new LongValue(Long.MAX_VALUE));
        newSelectBody.setTop(top);
        // 设置order by
        List<OrderByElement> orderByElements = new ArrayList<OrderByElement>();
        OrderByElement orderByElement = new OrderByElement();
        orderByElement.setExpression(PAGE_ROW_NUMBER_COLUMN);
        orderByElements.add(orderByElement);
        newSelectBody.setOrderByElements(orderByElements);
        // 设置where
        GreaterThan greaterThan = new GreaterThan();
        greaterThan.setLeftExpression(PAGE_ROW_NUMBER_COLUMN);
        greaterThan.setRightExpression(new LongValue(Long.MIN_VALUE));
        newSelectBody.setWhere(greaterThan);
        // 设置selectItems
        newSelectBody.setSelectItems(selectItems);
        // 设置fromIterm
        SubSelect fromItem = new SubSelect();
        fromItem.setSelectBody(selectBody);
        fromItem.setAlias(PAGE_TABLE_ALIAS);
        newSelectBody.setFromItem(fromItem);

        newSelect.setSelectBody(newSelectBody);
        if (isNotEmptyList(select.getWithItemsList())) {
            newSelect.setWithItemsList(select.getWithItemsList());
        }
        return newSelect;
    }

    /**
     * 包装SetOperationList
     *
     * @param setOperationList
     * @return
     */
    protected SelectBody wrapSetOperationList(SetOperationList setOperationList) {
        // 获取最后一个plainSelect
        SelectBody setSelectBody = setOperationList.getSelects().get(setOperationList.getSelects().size() - 1);
        if (!(setSelectBody instanceof PlainSelect)) {
            throw new RuntimeException("目前无法处理该SQL,您可以将该SQL发送给abel533@gmail.com协助作者解决!");
        }
        PlainSelect plainSelect = (PlainSelect) setSelectBody;
        PlainSelect selectBody = new PlainSelect();
        List<SelectItem> selectItems = getSelectItems(plainSelect);
        selectBody.setSelectItems(selectItems);

        // 设置fromIterm
        SubSelect fromItem = new SubSelect();
        fromItem.setSelectBody(setOperationList);
        fromItem.setAlias(new Alias(WRAP_TABLE));
        selectBody.setFromItem(fromItem);
        // order by
        if (isNotEmptyList(plainSelect.getOrderByElements())) {
            selectBody.setOrderByElements(plainSelect.getOrderByElements());
            plainSelect.setOrderByElements(null);
        }
        return selectBody;
    }

    /**
     * 获取查询列
     *
     * @param plainSelect
     * @return
     */
    protected List<SelectItem> getSelectItems(PlainSelect plainSelect) {
        // 设置selectItems
        List<SelectItem> selectItems = new ArrayList<SelectItem>();
        for (SelectItem selectItem : plainSelect.getSelectItems()) {
            // 别名需要特殊处理
            if (selectItem instanceof SelectExpressionItem) {
                SelectExpressionItem selectExpressionItem = (SelectExpressionItem) selectItem;
                if (selectExpressionItem.getAlias() != null) {
                    // 直接使用别名
                    Column column = new Column(selectExpressionItem.getAlias().getName());
                    SelectExpressionItem expressionItem = new SelectExpressionItem(column);
                    selectItems.add(expressionItem);
                } else if (selectExpressionItem.getExpression() instanceof Column) {
                    Column column = (Column) selectExpressionItem.getExpression();
                    SelectExpressionItem item = null;
                    if (column.getTable() != null) {
                        Column newColumn = new Column(column.getColumnName());
                        item = new SelectExpressionItem(newColumn);
                        selectItems.add(item);
                    } else {
                        selectItems.add(selectItem);
                    }
                } else {
                    selectItems.add(selectItem);
                }
            } else if (selectItem instanceof AllTableColumns) {
                selectItems.add(new AllColumns());
            } else {
                selectItems.add(selectItem);
            }
        }
        return selectItems;
    }

    /**
     * 最外层的SQL查询需要增加ROW_NUMBER()
     *
     * @param plainSelect
     */
    protected void addRowNumber(PlainSelect plainSelect) {
        // 增加ROW_NUMBER()
        StringBuilder orderByBuilder = new StringBuilder();
        orderByBuilder.append("ROW_NUMBER() OVER (");
        if (isNotEmptyList(plainSelect.getOrderByElements())) {

            // ByLouis 使用别名,自动找出哪一列,然后进行排序
            for (OrderByElement orderByElement : plainSelect.getOrderByElements()) {

                String orderName = orderByElement.getExpression().toString();

                // 如果排序列已经带.,如A.TypeId,则不用处理
                int indexOfPoint = orderName.indexOf(".");
                if (indexOfPoint >= 0)
                    break;

                // 找出排序列名
                String realFieldName = "";

                for (SelectItem selectItem : plainSelect.getSelectItems()) {
                    // 首先找到前台传过来的字段所在的列
                    // selectItem.toString()可以有4种格式
                    // 直接select字段:HelpCode
                    // 表加字段:A.HelpCode
                    // 直接select字段加别名:HelpCode as NewCode
                    // 表加字段加别名:A.HelpCode as NewCode

                    // 前台传过来的字段:有别名则是别名,列名则是列名
                    // 查找规则:最后一个空格,或最后一个.后面的数据
                    String selectName = selectItem.toString();
                    int lastIndexOfSpace = selectName.lastIndexOf(" ");
                    int lastIndexOfPoint = selectName.lastIndexOf(".");
                    int startGetIndex = 0;
                    if (lastIndexOfSpace > startGetIndex)
                        startGetIndex = lastIndexOfSpace;
                    if (lastIndexOfPoint > startGetIndex)
                        startGetIndex = lastIndexOfPoint;
                    if (startGetIndex == 0)
                        startGetIndex = 1;
                    else
                        startGetIndex++;
                    String fieldName = selectName.substring(startGetIndex);
                    System.out.println(fieldName);

                    if (fieldName.toUpperCase().equals(orderName.toUpperCase())) {
                        realFieldName = selectName;
                        // 找到对应select的字段
                        // 查找规则 第一个空格前面
                        int firstIndexOfSpace = selectName.indexOf(" ");
                        if (firstIndexOfSpace >= 0)
                            realFieldName = realFieldName.substring(0, firstIndexOfSpace);
                        break;
                    }
                }
                orderByElement.setExpression(new Column(realFieldName));
            }

            orderByBuilder.append(PlainSelect.orderByToString(false, plainSelect.getOrderByElements()));

        } else {
            throw new RuntimeException("请您在sql中包含order by语句!");
        }
        // 需要把改orderby清空
        if (isNotEmptyList(plainSelect.getOrderByElements())) {
            plainSelect.setOrderByElements(null);
        }
        orderByBuilder.append(") ");
        orderByBuilder.append(PAGE_ROW_NUMBER);
        Column orderByColumn = new Column(orderByBuilder.toString());
        plainSelect.getSelectItems().add(0, new SelectExpressionItem(orderByColumn));
    }

    /**
     * 处理selectBody去除Order by
     *
     * @param selectBody
     */
    protected void processSelectBody(SelectBody selectBody, int level) {
        if (selectBody instanceof PlainSelect) {
            processPlainSelect((PlainSelect) selectBody, level + 1);
        } else if (selectBody instanceof WithItem) {
            WithItem withItem = (WithItem) selectBody;
            if (withItem.getSelectBody() != null) {
                processSelectBody(withItem.getSelectBody(), level + 1);
            }
        } else {
            SetOperationList operationList = (SetOperationList) selectBody;
            if (operationList.getSelects() != null && operationList.getSelects().size() > 0) {
                List<SelectBody> plainSelects = operationList.getSelects();
                for (SelectBody plainSelect : plainSelects) {
                    processSelectBody(plainSelect, level + 1);
                }
            }
        }
    }

    /**
     * 处理PlainSelect类型的selectBody
     *
     * @param plainSelect
     */
    protected void processPlainSelect(PlainSelect plainSelect, int level) {
        if (level > 1) {
            if (isNotEmptyList(plainSelect.getOrderByElements())) {
                if (plainSelect.getTop() == null) {
                    plainSelect.setTop(TOP100_PERCENT);
                }
            }
        }
        if (plainSelect.getFromItem() != null) {
            processFromItem(plainSelect.getFromItem(), level + 1);
        }
        if (plainSelect.getJoins() != null && plainSelect.getJoins().size() > 0) {
            List<Join> joins = plainSelect.getJoins();
            for (Join join : joins) {
                if (join.getRightItem() != null) {
                    processFromItem(join.getRightItem(), level + 1);
                }
            }
        }
    }

    /**
     * 处理子查询
     *
     * @param fromItem
     */
    protected void processFromItem(FromItem fromItem, int level) {
        if (fromItem instanceof SubJoin) {
            SubJoin subJoin = (SubJoin) fromItem;
            if (subJoin.getJoin() != null) {
                if (subJoin.getJoin().getRightItem() != null) {
                    processFromItem(subJoin.getJoin().getRightItem(), level + 1);
                }
            }
            if (subJoin.getLeft() != null) {
                processFromItem(subJoin.getLeft(), level + 1);
            }
        } else if (fromItem instanceof SubSelect) {
            SubSelect subSelect = (SubSelect) fromItem;
            if (subSelect.getSelectBody() != null) {
                processSelectBody(subSelect.getSelectBody(), level + 1);
            }
        } else if (fromItem instanceof ValuesList) {

        } else if (fromItem instanceof LateralSubSelect) {
            LateralSubSelect lateralSubSelect = (LateralSubSelect) fromItem;
            if (lateralSubSelect.getSubSelect() != null) {
                SubSelect subSelect = lateralSubSelect.getSubSelect();
                if (subSelect.getSelectBody() != null) {
                    processSelectBody(subSelect.getSelectBody(), level + 1);
                }
            }
        }
        // Table时不用处理
    }

    /**
     * List不空
     *
     * @param list
     * @return
     */
    public boolean isNotEmptyList(List<?> list) {
        if (list == null || list.size() == 0) {
            return false;
        }
        return true;
    }

    /**
     * 转换为分页语句
     *
     * @param sql
     * @return
     */
    public String convertToPageSql(String sql) {
        return convertToPageSql(sql, null, null);
    }

    /**
     * 转换为分页语句
     *
     * @param sql
     * @param offset
     * @param limit
     * @return
     */
    public String convertToPageSql(String sql, Integer offset, Integer limit) {
        // 解析SQL
        Statement stmt;
        try {
            stmt = CCJSqlParserUtil.parse(sql);
        } catch (Throwable e) {
            throw new PageException("不支持该SQL转换为分页查询!");
        }
        if (!(stmt instanceof Select)) {
            throw new PageException("分页语句必须是Select查询!");
        }
        // 获取分页查询的select
        Select pageSelect = getPageSelect((Select) stmt);
        String pageSql = pageSelect.toString();
        // 缓存移到外面了,所以不替换参数
        if (offset != null) {
            pageSql = pageSql.replace(START_ROW, String.valueOf(offset));
        }
        if (limit != null) {
            pageSql = pageSql.replace(PAGE_SIZE, String.valueOf(limit));
        }
        return pageSql;
    }

}
6、MyBatis Generator代码生成器问题
MyBatis+SqlServer中,主键字段不要生成到插入语句中
<table tableName="Customer">
    <columnOverride column="RowId" isGeneratedAlways="true"></columnOverride>
</table>
MyBatis+SqlServer中,插入后返回主键值
代码生成器原来写法:
<table tableName="Customer">
    <generatedKey column="RowId" sqlStatement="SQLServer" identity="true"/>
</table>
生成Mapper中的Insert语句:
<insert id="insert" parameterType="com.LTSolution.ShopApp.Model.Customer">
  <selectKey keyProperty="rowid" order="AFTER" resultType="java.lang.Integer">
    SELECT SCOPE_IDENTITY()
  </selectKey>
  insert into Company (...)
  values (...)
</insert>
按照查看相关书籍和资料,这个写法应该是可行的,但是实际不行。
经过测试使用下面的写法成功插入后返回主键
代码生成器写法:
<table tableName="Customer">
    <generatedKey column="RowId" sqlStatement="JDBC" identity="true"/>
</table>
生成Mapper中的Insert语句:
<insert id="insert" keyColumn="RowId" keyProperty="rowid" parameterType="com.LTSolution.ShopApp.Model.Customer" useGeneratedKeys="true">
  insert into Customer (...)
  values (...)
</insert>
7、分页组件PageHelper和SQLServer的多表关联分页查询问题
原来使用4.1.7,当2个表关联查询的时候如果有同名,Select的时候给予了别名,使用PageHelper.orderBy("别名"),会出现错误
因为生成的语句是
SELECT TOP 3 Name,CTypeId FROM
(
SELECT ROW_NUMBER() OVER ( ORDER BY TypeId DESC) PAGE_ROW_NUMBER, A.Name,A.TypeId as CTypeId FROM Customer A
LEFT JOIN CustomerType B ON A.TypeId = B.TypeId
) AS PAGE_TABLE_ALIAS
WHERE PAGE_ROW_NUMBER > 0
ORDER BY PAGE_ROW_NUMBER
因为(ORDER BY TypeId DESC)中TypeId是不知道哪个表的
后来查看更新记录,后面的版本更新了这个问题
现在使用最新版本5.1.3,生成的语句是
SELECT TOP 3 Name,CTypeId FROM (
    SELECT ROW_NUMBER() OVER (ORDER BY CTypeId DESC)
    PAGE_ROW_NUMBER, Name, CTypeId FROM (
        SELECT A.Name, A.TypeId AS CTypeId
        FROM Customer A LEFT JOIN CustomerType B ON A.TypeId = B.TypeId
    ) AS PAGE_TABLE_ALIAS
) AS PAGE_TABLE_ALIAS
WHERE PAGE_ROW_NUMBER > 0 ORDER BY PAGE_ROW_NUMBER
可见其中增加了一个子查询,解决了这个问题
返回值为Map时,如果select的结果中某个字段的值全是空,默认不添加到Map中,需要改为把控制添加到Map中
使用select,返回值为Map,结果一些空的字段,不会写到Map中,导致前端接收不到该字段的值
只需要在mybatis-config.xml配置文件中加入一下设置代码即可(注意,要写到前面,写到后面XML文件会报错)
<configuration>
    <settings>
        <setting name="callSettersOnNulls" value="true" />
    </settings>
</configuration>
8、MyBatis连接SQL Server
1.1的例子中使用MyBatis连接MySQL数据库,如果使用SQL Server数据库,可以进行以下设置
1、pom文件中添加SQL Server连接的依赖
<dependency>
    <groupId>com.microsoft.sqlserver</groupId>
    <artifactId>sqljdbc4</artifactId>
    <version>4.0</version>
</dependency>
2、修改MyBatis的配置
<dataSource type="UNPOOLED">
    <property name="driver" value="com.microsoft.sqlserver.jdbc.SQLServerDriver" />
    <property name="url" value="jdbc:sqlserver://127.0.0.1;database=mybatis;" />
    <property name="username" value="sa" />
    <property name="password" value="sa" />
</dataSource>