安装
由于webpack依赖node环境,所以在安装webpack之前需要先安装Node!
这里我就使用局部方法安装webpage 3.6.0版本,如下:
npm install --save-dev webpack@3.6.0
node_modules/.bin/webpack -v    //查看版本
npm init    //初始化项目
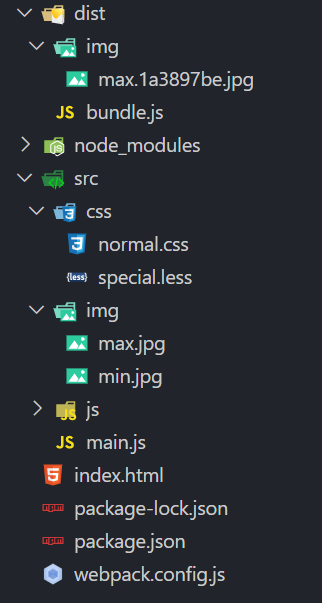
然后新建src、dist文件夹与index.html文件,并在src文件夹里新建main.js、math.js,如下图所示:

打包命令如下:
node_modules/.bin/webpack ./src/main.js ./dist/bundle.js
打包
配置webpack.config.js文件来便捷命令打包
在根目录创建名为webpack.config.js的文件
内容如下:
const path = require('path')

module.exports = {
  entry: './src/main.js',
  output: {
    path: path.resolve(__dirname, 'dist'),
    filename: 'bundle.js'
  }
}
然后直接输入以下命令即可完成打包:
node_modules/.bin/webpack
配置package.json文件来便捷命令打包
在package.json中添加如下代码:
  "scripts": {
    "test": "echo "Error: no test specified" && exit 1",
+   "build": "webpack"
  },
然后输入以下命令即可完成打包:
npm run build
loaders
处理CSS文件
安装css-loader、style-loader模块
npm install --save-dev css-loader
npm install style-loader --save-dev
编辑main.js文件,添加如下代码:
require('./css/normal.css') // 依赖css文件
编辑webpack.config.js文件,添加如下代码:
module: {
    rules: [
      {
        test: /.css$/,
        // 多个loader时,从右向左读取
        use: ['style-loader', 'css-loader']
      }
    ]
  }
然后执行npm run build即可!
处理less文件
安装less-loader模块
npm install --save-dev less-loader less
编辑main.js文件,并在末尾添加如下代码:
require('./css/special.less') // 依赖less文件
编辑webpack.config.js文件,添加如下代码:
module: {
    rules: [
      {
        test: /.css$/,
        // 多个loader时,从右向左读取
        use: ['style-loader', 'css-loader']
      },
+     {
+       test: /.less$/,
+       use: [{
+         loader: "style-loader"
+       }, {
+         loader: "css-loader"
+       }, {
+         loader: "less-loader"
+       }]
+     }
    ]
  }
然后执行npm run build即可!
加载和转译sass/scss文件同理,参考地址:webpack loader 样式
处理图片文件
安装url-loader模块
npm install --save-dev url-loader
编辑webpack.config.js文件,添加如下代码:
{
  test: /.(png|jpg|gif)$/,
  use: [
    {
      loader: 'url-loader',
      options: {
        limit: 30000
      }
    }
  ]
}
加载图片时,如果图片大小×1024小于limit,图片将编译成base64字符串形式
如果图片大小×1024大于limit,此时需要使用模块file-loader,步骤如下:
安装file-loader模块
npm install --save-dev file-loader
安装完成后,执行build后会发现并没有生效,是因为打包后图片路径问题,需要编辑webpack.config.js文件,添加一行如下代码即可解决:
module.exports = {
  entry: './src/main.js',
  output: {
    path: path.resolve(__dirname, 'dist'),
    filename: 'bundle.js',
+   publicPath: './dist/'
  },
打包完成后,我们又发现打包后的图片是直接存储在dist文件夹下的,图片名也是杂乱的,这样很不利于后期的维护与开发,因此需要将图片打包存储在dist/img/文件夹下,并且将图片文件名更改为易懂的名字!!
编辑webpack.config.js文件,添加如下代码:
{
  test: /.(png|jpg|gif)$/,
  use: [
    {
      loader: 'url-loader',
      options: {
        limit: 30000,
+       name: 'img/[name].[hash:8].[ext]'
      }
    }
  ]
}
最后我们可以看到项目的目录是这样的:
使用babel来实现ES6转ES5
安装babel-loader、babel-core、babel-preset-env模块
npm install --save-dev babel-loader@7 babel-core babel-preset-es2015
编辑webpack.config.js文件,添加如下代码:
module: {
  rules: [
    {
      test: /.js$/,
      exclude: /(node_modules|bower_components)/,
      use: {
        loader: 'babel-loader',
        options: {
          presets: ['es2015']
        }
      }
    }
  ]
}
最后执行npm run build即可!
Vue
使用并配置Vue
安装vue
npm install --save vue
然后在main.js里添加如下测试代码:
import Vue from 'vue'
const app = new Vue({
  el: '#app',
  data: {
    message: 'hello vue'
  }
})
并在html添加如下代码:
<div id="app">
  <h2>hello world</h2>
  <h2>{{message}}</h2>
</div>
打包后会发现页面没有任何显示,打开控制台后发现如下报错:
[Vue warn]: You are using the runtime-only build of Vue where the template compiler is not available. Either pre-compile the templates into render functions, or use the compiler-included build.
解决办法:
编辑webpack.config.js文件,添加如下代码:
module.exports = {
   entry: './src/main.js',
   output: {...
   },
   module: {...
   },
+  resolve: {
+    alias: {
+      'vue$': 'vue/dist/vue.esm.js'
+    }
+  }
}
最后执行npm run build即可!
处理.vue文件
安装vue-loader、vue-template-compiler模块
npm install --save-dev vue-loader vue-template-compiler
编辑webpack.config.js文件,添加如下代码:
module: {
  rules: [
+     {
+       test: /.vue$/,
+       use: ['vue-loader']
+     }
  ]
}
在main.js中添加如下代码:
import Vue from 'vue'
import App from './vue/App.vue'

new Vue({
  el: '#app',
  template: "<App></App>",
  components: {
    App
  }
})
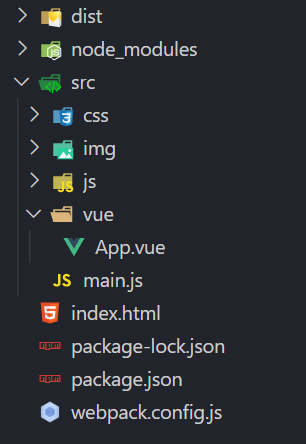
新建src/vue/App.vue文件,目录结构如下:
编辑App.vue文件,添加如下代码:
<template>
  <div>
    <h2 class="color">hello world</h2>
    <button>按钮</button>
    <h2>{{message}}</h2>
  </div>
</template>

<script>
export default {
  name: "App",
  data() {
    return {
      message: "hello vue!!!"
    };
  }
};
</script>

<style scoped>
.color {
  color: orange;
}
</style>
执行npm run build后会发现报错,报错信息大概如下:
vue-loader was used without the corresponding plugin. Make sure to include VueLoaderPlugin in your webpack config.
此时编辑package.json文件,将vue-loader改为如下版本:
"vue-loader": "^13.0.0",
保存后,执行如下命令就解决了:
npm install
npm run build
vue组件的使用
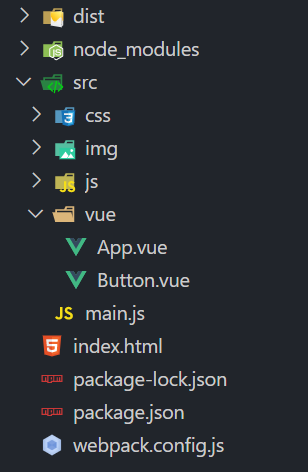
新建src/vue/Button.vue文件,目录结构如下:
编辑Button.vue文件,添加如下代码:
<template>
  <div>
    <button>这是button组件</button>
  </div>
</template>

<script>
export default {
  name: "Button"
};
</script>

<style>
</style>
接下来编辑App.vue文件,做如下更改:
<template>
  <div>
    <h2 class="color">hello world</h2>
    <button>按钮</button>
    <h2>{{message}}</h2>
+   <Button></Button>
  </div>
</template>

<script>
+   import Button from "./Button.vue";

    export default {
      name: "App",
+     components: {
+       Button
+     },
      data() {
        return {
          message: "hello vue!!!"
        };
      }
    };
</script>

<style scoped>
.color {
  color: orange;
}
</style>
最后执行npm run build即可!
如果我们在App.vue文件中:
import Button from "./Button.vue";
上面代码末尾的.vue去掉简写打包的话,就会出现报错。
此时如果想简写,又想不报错,在webpack.config.js文件,添加如下代码即可解决:
  resolve: {
+   extensions: ['.css', '.js', '.vue'],
    alias: {
      'vue$': 'vue/dist/vue.esm.js'
    }
  }
Plugins
BannerPlugin
作用:添加版权信息。
编辑webpack.config.js文件,添加如下代码:
    const path = require('path')
+   const webpack = require('webpack')

    module.exports = {
      entry: './src/main.js',
+     plugins: [
+       new webpack.BannerPlugin(`最终版权归LqZww所有!`)
+     ]
    }
打包后即可在js文件里的头部看见所写的版权信息!
HtmlWebpackPlugin
作用:打包后可以在dist目录下自动生成index.html文件,也可以将打包的js文件自动通过script标签插入body中。
安装html-webpack-plugin
npm install --save-dev html-webpack-plugin
编辑webpack.config.js文件,增删如下代码:
    const path = require('path')
    const webpack = require('webpack')
+   const HtmlWebpackPlugin = require('html-webpack-plugin')

    module.exports = {
      entry: './src/main.js',
      output: {
        path: path.resolve(__dirname, 'dist'),
        filename: 'bundle.js',
-       publicPath: './dist/'
      },
      plugins: [
        new webpack.BannerPlugin(`最终版权归LqZww所有!`),
+       new HtmlWebpackPlugin({
+         template: 'index.html'
+       })
      ]
    }
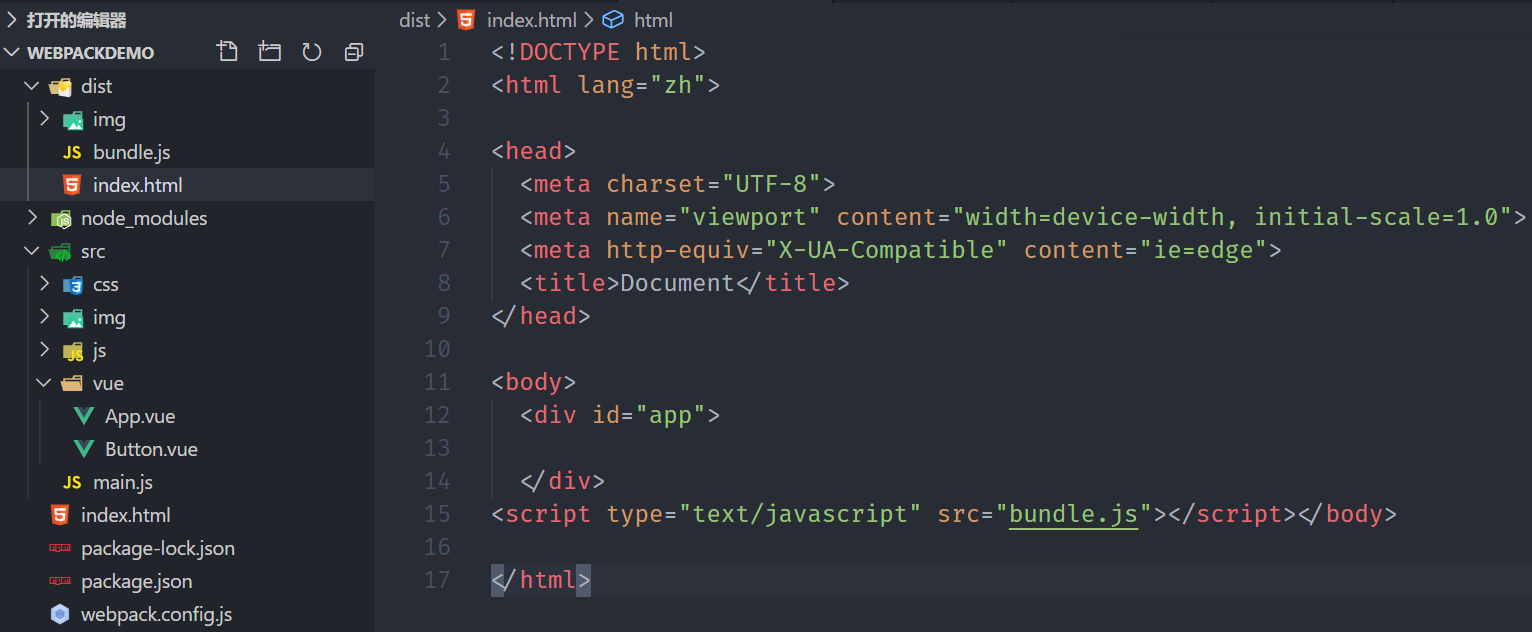
打包后就可以在dist目录下看见index.html文件,如下:
UglifyjsWebpackPlugin
作用:对打包的js文件进行压缩。
这里使用1.1.1版本,与cli2一致。
安装uglifyjs-webpack-plugin
npm install uglifyjs-webpack-plugin@1.1.1 --save-dev
编辑webpack.config.js文件,添加如下代码:
    const path = require('path')
    const webpack = require('webpack')
    const HtmlWebpackPlugin = require('html-webpack-plugin')
+   const UglifyjsWebpackPlugin = require('uglifyjs-webpack-plugin')

    module.exports = {
      entry: './src/main.js',
      plugins: [
        new webpack.BannerPlugin(`最终版权归LqZww所有!`),
        new HtmlWebpackPlugin({
          template: 'index.html'
        }),
+       new UglifyjsWebpackPlugin()
      ]
    }
打包后就可以发现dist目录下的js文件是进行了压缩。
webpack-dev-server
作用:实现实时重新加载功能
安装webpack-dev-server
npm install --save-dev webpack-dev-server@2.9.3
编辑webpack.config.js文件,添加如下代码:
    module.exports = {
      entry: './src/main.js',
      output: {
      },
      module: {
      },
      resolve: {
      },
      plugins: [
      ],
+     devServer: {
+       contentBase: './dist',
+       inline: true
+     }
    }
运行方法一:
在命令行里输入命令:
./node_modules/.bin/webpack-dev-server
然后默认直接访问http://localhost:8080/即可!
运行方法二:
编辑package.json文件,添加如下代码:
  "scripts": {
    "test": "echo "Error: no test specified" && exit 1",
    "build": "webpack",
+   "dev": "webpack-dev-server --open"
  },
然后在命令行里输入下列命令:
npm run dev
我们就会看到浏览器自动加载页面,更改代码后将自动重新加载。
配置文件分离
安装webpack-merge
npm install --save-dev webpack-merge
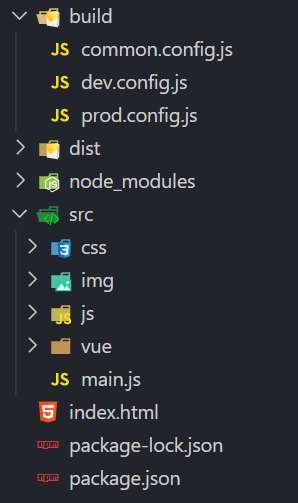
创建build文件夹,然后新建common.config.js、dev.config.js、prod.config.js文件,删除webpack.config.js文件,目录结构如图:
原webpack.config.js文件内容为:
const path = require('path')
const webpack = require('webpack')
const HtmlWebpackPlugin = require('html-webpack-plugin')
const UglifyjsWebpackPlugin = require('uglifyjs-webpack-plugin')

module.exports = {
  entry: './src/main.js',
  output: {
    path: path.resolve(__dirname, 'dist'),
    filename: 'bundle.js'
  },
  module: {
    rules: [
      {
        test: /.css$/,
        // 多个loader时,从右向左读取
        use: ['style-loader', 'css-loader']
      },
      {
        test: /.less$/,
        use: [{
          loader: "style-loader"
        }, {
          loader: "css-loader"
        }, {
          loader: "less-loader"
        }]
      },
      {
        test: /.(png|jpg|gif)$/,
        use: [
          {
            loader: 'url-loader',
            options: {
              limit: 30000,
              name: 'img/[name].[hash:8].[ext]'
            }
          }
        ]
      },
      {
        test: /.js$/,
        exclude: /(node_modules|bower_components)/,
        use: {
          loader: 'babel-loader',
          options: {
            presets: ['es2015']
          }
        }
      },
      {
        test: /.vue$/,
        use: ['vue-loader']
      }
    ]
  },
  resolve: {
    extensions: ['.css', '.js', '.vue'],
    alias: {
      'vue$': 'vue/dist/vue.esm.js'
    }
  },
  plugins: [
    new webpack.BannerPlugin(`最终版权归LqZww所有!`),
    new HtmlWebpackPlugin({
      template: 'index.html'
    }),
    new UglifyjsWebpackPlugin()
  ],
  devServer: {
    contentBase: './dist',
    inline: true
  }
}
现将原webpack.config.js代码拷贝至common.config.js中,并删除devServer、UglifyjsWebpackPlugin模块代码。
再将devServer提取到dev.config.js文件中,将UglifyjsWebpackPlugin提取到prod.config.js文件中。
具体代码如下:
common.config.js:
const path = require('path')
const webpack = require('webpack')
const HtmlWebpackPlugin = require('html-webpack-plugin')

module.exports = {
  entry: './src/main.js',
  output: {
    path: path.resolve(__dirname, 'dist'),
    filename: 'bundle.js'
  },
  module: {
    rules: [
      {
        test: /.css$/,
        // 多个loader时,从右向左读取
        use: ['style-loader', 'css-loader']
      },
      {
        test: /.less$/,
        use: [{
          loader: "style-loader"
        }, {
          loader: "css-loader"
        }, {
          loader: "less-loader"
        }]
      },
      {
        test: /.(png|jpg|gif)$/,
        use: [
          {
            loader: 'url-loader',
            options: {
              limit: 30000,
              name: 'img/[name].[hash:8].[ext]'
            }
          }
        ]
      },
      {
        test: /.js$/,
        exclude: /(node_modules|bower_components)/,
        use: {
          loader: 'babel-loader',
          options: {
            presets: ['es2015']
          }
        }
      },
      {
        test: /.vue$/,
        use: ['vue-loader']
      }
    ]
  },
  resolve: {
    extensions: ['.css', '.js', '.vue'],
    alias: {
      'vue$': 'vue/dist/vue.esm.js'
    }
  },
  plugins: [
    new webpack.BannerPlugin(`最终版权归LqZww所有!`),
    new HtmlWebpackPlugin({
      template: 'index.html'
    })
  ]
}
prod.config.js:
const UglifyjsWebpackPlugin = require('uglifyjs-webpack-plugin')
const WebpackMerge = require('webpack-merge')
const commonConfig = require('./common.config')

module.exports = WebpackMerge(commonConfig, {
  plugins: [
    new UglifyjsWebpackPlugin()
  ]
})
dev.config.js:
const WebpackMerge = require('webpack-merge')
const commonConfig = require('./common.config')

module.exports = WebpackMerge(commonConfig, {
  devServer: {
    contentBase: './dist',
    inline: true
  }
})
再修改下webpack.config.js文件,修改如下代码:
    module.exports = {
      entry: './src/main.js',
      output: {
-       path: path.resolve(__dirname, 'dist'),
+       path: path.resolve(__dirname, '../dist'),
        filename: 'bundle.js'
      },
还需要修改package.json文件,修改如下代码:
  "scripts": {
    "test": "echo "Error: no test specified" && exit 1",
-   "build": "webpack",
+   "build": "webpack --config ./build/prod.config.js",
-   "dev": "webpack-dev-server --open"
+   "dev": "webpack-dev-server --open --config ./build/dev.config.js"
  },
做完以上的配置,就可以顺序的执行npm run build、npm run dev命令了!