之前的aop是通过手动创建代理类来进行通知的,但是在日常开发中,我们并不愿意在代码中硬编码这些代理类,我们更愿意使用DI和IOC来管理aop代理类。Spring为我们提供了以下方式来使用aop框架
一、以声明的方式配置AOP(就是使用xml配置文件)
1.使用ProxyFactoryBean的方式:
ProxyFactoryBean类是FactoryBean的一个实现类,它允许指定一个bean作为目标,并且为该bean提供一组通知和顾问(这些通知和顾问最终会被合并到一个AOP代理中)它和我们之前的ProxyFactory都是Advised的实现。
以下是一个简单的例子:一个学生和一个老师,老师会告诉学生应该做什么。
public class Student {

    public void talk() {
        System.out.println("I am a boy");
    }

    public void walk() {
        System.out.println("I am walking");
    }

    public void sleep() {
        System.out.println("I want to sleep");
    }
}
老师类
public class Teacher {

    private Student student;

    public void tellStudent(){
        student.sleep();
        student.talk();
    }

    public Student getStudent() {
        return student;
    }

    public void setStudent(Student student) {
        this.student = student;
    }
}
- 我们创建一个通知类,这个和之前是一样的SpringAOP中的通知类型以及创建
package cn.lyn4ever.aop;

import org.aspectj.lang.JoinPoint;

public class AuditAdvice implements MethodBeforeAdvice {
    @Override
    public void before(Method method, Object[] objects, @Nullable Object o) throws Throwable {
        System.out.println("这个方法被通知了" + method.getName());
    }
}
- 然后就使用spring的IOC来管理这个通知类,在xml配置文件中声明如下:
<?xml version="1.0" encoding="UTF-8"?>
<beans xmlns="http://www.springframework.org/schema/beans"
       xmlns:xsi="http://www.w3.org/2001/XMLSchema-instance"
       xmlns:util="http://www.springframework.org/schema/util" xmlns:p="http://www.springframework.org/schema/p"
       xsi:schemaLocation="http://www.springframework.org/schema/beans
       http://www.springframework.org/schema/beans/spring-beans.xsd
       http://www.springframework.org/schema/util
       https://www.springframework.org/schema/util/spring-util.xsd">

    <!--注入student-->
    <bean name="student" class="cn.lyn4ever.aop.aopconfig.Student">
    </bean>

    <!--注入teacher-->
    <bean name="teacher" class="cn.lyn4ever.aop.aopconfig.Teacher">
        <!--注意,这个student的属性要是上边的代理类,而不是能student-->
        <!--<property name="student" ref="student"/>-->
        <property name="student" ref="proxyOne"/>
    </bean>

    <!--注入我们创建的通知类-->
    <bean id="advice" class="cn.lyn4ever.aop.aopconfig.AuditAdvice"></bean>

    <!--创建代理类,使用前边写的通知进行通知,这样会使这个类上的所有方法都被通知-->
    <bean name="proxyOne" class="org.springframework.aop.framework.ProxyFactoryBean" p:target-ref="student"
          p:interceptorNames-ref="interceptorNames">
        <!--因为interceptorNames的属性是一个可变参数,也就是一个list-->
    </bean>

    <!--在上边引入了util的名称空间,简化了书写-->
    <util:list id="interceptorNames">
        <value>advice</value>
    </util:list>
</beans>
- 测试类
 public static void main(String[] args) {
        GenericXmlApplicationContext context = new GenericXmlApplicationContext();
        context.load("application1.xml");
        context.refresh();

        Teacher teacher = (Teacher) context.getBean("teacherOne");
        teacher.tellStudent();

    }
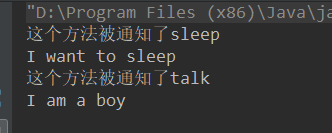
-
运行结果没有问题
-
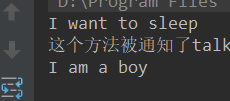
以上是通过直接创建通知的方式,接下来我们试一个创建一个切入点(因为以上是对类中所有方法都进行通知,这时我们使用切入点只对其中部分方法进行通知),在xml配置文件中添加如下。
<?xml version="1.0" encoding="UTF-8"?>
<beans xmlns="http://www.springframework.org/schema/beans"
       xmlns:xsi="http://www.w3.org/2001/XMLSchema-instance"
       xmlns:util="http://www.springframework.org/schema/util" xmlns:p="http://www.springframework.org/schema/p"
       xsi:schemaLocation="http://www.springframework.org/schema/beans
       http://www.springframework.org/schema/beans/spring-beans.xsd
       http://www.springframework.org/schema/util
       https://www.springframework.org/schema/util/spring-util.xsd">

    <!--注入student-->
    <bean name="student" class="cn.lyn4ever.aop.aopconfig.Student">
    </bean>

    <!--注入teacher-->
    <bean name="teacherOne" class="cn.lyn4ever.aop.aopconfig.Teacher">
        <!--注意,这个student的属性要是上边的代理类,而不是能student-->
        <!--<property name="student" ref="student"/>-->
        <property name="student" ref="proxyOne"/>
    </bean>

    <!--注入我们创建的通知类-->
    <bean id="advice" class="cn.lyn4ever.aop.aopconfig.AuditAdvice"></bean>

    <!--创建代理类,使用前边写的通知进行通知,这样会使这个类上的所有方法都被通知-->
    <bean name="proxyOne" class="org.springframework.aop.framework.ProxyFactoryBean" p:target-ref="student"
          p:interceptorNames-ref="interceptorNames">
        <!--因为interceptorNames的属性是一个可变参数,也就是一个list-->
    </bean>

    <!--在上边引入了util的名称空间,简化了书写-->
    <util:list id="interceptorNames">
        <value>advice</value>
    </util:list>


    <!--以下是使用切入点的方式来进行通知,上边的代码和上一个配置文件一样,没有修改-->
    <!--sutdent基本bean,我们继续使用-->

    <bean name="teacherTwo" p:student-ref="proxyTwo" class="cn.lyn4ever.aop.aopconfig.Teacher"/>

    <bean id="proxyTwo" class="org.springframework.aop.framework.ProxyFactoryBean"
          p:target-ref="student" p:interceptorNames-ref="interceptorAdvisorNames">
    </bean>

    <util:list id="interceptorAdvisorNames">
        <value>advisor</value>
    </util:list>

    <!--配置切入点bean-->
    <bean id="advisor" class="org.springframework.aop.support.DefaultPointcutAdvisor"
          p:advice-ref="advice">
        <property name="pointcut">
            <!--这个切入点我们用了一个匿名bean来写aspectJ的表达式,当然也可以用其他的类型切入点,这个在上边链接中能看到-->
            <bean class="org.springframework.aop.aspectj.AspectJExpressionPointcut"
                  p:expression="execution(* talk*(..))"/>
        </property>

    </bean>

</beans>

- 上图中的那个aspectj表达式写错了,在代码中有正确的
2.使用aop名称空间
在xml中引入如下的名称空间,为了不被影响,我册了其他多余的名称空间。然后很普通地注入我们之前那三个bean
<?xml version="1.0" encoding="UTF-8"?>
<beans xmlns="http://www.springframework.org/schema/beans"
xmlns:xsi="http://www.w3.org/2001/XMLSchema-instance"
xmlns:aop="http://www.springframework.org/schema/aop"
xsi:schemaLocation="http://www.springframework.org/schema/beans
http://www.springframework.org/schema/beans/spring-beans.xsd
http://www.springframework.org/schema/aop
http://www.springframework.org/schema/aop/spring-aop.xsd
">
<!--通过普通的方式来注入三个bean-->
<!--注入student-->
<bean name="student" class="cn.lyn4ever.aop.aopconfig.Student"/>
<!--注入teacher-->
<bean name="teacherOne" class="cn.lyn4ever.aop.aopconfig.Teacher">
<property name="student" ref="student"/>
</bean>
<!--注入我们创建的通知类-->
<bean id="advice" class="cn.lyn4ever.aop.proxyfactory.BeforeAdvice"/>
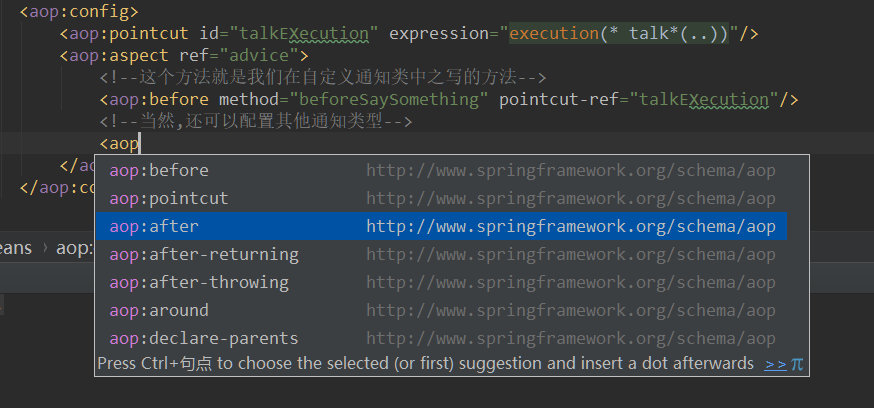
<aop:config>
<aop:pointcut id="talkExecution" expression="execution(* talk*(..))"/>
<aop:aspect ref="advice">
<!--这个方法就是我们在自定义通知类中之写的方法-->
<aop:before method="beforeSaySomething" pointcut-ref="talkExecution"/>
<!--当然,还可以配置其他通知类型-->
</aop:aspect>
</aop:config>
</beans>
在这个配置中,我们还可以配置其他类型的通知,但是这个method属性一定要写我们自定义的那个通知类中的方法
- 在aop:pointcut中写expression时还支持如下语法:
<aop:pointcut id="talkExecution" expression="execution(* talk*(..)) and args(String) and bean(stu*)"/>
<!--
中间的这个and表示和,也可以用or来表示或
args(String) 意思是参数类型是string,也可是自定义的类,这个后边有例子
bean(stu*) 意思是bean的id是以stu开头的,常用的就是用bean(*Service*)来表示服务层的bean
-->
3.使用@AspectJ样式注解方式
虽然是通过注解的方式来声明注解类,但是还是需要在xml中配置一点点内容(通过注解的方式也可以配置,但是在springboot中要使用的话有更方便的方式)
- 为了方便,就只写了一个HighStudent,而且直接调用它的方法,不依赖于外部的teacher实例来调用
package cn.lyn4ever.aop.aspectj;

import cn.lyn4ever.aop.aopconfig.Teacher;
import org.springframework.stereotype.Component;

/**
 * 声明这是一个SpringBean,由Spring来管理它
 */
@Component
public class HighStudent {

    public void talk() {
        System.out.println("I am a boy");
    }

    public void walk() {
        System.out.println("I am walking");
    }

    /**
     * 这个方法添加一个teacher来做为参数,为了配置后边切入点中的args()
     * @param teacher
     */
    public void sleep(Teacher teacher) {
        System.out.println("I want to sleep");
    }
}
- 创建切面类
package cn.lyn4ever.aop.aspectj;

import cn.lyn4ever.aop.aopconfig.Teacher;
import org.aspectj.lang.JoinPoint;
import org.aspectj.lang.ProceedingJoinPoint;
import org.aspectj.lang.annotation.Around;
import org.aspectj.lang.annotation.Aspect;
import org.aspectj.lang.annotation.Before;
import org.aspectj.lang.annotation.Pointcut;
import org.springframework.stereotype.Component;

/**
 * 声明切面类,也就是包括切点和通知
 */
@Component //声明交由spring管理
@Aspect //表示这是一个切面类
public class AnnotatedAdvice {

    /*
    创建切入点,当然也可以是多个
     */
    @Pointcut("execution(* talk*(..))")
    public void talkExecution(){}

    @Pointcut("bean(high*)")//这里为什么是high,因为我们这回测试bean是highStudent
    public void beanPoint(){}

    @Pointcut("args(value)")
    public void argsPoint(Teacher value){}

    /*
    创建通知,当然也可以是多个
    这个注解的参数就是上边的切入点方法名,注意有的还带参数
    这个通知方法的参数和之前一样,参数JoinPoint,也可不加
     */
    @Before("talkExecution()")
    public void doSomethingBefore(JoinPoint joinPoint){
        System.out.println("before: Do Something"+joinPoint.getSignature().getName()+"()");
    }

    /**
     * 环绕通知请加上ProceedingJoinPoint参数 ,它是joinPoint的子类
     * 因为你要放行方法的话,必须要加这个
     * @param joinPoint
     * @param teacher
     */
    @Around("argsPoint(teacher) && beanPoint()")
    public Object doSomethindAround(ProceedingJoinPoint joinPoint, Teacher teacher) throws Throwable {
        System.out.println("Around: Before Do Something"+joinPoint.getSignature().getName()+"()");
        Object proceed = joinPoint.proceed();
        System.out.println("Around: After Do Something"+joinPoint.getSignature().getName()+"()");

        return proceed;
    }

}
- xml中配置开启扫描注解
<?xml version="1.0" encoding="UTF-8"?>
<beans xmlns="http://www.springframework.org/schema/beans"
       xmlns:xsi="http://www.w3.org/2001/XMLSchema-instance"
       xmlns:aop="http://www.springframework.org/schema/aop"
       xmlns:context="http://www.springframework.org/schema/context"
       xsi:schemaLocation="http://www.springframework.org/schema/beans
       http://www.springframework.org/schema/beans/spring-beans.xsd
       http://www.springframework.org/schema/aop
       http://www.springframework.org/schema/aop/spring-aop.xsd http://www.springframework.org/schema/context https://www.springframework.org/schema/context/spring-context.xsd">

    <!--通知Spring扫描@Aspect注解-->
    <aop:aspectj-autoproxy/>

    <!--配置扫描包,扫描@Component-->
    <context:component-scan base-package="cn.lyn4ever.aop.aspectj"/>

</beans>
- 使用Java注解配置的方式配置扫描注解
@Configuration //声明这是一个配置类
@ComponentScan("cn.lyn4ever.aop.aspectj")
@EnableAspectJAutoProxy(proxyTargetClass = true)//相当于xml中的<aop:aspectj-autoproxy/>
public class BeanConfig {
}
- 测试方法
package cn.lyn4ever.aop.aspectj;

import cn.lyn4ever.aop.aopconfig.Teacher;
import org.springframework.context.annotation.AnnotationConfigApplicationContext;
import org.springframework.context.support.GenericApplicationContext;
import org.springframework.context.support.GenericXmlApplicationContext;

public class AspectMain {
    public static void main(String[] args) {
//        xmlConfig();
        javaConfig();

    }

    private static void javaConfig() {
        GenericApplicationContext context = new AnnotationConfigApplicationContext(BeanConfig.class);
        HighStudent student = (HighStudent) context.getBean("highStudent");
        student.sleep(new Teacher());//应该被环绕通知
        System.out.println();

        student.talk();//前置通知
        System.out.println();

        student.walk();//不会被通知
        System.out.println();
    }

    private static void xmlConfig(){
        GenericXmlApplicationContext context = new GenericXmlApplicationContext();
        context.load("application_aspect.xml");
        context.refresh();

        HighStudent student = (HighStudent) context.getBean("highStudent");
        student.sleep(new Teacher());//应该被环绕通知
        System.out.println();

        student.talk();//前置通知
        System.out.println();

        student.walk();//不会被通知
        System.out.println();
    }
}
