1、引入依赖
    <parent>
        <groupId>org.springframework.boot</groupId>
        <artifactId>spring-boot-starter-parent</artifactId>
        <version>2.5.1</version>
        <relativePath/>
    </parent>

    <dependencies>
        <dependency>
            <groupId>org.springframework.boot</groupId>
            <artifactId>spring-boot-starter-jdbc</artifactId>
        </dependency>
        <dependency>
            <groupId>org.springframework.boot</groupId>
            <artifactId>spring-boot-starter-web</artifactId>
        </dependency>

        <dependency>
            <groupId>com.oracle.database.jdbc</groupId>
            <artifactId>ojdbc8</artifactId>
            <scope>runtime</scope>
        </dependency>

        <dependency>
            <groupId>org.mybatis.spring.boot</groupId>
            <artifactId>mybatis-spring-boot-starter</artifactId>
            <version>2.2.0</version>
        </dependency>
        <dependency>
            <groupId>tk.mybatis</groupId>
            <artifactId>mapper-spring-boot-starter</artifactId>
            <version>2.1.5</version>
        </dependency>
        <dependency>
            <groupId>org.springframework.boot</groupId>
            <artifactId>spring-boot-starter-test</artifactId>
            <scope>test</scope>
        </dependency>
    </dependencies>

    <build>
        <plugins>
            <plugin>
                <groupId>org.springframework.boot</groupId>
                <artifactId>spring-boot-maven-plugin</artifactId>
            </plugin>
        </plugins>
    </build>
2、配置application.properties
server.port=8080

#配置内置数据源hikari(最新推荐,性能比德鲁伊高)
spring.datasource.url=jdbc:oracle:thin:@127.0.0.1:1521:orcl
spring.datasource.username=c##boat
spring.datasource.password=c##boat

#配置mybatis实体类扫描包
mybatis.type-aliases-package=com.example.pojo
mybatis.mapper-locations=classpath:mappers/**/*.xml
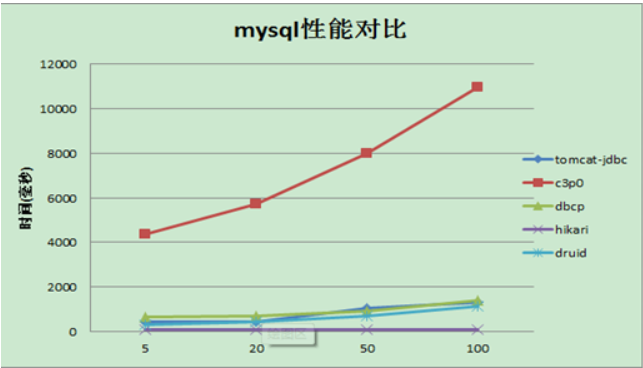
关于hikari 与 相关数据库连接池的比较

对于性能测试对比也给出了柱状图:

3、创建相关实体类,Dao, Mapper,Servier信息
创建实体类:(与数据库的表一致)
public class UserInfo {
    private String id;
    private String username;
    private String email;
    private String password;
    private String phoneNum;
    private Boolean status;
}
创建UserInfoMapper.xml文件
<!DOCTYPE mapper
        PUBLIC "-//mybatis.org//DTD Mapper 3.0//EN"
        "http://mybatis.org/dtd/mybatis-3-mapper.dtd">
<mapper namespace="com.example.dao.UserInfoDao">

    <select id="selectAll" resultType="UserInfo">
        select * from users
    </select>

    <delete id="deleteById" parameterType="String">
        delete from users where id = #{id}
    </delete>

</mapper>
创建dao
import com.example.pojo.UserInfo;
import org.apache.ibatis.annotations.Select;
import tk.mybatis.mapper.common.Mapper;

import java.util.List;

@org.apache.ibatis.annotations.Mapper
public interface UserInfoDao extends Mapper<UserInfo> {

    List<UserInfo> selectAll();

    Integer deleteById(String id);

}
创建service
接口:
public interface UserInfoService {

    List<UserInfo> findAll();

    Boolean deleteUserInfo(String id);

}

实现类:
@Service
public class UserInfoServiceImpl implements UserInfoService{

    @Autowired
    private UserInfoDao userInfoDao;

    @Override
    public List<UserInfo> findAll() {
        return userInfoDao.selectAll();
    }

    @Override
    @Transactional
    public Boolean deleteUserInfo(String id) {
        Integer integer = userInfoDao.deleteById(id);
        Boolean flag = integer == 1 ? true : false;
        //int i = 1 / 0;  //主要测试事务
        return flag;
    }

}
创建controller
@RestController
@RequestMapping("user")
public class UserInfoController {

    @Autowired
    private UserInfoService userInfoService;

    @GetMapping("findAll")
    public List<UserInfo> findAll(){
        return userInfoService.findAll();
    }

    @GetMapping("drop/{id}")
    public Boolean drop(@PathVariable(name = "id") String id){
        return userInfoService.deleteUserInfo(id);
    }
}
4、测试
访问 http://localhost:8080/user/findAll
