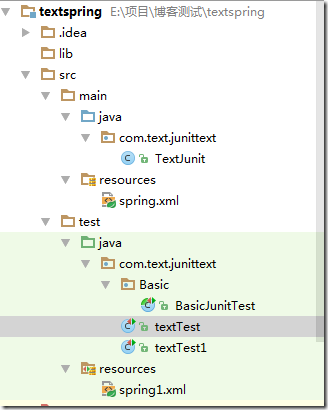
一、junit 测试
1.1 环境准备
利用Maven构建Java项目,用于统一开发规范与工具以及统一管理jar包。并建立测试的基础类TextJunit具有name的属性以及print方法。
1: package com.text.junittext; 2: 3: /**
4: * Created by mao on 2017/8/3.
5: */
6: //@Component
7: //@Scope("singleton")
8: public class TextJunit {
9: private String name;
10: 11: public String getName() {
12: return name;
13: } 14: 15: public void setName(String name) {
16: this.name = name;
17: }18: public void print()
19: {20: System.out.println(name);
21: } 22: }1.2 常规测试
利用Maven配置pom.xml自动从Maven中央库中导入Junit 4.9包。
配置文件:
<dependency>
    <groupId>junit</groupId>
    <artifactId>junit</artifactId>
    <version>4.9</version>
    <scope>test</scope>
</dependency>
代码:
1: package com.text.junittext; 2: 3: import org.junit.After; 4: import org.junit.Before; 5: 6: public class textTest1
7: {8: TextJunit textJunit=null;
9: @Before10: public void before()
11: {12: if (textJunit==null){
13: textJunit=new TextJunit();
14: }15: textJunit.setName("mmm");
16: } 17: @After18: public void after()
19: { 20: textJunit.print(); 21: } 22: @org.junit.Test23: public void testn()
24: { 25: textJunit.print();26: textJunit.setName("kkk");
27: } 28: }结果:
1.3 结合Spring测试
设想项目由Spring进行管理,Junit对于业务逻辑层进行测试,这样获得Spring容器中注入的Bean,测试相应的方法。
利用Junit结合Spring测试目前有两种方法:①直接利用 ClassPathXmlApplicationContext context = new ClassPathXmlApplicationContext( new String[] { "classpath:applicationContext.xml" }); 加载容器。②利用Spring-text包结合Junit进行Spring的加载并进行测试。
这里我主要利用第二种方法进行单元测试:由于项目通过Maven进行管理,所以需要在pom.xml中添加
<dependency>
    <groupId>org.springframework</groupId>
    <artifactId>spring-test</artifactId>
    <version>4.2.6.RELEASE</version>
    <scope>provided</scope>
</dependency>
然后在测试类上添加@RunWith注解,@ContextConfiguration注解,其中@RunWith指定使用springJunit的测试运行器,,@ContextConfiguration指定测试用的spring配置文件的位置。
进行这个测试时需要将@Component注释的取消注释,使得业务逻辑层的类能够注入到Spring容器中,这样在测试类中可以获得。
测试基类:(这样写多个测试类,只需要继承这个基类,就不需要重复的写@RunWith,@ContextConfiguration注解)
1: package com.text.junittext.Basic; 2: 3: import com.text.junittext.TextJunit; 4: import org.junit.After; 5: import org.junit.Before; 6: import org.junit.runner.RunWith; 7: import org.springframework.test.context.ContextConfiguration; 8: import org.springframework.test.context.junit4.SpringJUnit4ClassRunner; 9: 10: import javax.annotation.Resource; 11: 12: @RunWith(SpringJUnit4ClassRunner.class)
13: @ContextConfiguration({"classpath:spring.xml"})
14: public abstract class BasicJunitTest
15: { 16: @Resource17: private TextJunit textJunit;
18: @Before19: public void Init()
20: {21: textJunit.setName("kkk");
22: } 23: @After24: public void After()
25: { 26: textJunit.print(); 27: } 28: }并且在spring配置文件中配置<context:annotation-config />,指示spring支持注解,<context:component-scan base-package="com.text.junittext"/>,spring可以自动去扫描base-pack下面或者子包下面的Java文件,如果扫描到有@Component @Controller@Service等这些注解的类,则把这些类注册为bean。
spring的配置文件Spring.xml:
1: <?xml version="1.0" encoding="UTF-8"?>
2: <!--<!DOCTYPE beans PUBLIC "-//SPRING//DTD BEAN 2.0//EN" "http://www.springframework.org/dtd/spring-beans-2.0.dtd">-->
3: <beans xmlns="http://www.springframework.org/schema/beans"
4: xmlns:xsi="http://www.w3.org/2001/XMLSchema-instance"
5: xmlns:p="http://www.springframework.org/schema/p"
6: xmlns:aop="http://www.springframework.org/schema/aop"
7: xmlns:tx="http://www.springframework.org/schema/tx"
8: xmlns:context="http://www.springframework.org/schema/context"
9: xsi:schemaLocation="
10: http://www.springframework.org/schema/beans http://www.springframework.org/schema/beans/spring-beans-3.1.xsd 11: http://www.springframework.org/schema/aop http://www.springframework.org/schema/aop/spring-aop-3.1.xsd 12: http://www.springframework.org/schema/tx http://www.springframework.org/schema/tx/spring-tx-3.1.xsd 13: http://www.springframework.org/schema/context http://www.springframework.org/schema/context/spring-context-3.1.xsd 14: ">15: <context:component-scan base-package="com.text.junittext"/>
16: <context:annotation-config /> 17: </beans>测试类,继承基类:
1: package com.text.junittext; 2: 3: import com.text.junittext.Basic.BasicJunitTest; 4: 5: import javax.annotation.Resource; 6: 7: public class textTest extends BasicJunitTest
8: { 9: @Resource10: private TextJunit textJunit;
11: @org.junit.Test12: public void testn()
13: { 14: textJunit.print();15: textJunit.setName("bbb");
16: } 17: }测试结果:(前面的信息部分,代表spring容器已经初始化成功)
二、使用Junit测试@Scope
2.1 @Scope解释
@Scope用来配置 spring bean 的作用域,它标识 bean 的作用域,在spring2.0之前bean只有2种作用域即:singleton(单例)、prototype,在此之后增加了session、request、global session三种专用于Web应用程序上下文的Bean,这边主要对于前两个根据例子讲解。
①singleton 作用域
如果bean类被标记为singleton,那么在IOC容器中只会存在一个共享的bean实例对象,就相当于静态对象,其他的对象都可以对其值进行改变。
②prototype 作用域
每一次调用调用容器的 getBean()方法将new 出一个新的实例,但是spirng创建出来后,并不对于bean的整个生命周期负责,也就是负责释放prototype的职责不在spring,在于调用者。
③request、session、global session 作用域
表示该针对每一次HTTP请求都会产生一个新的bean,request表示bean仅在当前HTTP request内有效,session表示bean仅在当前HTTP session内有效,global session作用域类似于标准的HTTP Session作用域,不过它仅仅在基于portlet的web应用中才有意义。
2.2 例子测试
主要对于singleton(单例)、prototype进行测试,测试类textTest与测试基类BasicJunitTest都添加
@Resource
private TextJunit textJunit;
首先在基类中将name赋值为kkk,然后在测试类中输出,然后在测试类将name重新赋值为bbb,然后在基类中进行输出。如果测试类中输出了kkk,那么说明基类与测试类的textJunit共享了一个实例,如果测试类输出了null说明没有共享。
①singleton测试(首先将TextJunit类添加@Scope("singleton")注解)②prototype测试(首先将TextJunit类添加@Scope("prototype")注解)从中可以看出singleton(单例)、prototype各自发挥了作用。
三、问题与结论
在进行Spring结合Junit的测试过程中,发现了测试启动不了的问题
经过排查发现项目中存在Junit 4.3的jar包,后来我在maven中又添加了4.9的jar包,出现jar包的冲突,程序默认加载了4.3版本的jar包,所以测试程序启动不了。移除Junit 4.3版本即可。经过查找Junit官网可以发现Junit 4.9及以上才支持@RunWith(SpringJUnit4ClassRunner.class)。
很多时候我们以解决问题为目的,为达到目的费尽苦心,解决问题后全然放之脑后,没有反思,没有将解决问题的方式融入自己的方式,下次遇到问题,还是老一套,并不能提升自己解决问题的能力。技术需要脚踏实地,需要积淀。
欢迎斧正,共同进步!


