import os
import torch
import pandas as pd
from skimage import io, transform
import numpy as np
import matplotlib.pyplot as plt
from torch.utils.data import Dataset, DataLoader
from torchvision import transforms, utils
# Ignore warnings
import warnings
warnings.filterwarnings("ignore")
载入图片和坐标
landmarks_frame = pd.read_csv('data/faces/face_landmarks.csv')
n=65
img_name = landmarks_frame.iloc[n, 0]  #获取图片的名称
landmarks = landmarks_frame.iloc[n, 1:].as_matrix()  #获取点的位置
landmarks = landmarks.astype('float').reshape(-1, 2)
landmarks_frame.iloc[:3, :] #展示一下csv里面的格式
| image_name | part_0_x | part_0_y | part_1_x | part_1_y | part_2_x | part_2_y | part_3_x | part_3_y | part_4_x | ... | part_63_x | part_63_y | part_64_x | part_64_y | part_65_x | part_65_y | part_66_x | part_66_y | part_67_x | part_67_y | |
|---|---|---|---|---|---|---|---|---|---|---|---|---|---|---|---|---|---|---|---|---|---|
| 0 | 0805personali01.jpg | 27 | 83 | 27 | 98 | 29 | 113 | 33 | 127 | 39 | ... | 93 | 136 | 100 | 141 | 93 | 135 | 89 | 135 | 84 | 134 |
| 1 | 1084239450_e76e00b7e7.jpg | 70 | 236 | 71 | 257 | 75 | 278 | 82 | 299 | 90 | ... | 148 | 311 | 179 | 308 | 149 | 312 | 137 | 314 | 128 | 312 |
| 2 | 10comm-decarlo.jpg | 66 | 114 | 65 | 128 | 67 | 142 | 68 | 156 | 72 | ... | 128 | 162 | 136 | 167 | 127 | 166 | 121 | 165 | 116 | 164 |
3 rows × 137 columns
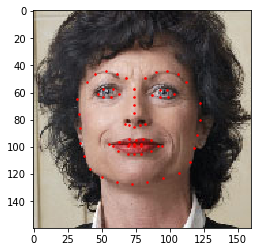
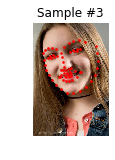
接下来,是如何展示图片,以及把点画在图片之上
def show_landmarks(image, landmarks):
    fig, ax = plt.subplots()
    ax.imshow(image)
    ax.scatter(landmarks[:, 0], landmarks[:, 1], s=10, marker='.', c='r')
    plt.pause(0.001)  #暂停让图片更新?
    plt.show()

show_landmarks(io.imread(os.path.join('data/faces/', img_name)),
              landmarks)
torch.utils.data.Dataset是一个抽象基类表示一个数据集,我们需要为其设定__len__方法和__getitem__方法.
class FaceLandmarksDataset(Dataset):
    def __init__(self, csv_file, root_dir, transform=None):
        self.landmarks_frame = pd.read_csv(csv_file)
        self.root_dir = root_dir
        self.transform = transform

    def __len__(self):
        return len(self.landmarks_frame)

    def __getitem__(self, idx):
        img_name = os.path.join(self.root_dir,
                               self.landmarks_frame.iloc[idx, 0])
        image = io.imread(img_name)
        landmarks = self.landmarks_frame.iloc[idx, 1:]
        landmarks = np.array([landmarks])
        landmarks = landmarks.astype('float').reshape(-1, 2)
        sample = {'image': image, 'landmarks': landmarks}

        if self.transform:
            sample = self.transform(sample)

        return sample
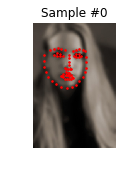
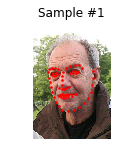
利用这个类,我们来展示一下前4幅图像
face_dataset = FaceLandmarksDataset(csv_file='data/faces/face_landmarks.csv',
                                    root_dir='data/faces/')

def show_landmarks(image, landmarks):
    plt.imshow(image)
    plt.scatter(landmarks[:, 0], landmarks[:, 1], s=10, marker='.', c='r')
    plt.pause(0.001)  #暂停让图片更新?

fig = plt.figure()
for i in range(len(face_dataset)):
    sample = face_dataset[i]
    print(i, sample['image'].shape, sample['landmarks'].shape)

    ax = plt.subplot(1, 4, i+1)
    plt.tight_layout()
    ax.set_title("Sample #{}".format(i))
    ax.axis("off")
    show_landmarks(**sample)
    if i == 3:
        plt.show()
        break
0 (324, 215, 3) (68, 2)
1 (500, 333, 3) (68, 2)
2 (250, 258, 3) (68, 2)

3 (434, 290, 3) (68, 2)
Transforms
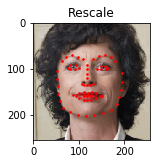
很多时候,我们需要对图片进行一些变化,比方说大小的调整等等
利用函子(_call_)能够很好很方便对图片进行处理
class Rescale(object):
    """Rescale the image in a sample to a given size.

    Args:
        output_size (tuple or int): Desired output size. If tuple, output is
            matched to output_size. If int, smaller of image edges is matched
            to output_size keeping aspect ratio the same.
    """

    def __init__(self, output_size):
        assert isinstance(output_size, (int, tuple)) #output_size应当是一个整数或者元组
        self.output_size = output_size

    def __call__(self, sample):
        image, landmarks = sample['image'], sample['landmarks']

        h, w = image.shape[:2]
        if isinstance(self.output_size, int): #如果是一个整数,那么缩放的逻辑是要保持比例
            if h > w:
                new_h, new_w = self.output_size * h / w, self.output_size
            else:
                new_h, new_w = self.output_size, self.output_size * w / h
        else: #否则就直接等于就好了
            new_h, new_w = self.output_size

        new_h, new_w = int(new_h), int(new_w)

        img = transform.resize(image, (new_h, new_w))

        # h and w are swapped for landmarks because for images,
        # x and y axes are axis 1 and 0 respectively
        landmarks = landmarks * [new_w / w, new_h / h] #坐标也要相应改变大小

        return {'image': img, 'landmarks': landmarks}
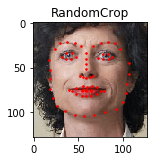
class RandomCrop(object): #随机裁剪,但是实际上是一整块来的
    """Crop randomly the image in a sample.

    Args:
        output_size (tuple or int): Desired output size. If int, square crop
            is made.
    """

    def __init__(self, output_size):
        assert isinstance(output_size, (int, tuple))
        if isinstance(output_size, int):
            self.output_size = (output_size, output_size)
        else:
            assert len(output_size) == 2
            self.output_size = output_size

    def __call__(self, sample):
        image, landmarks = sample['image'], sample['landmarks']

        h, w = image.shape[:2]
        new_h, new_w = self.output_size

        top = np.random.randint(0, h - new_h)
        left = np.random.randint(0, w - new_w)

        image = image[top: top + new_h,
                      left: left + new_w]

        landmarks = landmarks - [left, top]

        return {'image': image, 'landmarks': landmarks}
class ToTensor(object):
    """Convert ndarrays in sample to Tensors."""

    def __call__(self, sample):
        image, landmarks = sample['image'], sample['landmarks']

        # swap color axis because
        # numpy image: H x W x C
        # torch image: C X H X W
        image = image.transpose((2, 0, 1)) #把ndarray转换为tensor需要改变顺序
        return {'image': torch.from_numpy(image),
                'landmarks': torch.from_numpy(landmarks)}
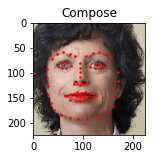
Compose transforms
利用torchvision.transforms.Compose可以帮助我们对一个图片进行多个操作
scale = Rescale(256)
crop = RandomCrop(128)
composed = transforms.Compose([Rescale(256),
                               RandomCrop(224)])

# Apply each of the above transforms on sample.
fig = plt.figure()
sample = face_dataset[65]
for i, tsfrm in enumerate([scale, crop, composed]):
    transformed_sample = tsfrm(sample)

    ax = plt.subplot(1, 3, i + 1)
    plt.tight_layout()
    ax.set_title(type(tsfrm).__name__)
    show_landmarks(**transformed_sample)

plt.show()
数据集的迭代
我们可以用 for ... in ... 来迭代数据集,但是这么做并不方便,因为很多时候训练神经网络是要分批和打乱顺序的torch.utils.data.DataLoader可以帮助我们完成这一个目标
transformed_dataset = FaceLandmarksDataset(csv_file='data/faces/face_landmarks.csv',
                                           root_dir='data/faces/',
                                           transform=transforms.Compose([
                                               Rescale(256),
                                               RandomCrop(224),
                                               ToTensor()
                                           ]))
dataloader = DataLoader(transformed_dataset, batch_size=4,
                        shuffle=True, num_workers=0) #batch_size: batch的大小 shuffle=True表示顺序打乱
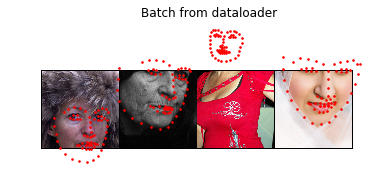
def show_landmarks_batch(sample_batched):
    """Show image with landmarks for a batch of samples."""
    images_batch, landmarks_batch =
            sample_batched['image'], sample_batched['landmarks']
    batch_size = len(images_batch)
    im_size = images_batch.size(2)
    grid_border_size = 2

    grid = utils.make_grid(images_batch) #为图片加入边框
    plt.imshow(grid.numpy().transpose((1, 2, 0)))

    for i in range(batch_size):
        plt.scatter(landmarks_batch[i, :, 0].numpy() + i * im_size + (i + 1) * grid_border_size, #既然图片加了边框,而且并排放置,所以我们需要把这部分加上去
                    landmarks_batch[i, :, 1].numpy() + grid_border_size,
                    s=10, marker='.', c='r')

        plt.title('Batch from dataloader')
for i_batch, sample_batched in enumerate(dataloader):
    print(i_batch, sample_batched['image'].size(),
          sample_batched['landmarks'].size())


    if i_batch == 0:
        plt.figure()
        show_landmarks_batch(sample_batched)
        plt.axis('off')
        plt.ioff()
        plt.show()
        break
0 torch.Size([4, 3, 224, 224]) torch.Size([4, 68, 2])
224