一个兼职DBA的数据库运维经验 小米科技 xx@xiaomi.com 2011
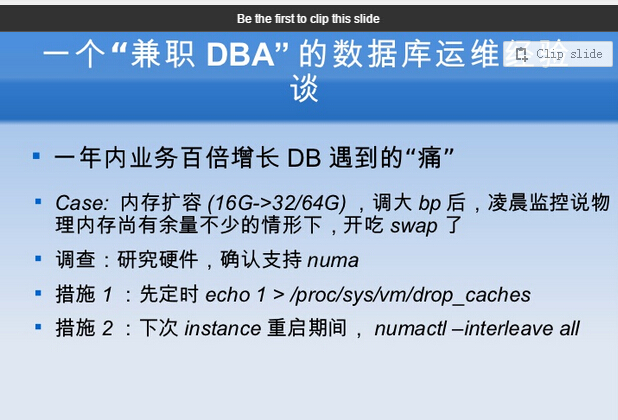
内存扩容 16G-》64G ,调大bp后,凌晨说监控物理内存有余量情况下,开吃swap,内存泄露
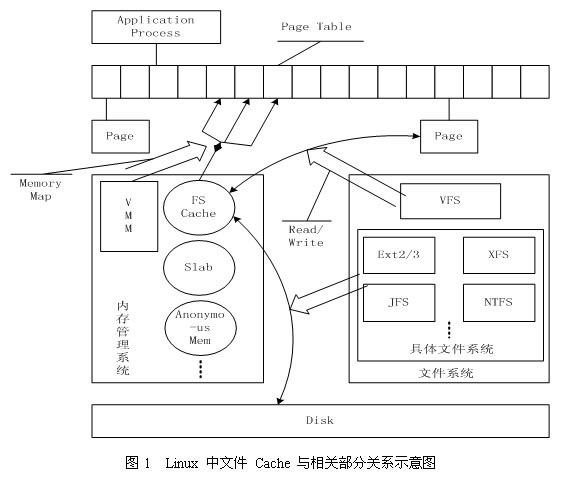
措施1 定时 echo 1 >/proc/sys/vm/drop_caches 页面缓存
措施2 下次mysql实例重启期间,numactl --interleave=all mysqld & 启动mysql时候关闭numa特性
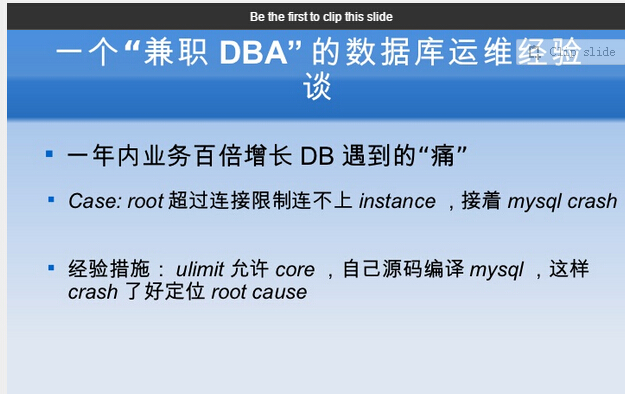
ulimit允许core
ulimit -c 最大的core文件大小,以block为单位 ulimit -c unlimited 对生成core文件大小不进行限制
需要深入了解OS底层才能运维好上层应用
报警监控系统粒度太大,不好用(我们公司现状)
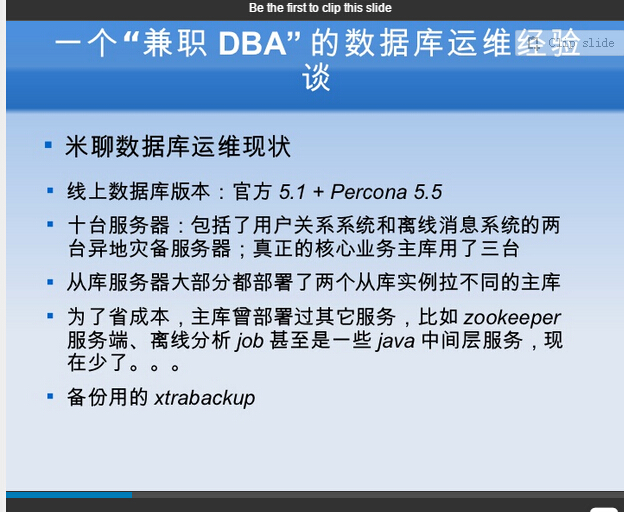
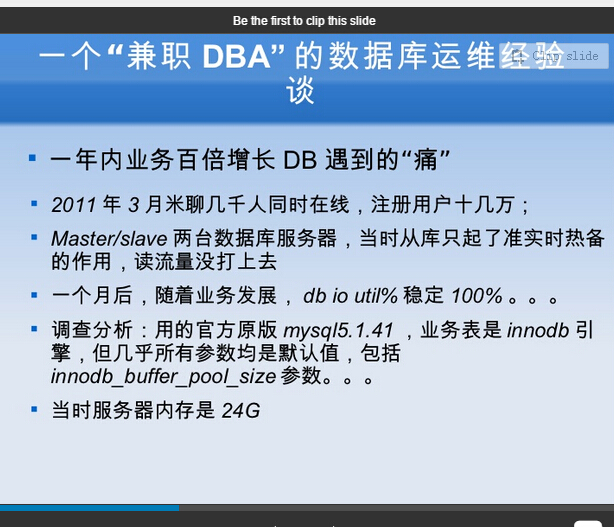
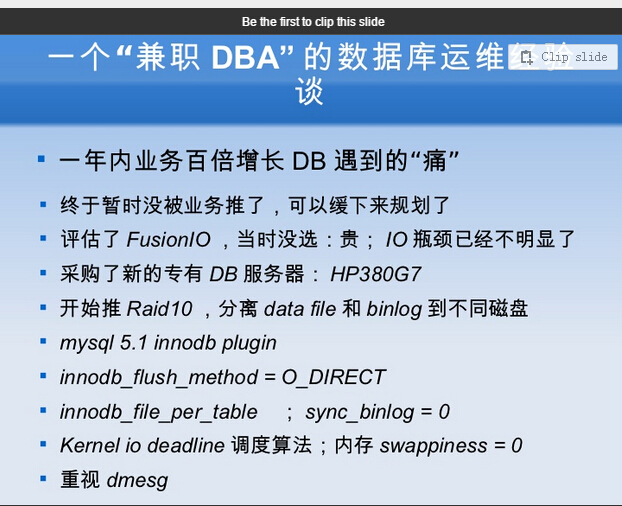
数据库状况:十个服务器,惠普HP380G7 戴尔R710 ,都做了主从
全部sas盘 15K RAID10
服务器内存24G
数据库跟业务混用,不是专门给数据库用 导致出问题(我们公司现状)
备份用的xtrabackup
数据库不大:160G 70G 30G
程序支持分库分表(未做到)
--------------------------
问题
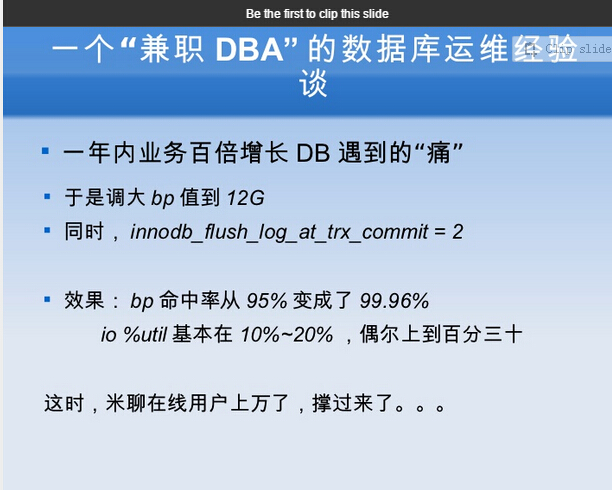
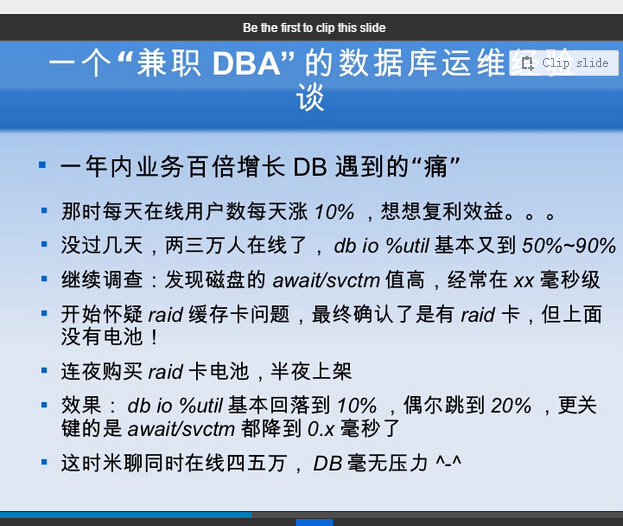
io util% 100%(学)
正常io util%应该稳定在20%~30%
磁盘await/svctm值高,经常在毫秒级(学)
问题:
raid卡电池无电(学)
买电池后,io util% 降到10%,await/svctm值在0.x毫秒级
数据数据和binlog文件分到不同磁盘(未做到)
kernel io deadline调度算法
内存 swappiness=0,即使swappiness=0 也有可能使用swap(学)
重视dmesg(学)
架构优化后,qps稳定在1500~2000
源码编译mysql
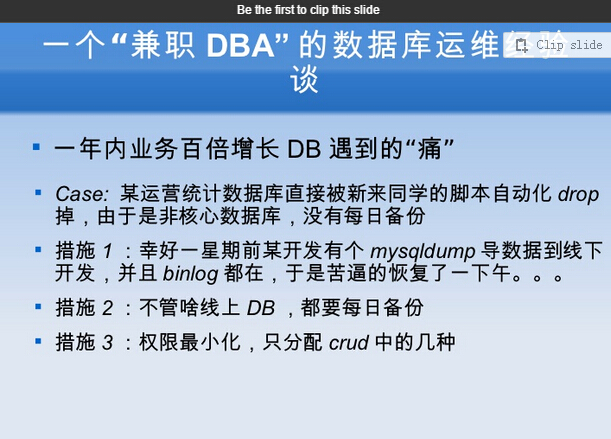
权限最小化,只分配CRUD权限(已经做到)
内存扩容16G->64G ,调大bp后,凌晨监控内存有余量情况下,开吃swap
解决方法1:定时 echo 1> /proc/sys/vm/drop_caches (学)
解决方法2:下次mysql实例重启期间,numactl --interleave=all mysqld & 启动mysql时候关闭numa特性 (学)
执行计划不好,就直接force index
我们公司现状
报警监控系统粒度太大,不好用
数据库跟业务混用,不是专门给数据库用 导致出问题
学
io util% 100%
磁盘await/svctm值高,经常在毫秒级
raid卡电池无电
内存 swappiness=0
重视dmesg
解决方法1:定时 echo 1> /proc/sys/vm/drop_caches
解决方法2:下次实例重启期间,numactl --interleave=all mysqld & 启动mysql时候关闭numa特性
做到
权限最小化,只分配CRUD权限
未做到
程序支持分库分表
数据数据和binlog文件分到不同磁盘
linux swap空间的swappiness=0
http://blog.csdn.net/wulantian/article/details/36184943
linux会使用硬盘的一部分做为SWAP分区,用来进行进程调度--进程是正在运行的程序--把当前不用的进程调成‘等待(standby)‘,甚至‘睡眠(sleep)’,一旦要用,再调成‘活动(active)’,睡眠的进程就躺到SWAP分区睡大觉,把内存空出来让给‘活动’的进程。
如果内存够大,应当告诉 linux 不必太多的使用 SWAP 分区, 可以通过修改 swappiness 的数值。swappiness=0的时候表示最大限度使用物理内存,然后才是 swap空间,swappiness=100的时候表示积极的使用swap分区,并且把内存上的数据及时的搬运到swap空间里面。
在linux里面,默认设置swappiness这个值等于60。
现在一般1个G的内存可修改为10, 2个G的可改为5, 甚至是0。具体这样做:
1.查看你的系统里面的swappiness
$ cat /proc/sys/vm/swappiness
不出意外的话,你应该看到是 60
2.修改swappiness值为10
$ sudo sysctl vm.swappiness=10
但是这只是临时性的修改,在你重启系统后会恢复默认的60,为长治久安,还要更进一步:
$ sudo gedit /etc/sysctl.conf
在这个文档的最后加上这样一行:
vm.swappiness=10
然后保存,重启。ok,你的设置就生效了。
值为0、1、60、100时的效果
0 Linux3.5或以上,宁愿用OOM Killer也不用swap
Linux3.4或之前,宁愿用swap也不用OOM Killer
1 Linux3.5或以上,宁愿用swap也不用OOM Killer
60 默认值
100 操作系统主动使用swap
redis开发与运维
Linux下清理内存和Cache方法 /proc/sys/vm/drop_caches
--http://www.linuxidc.com/Linux/2010-03/24939.htm
频繁的文件访问会导致系统的Cache使用量大增
$ free -m
total used free shared buffers cached
Mem: 3955 3926 28 0 55 3459
-/+ buffers/cache: 411 3544
Swap: 5726 0 5726
free内存减少到几十兆,系统运行缓慢
运行sync将dirty的内容写回硬盘
$sync
通过修改proc系统的drop_caches清理free的cache
$echo 3 > /proc/sys/vm/drop_caches
drop_caches的详细文档如下:
Writing to this will cause the kernel to drop clean caches, dentries and inodes from memory, causing that memory to become free.
To free pagecache:
* echo 1 > /proc/sys/vm/drop_caches
To free dentries and inodes:
* echo 2 > /proc/sys/vm/drop_caches
To free pagecache, dentries and inodes:
* echo 3 > /proc/sys/vm/drop_caches
As this is a non-destructive operation, and dirty objects are notfreeable, the user should run "sync" first in order to make sure allcached objects are freed.
This tunable was added in 2.6.16.
修改/etc/sysctl.conf 添加如下选项后就不会内存持续增加
vm.dirty_ratio = 1
vm.dirty_background_ratio=1
vm.dirty_writeback_centisecs=2
vm.dirty_expire_centisecs=3
vm.drop_caches=3
vm.swappiness =100
vm.vfs_cache_pressure=163
vm.overcommit_memory=2
vm.lowmem_reserve_ratio=32 32 8
kern.maxvnodes=3
上面的设置比较粗暴,使cache的作用基本无法发挥。需要根据机器的状况进行适当的调节寻找最佳的折衷。
清理linux内存cache
--http://blog.chinaunix.net/uid-25505925-id-180921.html
在使用grep从很多文件中搜索特定数据串的时候,发现内存使用迅速提高,主要是cache的使用占用了相当多的内存。在使用下面命令的时候忽视了文件的数量和文件大小,导致cache突增。
# grep -e "dst_string" ./*
大家在使用shell编程的时候一定要注意通配符的使用,这里尤其提醒大家就是星号(*)的使用,星号固然方便,但要适度使用。
这里主要还是记录如何手动清理linux内存cache,因为上面的操作使用的大量的cache。
1、使用free查看一下当前内存使用情况:
# free
total used free shared buffers cached
Mem: 16621896 8967952 7653944 0 212352 8377276
-/+ buffers/cache: 378324 16243572
Swap: 10241428 0 10241428
2、执行sync同步数据
# sync
该命令将未写的系统缓冲区写到磁盘中。包含已修改的 i-node、已延迟的块 I/O 和读写映射文件。
3、清理cache
# echo 3 > /proc/sys/vm/drop_caches
# free
total used free shared buffers cached
Mem: 16621896 579592 16042304 0 268 308708
-/+ buffers/cache: 270616 16351280
Swap: 10241428 0 10241428
4、对比一下加粗部分就清楚了,cache被清理掉了。
参考资料:
http://www.linuxidc.com/Linux/2010-03/24939.htm
http://han19838383.blog.163.com/blog/static/54316486201101032825333/
5、drop_cache的详细文档如下,以便查阅(摘自:http://www.linuxidc.com/Linux/2010-03/24939.htm)
Writing to this will cause the kernel to drop clean caches, dentries and inodes from memory, causing that memory to become free.
To free pagecache:
* echo 1 > /proc/sys/vm/drop_caches
To free dentries and inodes:
* echo 2 > /proc/sys/vm/drop_caches
To free pagecache, dentries and inodes:
* echo 3 > /proc/sys/vm/drop_caches
As this is a non-destructive operation, and dirty objects are notfreeable, the user should run "sync" first in order to make sure allcached objects are freed.
This tunable was added in 2.6.16.
f

f

f

f
f

f
f
f
f
f

f

f
f

f
f
f
f

f
f
f
f
我先来解释一下这三个步骤的作用:
第一步,使用free命令查看内存,这其实没有什么实际作用,就是做个前后对比;
第二步,执行sync命令,是为了确保文件系统的完整性(sync命令将所有未写的系统缓存写到磁盘中);
第三步,执行echo 3 > /proc/sys/vm/drop_caches就开始释放内存了。
这里说明一下/proc/sys/vm/drop_caches的作用:
当写入1时,释放页面缓存 #无任何危害
写入2时,释放目录文件和inodes
写入3时,释放页面缓存、目录文件和inodes #缓存目录文件和inodes的目的跟B树缓存根节点和中间节点的原理一样,快速查找叶子节点,快速根据内存中的inode找到data block
# free -m
total used free shared buffers cached
Mem: 996 925 71 9 187 252
-/+ buffers/cache: 484 511
Swap: 2047 400 1647

http://www.ibm.com/developerworks/cn/linux/l-cache/
f
MySQL工作故障运行中的MySQL被drop cache导致丢数据的案例
http://www.pro-mysql.com/2016/03/11/%E8%BF%90%E8%A1%8C%E4%B8%AD%E7%9A%84mysql%E8%A2%ABdrop-cache%E5%AF%BC%E8%87%B4%E4%B8%A2%E6%95%B0%E6%8D%AE%E7%9A%84%E6%A1%88%E4%BE%8B/
生产环境,一天回来,MySQL中丢了一些数据,咨询发现做了以下操作
echo 3 > /proc/sys/vm/drop_caches
具体看文档,最怕乱来的人
/proc/sys/vm/drop_caches (since Linux 2.6.16)
Writing to this file causes the kernel to drop clean caches, dentries and inodes from memory, causing that memory to become free.
To free pagecache, use echo 1 > /proc/sys/vm/drop_caches; to free dentries and inodes, use echo 2 > /proc/sys/vm/drop_caches; to free pagecache, dentries and inodes, use echo 3 > /proc/sys/vm/drop_caches.
Because this is a non-destructive 非破坏性操作operation and dirty objects 脏对象不会释放 are not freeable, the user should run sync first 用户必须要先执行sync命令.
sync
echo 3 > /proc/sys/vm/drop_caches
swapoff -a
swapon -a
可以cat一下/proc/sys/vm/drop_caches,看一下之前是否有人改过/proc/sys/vm/drop_caches,在/etc/sysctl.conf或者手动echo 3 > /proc/sys/vm/drop_caches
cat /proc/sys/vm/drop_caches
0
f
f
f
f
f
f