centos LNMP第一部分环境搭建 LAMP安装先后顺序 LNMP安装先后顺序 php安装 安装nginx 编写nginx启动脚本 懒汉模式 mv /usr/local/php/{p.conf.default,p.conf} php运行方式SAPI介绍 第二十三节课
推荐搜狐下载地址:http://mirrors.sohu.com/nginx/
LAMP安装先后顺序:mysql-》apache-》php
LNMP安装先后顺序:mysql-》php-》nginx(nginx的安装顺序怎样都无所谓)
注意:LAMP删除php整个目录也无所谓,因为apache只是调用/usr/local/apache2/modules/libphp5.so这个文件已而
apache会自动加载php模块
在apache目录下查找php模块: ls /usr/local/apache2/modules/libphp5.so
编译php的时候修改一下php.ini的位置,否则找不到php.ini无法启动php
./configure
--with-config-file-path=/usr/local/php/etc
上半节课
LAMP安装先后顺序
LNMP安装先后顺序
php安装
下半节课
安装nginx
编写nginx启动脚本
配置解析nginx.conf
懒汉模式 mv /etc/{php-fpm.conf.default,php-fpm.conf}
apache中的php和nginx中的php区别
php运行方式SAPI介绍
1. MySQL安装(同LAMP里面的安装方法)
2. php安装
注意:
1、php配置参数--with-mysql=/usr/local/mysql
懂的人可以只安装MySQL的库文件不用整个MySQL安装,比如局域网内两台机器,一台是数据库专用,一台是web,web那台也要安装mysql,安装php的时候不能远程连接mysql
--with-mysql=192.168.1.23/usr/local/mysql 这样配置是错的
但是web那台的mysql可以不启动mysql服务
2、--prefix=/usr/local/php 、--with-config-file-path=/usr/local/php/etc
如果先前已经安装过php,必须指定一个不同的名字,以免覆盖之前安装的php,比如改名为/usr/local/php-fpm ,/usr/local/php-fpm/etc
3、依赖库文件通常不会有什么问题,因为依赖的库文件都在安装上节课LAMP的时候安装上了
4、把apache的侦听端口改为8080或者把apache侦听ip改为lo这个网卡,否则nginx和apache使用同样的侦听端口会启动失败
5、php安装过程中缺少依赖文件,查看一下然后安装
yum list |grep -i curl
yum install -y libcurl-devel.i686
yum install -y libcurl-devel.i686
yum install -y libpng-devel
yum install -y freetype-devel.x86_64
yum install -y libpng-devel
yum install libjpeg-devel -y
yum install -y libcurl-devel
yum install gcc -y
yum install libxslt-devel  -y
yum install libmcrypt libmcrypt-devel -y
wget http://cn2.php.net/distributions/php-5.4.37.tar.bz2
tar jxf php-5.4.37.tar.bz2
groupadd php-fpm
useradd -s /sbin/nologin -g php-fpm  -d /dev/null  php-fpm
mkdir -p /usr/local/php-fpm
cd php-5.4.37
./configure --prefix=/usr/local/php-fpm --with-config-file-path=/usr/local/php-fpm/etc --enable-fpm --with-fpm-user=php-fpm --with-fpm-group=php-fpm --with-mysql=/usr/local/mysql --with-mysql-sock=/tmp/mysql.sock --with-libxml-dir --with-gd --with-jpeg-dir --with-png-dir --with-freetype-dir --with-iconv-dir --with-zlib-dir --with-mcrypt --enable-soap --enable-gd-native-ttf --enable-ftp --enable-mbstring --enable-exif --disable-ipv6 --with-curl

//即使编译的时候指定了php的用户和组,以后还可以通过修改配置文件(php-fpm.conf)来修改--with-fpm-user=php-fpm --with-fpm-group=php-fpm
echo $?
make && make install
echo $?
cp php.ini-production /usr/local/php-fpm/etc/php.ini
cp /download/php-5.4.37/sapi/fpm/init.d.php-fpm /etc/init.d/php-fpm   //拷贝启动脚本
mv   /usr/local/php-fpm/etc/{php-fpm.conf.default,php-fpm.conf}    //php-fpm的配置文件
chmod 755 /etc/init.d/php-fpm
chkconfig --add php-fpm
service php-fpm start
chkconfig php-fpm on
./configure的时候报错:
configure: error: Please reinstall the libcurl distribution -easy.h should be in <curl-dir>/include/curl/
yum install -y libcurl-devel
configure: error: jpeglib.h not found.
yum install libjpeg-devel -y
configure: error: png.h not found.
yum install -y libpng-devel
configure: error: freetype-config not found.
yum install -y freetype-devel.x86_64
3. 安装nginx
rpm -qa nginx //查看是否已经安装过nginx 把他卸载
yum remove nginx
cd /download
wget http://nginx.org/download/nginx-1.6.3.tar.gz
tar zxvf nginx-1.6.3.tar.gz
cd nginx-1.6.3

yum install -y pcre-devel   //安装pcre 为了确保能在 Nginx 中使用正则表达式进行更灵活配置安装之前需要确定系统是否安装有 PCRE(Perl Compatible Regular Expressions)包,perl语言兼容正则表达式
./configure --prefix=/usr/local/nginx --with-pcre
make && make install


启动nginx:
/usr/local/nginx/sbin/nginx
4. 编写nginx启动脚本
vi /etc/init.d/nginx //加入如下内容
#!/bin/bash
# chkconfig: 35 30 21     //3级别 5级别  可以参考/etc/init.d/iptables
# description: http service.
# Source Function Library
. /etc/init.d/functions
# Nginx Settings

NGINX_SBIN="/usr/local/nginx/sbin/nginx"    //注意路径
NGINX_CONF="/usr/local/nginx/conf/nginx.conf"  //注意路径
NGINX_PID="/usr/local/nginx/logs/nginx.pid"   //注意路径
RETVAL=0
prog="Nginx"

start() {
echo -n $"Starting $prog: "
mkdir -p /dev/shm/nginx_temp
daemon $NGINX_SBIN -c $NGINX_CONF
RETVAL=$?
echo
return $RETVAL
}

stop() {
echo -n $"Stopping $prog: "
killproc -p $NGINX_PID $NGINX_SBIN -TERM
rm -rf /dev/shm/nginx_temp
RETVAL=$?
echo
return $RETVAL
}

reload(){
echo -n $"Reloading $prog: "
killproc -p $NGINX_PID $NGINX_SBIN -HUP
RETVAL=$?
echo
return $RETVAL
}

restart(){
stop
start
}

configtest(){
$NGINX_SBIN -c $NGINX_CONF -t
return 0
}

case "$1" in
start)
start
;;
stop)
stop
;;
reload)
reload
;;
restart)
restart
;;
configtest)
configtest
;;
*)
echo $"Usage: $0 {start|stop|reload|restart|configtest}"
RETVAL=1
esac
exit $RETVAL

保存后,执行
chmod a+x /etc/init.d/nginx
chkconfig --add nginx
chkconfig nginx on
chkconfig --list nginx
killall httpd
service nginx start
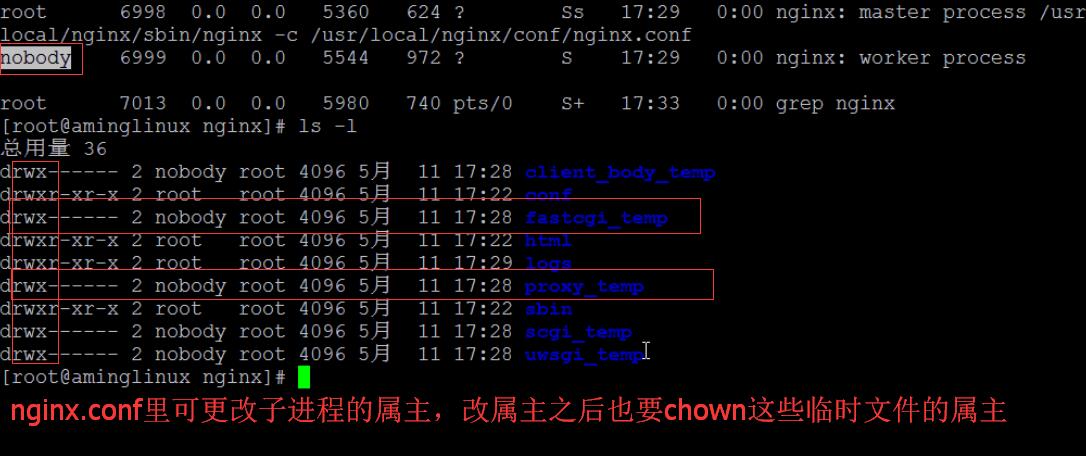
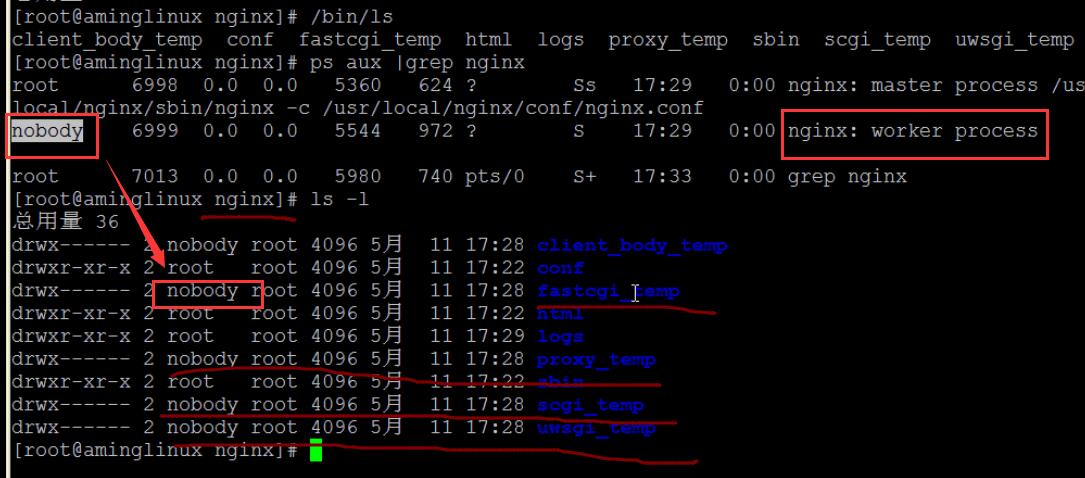
ps aux |grep nginx |grep -v grep
root 5160 0.0 0.0 23812 780 ? Ss 21:02 0:00 nginx: master process /usr/local/nginx/sbin/nginx -c /usr/local/nginx/conf/nginx.conf
nobody 5161 0.0 0.1 24236 1380 ? S 21:02 0:00 nginx: worker process
nginx.conf里可以更改子进程的属主为其他,那么更改属主之后也要chown /usr/local/nginx/下面的某些临时文件/目录的属主,否则无法读写这些临时文件/目录,默认是nobody
子进程:nobody 5161 0.0 0.1 24236 1380 ? S 21:02 0:00 nginx: worker process
5. 配置解析nginx.conf
vi /usr/local/nginx/conf/nginx.conf //把下面的配置,前面的#删除,并更改fastcgi_param SCRIPT_FILENAME 那一行
server {
listen 80;
server_name www.123.com;

#access_log logs/www.123.com.access.log main;   //#设定本虚拟主机的访问日志


location / {

root /data/www;
index index.php index.html index.htm;
}

//PHP 脚本请求全部转发到 FastCGI处理. 使用FastCGI默认配置.

location ~ .php$ {
root /data/www;    //这里要改
fastcgi_pass 127.0.0.1:9000;   //PHP监听端口
fastcgi_index index.php;
fastcgi_param SCRIPT_FILENAME /data/www$fastcgi_script_name;   //这里要改
include fastcgi_params; }
测试 /usr/local/nginx/sbin/nginx -t
重新加载 /usr/local/nginx/sbin/nginx -s reload
vim /usr/local/nginx/html/1.php
增加
<?php
phpinfo();
?>
测试: curl localhost/1.php
懒汉模式
前提:都在同一个目录下
同一个目录下多个文件需要mv
mv /usr/local/php/etc/{php-fpm.conf.default,php-fpm.conf}
mkdir /usr/local/{data,logs}
效果:将 /usr/local/php/etc/php-fpm.conf.default 改名为/usr/local/php/etc/php-fpm.conf
apache中的php和nginx中的php区别
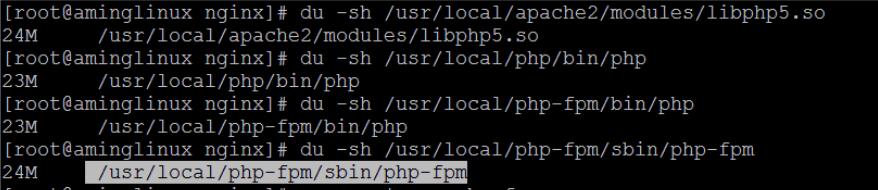
libphp5.so:只是一个模块
php-fpm:完整的程序 可以监听端口 可以自动启动
php:只是一个可执行程序,不可以自动启动,不可以监听端口
nginx只是代理php,本身不加载php模块
apache自始至终都是httpd进程在执行,只是加载了php模块,拥有php脚本解析功能
tar zxf php-5.3.28.tar.gz
cd php-5.3.28
./configure
--prefix=/usr/local/php //这个一定要加
--with-apxs2=/usr/local/apache2/bin/apxs //一定要加 结合apache 要先安装perl否则会报错
php源码编译常见错误解决方案
http://www.cnblogs.com/MYSQLZOUQI/p/4990441.html
扩展阅读
php运行方式SAPI介绍
http://www.phpddt.com/php/php-sapi.html
SAPI:Server Application Programming Interface 服务器端应用编程接口。它就是PHP与其它应用交互的接口,PHP脚本要执行有很多种方式,通过Web服务器,或者直接在命令行下,也可以嵌入在其他程序中。
SAPI提供了一个和外部通信的接口,常见的SAPI有:cgi 、fast-cgi、cli、isapi、apache 模块的 DLL
1、CGI
CGI即通用网关接口(Common Gateway Interface),它是一段程序,通俗的讲CGI就象是一座桥,把网页和WEB服务器中的执行程序连接起来,它把HTML接收的指令传递给服务器的执 行程序,再把服务器执行程序的结果返还给HTML页。CGI 的跨平台性能极佳,几乎可以在任何操作系统上实现。
CGI方式在遇到连接请求(用户 请求)先要创建cgi的子进程,激活一个CGI进程,然后处理请求,处理完后结束这个子进程。这就是fork-and-execute模式。所以用cgi 方式的服务器有多少连接请求就会有多少cgi子进程,子进程反复加载是cgi性能低下的主要原因。都会当用户请求数量非常多时,会大量挤占系统的资源如内 存,CPU时间等,造成效能低下。
2、FastCGI
fast-cgi 是cgi的升级版本,FastCGI像是一个常驻(long-live)型的CGI,它可以一直执行着,只要激活后,不会每次都要花费时间去fork一 次。PHP使用PHP-FPM(FastCGI Process Manager),全称PHP FastCGI进程管理器进行管理。
FastCGI的工作原理
Web Server启动时载入FastCGI进程管理器(IIS ISAPI或Apache Module)
FastCGI进程管理器自身初始化,启动多个CGI解释器进程(可见多个php-cgi)并等待来自Web Server的连接。
当客户端请求到达Web Server时,FastCGI进程管理器选择并连接到一个CGI解释器。Web server将CGI环境变量和标准输入发送到FastCGI子进程php-cgi。
FastCGI子进程完成处理后将标准输出和错误信息从同一连接返回WebServer。
当FastCGI子进程关闭连接时,请求便告处理完成。FastCGI子进程接着等待并处理来自FastCGI进程管理器(运行在Web Server中)的下一个连接。 在CGI模式中,php-cgi在此便退出了。
在上述情况中,你可以想象CGI通常有多慢。每一个Web 请求PHP都必须重新解析php.ini、重新载入全部扩展并重初始化全部数据结构。使用FastCGI,所有这些都只在进程启动时发生一次。一个额外的 好处是,持续数据库连接(Persistent database connection)可以工作。
3、APACHE2HANDLER
PHP作为Apache模块,Apache服务器在系统启动后,预先生成多个进程副本驻留在内存中,一旦有请求出 现,就立即使用这些空余的子进程进行处理,这样就不存在生成子进程造成的延迟了。这些服务器副本在处理完一次HTTP请求之后并不立即退出,而是停留在计 算机中等待下次请求。对于客户浏览器的请求反应更快,性能较高。
4、apache模块的DLL:
该运行模式是我们以前在windows环境下使用apache服务器经常使用的,而在模块化(DLL)中,PHP是与Web服务器一起启动并运行的。(是apache在CGI的基础上进行的一种扩展,加快PHP的运行效率)libphp5.so linux下
5、ISAPI 微软IIS:
ISAPI即Internet Server Application Program Interface,是微软提供的一套面向Internet服务的API接口.一个ISAPI的DLL,可以在被用户请求激活后长驻内存,等待用户的另一个请求,还可以在一个DLL里设置多个用户请求处理函数,此外,ISAPI的DLL应用程序和WWW服务器处于同一个进程中,效率要显著高于CGI。
cli:[php CLI模式介绍]
cli是php的命令行运行模式,大家经常会使用它,但是可能并没有注意到(例如:我们在linux下经常使用 “php -m”查找PHP安装了那些扩展就是PHP命令行运行模式;
root@steven php-5.4.37]# ls sapi/
aolserver       caudium     fpm        phttpd  tux
apache          cgi         isapi      pi3web  webjames
apache2filter   cli         litespeed  roxen
apache2handler  continuity  milter     tests
apache_hooks    embed       nsapi      thttpd
fpm
apache
cgi
isapi
cli
apache2handler
PCRE 库 正则需要用 nginx php
http://baike.baidu.com/link?url=3PRJOR-aLbXAdNtXjgTytMwW45PJheQv-MpwgSktzpTU7_tpN6fsq4cOlA-SEKzjj8mYBOixIf-3pWMwg38fIK
PCRE
PCRE(Perl Compatible Regular Expressions)是一个Perl库,包括 perl 兼容的正则表达式库。这些在执行正规表达式模式匹配时用与Perl 5同样的语法和语义是很有用的。Boost太庞大了,使用boost regex后,程序的编译速度明显变慢。测试了一下,同样一个程序,使用boost::regex编译时需要3秒,而使用pcre不到1秒。因此改用pcre来解决C语言中使用正则表达式的问题
PCRE(Perl Compatible Regular Expressions中文含义:perl语言兼容正则表达式)是一个用C语言编写的正则表达式函数库,由菲利普.海泽(Philip Hazel)编写。PCRE是一个轻量级的函数库,比Boost之类的正则表达式库小得多。PCRE十分易用,同时功能也很强大,性能超过了POSIX正则表达式库和一些经典的正则表达式库[1] 。
和Boost正则表达式库的比较显示[2] ,双方的性能相差无几,PCRE在匹配简单字符串时更快,Boost则在匹配较长字符串时胜出---但两者差距很小,考虑到PCRE的大小和易用性,我们可以认为PCRE更值得考虑。
PCRE被广泛使用在许多开源软件之中,最著名的莫过于Apache HTTP服务器和PHP脚本语言、R脚本语言,此外,正如从其名字所能看到的,PCRE也是perl语言的缺省正则库。
PCRE是用C语言实现的,其C++实现版本是PCRE++。
PCRE最新的版本是8.33,可以在其官方网站下载,官网地址见扩展阅读部分。
nginx详细安装步骤 一定要仔细看 !!
http://www.ibm.com/developerworks/cn/web/wa-lo-nginx/
接下来安装 Nginx,Nginx 一般有两个版本,分别是稳定版和开发版,您可以根据您的目的来选择这两个版本的其中一个,下面是把 Nginx 安装到 /opt/nginx 目录下的详细步骤:
# wget http://sysoev.r/nginx/nginx-0.6.31.tar.gz
# tar zxvf nginx-0.6.31.tar.gz
# cd nginx-0.6.31
# ./configure --with-http_stub_status_module –prefix=/opt/nginx
# make
# make install
其中参数 --with-http_stub_status_module 是为了启用 nginx 的 NginxStatus 功能,用来监控 Nginx 的当前状态。要使用监控宝监控nginx也要安装NginxStatus
安装成功后 /opt/nginx 目录下有四个子目录分别是:conf、html、logs、sbin 。其中 Nginx 的配置文件存放于 conf/nginx.conf,Nginx 只有一个程序文件位于 sbin 目录下的 nginx 文件。确保系统的 80 端口没被其他程序占用,运行 sbin/nginx 命令来启动 Nginx,打开浏览器访问此机器的 IP,如果浏览器出现 Welcome to nginx! 则表示 Nginx 已经安装并运行成功。
http://www.ibm.com/developerworks/cn/web/wa-lo-nginx/
建华的安装脚本也有
cd /software/nginx-1.4.6 && ./configure --sbin-path=/usr/sbin/nginx
--conf-path=/etc/nginx/nginx.conf --pid-path=/var/run/nginx/nginx.pid
--error-log-path=/var/log/nginx/error.log --http-log-path=/var/log/nginx/access.log
--user=nginx --group=nginx --with-pcre --with-http_gzip_static_module --with-http_ssl_module
--with-http_realip_module --with-http_geoip_module --with-http_stub_status_module
--add-module=/usr/local/nginx_upstream_check_module-master
--add-module=/usr/local/ngx_cache_purge-2.1   --with-http_gunzip_module
--add-module=/usr/local/ngx_req_status-master && make -j2 && make install
f