一、Hello World示例
1、引入依赖
<dependency>
       <groupId>javax.servlet</groupId>
       <artifactId>javax.servlet-api</artifactId>
       <version>4.0.1</version>
       <scope>provided</scope>
</dependency>
<dependency>
      <groupId>jstl</groupId>
      <artifactId>jstl</artifactId>
      <version>1.2</version>
</dependency>
<dependency>
    <groupId>org.springframework</groupId>
    <artifactId>spring-webmvc</artifactId>
    <version>4.2.5.RELEASE</version>
</dependency>
2、web.xml中定义servlet
<?xml version="1.0" encoding="UTF-8"?>
<web-app version="3.0"
    xmlns="http://java.sun.com/xml/ns/javaee"
    xmlns:xsi="http://www.w3.org/2001/XMLSchema-instance"
    xsi:schemaLocation="http://java.sun.com/xml/ns/javaee
        http://java.sun.com/xml/ns/javaee/web-app_3_0.xsd">
  <display-name>Archetype Created Web Application</display-name>

    <servlet>
        <servlet-name>test-servlet</servlet-name>
        <servlet-class>org.springframework.web.servlet.DispatcherServlet</servlet-class>
        <init-param>
            <param-name>contextConfigLocation</param-name>
            <param-value>/WEB-INF/test-servlet.xml</param-value>
        </init-param>
        <load-on-startup>1</load-on-startup>
    </servlet>

    <servlet-mapping>
        <servlet-name>test-servlet</servlet-name>
        <url-pattern>/</url-pattern>
    </servlet-mapping>

</web-app>
3、配置servlet
<?xml version="1.0" encoding="UTF-8"?>
<beans xmlns="http://www.springframework.org/schema/beans"
    xmlns:xsi="http://www.w3.org/2001/XMLSchema-instance"
    xsi:schemaLocation="http://www.springframework.org/schema/beans
           http://www.springframework.org/schema/beans/spring-beans-4.2.xsd">

    <!-- HandlerMapping -->
    <bean class="org.springframework.web.servlet.handler.BeanNameUrlHandlerMapping"/>

    <!-- HandlerAdapter -->
    <bean class="org.springframework.web.servlet.mvc.SimpleControllerHandlerAdapter"/>

    <!-- ViewResolver -->
    <bean class="org.springframework.web.servlet.view.InternalResourceViewResolver">
        <property name="viewClass" value="org.springframework.web.servlet.view.JstlView"/>
        <property name="prefix" value="/WEB-INF/jsp/"/>
        <property name="suffix" value=".jsp"/>
    </bean>

    <!-- 处理器 -->
    <bean name="/hello" class="cn.matt.controller.TestController"/>
</beans>
配置说明:
- BeanNameUrlHandlerMapping:表示将请求的URL映射为Bean名,如URL为 “上下文/hello”,则Spring配置文件必须有一个名字为“/hello”的Bean
- SimpleControllerHandlerAdapter:表示所有实现了org.springframework.web.servlet.mvc.Controller接口的Bean可以作为Spring Web MVC中的处理器
- InternalResourceViewResolver:用于支持Servlet、JSP视图解析
- viewClass:JstlView表示JSP模板页面需要使用JSTL标签库,classpath中必须包含jstl的相关jar包
- prefix、suffix:查找视图页面的前缀和后缀(前缀[逻辑视图名]后缀),比如传进来的逻辑视图名为hello,则该jsp视图页面应该存放在“WEB-INF/jsp/hello.jsp”
4、处理器
public class TestController implements Controller {
    public ModelAndView handleRequest(HttpServletRequest request, HttpServletResponse response) throws Exception {
           //1、收集参数、验证参数
           //2、绑定参数到命令对象
           //3、将命令对象传入业务对象进行业务处理
           //4、选择下一个页面
           ModelAndView mv = new ModelAndView();
           //添加模型数据 可以是任意的POJO对象
           mv.addObject("message", "Hello World!");
           //设置逻辑视图名,视图解析器会根据该名字解析到具体的视图页面
           mv.setViewName("hello");
           return mv;
    }
}
5、视图hello.jsp
<%@ page language="java" %>
<html>
<head>
<meta http-equiv="Content-Type" content="text/html; charset=ISO-8859-1">
<title>Insert title here</title>
</head>
<body>
    ${message}
</body>
</html>
使用tomcat启动,在浏览器输入 http://localhost:8080/myweb/hello 即可访问
二、DispatcherServlet详解
1、DispatcherServlet在web.xml中的配置
<servlet>
    <servlet-name>test-servlet</servlet-name>
    <servlet-class>org.springframework.web.servlet.DispatcherServlet</servlet-class>
    <init-param>
           <param-name>contextConfigLocation</param-name>
           <param-value>/WEB-INF/test-servlet.xml</param-value>
       </init-param>
    <load-on-startup>1</load-on-startup>
</servlet>
<servlet-mapping>
    <servlet-name>test-servlet</servlet-name>
    <url-pattern>/</url-pattern>
</servlet-mapping>
load-on-startup:表示启动容器时初始化该Servlet
url-pattern:表示哪些请求交给Spring Web MVC处理, “/” 是用来定义默认servlet映射的,详细可参考javaweb学习总结(五)——Servlet开发(一)
DispatcherServlet初始化配置:
- contextClass:实现WebApplicationContext接口的类, 默认使用XmlWebApplicationContext
- contextConfigLocation:指定上下文配置文件,可以被分成多个字符串(使用逗号作为分隔符) 来支持多个上下文,默认是“/WEB-INF/[servlet名字]-servlet.xml”。支持相对路径和类路径,如‘classpath:spring-mvc.xml’或‘/WEB-INF/test-servlet.xml’
- namespace:WebApplicationContext命名空间,默认值是[server-name]-servlet
2、通用上下文配置
<context-param>
     <param-name>contextConfigLocation</param-name>
     <param-value>classpath:spring-context.xml</param-value>
</context-param>
<listener>
    <listener-class>org.springframework.web.context.ContextLoaderListener</listener-class>
</listener>
通用上下文用于加载除Web层的其他Bean,如service、dao等,以便与其他Web框架集成
ContextLoaderListener初始化配置:
- contextConfigLocation:指定通用上下文配置文件,使用方式与DispatcherServlet相同,默认会去 /WEB-INFO/ 下加载applicationContext.xml
- contextClass:指定ApplicationContext的实现类,默认为XmlWebApplicationContext
3、DispatcherServlet上下文与通用上下文的关系
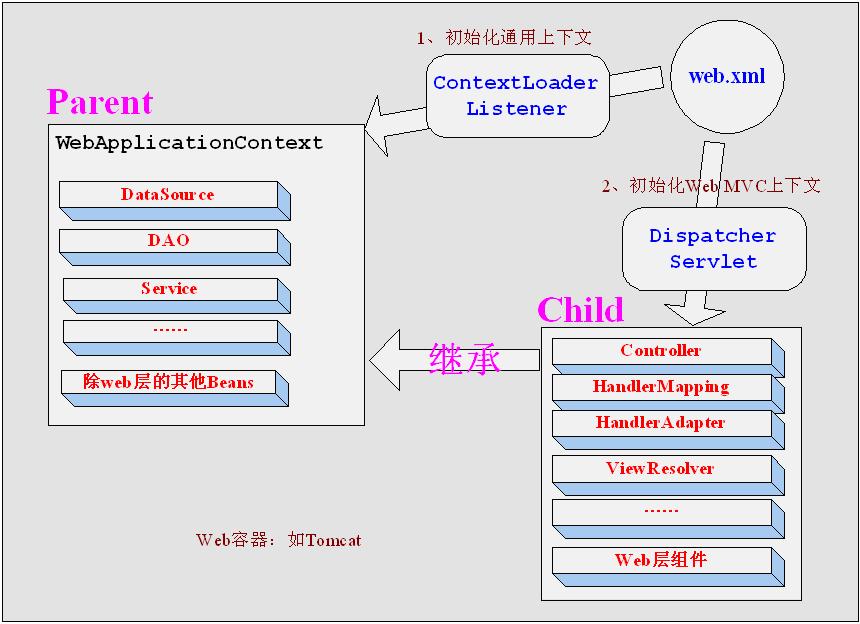
通用上下文:用于加载除Web层的其他Bean,如service、dao等,以便与其他Web框架集成;创建完毕后会将该上下文放在ServletContext:
servletContext.setAttribute(WebApplicationContext.ROOT_WEB_APPLICATION_CONTEXT_ATTRIBUTE, this.context);
DispatcherServlet上下文:用于加载只对Spring Web MVC有效的Bean,如Controller、HandlerMapping、HandlerAdapter等;创建时以通用上下文为父上下文,创建完毕后将该上下文放在ServletContext:
childContext.setParent(rootContext);
servletContext.setAttribute("org.springframework.web.servlet.FrameworkServlet.CONTEXT" + getServletName(), this.context);
4、spring mvc的典型配置
<!-- spring-context.xml中的配置 -->
<context:component-scan base-package="com.wind.pac" use-default-filters="true">
  <context:exclude-filter type="annotation" expression="org.springframework.stereotype.Controller" />
</context:component-scan>

<!-- spring-mvc.xml中的配置 -->
<context:component-scan base-package="com.wind.pac" use-default-filters="false">
    <context:include-filter type="annotation" expression="org.springframework.stereotype.Controller" />
    <context:include-filter type="annotation" expression="org.springframework.web.bind.annotation.RestController" />
</context:component-scan>
5、DispatcherServlet默认配置
DispatcherServlet的默认配置在DispatcherServlet.properties(和DispatcherServlet类在一个包下)中,是当Spring配置文件中没有指定配置时使用的默认策略
注:eclipse下,web项目的运行目录为:workspace.metadata.pluginsorg.eclipse.wst.server.core mp0wtpwebapps
参考:
第二章 Spring MVC入门 —— 跟开涛学SpringMVC