首先讲一下本文使用的版本:
Spring Boot:2.3.4.RELEASE
Spring Cloud:Hoxton.SR7
Spring Cloud Netflix:2.2.4.RELEASE
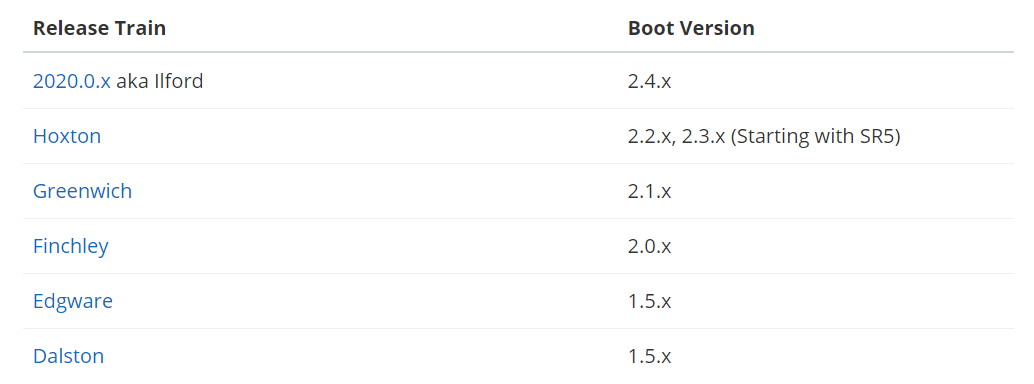
注意:Spring Cloud各种组件的版本搭配非常重要!!!官方提供的版本特别乱,之前以伦敦市地铁站名为版本名,现在又推出2020.0版本,开始以数字为版本号。如果版本用错了,会导致各种莫名其妙的问题!
可参考官方网站:https://spring.io/projects/spring-cloud
目前的版本搭配如图所示:
本文要搭建三个组件:服务注册中心、服务提供者和服务消费者,其中通过Spring Cloud Eureka实现服务注册与发现,通过Spring Cloud Ribbon实现客户端负载均衡,也就是服务消费,接下来介绍搭建过程:
一、服务注册中心(Eureka Server)
从https://start.spring.io/中新建Spring Boot工程,记为Eureka Server。
设置pom.xml:


 1 <?xml version="1.0" encoding="UTF-8"?>
 2 <project xmlns="http://maven.apache.org/POM/4.0.0" xmlns:xsi="http://www.w3.org/2001/XMLSchema-instance"
 3     xsi:schemaLocation="http://maven.apache.org/POM/4.0.0 https://maven.apache.org/xsd/maven-4.0.0.xsd">
 4     <modelVersion>4.0.0</modelVersion>
 5     <parent>
 6         <groupId>org.springframework.boot</groupId>
 7         <artifactId>spring-boot-starter-parent</artifactId>
 8         <version>2.3.4.RELEASE</version>
 9         <relativePath/> <!-- lookup parent from repository -->
10     </parent>
11     <groupId>cn.edu.whu</groupId>
12     <artifactId>eureka</artifactId>
13     <version>0.0.1-SNAPSHOT</version>
14     <name>eureka</name>
15     <description>Eureka Server for MicroServices</description>
16
17     <properties>
18         <project.build.sourceEncoding>UTF-8</project.build.sourceEncoding>
19         <project.reporting.outputEncoding>UTF-8</project.reporting.outputEncoding>
20         <java.version>1.8</java.version>
21         <spring-cloud.version>Hoxton.SR7</spring-cloud.version>
22         <netflix.version>2.2.4.RELEASE</netflix.version>
23     </properties>
24
25     <dependencies>
26         <dependency>
27             <groupId>org.springframework.boot</groupId>
28             <artifactId>spring-boot-starter-web</artifactId>
29         </dependency>
30
31         <dependency>
32             <groupId>org.springframework.boot</groupId>
33             <artifactId>spring-boot-starter-test</artifactId>
34             <scope>test</scope>
35         </dependency>
36
37         <!-- SpringCloud Eureka 注册中心依赖 -->
38         <dependency>
39             <groupId>org.springframework.cloud</groupId>
40             <artifactId>spring-cloud-starter-netflix-eureka-server</artifactId>
41             <version>${netflix.version}</version>
42         </dependency>
43     </dependencies>
44     <dependencyManagement>
45         <dependencies>
46             <dependency>
47                 <groupId>org.springframework.cloud</groupId>
48                 <artifactId>spring-cloud-dependencies</artifactId>
49                 <version>${spring-cloud.version}</version>
50                 <type>pom</type>
51                 <scope>import</scope>
52             </dependency>
53         </dependencies>
54     </dependencyManagement>
55     <build>
56         <plugins>
57             <plugin>
58                 <groupId>org.springframework.boot</groupId>
59                 <artifactId>spring-boot-maven-plugin</artifactId>
60             </plugin>
61         </plugins>
62     </build>
63
64 </project>
在启动程序前添加@EnableEurekaServer注解,代码如下:
 1 import org.springframework.boot.SpringApplication;
 2 import org.springframework.boot.autoconfigure.SpringBootApplication;
 3 import org.springframework.cloud.netflix.eureka.server.EnableEurekaServer;
 4
 5 @SpringBootApplication
 6 @EnableEurekaServer
 7 public class EurekaApplication {
 8
 9     public static void main(String[] args) {
10         SpringApplication.run(EurekaApplication.class, args);
11     }
12
13 }
然后配置application.properties如下:
1 server.port=1111
2
3 eureka.instance.hostname=localhost
4 eureka.client.register-with-eureka=false
5 eureka.client.fetch-registry=false
6 eureka.client.service-url.defaultZone=http://${eureka.instance.hostname}:${server.port}/eureka/
7 eureka.instance.prefer-ip-address=true
其中eureka.client.register-with-eureka=false表示不向注册中心注册自己;
eureka.client.fetch-registry=false表示不检索其他服务注册中心
本文仅提供一个服务注册中心,构建高可用注册中心时采用其他设置。
启动工程并在浏览器访问URL:http://localhost:1111/,可看到如下页面:
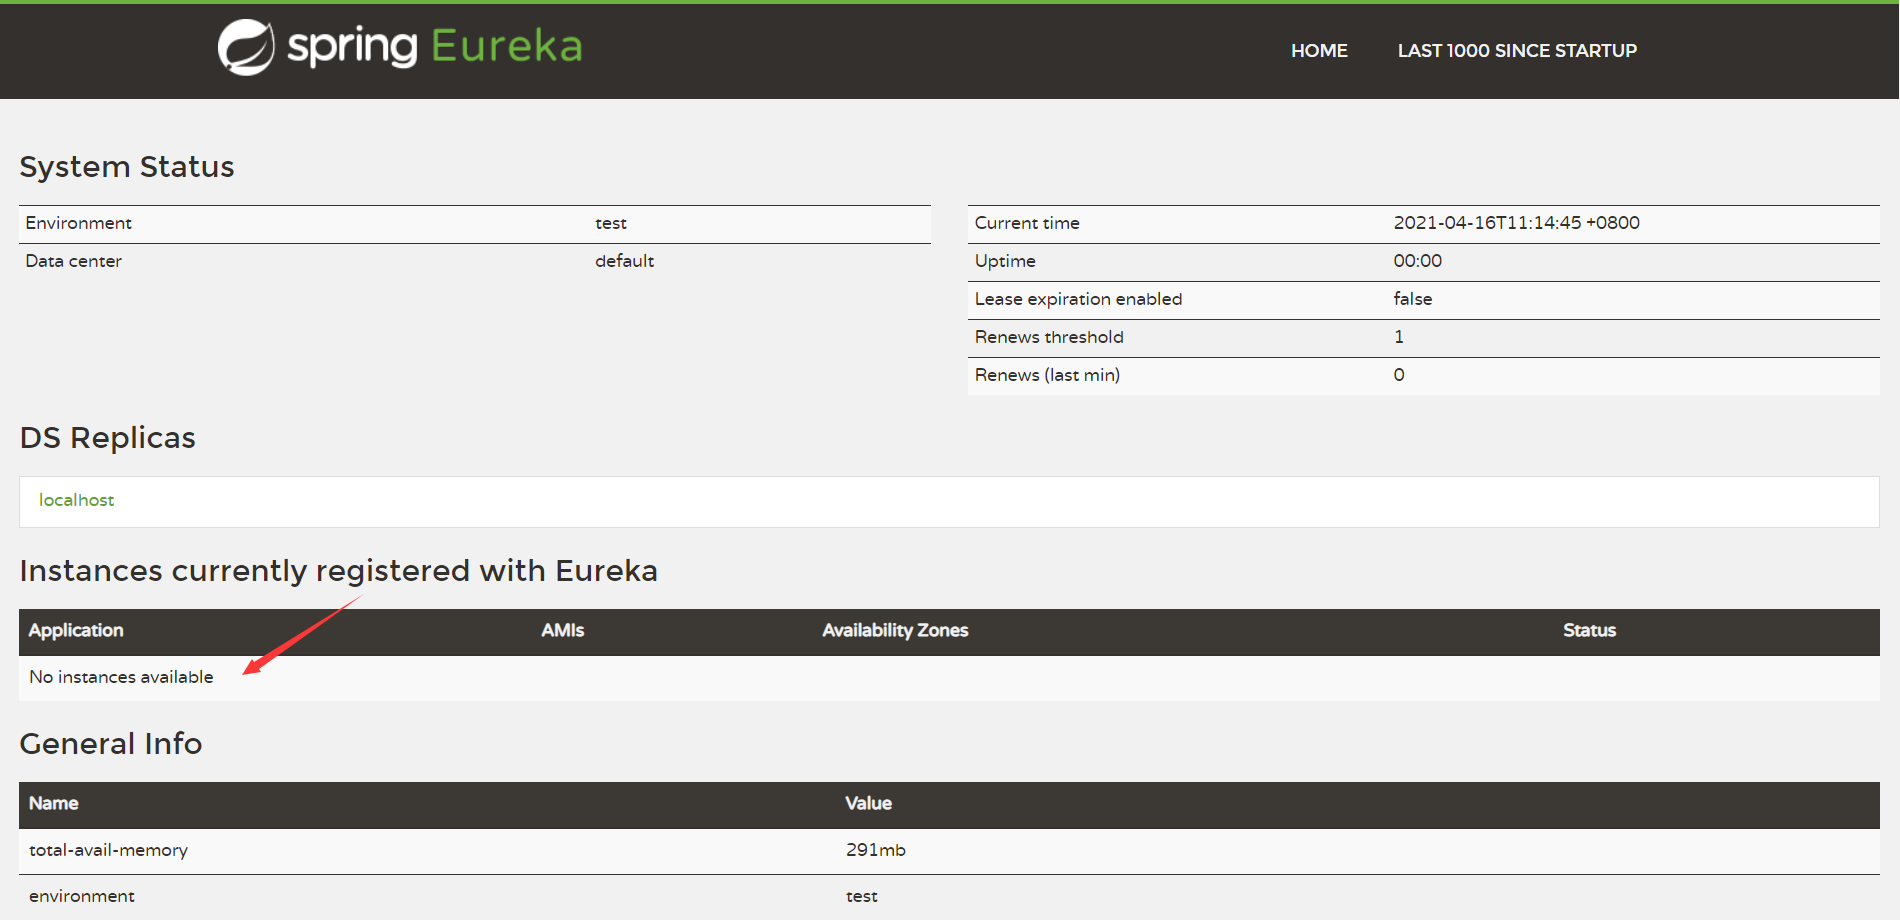
表明服务注册中心已经搭建成功,但是服务实例列表中还为空,说明没有服务注册进来。
二、服务提供者(Eureka Client)
从https://start.spring.io/中新建Spring Boot工程,记为Demo,作为服务提供者提供Hello Service。
设置pom.xml:
 1 <?xml version="1.0" encoding="UTF-8"?>
 2 <project xmlns="http://maven.apache.org/POM/4.0.0" xmlns:xsi="http://www.w3.org/2001/XMLSchema-instance"
 3     xsi:schemaLocation="http://maven.apache.org/POM/4.0.0 https://maven.apache.org/xsd/maven-4.0.0.xsd">
 4     <modelVersion>4.0.0</modelVersion>
 5     <parent>
 6         <groupId>org.springframework.boot</groupId>
 7         <artifactId>spring-boot-starter-parent</artifactId>
 8         <version>2.3.4.RELEASE</version>
 9         <relativePath/> <!-- lookup parent from repository -->
10     </parent>
11     <groupId>com.example</groupId>
12     <artifactId>demo</artifactId>
13     <version>0.0.1-SNAPSHOT</version>
14     <name>demo</name>
15     <description>Demo project for Spring Boot</description>
16     <properties>
17         <java.version>1.8</java.version>
18         <spring-cloud.version>Hoxton.SR7</spring-cloud.version>
19         <netflix.version>2.2.4.RELEASE</netflix.version>
20     </properties>
21     <dependencies>
22         <dependency>
23             <groupId>org.springframework.boot</groupId>
24             <artifactId>spring-boot-starter</artifactId>
25         </dependency>
26
27         <dependency>
28             <groupId>org.springframework.boot</groupId>
29             <artifactId>spring-boot-starter-test</artifactId>
30             <scope>test</scope>
31         </dependency>
32
33         <dependency>
34             <groupId>org.springframework.boot</groupId>
35             <artifactId>spring-boot-starter-web</artifactId>
36         </dependency>
37
38         <dependency>
39             <groupId>org.springframework.cloud</groupId>
40             <artifactId>spring-cloud-starter-netflix-eureka-client</artifactId>
41             <version>${netflix.version}</version>
42         </dependency>
43     </dependencies>
44     <dependencyManagement>
45         <dependencies>
46             <dependency>
47                 <groupId>org.springframework.cloud</groupId>
48                 <artifactId>spring-cloud-dependencies</artifactId>
49                 <version>${spring-cloud.version}</version>
50                 <type>pom</type>
51                 <scope>import</scope>
52             </dependency>
53         </dependencies>
54     </dependencyManagement>
55
56     <build>
57         <plugins>
58             <plugin>
59                 <groupId>org.springframework.boot</groupId>
60                 <artifactId>spring-boot-maven-plugin</artifactId>
61             </plugin>
62         </plugins>
63     </build>
64
65 </project>
Eureka Client不需要在启动程序前添加注解,只要在pom.xml添加设置就会自动注册。
新建HelloController.java,用于提供访问服务,代码如下:
 1 import org.slf4j.Logger;
 2 import org.slf4j.LoggerFactory;
 3 import org.springframework.web.bind.annotation.RequestMapping;
 4 import org.springframework.web.bind.annotation.RestController;
 5
 6 @RestController
 7 public class HelloController {
 8
 9     public static final Logger logger = LoggerFactory.getLogger(HelloController.class);
10
11     @RequestMapping("/hello")
12     public String index() {
13         String basePath = "Hello Service";
14         logger.info("Hello Service!" );
15         return basePath;
16     }
17 }
再配置application.properties如下:
1 spring.application.name=Hello-Service
2 eureka.client.service-url.defaultZone=http://localhost:1111/eureka/
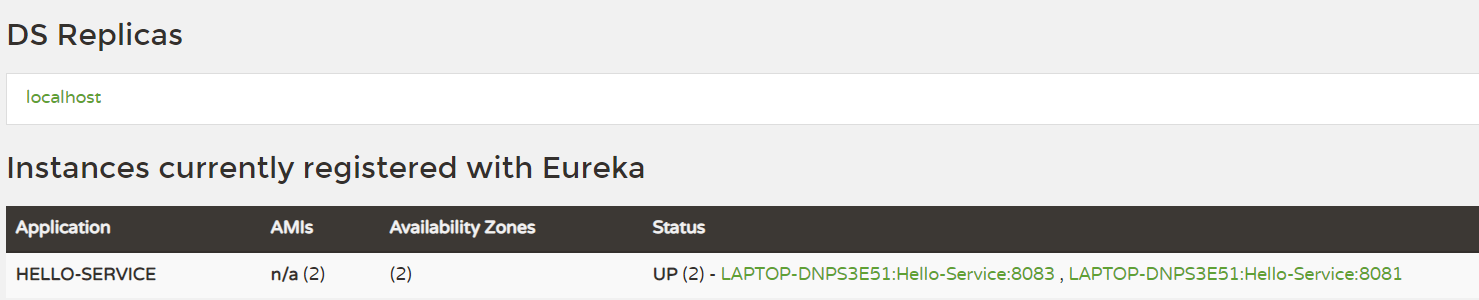
启动工程,再查看注册中心的管理页面,可看到该服务已经注册成功:

三、服务消费者(Ribbon)
将上文中提供Hello Service的工程生成Jar包,并放到两个路径下,通过java -jar命令行在不同的端口启动:
java -jar demo-0.0.1-SNAPSHOT.jar --server.port=8081
java -jar demo-0.0.1-SNAPSHOT.jar --server.port=8083
以此制造两个提供相同服务的提供者:
从而用Ribbon来通过客户端负载均衡的策略,消费这两个服务。
从https://start.spring.io/中新建Spring Boot工程,记为Ribbon,作为服务消费者。
设置pom.xml:
 1 <?xml version="1.0" encoding="UTF-8"?>
 2 <project xmlns="http://maven.apache.org/POM/4.0.0" xmlns:xsi="http://www.w3.org/2001/XMLSchema-instance"
 3     xsi:schemaLocation="http://maven.apache.org/POM/4.0.0 https://maven.apache.org/xsd/maven-4.0.0.xsd">
 4     <modelVersion>4.0.0</modelVersion>
 5     <parent>
 6         <groupId>org.springframework.boot</groupId>
 7         <artifactId>spring-boot-starter-parent</artifactId>
 8         <version>2.3.4.RELEASE</version>
 9         <relativePath/> <!-- lookup parent from repository -->
10     </parent>
11     <groupId>com.example</groupId>
12     <artifactId>ribbon</artifactId>
13     <version>0.0.1-SNAPSHOT</version>
14     <name>ribbon</name>
15     <description>Demo project for Spring Boot</description>
16     <properties>
17         <java.version>1.8</java.version>
18         <spring-cloud.version>Hoxton.SR7</spring-cloud.version>
19         <netflix.version>2.2.4.RELEASE</netflix.version>
20     </properties>
21     <dependencies>
22         <dependency>
23             <groupId>org.springframework.boot</groupId>
24             <artifactId>spring-boot-starter-web</artifactId>
25         </dependency>
26
27         <dependency>
28             <groupId>org.springframework.boot</groupId>
29             <artifactId>spring-boot-starter-test</artifactId>
30             <scope>test</scope>
31         </dependency>
32
33         <dependency>
34             <groupId>org.springframework.cloud</groupId>
35             <artifactId>spring-cloud-starter-netflix-eureka-client</artifactId>
36             <version>${netflix.version}</version>
37         </dependency>
38
39         <dependency>
40             <groupId>org.springframework.cloud</groupId>
41             <artifactId>spring-cloud-starter-netflix-ribbon</artifactId>
42             <version>${netflix.version}</version>
43         </dependency>
44     </dependencies>
45     <dependencyManagement>
46         <dependencies>
47             <dependency>
48                 <groupId>org.springframework.cloud</groupId>
49                 <artifactId>spring-cloud-dependencies</artifactId>
50                 <version>${spring-cloud.version}</version>
51                 <type>pom</type>
52                 <scope>import</scope>
53             </dependency>
54         </dependencies>
55     </dependencyManagement>
56
57     <build>
58         <plugins>
59             <plugin>
60                 <groupId>org.springframework.boot</groupId>
61                 <artifactId>spring-boot-maven-plugin</artifactId>
62             </plugin>
63         </plugins>
64     </build>
65
66 </project>
在启动程序前添加@LoadBalanced注解,完整代码如下:
 1 import org.springframework.boot.SpringApplication;
 2 import org.springframework.boot.autoconfigure.SpringBootApplication;
 3 import org.springframework.cloud.client.loadbalancer.LoadBalanced;
 4 import org.springframework.context.annotation.Bean;
 5 import org.springframework.web.client.RestTemplate;
 6
 7 @SpringBootApplication
 8 public class RibbonApplication {
 9
10     @Bean
11     @LoadBalanced
12     RestTemplate restTemplate() {
13         return new RestTemplate();
14     }
15
16     public static void main(String[] args) {
17         SpringApplication.run(RibbonApplication.class, args);
18     }
19
20 }
新建ConsumerController,用于消费Hello Service服务,代码如下:
 1 import org.springframework.beans.factory.annotation.Autowired;
 2 import org.springframework.web.bind.annotation.RequestMapping;
 3 import org.springframework.web.bind.annotation.RequestMethod;
 4 import org.springframework.web.bind.annotation.RestController;
 5 import org.springframework.web.client.RestTemplate;
 6
 7 @RestController
 8 public class ConsumerController {
 9
10     @Autowired
11     RestTemplate restTemplate;
12
13     @RequestMapping(value = "/ribbon-consumer", method = RequestMethod.GET)
14     public String helloConsumer(){
15         return restTemplate.getForObject("http://HELLO-SERVICE/hello",String.class);
16     }
17
18     @RequestMapping("/hello")
19     public String hello(){
20         return "Ribbon Hello";
21     }
22 }
注意其中http://HELLO-SERVICE/hello一定要使用在注册中心注册的服务名,而不用IP地址,这才是服务消费的意义所在。
然后配置application.properties如下:
1 server.port=9000
2 spring.application.name=Ribbon-Consumer
3 eureka.client.service-url.defaultZone=http://localhost:1111/eureka/
4 eureka.client.fetchRegistry=true
将自身也注册到注册中心,这时可以看到注册中心管理界面中又多了一个服务:
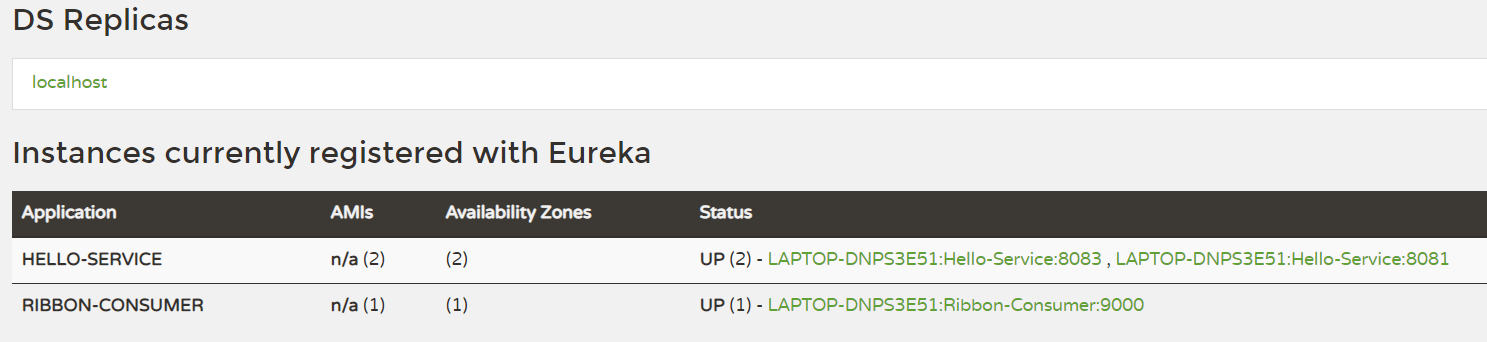
表示两个服务提供者和一个服务消费者,都已经注册成功。
接下来在浏览器中访问URL:http://localhost:9000/ribbon-consumer,可看到返回如下:
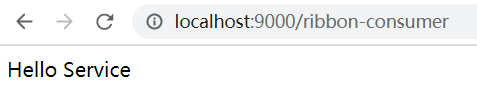
表明已经通过Ribbon访问Hello Service成功。
多访问几次,可发现两个服务提供者交替打印日志,说明在交替调用它们的服务。
至此,已经完成微服务架构中服务注册与发现、客户端负载均衡的功能。