索引:
Create a web API with ASP.NET Core MVC and Visual Studio for Windows
在windows上用vs与asp.net core mvc 创建一个 web api 程序
2017-5-24 8 分钟阅读时长
本文内容
1.Overview
综述
创建一个项目
3.Register the database context
注册db上下文
添加一个控制器
开始要做的事儿
6.Implement the other CRUD operations
实现 CRUD 操作
By Rick Anderson and Mike Wasson
In this tutorial, you’ll build a web API for managing a list of "to-do" items. You won’t build a UI.
在本篇教程中,我们将创建一个用于管理“to-do”列表web api 小程序,他不需要界面。
There are 3 versions of this tutorial:
- Windows: Web API with Visual Studio for Windows (This tutorial)
Windows+vs 创建
Apple+vs 创建
- macOS, Linux, Windows: Web API with Visual Studio Code
vs code 跨平台创建
Overview
概览
Here is the API that you’ll create:
下面是将要创建的api 列表
|
API |
Description |
Request body |
Response body |
|
GET /api/todo |
Get all to-do items 获取所有 to-do 数据 |
None |
Array of to-do items |
|
GET /api/todo/{id} |
Get an item by ID 获取一条 to-do 数据 |
None |
To-do item |
|
POST /api/todo |
Add a new item 新增一条 to-do 数据 |
To-do item |
To-do item |
|
PUT /api/todo/{id} |
Update an existing item 修改一条 to-do 数据 |
To-do item |
None |
|
DELETE /api/todo/{id} |
Delete an item 删除一条 to-do 数据 |
None |
None |
The following diagram shows the basic design of the app.
下图展示了这个程序的基本设计

- The client is whatever consumes the web API (mobile app, browser, etc). We aren’t writing a client in this tutorial. We'll
无论 api 的调用方是 手机app还是桌面浏览器,我们不用写一个客户端。
use Postman or curl to test the app.
我们可以用 postman 或者 curl 进行接口调用测试
- A model is an object that represents the data in your application. In this case, the only model is a to-do item. Models are
在你的应用中用model来代表一个数据对象。在本例中,只有一个 to-do 数据model,
represented as C# classes, also know as Plain Old C# Object (POCOs).
Models 代表了 项目中的数据类。
- A controller is an object that handles HTTP requests and creates the HTTP response. This app will have a single controller.
Controller 是一个用来处理 HTTP 请求与相应的对象类。这个app中只有一个 controller。
- To keep the tutorial simple, the app doesn’t use a persistent database. Instead, it stores to-do items in an in-memory
为保持教程的简单性,app 中不使用持久化的db,而是将 to-do 数据存在内存数据库中。
database.
Create the project
创建项目
From Visual Studio, select File menu, > New > Project.
在 vs 中选择 新建项目菜单
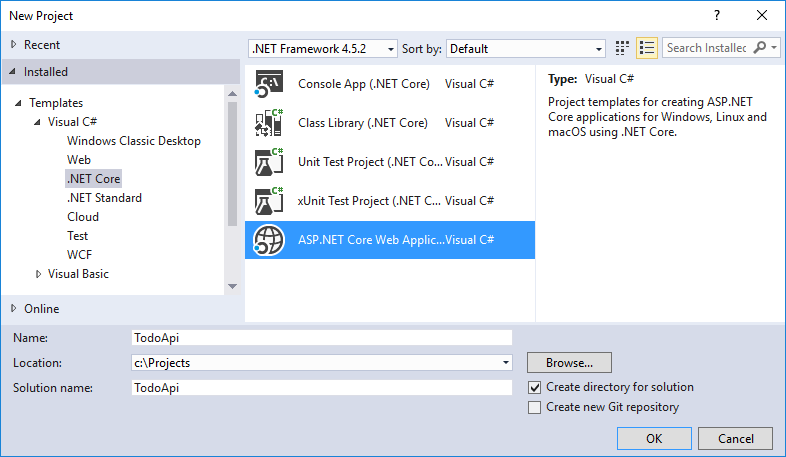
Select the ASP.NET Core Web Application (.NET Core) project template. Name the project TodoApi and select OK.
选择如下图中的项目模板,并确认。

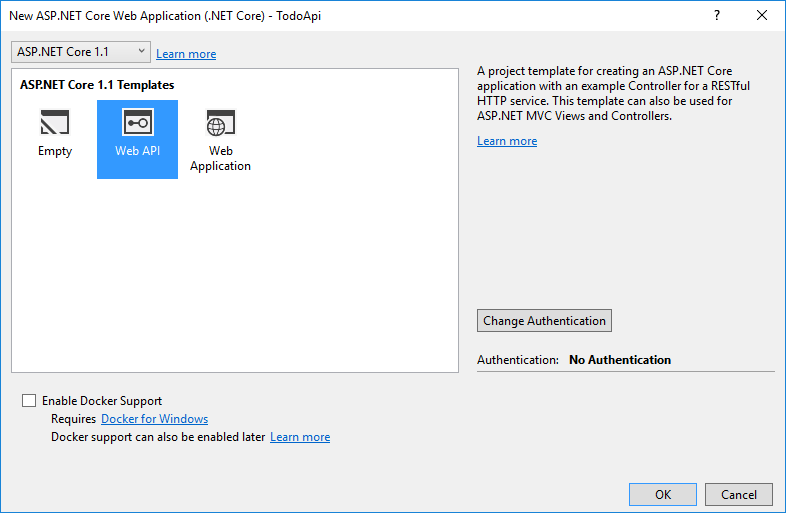
In the New ASP.NET Core Web Application (.NET Core) - TodoApi dialog, select the Web API template. Select OK.
在模板类型弹框中选择 Web API 模板,并确认。
Do not select Enable Docker Support.
不要选择 Docker 支持

Launch the app
运行 app
In Visual Studio, press CTRL+F5 to launch the app. Visual Studio launches a browser and navigates
在 vs 中,按下 CTRL+F5 快捷键,启动app。VS 将启动一个浏览器,并
to http://localhost:port/api/values, where port is a randomly chosen port number. If you're using Chrome, Edge or Firefox,
导航到 http://localhost:port/api/values 这个地址,端口是随机选择的。如果你用的是 Chrome、Edge、Firefox 浏览器,
the ValuesController data will be displayed:
ValuesController 控制器中的数据将会如下显示:

1 ["value1","value2"]
If you're using IE, you are prompted to open or save the values.json file.
若果你用的是 IE 浏览器,会提示你打开或保存 values.json 文件。
Add support for Entity Framework Core
添加 Entity Framework Core 的支持
Install the Entity Framework Core InMemory database provider. This database provider allows Entity Framework Core to be used
安装 Entity Framework Core InMemory 数据提供程序。这个数据库提供程序允许 EF 使用
with an in-memory database.
内存中的数据库。
Edit the TodoApi.csproj file. In Solution Explorer, right-click the project. Select Edit TodoApi.csproj. In the ItemGroup element,
编辑 TodoApi.csproj 文件。在解决方案资源管理器中,邮件点击项目,选择 Edit TodoApi.csproj ,在 ItemGroup 节点中
add "Microsoft.EntityFrameworkCore.InMemory":
添加 Microsoft.EntityFrameworkCore.InMemory 。

 1 <Project Sdk="Microsoft.NET.Sdk.Web">
 2
 3   <PropertyGroup>
 4     <TargetFramework>netcoreapp1.1</TargetFramework>
 5   </PropertyGroup>
 6
 7   <ItemGroup>
 8     <Folder Include="wwwroot" />
 9   </ItemGroup>
10   <ItemGroup>
11     <PackageReference Include="Microsoft.ApplicationInsights.AspNetCore" Version="2.0.0" />
12     <PackageReference Include="Microsoft.AspNetCore" Version="1.1.1" />
13     <PackageReference Include="Microsoft.AspNetCore.Mvc" Version="1.1.2" />
14     <PackageReference Include="Microsoft.Extensions.Logging.Debug" Version="1.1.1" />
15     <PackageReference Include="Microsoft.EntityFrameworkCore.InMemory" Version="1.1.1" />
16   </ItemGroup>
17   <ItemGroup>
18     <DotNetCliToolReference Include="Microsoft.VisualStudio.Web.CodeGeneration.Tools" Version="1.0.0" />
19   </ItemGroup>
20
21 </Project>
Add a model class
添加一个 model 数据类
A model is an object that represents the data in your application. In this case, the only model is a to-do item.
model 是一个用来描述并表现app中数据的类对象。在本例中,只有一个 to-do model.
Add a folder named "Models". In Solution Explorer, right-click the project. Select Add > New Folder. Name the folder Models.
添加一个 Models 文件夹。 在解决方案资源管理器中,右击项目,选择 Add > New Folder 。将文件夹命名为 Models 。
Note: You can put model classes anywhere in your project, but the Models folder is used by convention.
注意:你可以在项目中的任何位置创建 model 类,但是习惯上通常使用 Models 文件夹。
Add a TodoItem class. Right-click the Models folder and select Add > Class. Name the class TodoItemand select Add.
添加 TodoItem 类。在 Models 文件夹下,添加类。
Replace the generated code with:
使用下面的代码替换 vs 自动生成的代码:

 1 namespace TodoApi.Models
 2
 3 {
 4
 5     public class TodoItem
 6
 7     {
 8
 9         public long Id { get; set; }
10
11         public string Name { get; set; }
12
13         public bool IsComplete { get; set; }
14
15     }
16
17 }
Create the database context
创建 db 上下文
The database context is the main class that coordinates Entity Framework functionality for a given data model. You create this class
database context 是EF 未提供数据model 功能的主类,有创建的这个上下文类
by deriving from the Microsoft.EntityFrameworkCore.DbContext class.
继承自 Microsoft.EntityFrameworkCore.DbContext 类。
Add a TodoContext class. Right-click the Models folder and select Add > Class. Name the class TodoContext and select Add.
添加一个 TodoContext 类。添加如下代码中的类:

 1 using Microsoft.EntityFrameworkCore;
 2
 3
 4
 5 namespace TodoApi.Models
 6
 7 {
 8
 9     public class TodoContext : DbContext
10
11     {
12
13         public TodoContext(DbContextOptions<TodoContext> options)
14
15             : base(options)
16
17         {
18
19         }
20
21
22
23         public DbSet<TodoItem> TodoItems { get; set; }
24
25
26
27     }
28
29 }
Register the database context
注册 db 上下文
In order to inject the database context into the controller, we need to register it with the dependency injection container. Register
为了在控制器中注入 db context ,我们需要在依赖注入容器中注册一下。
the database context with the service container using the built-in support for dependency injection. Replace the contents of
注册 db context 使用內建的依赖注入服务容器。将下面的代码copy 到
the Startup.cs file with the following:
Startup.cs 文件中:

 1 using Microsoft.AspNetCore.Builder;
 2
 3 using Microsoft.EntityFrameworkCore;
 4
 5 using Microsoft.Extensions.DependencyInjection;
 6
 7 using TodoApi.Models;
 8
 9
10
11 namespace TodoApi
12
13 {
14
15     public class Startup
16
17     {
18
19         public void ConfigureServices(IServiceCollection services)
20
21         {
22
23             services.AddDbContext<TodoContext>(opt => opt.UseInMemoryDatabase());
24
25             services.AddMvc();
26
27         }
28
29
30
31         public void Configure(IApplicationBuilder app)
32
33         {
34
35             app.UseMvc();
36
37         }
38
39     }
40
41 }
The preceding code:
前述代码:
- Removes the code we're not using.
移除我们不需要的代码
- Specifies an in-memory database is injected into the service container.
指定一个注入到服务容器中的 内存 db
Add a controller
添加一个控制器
In Solution Explorer, right-click the Controllers folder. Select Add > New Item. In the Add New Itemdialog, select the Web API
在解决方案资源管理器中,右击 Controllers 文件夹,如下图选择 web api 模板
Controller Class template. Name the class TodoController.
添加 TodoController 类。

Replace the generated code with the following:
在类中添加下面的代码:

 1 using System.Collections.Generic;
 2
 3 using Microsoft.AspNetCore.Mvc;
 4
 5 using TodoApi.Models;
 6
 7 using System.Linq;
 8
 9
10
11 namespace TodoApi.Controllers
12
13 {
14
15     [Route("api/[controller]")]
16
17     public class TodoController : Controller
18
19     {
20
21         private readonly TodoContext _context;
22
23
24
25         public TodoController(TodoContext context)
26
27         {
28
29             _context = context;
30
31
32
33             if (_context.TodoItems.Count() == 0)
34
35             {
36
37                 _context.TodoItems.Add(new TodoItem { Name = "Item1" });
38
39                 _context.SaveChanges();
40
41             }
42
43         }
44
45     }
46
47 }
The preceding code:
前述代码:
- Defines an empty controller class. In the next sections, we'll add methods to implement the API.
定义一个空的控制器。在下面的部分中,我们将添加方法来实现 api 。
- The constructor uses Dependency Injection to inject the database context (TodoContext) into the controller. The database
构造函数通过依赖注入将 db context 注入到 控制器中。
context is used in each of the CRUD methods in the controller.
数据上下文将在控制器中的每个crud方法中被使用。
- The constructor adds an item to the in-memory database if one doesn't exist.
在构造函数中将会向 内存db增加一条数据,当这条数据不存在时。
Getting to-do items
获取 to-do 数据
To get to-do items, add the following methods to the TodoController class.
在 TodoController 中添加方法,以用于获取 to-do 数据

 1 [HttpGet]
 2
 3 public IEnumerable<TodoItem> GetAll()
 4
 5 {
 6
 7     return _context.TodoItems.ToList();
 8
 9 }
10
11
12
13 [HttpGet("{id}", Name = "GetTodo")]
14
15 public IActionResult GetById(long id)
16
17 {
18
19     var item = _context.TodoItems.FirstOrDefault(t => t.Id == id);
20
21     if (item == null)
22
23     {
24
25         return NotFound();
26
27     }
28
29     return new ObjectResult(item);
30
31 }
These methods implement the two GET methods:
下面的方法是获取数据的方法:
- GET /api/todo
- GET /api/todo/{id}
Here is an example HTTP response for the GetAll method:
下面是 GetAll 方法的 HTTP 响应数据:

 1 HTTP/1.1 200 OK
 2
 3    Content-Type: application/json; charset=utf-8
 4
 5    Server: Microsoft-IIS/10.0
 6
 7    Date: Thu, 18 Jun 2015 20:51:10 GMT
 8
 9    Content-Length: 82
10
11
12
13    [{"Key":"1", "Name":"Item1","IsComplete":false}]
Later in the tutorial I'll show how you can view the HTTP response using Postman or curl.
在本文的后面,我将展示使用 postman 与 curl 的 HTTP 响应报文。
Routing and URL paths
路由与URL路径
The [HttpGet] attribute specifies an HTTP GET method. The URL path for each method is constructed as follows:
[HttpGet] 特性标记,指定了 HTTP GET 类型的请求动词。每一个方法的 URL 路径的定义路径结构如下:
- Take the template string in the controller’s route attribute:
在控制器的路由标记采取如下的字符串模板:

 1 namespace TodoApi.Controllers
 2
 3 {
 4
 5     [Route("api/[controller]")]
 6
 7     public class TodoController : Controller
 8
 9     {
10
11         private readonly TodoContext _context;
- Replace "[Controller]" with the name of the controller, which is the controller class name minus the "Controller" suffix. For this
用控制器的名字替换 [Controller] ,控制器的名字就是去除 "Controller" 结尾的字符串。例如,
sample, the controller class name is TodoController and the root name is "todo". ASP.NET Core routing is not case sensitive.
TodoController 的名字就是 todo 。asp.net core 的路由不区分大小写。
- If the [HttpGet] attribute has a route template (such as [HttpGet("/products")], append that to the path. This sample
如果 [HttpGet] 特性标记有一个路由模板,附加到路径上。这个例子不使用模板。
doesn't use a template. See Attribute routing with Http[Verb] attributes for more information.
可以查看 Attribute routing with Http[Verb] attributes已获得更多信息。
In the GetById method:
在 GetById 方法中

1 [HttpGet("{id}", Name = "GetTodo")]
2
3 public IActionResult GetById(long id)
"{id}" is a placeholder variable for the ID of the todo item. When GetById is invoked, it assigns the value of "{id}" in the URL to
"{id}" 是一个变量占位符,这个变量就是 todo 的ID。当 GetById 方法被调用时,他将 URL 中的id的值分派给了方法的id
the method's id parameter.
参数上。
Name = "GetTodo" creates a named route and allows you to link to this route in an HTTP Response. I'll explain it with an example
Name = "GetTodo" 创建了一个命名路由并允许你链接到这个路由在HTTP 响应中。稍后,我会在一个示例中进行说明。
later. See Routing to Controller Actions for detailed information.
在 Routing to Controller Actions 中可以查看更详细的信息。
Return values
返回值
The GetAll method returns an IEnumerable. MVC automatically serializes the object to JSON and writes the JSON into the body
GetAll 方法返回一个 IEnumerable 类型。MVC 自动将其序列化为json 并写入响应体中。
of the response message. The response code for this method is 200, assuming there are no unhandled exceptions. (Unhandled
这个方法的http 响应码是200 ,假设这里没有做异常处理,
exceptions are translated into 5xx errors.)
(未处理异常将被转化为 5xx 这类的错误码)。
In contrast, the GetById method returns the more general IActionResult type, which represents a wide range of return
相比之下 GetById 返回普通的 IActionResult 类型,一种可以描述更广泛的返回类型的类型。
types. GetById has two different return types:
GetById 方法有两种不同的返回类型:
- If no item matches the requested ID, the method returns a 404 error. This is done by returning NotFound.
如果没有找到id匹配的项,将由 NotFound 结束方法,此时返回 404 。
- Otherwise, the method returns 200 with a JSON response body. This is done by returning an ObjectResult
否则,将由 ObjectResult 结束方法,方法返回一个json值,并且状态码200.
Launch the app
运行app
In Visual Studio, press CTRL+F5 to launch the app. Visual Studio launches a browser and navigates
在vs中,按下CTRL+F5 启动app。VS将启动一个浏览器并导航到
to http://localhost:port/api/values, where port is a randomly chosen port number. If you're using Chrome, Edge or Firefox,
http://localhost:port/api/values 这个地址,端口被随机选择。如果你使用的是 Chrome, Edge or Firefox,
the data will be displayed. If you're using IE, IE will prompt to you open or save the values.json file. Navigate to the Todo controller
数据将直接展示出来,如果你用的是IE,将会提示打开或保存 values.json 文件。导航至 Todo 控制器
we just created http://localhost:port/api/todo.
我们创建 http://localhost:port/api/todo 。
Implement the other CRUD operations
实现其它的CRUD操作
We'll add Create, Update, and Delete methods to the controller. These are variations on a theme, so I'll just show the code and
我们将在控制器中添加 Create、Update、Delete 三个方法。这些都是同一种主题的不同类型表现而已,因此我只展示代码并且
highlight the main differences. Build the project after adding or changing code.
高亮出主要的不同地方。
Create

 1 [HttpPost]
 2
 3 public IActionResult Create([FromBody] TodoItem item)
 4
 5 {
 6
 7     if (item == null)
 8
 9     {
10
11         return BadRequest();
12
13     }
14
15
16
17     _context.TodoItems.Add(item);
18
19     _context.SaveChanges();
20
21
22
23     return CreatedAtRoute("GetTodo", new { id = item.Id }, item);
24
25 }
This is an HTTP POST method, indicated by the [HttpPost] attribute. The [FromBody] attribute tells MVC to get the value of the
这个方法指明了 [HttpPost] 标记是一个 HTTP POST 方法。[FromBody] 标记告诉MVC
to-do item from the body of the HTTP request.
从http 请求体中获取item数据
The CreatedAtRoute method returns a 201 response, which is the standard response for an HTTP POST method that creates a
CreatedAtRoute 方法返回一个201响应码,是对http post产生的一个标准的响应,表示
new resource on the server. CreatedAtRoute also adds a Location header to the response. The Location header specifies the URI
在服务器上创建了一条新数据。同时,也添加了一个重定向头,这个重定向指向了
of the newly created to-do item. See 10.2.2 201 Created.
新建的这条 to-do 数据。
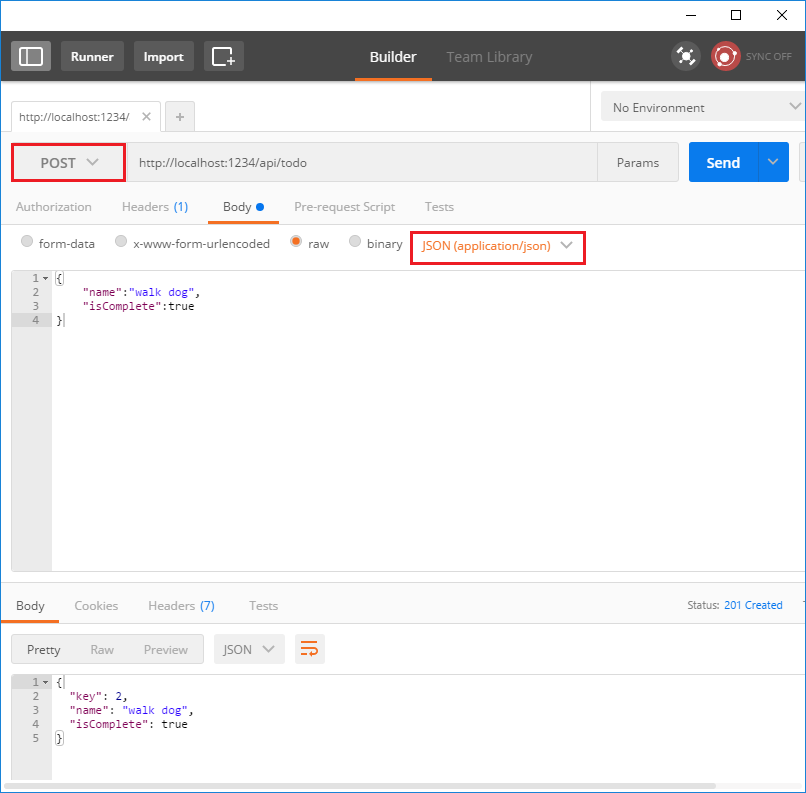
Use Postman to send a Create request
使用 postman 发送一个创建请求

- Set the HTTP method to POST
选择 post 为要使用的HTTP方法
- Select the Body radio button
点击 body 按钮
- Select the raw radio button
选择原始数据 按钮
- Set the type to JSON
选择 json 数据类型
- In the key-value editor, enter a Todo item such as
在编辑框中,输入下面的数据:

1 {
2
3     "name":"walk dog",
4
5     "isComplete":true
6
7 }
- Select Send
点击 send 按钮
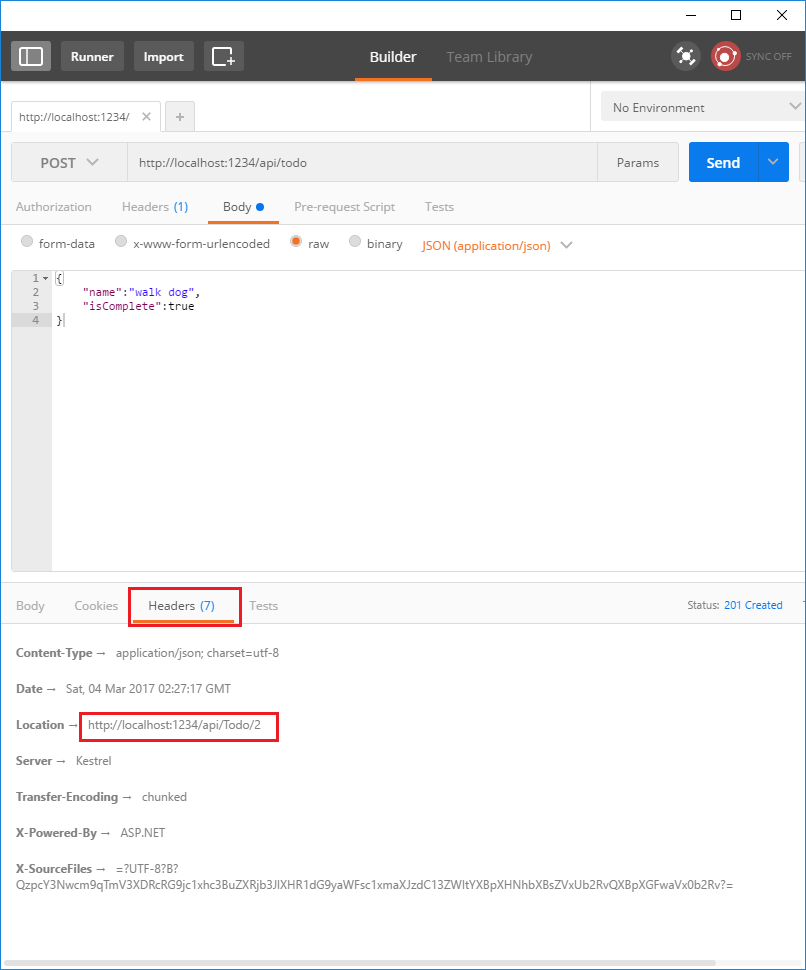
- Select the Headers tab in the lower pane and copy the Location header:

You can use the Location header URI to access the resource you just created. Recall the GetById method created the "GetTodo" named route:

1 [HttpGet("{id}", Name = "GetTodo")]
2
3 public IActionResult GetById(long id)
Update

 1 [HttpPut("{id}")]
 2
 3 public IActionResult Update(long id, [FromBody] TodoItem item)
 4
 5 {
 6
 7     if (item == null || item.Id != id)
 8
 9     {
10
11         return BadRequest();
12
13     }
14
15
16
17     var todo = _context.TodoItems.FirstOrDefault(t => t.Id == id);
18
19     if (todo == null)
20
21     {
22
23         return NotFound();
24
25     }
26
27
28
29     todo.IsComplete = item.IsComplete;
30
31     todo.Name = item.Name;
32
33
34
35     _context.TodoItems.Update(todo);
36
37     _context.SaveChanges();
38
39     return new NoContentResult();
40
41 }
Update is similar to Create, but uses HTTP PUT. The response is 204 (No Content). According to the HTTP spec, a PUT request
Update 与 Create 类似,此处省略。。。。。字。
requires the client to send the entire updated entity, not just the deltas. To support partial updates, use HTTP PATCH.

Delete

 1 [HttpDelete("{id}")]
 2
 3 public IActionResult Delete(long id)
 4
 5 {
 6
 7     var todo = _context.TodoItems.First(t => t.Id == id);
 8
 9     if (todo == null)
10
11     {
12
13         return NotFound();
14
15     }
16
17
18
19     _context.TodoItems.Remove(todo);
20
21     _context.SaveChanges();
22
23     return new NoContentResult();
24
25 }
The response is 204 (No Content).

Next steps
接下来的教程
- Routing to Controller Actions
- For information about deploying your API, see Publishing and Deployment.
- View or download sample code. See how to download.
- Postman
蒙
2017-07-10 16:34 周一
