创建一个简单的WCF程序
2014-06-05
创建一个简单的WCF程序
步骤一: 构建整个解决方案
步骤二:创建服务契约
步骤三:创建服务
步骤四:通过自我寄宿的方式寄宿服务
步骤五:创建客户端调用服务
创建一个简单的WCF程序 [1]
下面创建一个简单的WCF,以便对WCF有个直观的了解
在这个例子中,将实现一个简单的计算服务(CalculatorService),提供加的运算。和传统的分布式通信框架一样,WCF本质上提供一个跨进程、跨机器以致跨网络的服务调用。在本例中,客户端和服务通过运行在相同的同一台机器上不同进程模拟,图1体现了客户端和服务端进程互相调用的关系。

图1 计算服务应用运行环境
在这个例子中,采用了两种服务寄宿方式:
- 通过自我寄宿(Self-Hosting)的方式创建一个控制台应用作为服务的宿主(寄宿进程为Hosting.exe);
- 通过IIS寄宿方式将服务寄宿于IIS中(寄宿进程为IIS的工作进行W3wp.exe)。
客户端通过另一个控制台应用模拟(进程为Client.exe)
步骤一: 构建整个解决方案
通过VS 2010创建一个空白的解决方案,添加如下四个项目。项目的类型、承载的功能和相互引用关系如下,整个项目在VS下的结构如图2所示(示例代码)。
- Contracts:一个类库项目,定义服务契约(Service Contract),引用System.ServiceMode程序集(WCF框架的绝大部分实现和API定义在该程序集中);
- Services:一个类库项目,提供对WCF服务的实现。定义在该项目中的所有WCF服务实现了定义在Contracts中相应的服务契约,所以Services具有对Contracts项目的引用;
- Hosting:一个控制台(Console)应用,实现对定义在Services项目中的服务的寄宿,该项目须要同时引用Contracts和Services两个项目和System.ServiceMode程序集;
- Client:一个控制台应用模拟服务的客户端,该项目引用System.ServiceMode程序集。
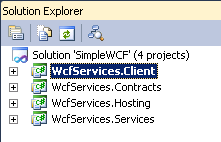
图2 计算服务在VS中的结构
步骤二:创建服务契约
WCF采用基于契约的交互方式实现了服务的自治,以及客户端和服务端之间的松耦合。WCF包含四种类型的契约:服务契约、数据契约、消息契约和错误契约,这里着重于服务契约。从功能上讲,服务契约抽象了服务提供的所有操作;而站在消息交换的角度来看,服务契约则定义了基于服务调用的消息交换过程中,请求消息和回复消息的结构,以及采用的消息交换模式。


 1 using System.ServiceModel;
 2 namespace WcfServices.Contracts
 3 {
 4     [ServiceContract]
 5     public interface ICalculator
 6     {
 7         [OperationContract]
 8         double Add(double x, double y);
 9     }
10 }
步骤三:创建服务
服务实现了服务契约接口ICalculator
 1 using WcfServices.Contracts;
 2 namespace WcfServices.Services
 3 {
 4     public class CalculatorService:ICalculator
 5     {
 6         public double Add(double x, double y)
 7         {
 8             return x + y;
 9         }
10     }
11 }
步骤四:通过自我寄宿的方式寄宿服务
WCF服务需要依存一个运行着的进程(宿主),服务寄宿就是为服务指定一个宿主的过程。WCF是一个基于消息的通信框架,采用基于终结点(Endpoint)的通信手段。终结点由地址(Address)、绑定(Binding)和契约(Contract)三要素组成。由于三要素应为首字母分别为ABC,所以就有了易于记忆的公式:Endpoint = ABC
- 地址(Address):地址决定了服务的位置,解决了服务寻址的问题;
- 绑定(Binding):绑定实现了通信的所有细节,包括网络传输、消息编码,以及其他为实现某种功能(比如安全、可靠传输、事务等)对消息进行的相应处理。WCF中具有一系列的系统定义绑定,比如BasicHttpBinding、WsHttpBinding、NetTcpBinding等;
- 契约(Contract):契约是对服务操作的抽象,也是对消息交换模式以及消息结构的定义。
 1 using System;
 2 using System.ServiceModel;
 3 using System.ServiceModel.Description;
 4 using WcfServices.Contracts;
 5 using WcfServices.Services;
 6
 7 namespace WcfServices.Hosting
 8 {
 9     class Program
10     {
11         static void Main(string[] args)
12         {
13             /**
14              * Create a host to provide service.
15              * ServiceType is HelloWorld
16              * BaseAddress is in localhost
17              */
18             using (ServiceHost host = new ServiceHost(typeof(CalculatorService), new Uri("http://localhost:8080/calculatorservice")))
19             {
20                 /**
21                 * Add an serviceEndpoint to this host
22                 * Implemented Contract is ICalculator
23                 * Binding pattern is BasicHttpBinding
24                 * Address  'SVC' is a relative address
25                 */
26                 host.AddServiceEndpoint(typeof(ICalculator), new BasicHttpBinding(), "SVC");
27                 if (host.Description.Behaviors.Find<ServiceMetadataBehavior>() == null)
28                 {
29                     ServiceMetadataBehavior behavior = new ServiceMetadataBehavior();
30                     behavior.HttpGetEnabled = true;
31                     behavior.HttpGetUrl = new Uri("http://localhost:8080/calculatorservice");
32                     host.Description.Behaviors.Add(behavior);
33                 }
34                 host.Opened += delegate
35                 {
36                     Console.WriteLine("CalculaorService have started, press any key to stop it!");
37                 };
38
39                 host.Open();
40                 Console.Read();
41             }
42         }
43     }
44 }
WCF服务寄宿通过一个特殊的对象完成:ServiceHost。在上面的例子中,基于WCF服务的类型(typeof(CalculatorService))创建了ServieHost对象,并添加了一个终结点。具体的地址为http://localhost:8080/calculatorservice,采用了WSHttpBinding,并指定了服务契约的类型ICalculator。
松耦合是SOA的一个基本的特征,WCF应用中客户端和服务端的松耦合体现在客户端只须要了解WCF服务基本的描述,而无须知道具体的实现细节,就可以实现正常的服务调用。
WCF服务的描述通过元数据(Metadata)的形式发布出来。WCF中元数据的发布通过一个特殊的服务行为ServiceMetadataBehavior实现。在上面提供的服务寄宿代码中,我们为创建的ServiceHost添加了ServiceMetadataBehavior,并采用了基于HTTP-GET的元数据获取方式,元数据的发布地址通过ServiceMetadataBehavior的HttpGetUrl指定。在调用ServiceHost的Open方法对服务成功寄宿后,也就是Hosting控制台程序正常运行后,如图3所示。

图3 运行寄宿wcf服务的控制台程序
在你的浏览器地址栏中,输入http://localhost:8080/calculatorservice,效果图4所示:
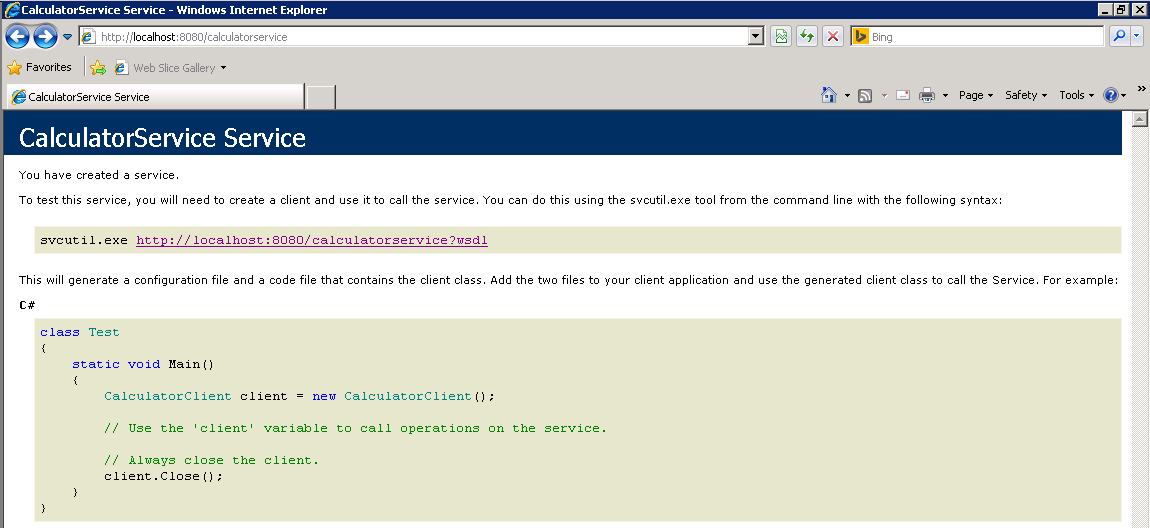
图4 calculatorservice service运行正常
点击页面中的链接,出现WSDL格式的XML文件,如下代码:
 1   <?xml version="1.0" encoding="utf-8" ?>
 2 - <wsdl:definitions name="CalculatorService" targetNamespace="http://tempuri.org/" xmlns:wsdl="http://schemas.xmlsoap.org/wsdl/" xmlns:soap="http://schemas.xmlsoap.org/wsdl/soap/" xmlns:soapenc="http://schemas.xmlsoap.org/soap/encoding/" xmlns:wsu="http://docs.oasis-open.org/wss/2004/01/oasis-200401-wss-wssecurity-utility-1.0.xsd" xmlns:xsd="http://www.w3.org/2001/XMLSchema" xmlns:soap12="http://schemas.xmlsoap.org/wsdl/soap12/" xmlns:tns="http://tempuri.org/" xmlns:wsa="http://schemas.xmlsoap.org/ws/2004/08/addressing" xmlns:wsp="http://schemas.xmlsoap.org/ws/2004/09/policy" xmlns:wsap="http://schemas.xmlsoap.org/ws/2004/08/addressing/policy" xmlns:wsaw="http://www.w3.org/2006/05/addressing/wsdl" xmlns:msc="http://schemas.microsoft.com/ws/2005/12/wsdl/contract" xmlns:wsa10="http://www.w3.org/2005/08/addressing" xmlns:wsx="http://schemas.xmlsoap.org/ws/2004/09/mex" xmlns:wsam="http://www.w3.org/2007/05/addressing/metadata">
 3 - <wsdl:types>
 4 - <xsd:schema targetNamespace="http://tempuri.org/Imports">
 5   <xsd:import schemaLocation="http://localhost:8080/calculatorservice?xsd=xsd0" namespace="http://tempuri.org/" />
 6   <xsd:import schemaLocation="http://localhost:8080/calculatorservice?xsd=xsd1" namespace="http://schemas.microsoft.com/2003/10/Serialization/" />
 7   </xsd:schema>
 8   </wsdl:types>
 9 + <wsdl:message name="ICalculator_Add_InputMessage">
10   <wsdl:part name="parameters" element="tns:Add" />
11   </wsdl:message>
12 - <wsdl:message name="ICalculator_Add_OutputMessage">
13   <wsdl:part name="parameters" element="tns:AddResponse" />
14   </wsdl:message>
15 - <wsdl:portType name="ICalculator">
16 - <wsdl:operation name="Add">
17   <wsdl:input wsaw:Action="http://tempuri.org/ICalculator/Add" message="tns:ICalculator_Add_InputMessage" />
18   <wsdl:output wsaw:Action="http://tempuri.org/ICalculator/AddResponse" message="tns:ICalculator_Add_OutputMessage" />
19   </wsdl:operation>
20   </wsdl:portType>
21 - <wsdl:binding name="BasicHttpBinding_ICalculator" type="tns:ICalculator">
22   <soap:binding transport="http://schemas.xmlsoap.org/soap/http" />
23 - <wsdl:operation name="Add">
24   <soap:operation soapAction="http://tempuri.org/ICalculator/Add" style="document" />
25 - <wsdl:input>
26   <soap:body use="literal" />
27   </wsdl:input>
28 - <wsdl:output>
29   <soap:body use="literal" />
30   </wsdl:output>
31   </wsdl:operation>
32   </wsdl:binding>
33 - <wsdl:service name="CalculatorService">
34 - <wsdl:port name="BasicHttpBinding_ICalculator" binding="tns:BasicHttpBinding_ICalculator">
35   <soap:address location="http://localhost:8080/calculatorservice/SVC" />
36   </wsdl:port>
37   </wsdl:service>
38   </wsdl:definitions>
步骤五:创建客户端调用服务
服务被成功寄宿后,服务端便开始了服务调用请求的监听工作。此外,服务寄宿将服务描述通过元数据的形式发布出来,相应的客户端就可以获取这些元数据创建客户端程序进行服务的消费。在VS下,当我们添加服务引用的时候,VS在内部帮我们实现元数据的获取,并借助这些元数据通过代码生成工具(SvcUtil.exe)自动生成用于服务调用的服务代理相关的代码和相应的配置。
在运行服务寄宿程序(Hosting.exe)的情况下,右键点击Client项目,在弹出的上下文菜单中选择“添加服务引用(Add Service References)”,如图5所示的添加服务引用的对话会显示出来。在地址栏上键入服务元数据发布的源地址:http://127.0.0.1:8080/calculatorservice,并指定一个命名空间,点击OK按钮,VS为为你生成一系列用于服务调用的代码和配置。
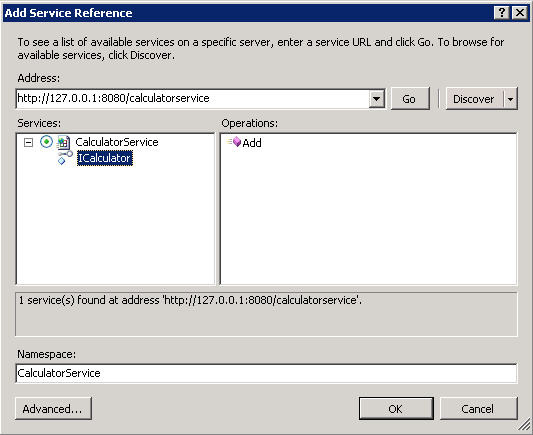
图5 添加服务引用
在一系列自动生成的类中,包含一个服务契约接口、一个服务代理对象和其他相关的类。被客户端直接用于服务调用的是服务代理类CalculatorClient,它继承字ClientBase<ICalculator>:
 1 //------------------------------------------------------------------------------
 2 // <auto-generated>
 3 //     This code was generated by a tool.
 4 //     Runtime Version:4.0.30319.2034
 5 //
 6 //     Changes to this file may cause incorrect behavior and will be lost if
 7 //     the code is regenerated.
 8 // </auto-generated>
 9 //------------------------------------------------------------------------------
10
11 namespace WcfServices.Client.CalculatorService {
12
13
14     [System.CodeDom.Compiler.GeneratedCodeAttribute("System.ServiceModel", "4.0.0.0")]
15     [System.ServiceModel.ServiceContractAttribute(ConfigurationName="CalculatorService.ICalculator")]
16     public interface ICalculator {
17
18         [System.ServiceModel.OperationContractAttribute(Action="http://tempuri.org/ICalculator/Add", ReplyAction="http://tempuri.org/ICalculator/AddResponse")]
19         double Add(double x, double y);
20     }
21
22     [System.CodeDom.Compiler.GeneratedCodeAttribute("System.ServiceModel", "4.0.0.0")]
23     public interface ICalculatorChannel : WcfServices.Client.CalculatorService.ICalculator, System.ServiceModel.IClientChannel {
24     }
25
26     [System.Diagnostics.DebuggerStepThroughAttribute()]
27     [System.CodeDom.Compiler.GeneratedCodeAttribute("System.ServiceModel", "4.0.0.0")]
28     public partial class CalculatorClient : System.ServiceModel.ClientBase<WcfServices.Client.CalculatorService.ICalculator>, WcfServices.Client.CalculatorService.ICalculator {
29
30         public CalculatorClient() {
31         }
32
33         public CalculatorClient(string endpointConfigurationName) :
34                 base(endpointConfigurationName) {
35         }
36
37         public CalculatorClient(string endpointConfigurationName, string remoteAddress) :
38                 base(endpointConfigurationName, remoteAddress) {
39         }
40
41         public CalculatorClient(string endpointConfigurationName, System.ServiceModel.EndpointAddress remoteAddress) :
42                 base(endpointConfigurationName, remoteAddress) {
43         }
44
45         public CalculatorClient(System.ServiceModel.Channels.Binding binding, System.ServiceModel.EndpointAddress remoteAddress) :
46                 base(binding, remoteAddress) {
47         }
48
49         public double Add(double x, double y) {
50             return base.Channel.Add(x, y);
51         }
52     }
53 }
我们可以创建CalculatorServiceClient对象,执行相应方法调用服务操作。客户端进行服务调用的代码如下:
 1 using System;
 2 using WcfServices.Client.CalculatorService;
 3 namespace WcfServices.Client
 4 {
 5     class Program
 6     {
 7         static void Main(string[] args)
 8         {
 9             using (CalculatorClient proxy = new CalculatorClient())
10             {
11                 Console.WriteLine("x + y = {2} when x = {0} and y = {1}", 1, 2, proxy.Add(1, 2));
12                 Console.Read();
13             }
14         }
15     }
16 }
运行客户端后,结果如图6所示:
图6 客户端结果
参考:
[1] 我的WCF之旅(1):创建一个简单的WCF程序 http://www.cnblogs.com/artech/archive/2007/02/26/656901.html
[2] 一个WCF的HelloWorld程序 http://www.cnblogs.com/judastree/archive/2012/08/26/2657190.html