环境:centos 7+nginx
工具:VMware(虚拟机)putty(接口连接软件),Fillezilla(FTP软件)
1.首先在VMware下安装centos 选择最小版本Minimal ISO的镜像 地址 https://www.centos.org/download/
2.系统配置
(1) 启动网卡
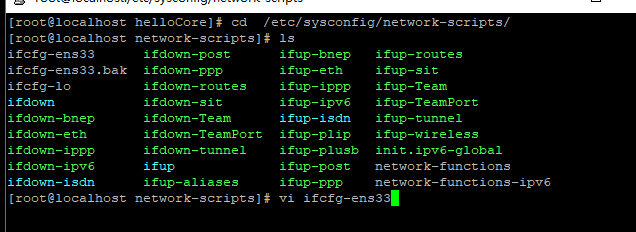
输入命令进入目录 cd /etc/sysconfig/network-scripts/
查看 ls

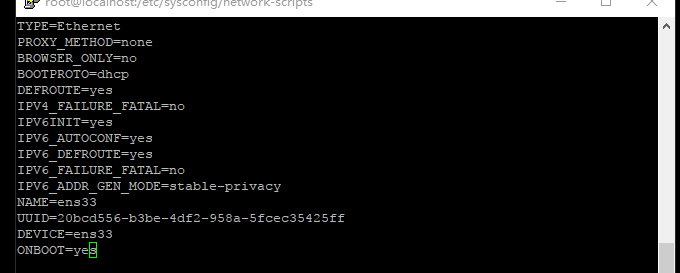
编辑: vi ifcfg-ens33

设置: ONBOOT=yes
输入: esc+:+w+q:退出保存
(2) 安装包 ip地址相关
输入命令: sudo yum install net-tools
这时候可以输入ifconfig就可以查看当前系统IP地址了,
2.安装nginx
为了方便操作 可以使用putty操作系统
输入IP地址选择22端口连接系统

输入root账号密码后输入命令安装nginx
sudo yum install epel-release
sudo yum install nginx
sudo systemctl start nginx
sudo firewall-cmd --permanent --zone=public --add-service=http
sudo firewall-cmd --permanent --zone=public --add-service=https
sudo firewall-cmd --reload
具体参考:https://www.digitalocean.com/community/tutorials/how-to-install-nginx-on-centos-7
此时在网址输入ip地址显示默认页面则表示成功安装

3.安装.NET SDK
请参考 https://www.microsoft.com/net/learn/get-started/linuxcentos
4.将visual 工具或者通过dotnet命令行把网站通过Fillezilla工具发布到 centos上
5.使用nginx代理网站
输入命令
cd /etc/nginx
vi nginx.confv
将默认的server部分改为
server {
listen 80;
location / {
proxy_pass http://localhost:5000;
proxy_http_version 1.1;
proxy_set_header Upgrade $http_upgrade;
proxy_set_header Connection keep-alive;
proxy_set_header Host $host;
proxy_cache_bypass $http_upgrade;
}
}
最后启动网站 dotnet run

输入网址查看网站
