文件读取
读取流程
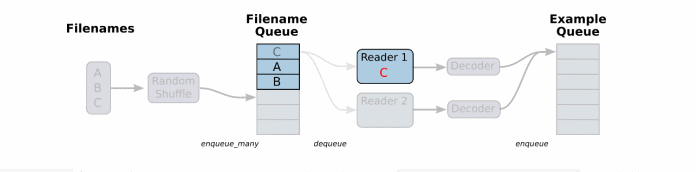
- 第一阶段构造文件名队列
- 第二阶段读取与解码
- 第三阶段批处理
注︰这些操作需要启动运行这些队列操作的线程,以便我们在进行文件读取的过程中能够顺利进行入队出队操作。
构造文件名队列
将需要读取的文件的文件名放入文件名队列
API
tf.train.string_input_producer(string_tensor, num_epochs=None, shuffle=True, seed=None, capacity=32, name=None)
- string_tensor:含有文件名+路径的1阶张量
- num_epochs:过几遍数据,默认无限过数据
- return文件队列
读取与解码
从队列当中读取文件内容,并进行解码操作。
文本逗号分隔值(CSV)
- 读取:tf.TextLineReader()
- 解码:tf.decode_csv()
图片
- 读取:tf.WholeFileReader()
- 解码:
- tf.image.decode_jpeg(contents) return:uint8张量,3-D形状[height, width, channels]
- tf.image.decode_png(contents) return:uint8张量,3-D形状[height, width, channels]
二进制
- 读取:tf.FixedLengthRecordReader(record_bytes)
- 解码:tf.decode_raw()
TFRecords
- 读取:tf.TFRecordReader()
注
- 读取方法均返回读取器实例
- 它们有共同的读取方法: read(file_queue),并且都会返回一个Tensors元组(key文件名字,value默认的内容(一个样本))
- 由于默认只会读取一个样本,所以如果想要进行批处理,需要使用tf.train.batch或tf.train.shuffle_batch进行批处理操作,便于之后指定每批次多个样本的训练。
批处理
解码之后,可以直接获取默认的一个样本内容了,但如果想要获取多个样本,需要加入到新的队列进行批处理。
API
tf.train.batch(tensors, batch_size, num_threads = 1, capacity = 32, name=None)
- 读取指定大小(个数)的张量
- tensors:可以是包含张量的列表,批处理的内容放到列表当中
- batch_size:从队列中读取的批处理大小
- num_threads:进入队列的线程数
- capacity:整数,队列中元素的最大数量
- return:tensors
tf.train.shuffle_batch
线程操作
- 以上用到的队列都是tf.train.QueueRunner对象。
- 每个QueueRunner都负责一个阶段,tf.train.start_queue_runners函数会要求图中的每个QueueRunner启动它的运行队列操作的线程。(这些操作需要在会话中开启)
开启线程
tf.train.Coordinator()
- 线程协调员,对线程进行管理和协调
- request_stop():请求停止
- should_stop():询问是否结束
- join(threads=None, stop_grace_period_secs=120):回收线程
- return:线程协调员实例
开启会话
tf.train.start_queue_runners(sess=None, coord=None)
- 收集图中所有的队列线程,默认同时启动线程
- sess:所在的会话
- coord:线程协调器o return:返回所有线程
案例
狗图片读取
图像基本概念
在图像数字化表示当中,分为黑白和彩色两种。在数字化表示图片的时候,有三个因素。分别是图片的长、图片的宽、图片的颜色通道数。那么黑白图片的颜色通道数为1,它只需要一个数字就可以表示一个像素位;而彩色照片就不一样了,它有三个颜色通道,分别为RGB,通过三个数字表示一个像素位。TensorFlow支持JPG、PNG图像格式,RGB、RGBA颜色空间。图像用与图像尺寸相同(heightwidthchnanel)张量表示。图像所有像素存在磁盘文件,需要被加载到内存。
图像大小压缩
大尺寸图像输入占用大量系统内存。训练CNN需要大量时间,加载大文件增加更多训练时间,也难存放多数系统GPU显存。大尺寸图像大量无关本征属性信息,影响模型泛化能力。最好在预处理阶段完成图像操作,缩小、裁剪、缩放、灰度调整等。图像加载后,翻转、扭曲,使输入网络训练信息多样化,缓解过拟合。Python图像处理框架PIL、OpenCV。TensorFlow提供部分图像处理方法。
- tf.image.resize_images 压缩图片到指定大小
代码
import tensorflow as tf
import os


def read_picture():
    tf.compat.v1.disable_eager_execution()
    """
    读取狗图片案例
    :return:
    """
    # 1、构造文件名队列
    # 构造文件名列表
    filename_list = os.listdir("../dog")
    # 给文件名加上路径
    file_list = [os.path.join("../dog/", i) for i in filename_list]
    # print("file_list:
", file_list)
    # print("filename_list:
", filename_list)
    file_queue = tf.compat.v1.train.string_input_producer(file_list)

    # 2、读取与解码
    # 读取
    reader = tf.compat.v1.WholeFileReader()
    key, value = reader.read(file_queue)
    print("key:
", key)
    print("value:
", value)

    # 解码
    image_decoded = tf.image.decode_jpeg(value)
    print("image_decoded:
", image_decoded)

    # 将图片缩放到同一个大小
    image_resized = tf.compat.v1.image.resize_images(image_decoded, [200, 200])
    print("image_resized_before:
", image_resized)
    # 更新静态形状
    image_resized.set_shape([200, 200, 3])
    print("image_resized_after:
", image_resized)


    # 3、批处理队列
    image_batch = tf.compat.v1.train.batch([image_resized], batch_size=100, num_threads=2, capacity=100)
    print("image_batch:
", image_batch)

    # 开启会话
    with tf.compat.v1.Session() as sess:
        # 开启线程
        # 构造线程协调器
        coord = tf.train.Coordinator()
        threads = tf.compat.v1.train.start_queue_runners(sess=sess, coord=coord)

        # 运行
        filename, sample, image, n_image = sess.run([key, value, image_resized, image_batch])
        print("filename:
", filename)
        print("sample:
", sample)
        print("image:
", image)
        print("n_image:
", n_image)

        coord.request_stop()
        coord.join(threads)


    return None

if __name__ == "__main__":
    # 代码1:读取狗图片案例
    read_picture()

二进制数据读取
代码
import tensorflow as tf
import os


class Cifar():

    def __init__(self):

        # 设置图像大小
        self.height = 32
        self.width = 32
        self.channel = 3

        # 设置图像字节数
        self.image = self.height * self.width * self.channel
        self.label = 1
        self.sample = self.image + self.label


    def read_binary(self):
        """
        读取二进制文件
        :return:
        """
        # 1、构造文件名队列
        filename_list = os.listdir("../cifar-10-batches-bin")
        # print("filename_list:
", filename_list)
        file_list = [os.path.join("../cifar-10-batches-bin/", i) for i in filename_list if i[-3:]=="bin"]
        # print("file_list:
", file_list)
        file_queue = tf.compat.v1.train.string_input_producer(file_list)

        # 2、读取与解码
        # 读取
        reader = tf.compat.v1.FixedLengthRecordReader(self.sample)
        # key文件名 value样本
        key, value = reader.read(file_queue)

        # 解码
        image_decoded = tf.compat.v1.decode_raw(value, tf.uint8)
        print("image_decoded:
", image_decoded)

        # 切片操作
        label = tf.slice(image_decoded, [0], [self.label])
        image = tf.slice(image_decoded, [self.label], [self.image])
        print("label:
", label)
        print("image:
", image)

        # 调整图像的形状
        image_reshaped = tf.reshape(image, [self.channel, self.height, self.width])
        print("image_reshaped:
", image_reshaped)

        # 三维数组的转置
        image_transposed = tf.transpose(image_reshaped, [1, 2, 0])
        print("image_transposed:
", image_transposed)

        # 3、构造批处理队列
        image_batch, label_batch = tf.compat.v1.train.batch([image_transposed, label], batch_size=100, num_threads=2, capacity=100)

        # 开启会话
        with tf.compat.v1.Session() as sess:

            # 开启线程
            coord = tf.train.Coordinator()
            threads = tf.compat.v1.train.start_queue_runners(sess=sess, coord=coord)

            label_value, image_value = sess.run([label_batch, image_batch])
            print("label_value:
", label_value)
            print("image:
", image_value)

            coord.request_stop()
            coord.join(threads)

        return None


if __name__ == "__main__":
    tf.compat.v1.disable_eager_execution()
    cifar = Cifar()
    cifar.read_binary()

TFRecords存储与读取
代码
import tensorflow as tf
import os


class Cifar():

    def __init__(self):

        # 设置图像大小
        self.height = 32
        self.width = 32
        self.channel = 3

        # 设置图像字节数
        self.image = self.height * self.width * self.channel
        self.label = 1
        self.sample = self.image + self.label


    def read_binary(self):
        """
        读取二进制文件
        :return:
        """
        # 1、构造文件名队列
        filename_list = os.listdir("../cifar-10-batches-bin")
        # print("filename_list:
", filename_list)
        file_list = [os.path.join("../cifar-10-batches-bin/", i) for i in filename_list if i[-3:]=="bin"]
        # print("file_list:
", file_list)
        file_queue = tf.compat.v1.train.string_input_producer(file_list)

        # 2、读取与解码
        # 读取
        reader = tf.compat.v1.FixedLengthRecordReader(self.sample)
        # key文件名 value样本
        key, value = reader.read(file_queue)

        # 解码
        image_decoded = tf.compat.v1.decode_raw(value, tf.uint8)
        print("image_decoded:
", image_decoded)

        # 切片操作
        label = tf.slice(image_decoded, [0], [self.label])
        image = tf.slice(image_decoded, [self.label], [self.image])
        print("label:
", label)
        print("image:
", image)

        # 调整图像的形状
        image_reshaped = tf.reshape(image, [self.channel, self.height, self.width])
        print("image_reshaped:
", image_reshaped)

        # 三维数组的转置
        image_transposed = tf.transpose(image_reshaped, [1, 2, 0])
        print("image_transposed:
", image_transposed)

        # 3、构造批处理队列
        image_batch, label_batch = tf.compat.v1.train.batch([image_transposed, label], batch_size=100, num_threads=2, capacity=100)

        # 开启会话
        with tf.compat.v1.Session() as sess:

            # 开启线程
            coord = tf.train.Coordinator()
            threads = tf.compat.v1.train.start_queue_runners(sess=sess, coord=coord)

            label_value, image_value = sess.run([label_batch, image_batch])
            print("label_value:
", label_value)
            print("image:
", image_value)

            coord.request_stop()
            coord.join(threads)

        return image_value, label_value

    def write_to_tfrecords(self, image_batch, label_batch):
        """
        将样本的特征值和目标值一起写入tfrecords文件
        :param image:
        :param label:
        :return:
        """
        with tf.compat.v1.python_io.TFRecordWriter("cifar10.tfrecords") as writer:
            # 循环构造example对象,并序列化写入文件
            for i in range(100):
                image = image_batch[i].tostring()
                label = label_batch[i][0]
                # print("tfrecords_image:
", image)
                # print("tfrecords_label:
", label)
                example = tf.train.Example(features=tf.train.Features(feature={
                    "image": tf.train.Feature(bytes_list=tf.train.BytesList(value=[image])),
                    "label": tf.train.Feature(int64_list=tf.train.Int64List(value=[label])),
                }))
                # example.SerializeToString()
                # 将序列化后的example写入文件
                writer.write(example.SerializeToString())

        return None

    def read_tfrecords(self):
        """
        读取TFRecords文件
        :return:
        """
        # 1、构造文件名队列
        file_queue = tf.compat.v1.train.string_input_producer(["cifar10.tfrecords"])

        # 2、读取与解码
        # 读取
        reader = tf.compat.v1.TFRecordReader()
        key, value = reader.read(file_queue)

        # 解析example
        feature = tf.compat.v1.parse_single_example(value, features={
            "image": tf.compat.v1.FixedLenFeature([], tf.string),
            "label": tf.compat.v1.FixedLenFeature([], tf.int64)
        })
        image = feature["image"]
        label = feature["label"]
        print("read_tf_image:
", image)
        print("read_tf_label:
", label)

        # 解码
        image_decoded = tf.compat.v1.decode_raw(image, tf.uint8)
        print("image_decoded:
", image_decoded)
        # 图像形状调整
        image_reshaped = tf.reshape(image_decoded, [self.height, self.width, self.channel])
        print("image_reshaped:
", image_reshaped)

        # 3、构造批处理队列
        image_batch, label_batch = tf.compat.v1.train.batch([image_reshaped, label], batch_size=100, num_threads=2, capacity=100)
        print("image_batch:
", image_batch)
        print("label_batch:
", label_batch)

        # 开启会话
        with tf.compat.v1.Session() as sess:

            # 开启线程
            coord = tf.train.Coordinator()
            threads = tf.compat.v1.train.start_queue_runners(sess=sess, coord=coord)

            image_value, label_value = sess.run([image_batch, label_batch])
            print("image_value:
", image_value)
            print("label_value:
", label_value)

            # 回收资源
            coord.request_stop()
            coord.join(threads)

        return None

if __name__ == "__main__":
    tf.compat.v1.disable_eager_execution()
    cifar = Cifar()
    #image_value, label_value=cifar.read_binary()
    #cifar.write_to_tfrecords(image_value, label_value)
    cifar.read_tfrecords()
