Android Stuidio的安装测试:
完成Hello World, 要求修改res目录中的内容,Hello World后要显示自己的学号
·实验过程
完成任务一,只需在Android应用程序文件中修改布局文件中的android:text="Hello World!" 将引号里面的英文单词替换成自己的学号即可。
运行结果:

Activity测试:
创建 ThirdActivity, 在ThirdActivity中显示自己的学号,修改代码让MainActivity启动ThirdActivity
·实验过程:
首先实验要求我们在MainActivity中启动ThirdActivity,这就需要我们配置一个Activity,即在AndroidManifest.xml中添加Activity,并修改相应的布局文件让其启动。从教材上我们能了解到怎样修改布局文件,即添加相应代码即可:
@Override
public boolean onTouch(View arg0, MotionEvent event) {
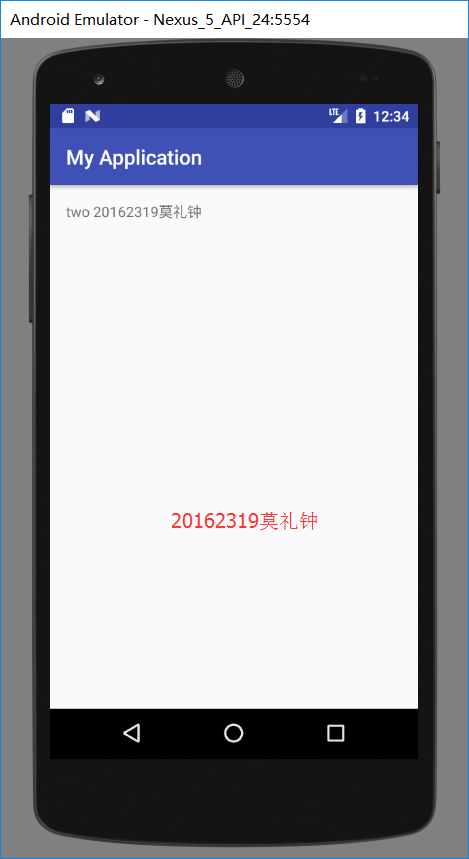
Intent intent = new Intent(this, ThirdActivity.class);
intent.putExtra("message", "20162319莫礼钟");
startActivity(intent);
return true;
UI测试:
构建项目,运行教材相关代码
修改代码让Toast消息中显示自己的学号信息
·实验过程:
修改相应代码
activity_main:
<Button
    android:layout_width="wrap_content"
    android:layout_height="wrap_content"
    android:text="20162319莫礼钟"
    android:id="@+id/btn1"
    android:layout_alignParentTop="true"
    android:layout_marginTop="31dp"
    android:layout_alignParentRight="true"
    android:layout_alignParentEnd="true"
    android:layout_alignParentLeft="true"
    android:layout_alignParentStart="true" />
<RelativeLayout xmlns:android="http://schemas.android.com/apk/res/android"
xmlns:tools="http://schemas.android.com/tools"
android:layout_width="match_parent"
android:layout_height="match_parent"
android:paddingLeft="2dp"
android:paddingRight="2dp">
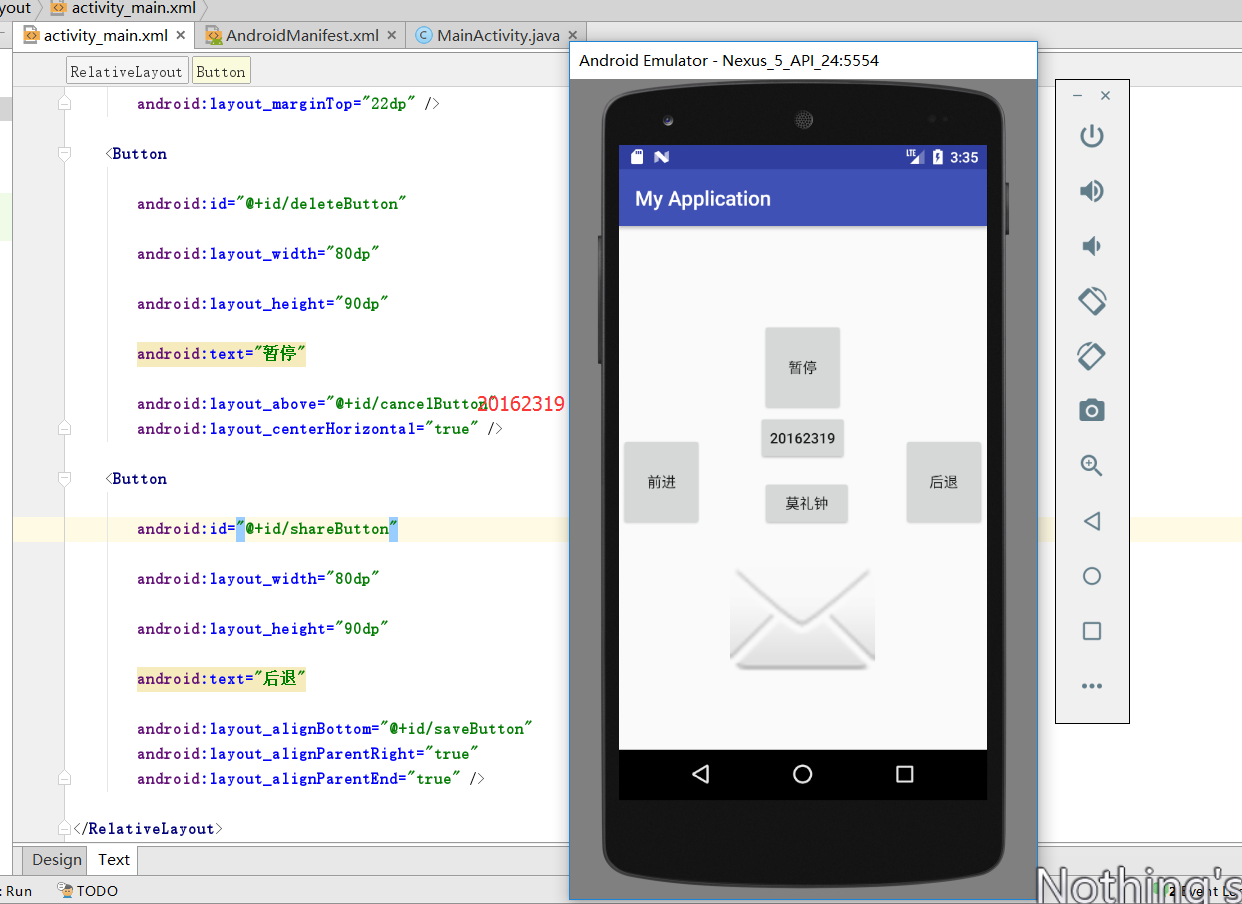
<Button
android:id="@+id/cancelButton"
android:layout_width="wrap_content"
android:layout_height="wrap_content"
android:text="20162319"
android:layout_above="@+id/saveButton"
android:layout_centerHorizontal="true"
android:layout_marginBottom="16dp" />
<Button
android:id="@+id/saveButton"
android:layout_width="wrap_content"
android:layout_height="wrap_content"
android:text="莫礼钟"
android:layout_above="@+id/imageView"
android:layout_alignLeft="@+id/deleteButton"
android:layout_alignStart="@+id/deleteButton"
android:layout_marginBottom="13dp" />
<ImageView
android:layout_width="150dp"
android:layout_height="150dp"
android:padding="4dp"
android:src="@android:drawable/ic_dialog_email"
android:id="@+id/imageView"
android:layout_alignParentBottom="true"
android:layout_centerHorizontal="true"
android:layout_marginBottom="54dp" />
<LinearLayout
android:id="@+id/filter_button_container"
android:layout_width="match_parent"
android:layout_height="wrap_content"
android:layout_alignParentBottom="true"
android:gravity="center|bottom"
android:background="@android:color/white"
android:orientation="horizontal" >
</LinearLayout>
<Button
android:id="@+id/filterButton"
android:layout_width="80dp"
android:layout_height="90dp"
android:text="前进"
android:layout_below="@+id/deleteButton"
android:layout_alignParentLeft="true"
android:layout_alignParentStart="true"
android:layout_marginTop="22dp" />
<Button
android:id="@+id/deleteButton"
android:layout_width="80dp"
android:layout_height="90dp"
android:text="暂停"
android:layout_above="@+id/cancelButton"
android:layout_centerHorizontal="true" />
<Button
android:id="@+id/shareButton"
android:layout_width="80dp"
android:layout_height="90dp"
android:text="后退"
android:layout_alignBottom="@+id/saveButton"
android:layout_alignParentRight="true"
android:layout_alignParentEnd="true" />
事件处理测试:
参考《Java和Android开发学习指南(第二版)(EPUBIT,Java for Android 2nd)》第二十八章:
- 构建项目,运行教材相关代码
- 提交代码运行截图和码云Git链接,截图要有学号水印,否则会扣分
·实验过程:
运用view.setBackgroundColor(colors[counter++]传入颜色对象。
代码如下:public class MainActivity extends AppCompatActivity {
int counter = 0;
int[] colors = {Color.BLACK, Color.BLUE, Color.CYAN, Color.DKGRAY, Color.GRAY, Color.GREEN, Color.LTGRAY, Color.MAGENTA, Color.RED, Color.WHITE, Color.YELLOW};
@Override
protected void onCreate(Bundle savedInstanceState) {
    super.onCreate(savedInstanceState);
    setContentView(R.layout.activity_main);
}

@Override
public boolean onCreateOptionsMenu(Menu menu) {
    // Inflate the menu; this adds items to the action bar if it

    // is present.

    getMenuInflater().inflate(R.menu.menu_main, menu);
    return true;
}

public void changeColor(View view) {
    if (counter == colors.length) {
        counter = 0;
    }
    view.setBackgroundColor(colors[counter++]);
}
}
运行结果:

实验感想
其实在实验中碰到了很多小问题,但其中最让我头疼的就是R的丢失问题,后来我试了一下重新建立一个新项目,发现R又不报错了。王老师说可能是因为教材上的代码跟我们现在用的版本有一点不兼容,所以写代码的时候不能复制粘贴而是根据教材上的提示自己写出代码,这样就不会出现问题。
后来我找到了一篇博客。希望以后自己能用这个程序设计出象棋游戏。