cocos2d-x version 2.2.0
首先,在 HelloWorldScene.cpp 中的 init()函数中 添加如下代码 (资源文件可以直接到 cocos2d-x 中获取)
#include "CCArmature/utils/CCArmatureDataManager.h" //(头文件添加)
//! create a new thread to load data(异步加载)
        /**
        * @brief Add ArmatureFileInfo, it is managed by CCArmatureDataManager.
        *   It will load data in a new thread
        *  添加ArmatureFileInfo,它是由CCArmatureDataManager管理。 它将数据加载在一个新线程
        */

        extension::CCArmatureDataManager::sharedArmatureDataManager()
            ->addArmatureFileInfoAsync("cyborg.png", "cyborg.plist", "cyborg.xml", this, NULL/*schedule_selector(TestArmatureNesting::close)*/);

        CCLayer *pLayer = new TestArmatureNesting();
        this->addChild(pLayer);
其次,TestArmatureNesting 类实现
//.h
class TestArmatureNesting : public cocos2d::CCLayer
{
public:
    virtual void onEnter();
    virtual void onExit();
    virtual bool ccTouchBegan(cocos2d::CCTouch *pTouch, cocos2d::CCEvent *pEvent);
    virtual void registerWithTouchDispatcher();

    void close(float percent);

    cocos2d::extension::CCArmature *armature;
    int weaponIndex;
};


//.cpp
void TestArmatureNesting::onEnter()
{
    CCLayer::onEnter();
    setTouchEnabled(true);//触摸事件开启   与registerWithTouchDispatcher() 对应

    armature = cocos2d::extension::CCArmature::create("cyborg");
    /** playByIndex()
     * Play animation by index, the other param is the same to play.
     * @param  _animationIndex  the animation index you want to play
     */
    armature->getAnimation()->playByIndex(1);
    armature->setPosition(ccp(200,200));
    armature->setScale(1.2f);
    armature->getAnimation()->setSpeedScale(0.4f);
    addChild(armature);

    weaponIndex = 0;
}

void TestArmatureNesting::onExit()
{
    CCDirector::sharedDirector()->getTouchDispatcher()->removeDelegate(this);
    CCLayer::onExit();
}

bool TestArmatureNesting::ccTouchBegan( CCTouch *pTouch, CCEvent *pEvent )
{
    ++weaponIndex;
    weaponIndex = weaponIndex % 4;

    /** virtual CCBone *getBone(const char *name) const;
     * Get a bone with the specified name
     *
     * @param name The bone's name you want to get
     */
    if(armature != NULL)
    {
        armature->getBone("armInside")->getChildArmature()->getAnimation()->playByIndex(weaponIndex);
        armature->getBone("armOutside")->getChildArmature()->getAnimation()->playByIndex(weaponIndex);
    }

    return false;
}

//registerWithTouchDispatcher() 注册触摸事件(触摸事件)    -1>0  先触发
void TestArmatureNesting::registerWithTouchDispatcher()
{
    CCDirector::sharedDirector()->getTouchDispatcher()->addTargetedDelegate(this, INT_MIN + 1, true);
}

void TestArmatureNesting::close(float percent)
{

}
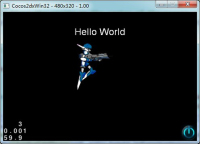
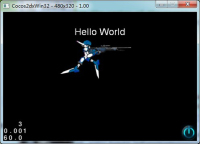
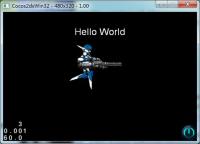
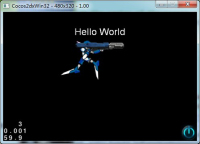
点击屏幕 切换装备:(如图)
打开 .json 或者 .xml 文件我们会发现 一个动作的组成结构:
<mov name="fall" dr="5" to="6" drTW="5" lp="1" twE="NaN">
…… …… …… ……
</mov>
表示一个动作
这也就是 armature->getAnimation()->playByIndex(1); 这里的参数 1 的由来。