上一篇简单介绍了RabbitMQ的下载安装以及简单的发送与接收的例子,今天说说RabbitMQ的内部管理机制,先上个图
一,Exchange(交换器)
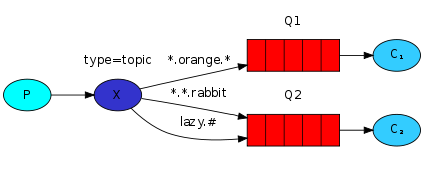
RabbitMQ中的消息传递模型的核心思想是生产者永远不会将任何消息直接发送到队列中。也就是当消息发送后会经过一系列的转化最终才会将消息分发到队列当中去,而在中间起到转化分发消息作用的就是Exchange。
Exchange的类型有direct,topic,headers,fanout等几种类型,它的类型决定了Exchange是如何执行的,如fanout:它只是将收到的所有消息广播到它所知道的所有队列中
Exchange可以通过代码去创建:channel.ExchangeDeclare(exchange: "logs_topic", type: "topic");
也可以通过管理工具去手动创建 :
最底部有添加按钮可以手动添加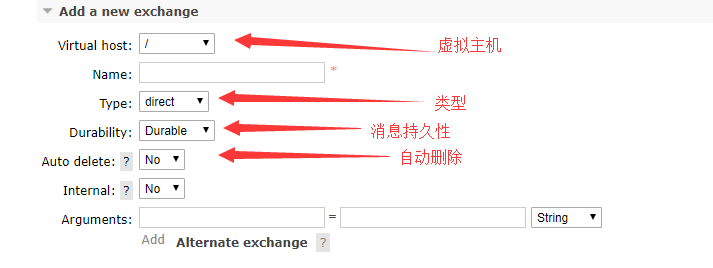
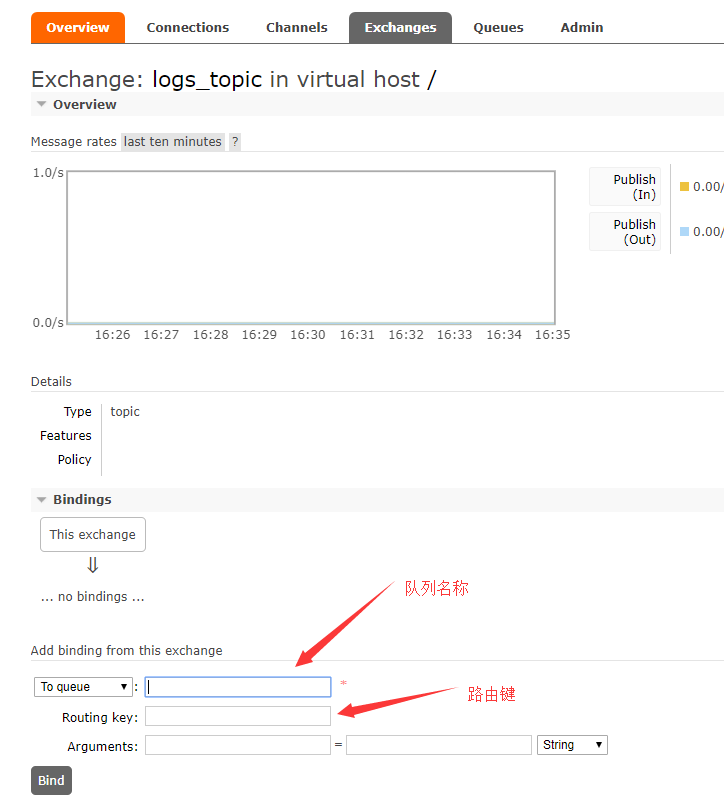
这是我们可以发送消息到交换器了:
channel.BasicPublish(exchange: "logs", routingKey: "", basicProperties: null, body: body);
接受消息也就可以在将交换器与队列绑定来接受消息了
channel.QueueBind(queue: queueName,exchange: "logs",routingKey: "");
二,Routing(路由)
路由说白了就是根据Exchange的类型定义一个将消息发送到队列的规则
channel.QueueBind(queue:queueName,
                  交换:“direct_logs”,
                  routingKey:“black”);
在接受端称它为绑定键,routingKey的含义取决于交换类型。我们之前使用的 fanout简单地忽略了它的价值
我们如何使用它呢,直接贴代码发送端:
var factory = new ConnectionFactory() { HostName = "localhost"};
            using (var connection = factory.CreateConnection())
            using (var channel = connection.CreateModel())
            {
          //交换器类型:topic
                channel.ExchangeDeclare(exchange: "logs_topic", type: "topic");
                var body = Encoding.UTF8.GetBytes(msg);

                //定义路由值routingKey: "kern.123456"
          channel.BasicPublish(exchange: "logs_topic", routingKey: "kern.123456", basicProperties: null, body: body);
        }
接收端:
 var factory = new ConnectionFactory { HostName = "localhost" };

            using (var connection = factory.CreateConnection())
            using (var channel = connection.CreateModel())
            {
                channel.ExchangeDeclare(exchange: "logs_topic", type: "topic");
                var queueName = channel.QueueDeclare().QueueName;
          //接收路由数组 topic类型可以通过通配符进行路由匹配 官网:http://www.rabbitmq.com/tutorials/tutorial-five-dotnet.html
                args = new[] { "kern.*" };
foreach (var bindingKey in args)
                {
            //绑定交换器,路由与队列
                    channel.QueueBind(queue: queueName,
                        exchange: "logs_topic",
                        routingKey: bindingKey);
                }

                Console.WriteLine(" [*] Waiting for messages. To exit press CTRL+C");

                var consumer = new EventingBasicConsumer(channel);
                consumer.Received += (model, ea) =>
                {
                    var body = ea.Body;
                    var message = Encoding.UTF8.GetString(body);
                    var routingKey = ea.RoutingKey;
                    Console.WriteLine(" [x] Received '{0}':'{1}'",
                        routingKey,
                        message);
                };
                channel.BasicConsume(queue: queueName,
                    autoAck: true,
                    consumer: consumer);

                Console.WriteLine(" Press [enter] to exit.");
                Console.ReadLine();
            }
当然设置路由也可以通过管理工具进行添加设置
三,Queues(队列)
我们通过管理工具看一下:

最后说一下远程连接注意的地方,RabbitMq默认账户是“guest”在默认配置下只能通过localhost访问。我们添加新账户的时候注意账户的权限设置