SpringMVC——数据绑定及表单标签
理解数据绑定
为什么要使用数据绑定
基于HTTP特性,所有的用户输入的请求参数类型都是String,比如下面表单:

按照我们以往所学,如果要获取请求的所有参数的话,我们需要这样写:
public String saveProduct(String name,String description,Integer price)
{....}
但是我们发现这些参数都是描述一类事物的属性信息的,并且如果参数过多的话,将会加大我们修改和编写的负担。数据绑定是将用户输入绑定到Java对象的一种特性。
我们可以这样理解,我们定义一个Java类Product,拥有name、price、description等属性,当请求映射时,可以直接把请求的参数自动注入到一个Product对象中。
有了数据绑定后,SpringMVC将会为我们自动进行格式转换,我们如下编写即可:
public String saveProduct(Produc product, RedirectAttributes redirectAttributes)
{....}
这无疑将是方便的!
表单标签库
加入taglib指令
表单标签库包含了可以用在JSP页面中渲染HTML元素的标签。
为了使用这些标签,必须在开头声明这个taglib指令
<%@taglib uri="http://www.springframework.org/tags/form" prefix="form" %>
表单标签库中的所有标签:
| 标签 | 描述 |
|---|---|
| form | 渲染表单元素 |
| input | 渲染<input type="text"/> |
| password | 渲染<input type="password"/> |
| hidden | 渲染<input type="hidden"/> |
| textarea | 渲染textare元素 |
| checkbox | 渲染<input type="checkbox"/> |
| checkboxes | 渲染多个<input type="checkbox"/> |
| radiobutton | 渲染一个<input type="radio"/> |
| radiobuttons | 渲染多个<input type="radio"/> |
| select | 渲染一个选择元素 |
| option | 渲染一个可选元素 |
| options | 渲染一个可被选择元素列表 |
| errors | 在span元素中渲染字段错误 |
表单标签
实现的效果
具体的表单标签的用法,请详情查看原文章(http://elim.iteye.com/blog/1807330).
下面我仅仅以我的实例,来说明用到的表单标签:
我们的实现效果:
1.图书列表界面:

2.图书编辑界面:

思路分析
1.首先我们在图书列表界面中,点击链接后,会访问book_edit/${book.id}。
<body>
    <a href="<c:url value="/book_input"/>">Add Book</a>
    <table>
        <tr>
            <th>Category</th>
            <th>Title</th>
            <th>ISBN</th>
            <th>Author</th>
            <th> </th>
        </tr>
        <c:forEach items="${books}" var="book">
            <tr>
                <td>${book.category.name}</td>
                <td>${book.title}</td>
                <td>${book.isbn}</td>
                <td>${book.author}</td>
                <td><a href="book_edit/${book.id}">Edit</a> </td>
            </tr>
        </c:forEach>
    </table>
</body>
2.Controller接收到请求会保存类别信息和图书信息到Model中。
    @RequestMapping(value = "/book_edit/{id}")
    public String bookSave(Model model, @PathVariable int id)
    {
        List<Category> categories=bookService.getAllCategorys();
        model.addAttribute("categories",categories);
        Book book= bookService.get(id);
        model.addAttribute("book",book);
        return "BookEditForm";
    }
3.使用表单标签,绑定requestScope中的Book对象和Category对象到表单中。
<body>
<form:form commandName="book" action="book_update" method="post">
    <legend>Edit a Book</legend>
    <p>
        <label for="category">Category:</label>
        <form:select id="category" path="category.id" items="${categories}" itemLabel="name" itemValue="id"/>
    </p>
    <p>
        <label for="title">Title:</label>
        <form:input id="title" path="title"/>
    </p>
    <p>
        <label for="author">Author:</label>
        <form:input id="author" path="author"/>
    </p>
    <p>
        <label for="isbn">ISBN:</label>
        <form:input id="title" path="isbn"/>
    </p>
    <p>
        <input type="reset">
        <input type="submit" value="Update Book">
    </p>
</form:form>
</body>
表单标签之FORM
使用Spring的form标签主要有两个作用:
第一是它会自动的绑定来自Model中的一个属性值到当前form对应的实体对象,默认是command属性,这样我们就可以在form表单体里面方便的使用该对象的属性了;但是我们要使用的Model中的Book,而非默认的command,所以我们可以将保存在Model中的Book键值对的键值改为command或者在form中指定commandName,即commandName="book"
第二是它支持我们在提交表单的时候使用除GET和POST之外的其他方法进行提交,包括DELETE和PUT等。
<form:form action="formTag/form.do" method="delete" modelAttribute="user">
    <table>
        <tr>
            <td>Name:</td><td><form:input path="name"/></td>
        </tr>
        <tr>
            <td>Age:</td><td><form:input path="age"/></td>
        </tr>
        <tr>
            <td colspan="2"><input type="submit" value="提交"/></td>
        </tr>
    </table>
</form:form>
说明:
其生成的代码如下:
<form id="user" action="formTag/form.do" method="post">
    <input type="hidden" name="_method" value="delete"/>
    <table>
        <tr>
            <td>Name:</td><td><input id="name" name="name" type="text" value="ZhangSan"/></td>
        </tr>
        <tr>
            <td>Age:</td><td><input id="age" name="age" type="text" value="36"/></td>
        </tr>
        <tr>
            <td colspan="2"><input type="submit" value="提交"/></td>
        </tr>
    </table>
</form>
从它生成的代码我们可以看出,Spring在实现除GET和POST之外的请求方法时,还是使用的POST方法进行请求,然后给表单加上了一个隐藏域,用以表示真正的请求方法,这个隐藏域的名称默认是“_method”。
但此时我们还需要在Web.XML中添加:
详情请查看:SpringMVC:学习笔记(3)——REST<filter> <filter-name>hiddenHttpMethodFilter</filter-name> <filter-class>org.springframework.web.filter.HiddenHttpMethodFilter</filter-class> </filter> <filter-mapping> <filter-name>hiddenHttpMethodFilter</filter-name> <url-pattern>/*</url-pattern> </filter-mapping>
表单标签之Input
SpringMVC的input标签会被渲染为一个type为text的普通Html input标签,这个标签最重要的属性时PATH,它将这个输入字段绑定到book的一个属性,即绑定到Book的标题属性。
<p>
        <label for="title">Title:</label>
        <form:input id="title" path="title"/>
</p>
使用SpringMVC的input标签的唯一作用就是它能绑定表单数据。SpringMVC表单标签最大的好处就是它支持数据绑定,当我们的表单标签不需要绑定的数据的时候,我们应该使用普通的Html标签。关于input标签绑定表单数据的方法已经在介绍form标签的时候顺带介绍过了,这里就不再过多的赘述了
表单标签之Select
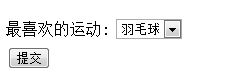
select标签将会被渲染为一个普通的HTML select标签。这里拿user最喜欢的球类运动来做示例,有如下这样一个处理器方法和对应的视图页面:
后台逻辑
@RequestMapping(value="form", method=RequestMethod.GET)
public String formTag(Map<String, Object> map) {
   User user = new User();
   user.setFavoriteBall(4);//设置我最喜爱的球类运动是4羽毛球
   Map<Integer, String> ballMap = new HashMap<Integer, String>();
   ballMap.put(1, "篮球");
   ballMap.put(2, "足球");
   ballMap.put(3, "乒乓球");
   ballMap.put(4, "羽毛球");
   ballMap.put(5, "排球");
   map.put("user", user);
   map.put("ballMap", ballMap);
   return "formTag/form";
}
前端视图
<form:form action="formTag/form.do" method="post" commandName="user">
    <table>
        <tr>
            <td>最喜欢的运动:</td>
            <td>
               <form:select path="favoriteBall" items="${ballMap}"/>
            </td>
        </tr>
       <tr>
            <td colspan="2"><input type="submit" value="提交"/></td>
        </tr>
    </table>
</form:form>
渲染效果
这个时候会渲染出如下结果:
相关说明
从上面示例我们可以看出:
1.通过items属性给select标签指定了一个数据源,并且绑定了表单对象user的favoriteBall属性。
说明:
Items属性是用于指定当前select的所有可选项的,但是它对于select标签而言不是必须的,因为我们还可以手动的在select标签中间加上option标签来指定select可选的option。
2.Select标签支持的items属性的数据类型可以是Array、Collection和Map,当数据类型为Array或Collection时且其中的元素为一个POJO时,我们可以通过属性itemLabel和itemValue来指定将用于呈现的option Label和Value,其他情况下Array和Collection数据源中的元素将既作为可选项option的value又作为它的Label。当items的数据类型为Map时,Map的key将作为可选项option的value,而Map的value将作为option的Label标签。