SpringMVC:学习笔记(8)——文件上传
SpringMVC处理文件上传的两种方式:
1.使用Apache Commons FileUpload元件。
2.利用Servlet3.0及其更高版本的内置支持。
文件上传前端处理
本模块使用到的前端Ajax库为Axio,其地址为GitHub官网。
关于文件上传
上传文件就是把客户端的文件发送给服务器端。
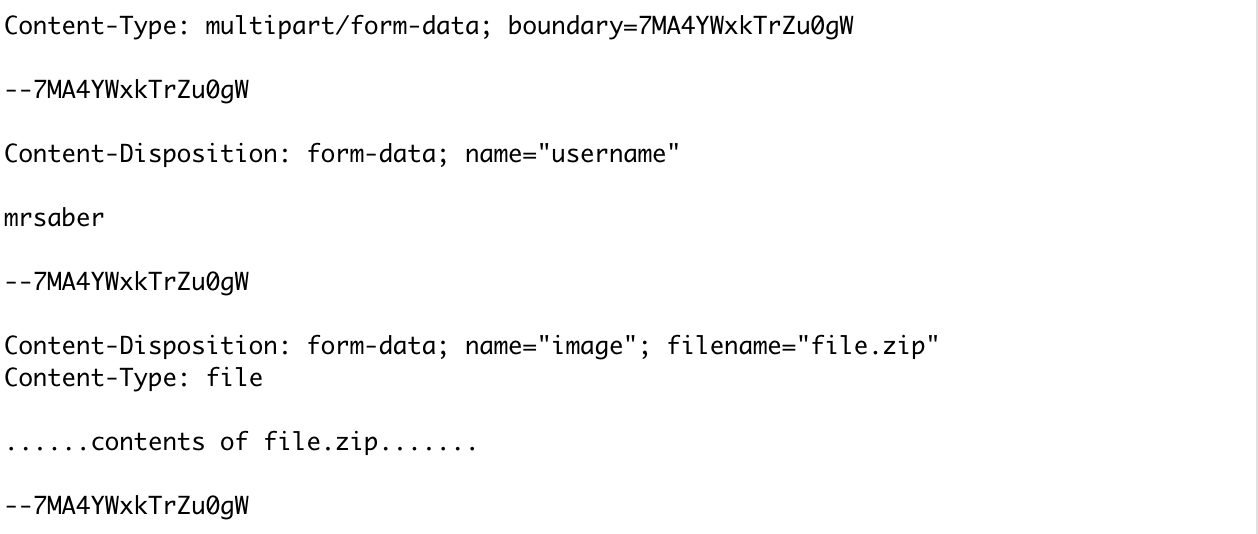
在常见情况(不包含文件上传)下,我们POST请求Content-Type是application/x-www-form-urlencoded,这意味着消息内容会经过URL编码,就像在GET请求时URL里的QueryString那样。txt1=hello&txt2=world。为了支持表单上传,我们第一个要设置的请求的Content-Type,即为multipart/form-data,以支持客户端向服务器发送二进制数据。
一个常见的请求上传格式大概是这样的:
基于表单进行上传
我们首先构建一个简易的文件上传表单,这里面有几个需要注意的地方:
- 在form中,我们添加了enctype="multipart/form-data" 这条属性,enctype属性规定了在发送到服务器之前应该如何对表单数据进行编码

- action="upload"> 指明了服务器接受文件的地址。
<!DOCTYPE html>
<html lang="en">
<head>
    <meta charset="UTF-8">
    <title>Title</title>
</head>
<body>
    <form name="uploadForm" method="POST" enctype="multipart/form-data" action="upload">
        <table>
            <tr>
                <td>UserName</td>
                <td><input type="text" name="username"></td>
            </tr>
            <tr>
                <td>upload1</td>
                <td><input type="file" name="file"></td>
            </tr>
            <tr><td><input type="submit" name="submit" value="上传"></td></tr>
        </table>
    </form>
</body>
</html>
然后,再点击上传按钮后,服务器将会接收到上传请求。
补充:
在HTML5中,通过在input元素中引入多个multiple属性,使得多个文件的上传变得更加简单,下面均可使一个上传框支持多个文件上传。
<input type="file" name="fieldName" multiple/>
<input type="file" name="fieldName" multiple="multiple"/>
<input type="file" name="fieldName" multiple=""/>
基于FormData进行上传
FormData对象用以将数据编译成键值对,以便用XMLHttpRequest来发送数据。其主要用于发送表单数据,但亦可用于发送带键数据(keyed data),而独立于表单使用。如果表单enctype属性设为multipart/form-data ,则会使用表单的submit()方法来发送数据,从而,发送数据与传统表单具有同样形式。
简单来说就是,我们完全用JavaScript代码来拼写表单数据,如下:
var formData = new FormData();

//普通字段
formData.append("username", "Groucho");
formData.append("accountnum", 123456); //数字123456会被立即转换成字符串 "123456"

// 文件:基于<input type=‘file’/>
formData.append("userfile", fileInputElement.files[0]);

// 文件:Blob 对象
var content = '<a id="a"><b id="b">hey!</b></a>'; // 新文件的正文...
var blob = new Blob([content], { type: "text/xml"});
formData.append("webmasterfile", blob);
接着,我们就可以使用axios,来上传数据,此处需要注意的是,我们需要进行请求头的设置:'Content-Type': 'multipart-/form-data'
//构造表头
let config = {
            headers: {
                'Content-Type': 'multipart-/form-data'
            }
        }

axios.post("//127.0.0.1:8000/web/cam", formData, config)
	.then((response) => {…}))
	.catch((error) =>{…});
到这里,前端的处理就完成了。
用CommonsFileUpLoad处理上传请求
首先我们需要导入两个jar包。

我们在前端处理部分已经讲了,基于表单进行处理的方法,我们可以编写如下测试视图:

表单模型
我们要创建一个对应于表单的表单模型,我们知道@ModelAttribute是一个非常常用的注解,将其运用在参数上,会将客户端传递过来的参数按名称注入到指定对象中,并且会将这个对象自动加入ModelMap中。
在参数映射环节中,常见的表单模型字段类型都很简单,比如字符串、时间、数值等,但是对于文件字段,我们要使用MultipartFile类型。仅仅这一步操作而已,表单模型就可以映射所有的请求数据,包括文件数据。其代码可能如下:
public class Product implements Serializable {
    //实现了这个接口,可以安全的将数据保存到HttpSession中
    private long id;
    private String name;
    private String description;
    private String price;
    //在Domain类中加入MultipartFile类型的属性,用来保存上传的文件
    private List<MultipartFile> images;
    public List<MultipartFile> getImages() {
        return images;
    }

    public void setImages(List<MultipartFile> images) {
        this.images = images;
    }
  ......多个get和set方法。
}
MultipartFile接口还提供了以下方法:

后端控制器
首先控制器已经事先将所有的请求参数映射到我们创建好的Product对象中。Product中有一个类型为MultipartFile的字段,映射了请求中名为images的上传文件。我们只需要使用访问器来访问文件,然后使用transfer即可保存到本地。
@Controller
public class ProductController {
  ....
    @RequestMapping(value = "/product_save",method = RequestMethod.POST)
    public String saveProduct(HttpServletRequest servletRequest, @ModelAttribute Product product,
BindingResult bindingResult)
    {
        List<MultipartFile> files= product.getImages();
        System.out.println("文件数量是"+files.size());
        if(null!=files&&files.size()>0)
        {
            for (MultipartFile file:files)
            {
                String fileName=file.getOriginalFilename(); //获得文件名称
                File imagFile = new File(servletRequest.getServletContext().getRealPath("/image"),fileName);try {
                    file.transferTo(imagFile);//用于将文件写到服务器本地
                } catch (IOException e) {
                    e.printStackTrace();
                }
            }
        }
        return "ProductDetails";
    }
}
配置文件
在SpringMVC的配置文件中配置了一个名为multipartResolver的Bean。它可以对文件上传器做一些配置,比如“maxuploadsize”、“maxinmemorysize”和“defaultencoding”等。
<?xml version="1.0" encoding="UTF-8"?>
<beans xmlns="http://www.springframework.org/schema/beans"...>

    <!--resources  元素指示SpringMVC那些静态资源需要单独处理-->
    <mvc:resources mapping="/image/**" location="/image/"/>
    <bean id="multipartResolver" class="org.springframework.web.multipart.commons.CommonsMultipartResolver">
        <property name="maxUploadSize" value="2000000"/>
    </bean>
</beans>
说明:
resources 元素指示SpringMVC那些静态资源需要单独处理,此处我们要单独处理的是image,如果不单独处理而是经过dispatcher的话,就会发生404错误.
当然,我们也可以基于JavaConfig的配置文件

用Servlet3及其更高版本上传文件
有了Servlet3,就不需要Commons FileUpload 和Commons IO元件了。因为在Servlet3中内置了上传文件的特性。且Domain类和Controller类基本不变,我们仅仅需要修改一下配置文件。
修改Web.xml
我们可以看到实在dispatcher的基础上添加了配置项:multipart-config
<?xml version="1.0" encoding="UTF-8"?>
<web-app xmlns="http://xmlns.jcp.org/xml/ns/javaee"
         xmlns:xsi="http://www.w3.org/2001/XMLSchema-instance"
         xsi:schemaLocation="http://xmlns.jcp.org/xml/ns/javaee http://xmlns.jcp.org/xml/ns/javaee/web-app_3_1.xsd"
         version="3.1">
    <context-param>
        <param-name>contextConfigLocation</param-name>
        <param-value>/WEB-INF/applicationContext.xml</param-value>
    </context-param>
    <listener>
        <listener-class>org.springframework.web.context.ContextLoaderListener</listener-class>
    </listener>

    <servlet>
        <servlet-name>dispatcher</servlet-name>
        <servlet-class>org.springframework.web.servlet.DispatcherServlet</servlet-class>
        <load-on-startup>1</load-on-startup>
        <multipart-config>
            <max-file-size>20848820</max-file-size>
            <!--上传内文件的最大容量-->
            <max-request-size>418018841</max-request-size>
            <!--表示多部分HTTP请求允许的最大容量-->
            <file-size-threshold>1048576</file-size-threshold>
            <!--超过这个容量将会被写到磁盘中-->
            <location>/image/</location>
            <!--要将已上传的文件保存到磁盘中的位置-->
        </multipart-config>
    </servlet>

    <servlet-mapping>
        <servlet-name>dispatcher</servlet-name>
        <url-pattern>/</url-pattern>
    </servlet-mapping>
    <!--Spring中文乱码拦截器-->
    <filter>
        <filter-name>setcharacter</filter-name>
        <filter-class>org.springframework.web.filter.CharacterEncodingFilter</filter-class>
        <init-param>
            <param-name>encoding</param-name>
            <param-value>UTF-8</param-value>
        </init-param>
    </filter>
    <filter-mapping>
        <filter-name>setcharacter</filter-name>
        <url-pattern>/*</url-pattern>
    </filter-mapping>
 </web-app>
SpringMVC配置文件添加多部分解析器
<bean id="MultipartResolver" class="org.springframework.web.multipart.support.StandardServletMultipartResolver"></bean>