前提:开发和之前eclipse的开发有很大的不同!
1、服务端的实现
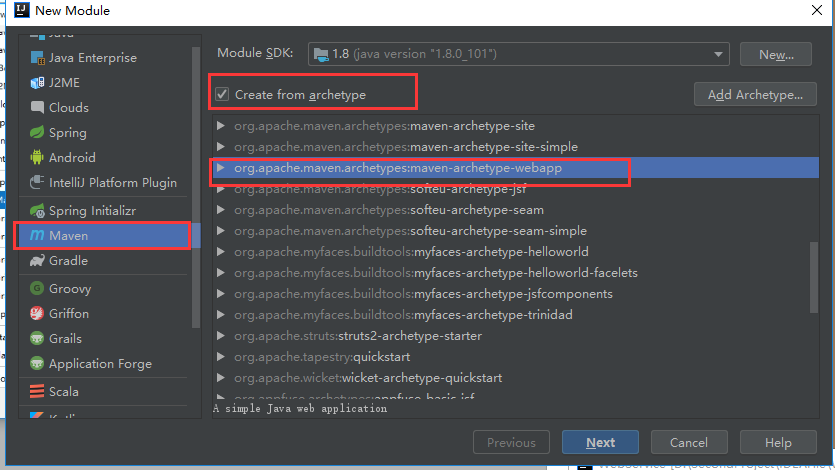
1、新建项目
此时创建的是web项目
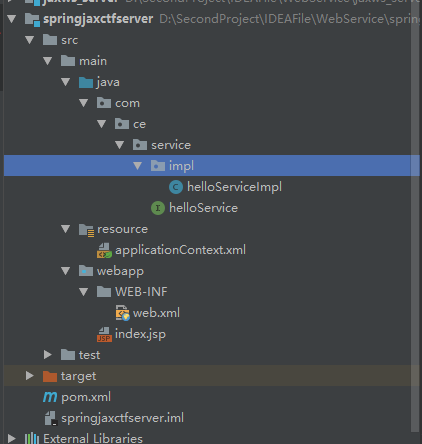
2、此时创建的项目是不完整的需要开发人员手动补充完整
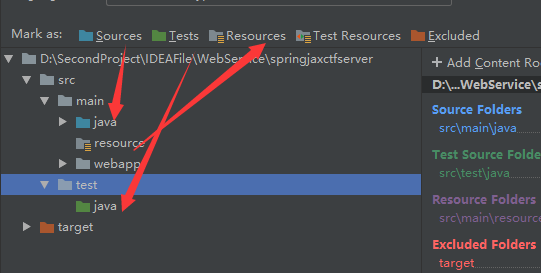
3、对文件夹的设置(满满的软件使用方法)
4、类:
接口类
helloService.java
package com.ce.service;

import javax.jws.WebService;

@WebService
public interface helloService {
    public String hello(String name);
}
接口的实现类:
package com.ce.service.impl;
import com.ce.service.helloService;

public class helloServiceImpl implements helloService {
    @Override
    public String hello(String name) {
       return "你好 : " + name;
    }
}
关键的是web.xml文件的配置:
这里的url-pattern是一个切点(知道就好了)
<?xml version="1.0" encoding="UTF-8"?>
<web-app xmlns:xsi="http://www.w3.org/2001/XMLSchema-instance" xmlns="http://xmlns.jcp.org/xml/ns/javaee" xsi:schemaLocation="http://xmlns.jcp.org/xml/ns/javaeehttp://xmlns.jcp.org/xml/ns/javaee/web-app_3_1.xsd" version="3.1">
  <display-name>cxf</display-name>

  <servlet>
    <servlet-name>CXFServlet</servlet-name>
    <servlet-class>org.apache.cxf.transport.servlet.CXFServlet</servlet-class>
  </servlet>
  <servlet-mapping>
    <servlet-name>CXFServlet</servlet-name>
    <!--将作为前缀的一部分-->
    <url-pattern>/cr/*</url-pattern>
  </servlet-mapping>


  <context-param>
    <param-name>contextConfigLocation</param-name>
    <param-value>classpath:/applicationContext.xml</param-value>
  </context-param>

  <listener>
    <listener-class>org.springframework.web.context.ContextLoaderListener</listener-class>
  </listener>

</web-app>
spring的配置文件
applicationContext.xml
这里需要引入约束
<?xml version="1.0" encoding="UTF-8"?>
<beans  xmlns="http://www.springframework.org/schema/beans"
        xmlns:context="http://www.springframework.org/schema/context"
        xmlns:xsi="http://www.w3.org/2001/XMLSchema-instance"
        xmlns:cxf="http://cxf.apache.org/core"
        xmlns:jaxws="http://cxf.apache.org/jaxws"
        xmlns:jaxrs="http://cxf.apache.org/jaxrs"
        xsi:schemaLocation="
http://www.springframework.org/schema/beans
http://www.springframework.org/schema/beans/spring-beans.xsd
http://www.springframework.org/schema/context
http://www.springframework.org/schema/spring-context.xsd
http://cxf.apache.org/core
http://cxf.apache.org/schema/core.xsd
http://cxf.apache.org/jaxws
http://cxf.apache.org/schemas/jaxws.xsd
http://cxf.apache.org/jaxrs
http://cxf.apache.org/schemas/jaxrs.xsd">
<!--服务地址-->
<jaxws:server address="/hello">
    <!--服务类-->
    <jaxws:serviceBean>
        <bean class="com.ce.service.impl.helloServiceImpl"></bean>
    </jaxws:serviceBean>
</jaxws:server>
</beans>
添加tomcat进行运行项目:
在同tomcat文件夹中加入jar(坑位)
否则启动就会立即进行报错

此时开启服务:
访问网址:

2、客户端
1、新建项目

2、工程目录

3、pom文件的依赖
pom文件的依赖与服务的相同
4、applicationContext.xml
<?xml version="1.0" encoding="UTF-8"?>
<beans  xmlns="http://www.springframework.org/schema/beans"
        xmlns:context="http://www.springframework.org/schema/context"
        xmlns:xsi="http://www.w3.org/2001/XMLSchema-instance"
        xmlns:cxf="http://cxf.apache.org/core"
        xmlns:jaxws="http://cxf.apache.org/jaxws"
        xmlns:jaxrs="http://cxf.apache.org/jaxrs"
        xsi:schemaLocation="
http://www.springframework.org/schema/beans
http://www.springframework.org/schema/beans/spring-beans.xsd
http://www.springframework.org/schema/context
http://www.springframework.org/schema/spring-context.xsd
http://cxf.apache.org/core
http://cxf.apache.org/schema/core.xsd
http://cxf.apache.org/jaxws
http://cxf.apache.org/schemas/jaxws.xsd
http://cxf.apache.org/jaxrs
http://cxf.apache.org/schemas/jaxrs.xsd">

<!--客户端配置-->
<!--
服务地址
服务接口类型
-->
<jaxws:client id="helloService"
  serviceClass="com.ce.service.helloService"
  address="http://localhost:8082/cr/hello">
</jaxws:client>

</beans>
测试类:
package com.ce;

import com.ce.service.helloService;
import org.junit.Test;
import org.junit.runner.RunWith;
import org.springframework.test.context.ContextConfiguration;
import org.springframework.test.context.junit4.SpringJUnit4ClassRunner;
import javax.annotation.Resource;

@RunWith(SpringJUnit4ClassRunner.class)
@ContextConfiguration("classpath:applicationContext.xml")
public class Client {

    //注入对象
    @Resource
    private com.ce.service.helloService helloService;

    @Test
    public void test(){
        //查看接口的代理对象类型
        System.out.println(helloService.getClass());

        //远程访问服务的的方法
        String mr = helloService.hello("Mr");
        System.out.println(mr);

    }
}
此时测试可以得到答案!!!