1 AOP理解
AOP Aspect Oriented Programing 面向切面编程 --简单来说可以在原来的方法执行的逻辑增加一些新的逻辑
*AOP:面向切面编程.不是替代面向对象,对面向对象扩展,延伸.
* AOP的思想:
* 代理机制.(横向抽取).
* Spring使用AOP的时候,根据类的情况,自动选择代理机制:
* JDK :针对实现了接口的类生成代理.
* CGLIB :针对没有实现接口的类生成代理.生成某个类的子类.
2 Spring的AOP代理:
JDK动态代理:对实现了接口的类生成代理
CGLib代理机制:对类生成代理
3 代理
(1) jdk 代理
步骤:
1 编写被代理对象 ,UserDao 接口 UserDaoImpl实现类
2 编写代理对象 (实现InvocationHandler接口)
创建代理对象
import java.lang.reflect.InvocationHandler;
import java.lang.reflect.Method;
import java.lang.reflect.Proxy;

import org.springframework.stereotype.Component;
@Component
public class Myproxy implements InvocationHandler {
	private UserDao userDao=new UserDaoImpl();


	public Myproxy(UserDao userDao) {
		super();
		this.userDao = userDao;
	}

	public UserDao createProxy() {
		UserDao proxy = (UserDao) Proxy.newProxyInstance(userDao.getClass()
				.getClassLoader(), userDao.getClass().getInterfaces(), this);
		return proxy;
	}


	@Override
	public Object invoke(Object proxy, Method method, Object[] args) throws Throwable {
		// TODO Auto-generated method stub
		System.out.println("增强");
		return method.invoke(userDao, args);
	}

}
测试:
@Test
	public void test() {
		Myproxy myproxy = new Myproxy(userDao);
		UserDao userDao = myproxy.createProxy();
		userDao.delete();
	}
cglib代理
步骤:
1 编写被代理对象 ,UserDao 接口 UserDaoImpl实现类
2 编写代理对象 (实现MethodInterceptor接口)
class MyCglib implements MethodInterceptor{
	@Autowired
	OrderDao orderDao;

	public MyCglib(OrderDao orderDao) {
		super();
		this.orderDao = orderDao;
	}

	public OrderDao createProxy(){
		// 使用CGLIB生成代理:
		// 1.创建核心类:Enhancer
		Enhancer enhancer = new Enhancer();
		// 2.为其设置父类:
		enhancer.setSuperclass(orderDao.getClass());
		// 3.设置回调:
		enhancer.setCallback(this);
		// 4.创建代理:
		return (OrderDao) enhancer.create();
	}


	@Override
	public Object intercept(Object arg0, Method arg1, Object[] arg2, MethodProxy arg3) throws Throwable {
		// TODO Auto-generated method stub
		if("show".equals(arg1.getName())){
			System.out.println("========show======");
			Object obj = arg3.invokeSuper(arg0, arg2);
			return obj;
		}
		return arg3.invokeSuper(arg0,  arg2);
	}
3 Spring的AOP的开发: 传统开发方式有 生成代理
针对所有方法的增强:(不带有切点的切面)
第一步:导入相应jar包.
* spring-aop-3.2.0.RELEASE.jar
* com.springsource.org.aopalliance-1.0.0.jar
第二步:编写被代理对象:
* CustomerDao接口
* CustoemrDaoImpl实现类
第三步:编写增强的代码:
public class MyBeforeAdvice implements MethodBeforeAdvice{
public void before(Method method, Object[] args, Object target) throws Throwable {
System.out.println("前置增强...");
}
}
· 第四步 配置xml
<!-- 定义目标对象 -->
<bean id="customerDao" class="cn.itcast.spring3.demo3.CustomerDaoImpl"></bean>
<!-- 定义增强 -->
<bean id="beforeAdvice" class="cn.itcast.spring3.demo3.MyBeforeAdvice"></bean>
<!-- Spring支持配置生成代理: -->
<bean id="customerDaoProxy" class="org.springframework.aop.framework.ProxyFactoryBean">
<!-- 设置目标对象 -->
<property name="target" ref="customerDao"/>
<!-- 设置实现的接口 ,value中写接口的全路径 -->
<property name="proxyInterfaces" value="cn.itcast.spring3.demo3.CustomerDao"/>
<!-- 配置增强 需要使用value:要的名称 -->
<property name="interceptorNames" value="beforeAdvice"/>
</bean>
带有切点的切面:(针对目标对象的某些方法进行增强)
PointcutAdvisor 接口:
DefaultPointcutAdvisor 最常用的切面类型,它可以通过任意Pointcut和Advice 组合定义切面
RegexpMethodPointcutAdvisor 构造正则表达式切点切面
第一步:创建被代理对象.
* OrderDao
第二步:编写增强的类:
public class MyAroundAdvice implements MethodInterceptor{
public Object invoke(MethodInvocation methodInvocation) throws Throwable {
System.out.println("环绕前增强...");
Object result = methodInvocation.proceed();// 执行目标对象的方法
System.out.println("环绕后增强...");
return result;
}
}
第三步:生成代理:
<!-- 1配置被代理对象 -->
	<bean id="userserv" class="demo2_aop_ogi_pointcut.UserServImpladd"></bean>
	<!-- 2配置增强bean -->
	<bean id="before" class="demo2_aop_ogi_pointcut.MyBeforeAdvise"></bean>

	<!-- 亚配置切面 -->

	<bean id="myPointcutAdvisor"
		class="org.springframework.aop.support.RegexpMethodPointcutAdvisor">
		<!-- 配置切点 patterns 可以配置多个切点 默认使用逗号隔开 -->
		<property name="pattern" value="demo2_aop_ogi_pointcut.IUserServ.*dd.*"></property>
		<!-- 配置增强 -->
		<property name="advice" ref="before"></property>
	</bean>
	<bean id="userservProxy" class="org.springframework.aop.framework.ProxyFactoryBean">
		<!-- 配置接口 -->
		<property name="proxyInterfaces" value="demo2_aop_ogi_pointcut.IUserServ"></property>
		<!-- 配置目标对象 -->
		<property name="target" ref="userserv" />
		<!-- 配置增强 -->
		<property name="interceptorNames" value="myPointcutAdvisor"></property>
	</bean>
《2》自动代理
1 编写接口和实现类
2 编写增强的类
3 配置代理
增强的类
public class MyBeforeAdvise implements MethodBeforeAdvice {
	/**
	 * @param method:执行的方法
	 * @param args:参数
	 * @param target:目标对象
	 */
	@Override
	public void before(Method method, Object[] args, Object target) throws Throwable {

		System.out.println("auto----------before");
		//method.invoke(target, args);
	}

	public void afterReturning(Object arg0, Method arg1, Object[] arg2, Object arg3) throws Throwable {
		System.out.println("after");

	}

	public Object invoke(MethodInvocation methodInvocation) throws Throwable {

		System.out.println("环绕前增强...");
		methodInvocation.proceed();// 执行目标对象的方法
		System.out.println("环绕后增强...");
		return null;
	}

}
配置xml
无切点
<bean id="userdao" class="demo3_aop_autoproxy.UserDao"></bean>

	<bean id="orderd" class="demo3_aop_autoproxy.OrderDao"></bean>

	<bean id="before" class="demo3_aop_autoproxy.MyBeforeAdvise"></bean>


	 <bean class="org.springframework.aop.framework.autoproxy.BeanNameAutoProxyCreator">
		<property name="beanNames" value="*dao" />   //直接为*.dao包下面的所有方法增强
          <property name="interceptorNames" value="before" />
     </bean>
	<bean
		class="org.springframework.aop.framework.autoproxy.DefaultAdvisorAutoProxyCreator"></bean>
有切点
<bean id="userdao" class="demo3_aop_autoproxy.UserDao"></bean>

	<bean id="orderd" class="demo3_aop_autoproxy.OrderDao"></bean>

	<bean id="before" class="demo3_aop_autoproxy.MyBeforeAdvise"></bean>

	<!-- 配置切面 -->
	<bean id="myPointcutAdvisor"
		class="org.springframework.aop.support.RegexpMethodPointcutAdvisor">
		<property name="pattern" value=".*add.*" />
		<property name="advice" ref="before" />
	</bean>
	<bean
		class="org.springframework.aop.framework.autoproxy.DefaultAdvisorAutoProxyCreator"></bean>
4 aspect 实现增强
(1 ) 注解的方式
1 编写 接口和实现类
2 编写增强的类
3 配置xml.
package demo3_aop_aspectj_annotation;

import org.aspectj.lang.ProceedingJoinPoint;
import org.aspectj.lang.annotation.Around;
import org.aspectj.lang.annotation.Aspect;
import org.aspectj.lang.annotation.Before;
import org.aspectj.lang.annotation.Pointcut;
import org.springframework.stereotype.Component;
@Component
@Aspect
public class MyBeforeAdvise  {
	@Before("execution(* demo3_aop_aspectj_annotation.UserServImpl.add(..))")
	public void before(){
		System.out.println("annotation before");
	}
	@Around("myPointcut()")
	public Object around(ProceedingJoinPoint  invocation) throws Throwable{
		System.out.println("annotation around");
		return invocation.proceed();
	}
	@Pointcut("execution(* demo3_aop_aspectj_annotation.UserServImpl.add(..))")
	private void myPointcut(){}
}
xml配置
<?xml version="1.0" encoding="UTF-8"?>
<beans xmlns="http://www.springframework.org/schema/beans"
	xmlns:context="http://www.springframework.org/schema/context" xmlns:p="http://www.springframework.org/schema/p"
	xmlns:aop="http://www.springframework.org/schema/aop" xmlns:tx="http://www.springframework.org/schema/tx"
	xmlns:xsi="http://www.w3.org/2001/XMLSchema-instance"
	xsi:schemaLocation="http://www.springframework.org/schema/beans http://www.springframework.org/schema/beans/spring-beans-4.0.xsd
	http://www.springframework.org/schema/context http://www.springframework.org/schema/context/spring-context-4.0.xsd
	http://www.springframework.org/schema/aop http://www.springframework.org/schema/aop/spring-aop-4.0.xsd http://www.springframework.org/schema/tx http://www.springframework.org/schema/tx/spring-tx-4.0.xsd
	http://www.springframework.org/schema/util http://www.springframework.org/schema/util/spring-util-4.0.xsd">
	<aop:aspectj-autoproxy />
	<context:component-scan base-package="demo3_aop_aspectj_annotation"></context:component-scan>
</beans>
xml配置的方式
1 编写 接口和实现类
2 编写增强的类
3 配置xml.
·增强的类
package demo3_aop_aspectj_xml;

public class MyBeforeAdvise {

	public void before() throws Throwable {
		System.out.println("aspectj xml =========before");
	}
	public void afterReturing(Object returnVal) {
		System.out.println("后置通知...返回值:" + returnVal);
	}
}
实现类
package demo3_aop_aspectj_xml;

public class UserServImpl implements IUserServ {

	@Override
	public int add(int i) {
		System.out.println("add");
		return 5;
	}

	@Override
	public void delete() {
		System.out.println("delete");

	}

}
xml配置
<?xml version="1.0" encoding="UTF-8"?>
<beans xmlns="http://www.springframework.org/schema/beans"
	xmlns:context="http://www.springframework.org/schema/context" xmlns:p="http://www.springframework.org/schema/p"
	xmlns:aop="http://www.springframework.org/schema/aop" xmlns:tx="http://www.springframework.org/schema/tx"
	xmlns:xsi="http://www.w3.org/2001/XMLSchema-instance"
	xsi:schemaLocation="http://www.springframework.org/schema/beans http://www.springframework.org/schema/beans/spring-beans-4.0.xsd
	http://www.springframework.org/schema/context http://www.springframework.org/schema/context/spring-context-4.0.xsd
	http://www.springframework.org/schema/aop http://www.springframework.org/schema/aop/spring-aop-4.0.xsd http://www.springframework.org/schema/tx http://www.springframework.org/schema/tx/spring-tx-4.0.xsd
	http://www.springframework.org/schema/util http://www.springframework.org/schema/util/spring-util-4.0.xsd">
	<!-- 配置业务bean -->
	<bean id="userServ" class="demo3_aop_aspectj_xml.UserServImpl">
	</bean>
	<bean id="myBefore" class="demo3_aop_aspectj_xml.MyBeforeAdvise"></bean>
	<!-- 配置切点 -->

	<aop:config>
		<!-- 定义切点: -->
		<aop:pointcut expression="execution(* demo3_aop_aspectj_xml.IUserServ.add(..))"
			id="mypointcut" />
		<aop:aspect ref="myBefore"> <!--增强的类 -->
			<!-- 后置通知 要获取返回值 必须和方法的变量名字一致 -->
			<aop:after-returning method="afterReturing" pointcut-ref="mypointcut" returning="returnVal"/>
		</aop:aspect>
	</aop:config>


</beans>
5 spring事务
事务:是逻辑上一组操作,要么全都成功,要么全都失败.
事务特性:
ACID:
原子性:事务不可分割
一致性:事务执行的前后,数据完整性保持一致.
隔离性:一个事务执行的时候,不应该受到其他事务的打扰
持久性:一旦结束,数据就永久的保存到数据库.
如果不考虑隔离性:
脏读:一个事务读到另一个事务未提交数据
不可重复读:一个事务读到另一个事务已经提交数据(update)导致一个事务多次查询结果不一致
虚读:一个事务读到另一个事务已经提交数据(insert)导致一个事务多次查询结果不一致
事务的隔离级别:
未提交读:以上情况都有可能发生。
已提交读:避免脏读,但不可重复读,虚读是有可能发生。
可重复读:避免脏读,不可重复读,但是虚读有可能发生。
串行的:避免以上所有情况.
PlatformTransactionManager:平台事务管理器.(接口 )
API详解:
PlatformTransactionManager:接口.
Spring为不同的持久化框架提供了不同PlatformTransactionManager接口实现
org.springframework.jdbc.datasource.DataSourceTransactionManager : 使用Spring JDBC或iBatis 进行持久化数据时使用 (DataSourceTransactionManager 作为实现类实现PlatformTransactionManager接口)
org.springframework.orm.hibernate3.HibernateTransactionManager : 使用Hibernate3.0版本进行持久化数据时使用
事务的传播行为:(不是JDBC事务管理,用来解决实际开发的问题.)传播行为:解决业务层之间的调用的事务的关系.
PROPAGATION_REQUIRED :支持当前事务,如果不存在 就新建一个
* A,B 如果A有事务,B使用A的事务,如果A没有事务,B就开启一个新的事务.(A,B是在一个事务中。)
PROPAGATION_SUPPORTS 【更多的用于查询】 :支持当前事务,如果不存在,就不使用事务
* A,B 如果A有事务,B使用A的事务,如果A没有事务,B就不使用事务.
PROPAGATION_REQUIRES_NEW 如果有事务存在,挂起当前事务,创建一个新的事务
* A,B 如果A有事务,B将A的事务挂起,重新创建一个新的事务.(A,B不在一个事务中.事务互不影响.)
基于注解的方式配置事务
BookShopDaoImpl.java 这个类实现了三个方法(
1 根据书号获取书的单价
2 更新书的库存. 使书号对应的库存 - 1
3 更新用户的账户余额: 使 username 的 money - price)
package com.rl.springtransaction;

import org.springframework.beans.factory.access.BootstrapException;
import org.springframework.beans.factory.annotation.Autowired;
import org.springframework.jdbc.core.JdbcTemplate;
import org.springframework.stereotype.Repository;


@Repository("bookShopDao")
public class BookShopDaoImpl implements BookShopDao{
	@Autowired
	JdbcTemplate jdbcTemplate;
	//根据书号获取书的单价
	@Override
	public int findBookPriceByIsbn(int isbn) {
		String sql="select price from book where isbn=?";
		return jdbcTemplate.queryForObject(sql, Integer.class, isbn);
	}
	//更新书的库存. 使书号对应的库存 - 1
	@Override
	public void updateBookStock(int isbn) {
		//检查书的库存是否足够, 若不够, 则抛出异常
		String sql2 = "SELECT store FROM book_store WHERE isbn = ?";
		int stock = jdbcTemplate.queryForObject(sql2, Integer.class, isbn);
			if(stock == 0){
				throw new BootstrapException("库存不足!");
			}
		String sql="update book_store set store=store-1 where isbn=?";
		jdbcTemplate.update(sql, isbn);
	}
	//更新用户的账户余额: 使 username 的 money - price
	@Override
	public void updateUserAccount(String username, int price) {
		//验证余额是否足够, 若不足, 则抛出异常
				String sql2 = "SELECT money FROM account WHERE username = ?";
				int money = jdbcTemplate.queryForObject(sql2, Integer.class, username);

				if(money <price){
					throw new BootstrapException("余额不足!");
				}

				String sql = "UPDATE account SET money = money - ? WHERE username = ?";
				jdbcTemplate.update(sql, price, username);
	}

}
BooShopServicesImpl.java (这个类主要是购买方法purchase(String username, int isbn) 参数,username 要传入的购买者的名字 ,isbn 图书编号 这是创建的一个购买的事务 每次默认买一本书)
package com.rl.springtransaction;

import org.springframework.beans.factory.annotation.Autowired;
import org.springframework.stereotype.Service;
import org.springframework.transaction.annotation.Propagation;
import org.springframework.transaction.annotation.Transactional;

@Service("bookShopServices")
public class BookShopServicesImpl implements BookShopService{
	@Autowired
	private BookShopDao bookShopDao;

	@Transactional(propagation=Propagation.REQUIRES_NEW)
	@Override
	public void purchase(String username, int isbn) {


				//1	. 获取书的单价
				int price = bookShopDao.findBookPriceByIsbn(isbn);

				//2. 更新数的库存
				bookShopDao.updateBookStock(isbn);

				//3. 更新用户余额
				bookShopDao.updateUserAccount(username, price);

	}

}
CashirImpl.java (前面的购买方法中一次只能买一本书, 通过这个类 开启一个事务 调用前面一个事务的方法 实现一次能购买多本书)
package com.rl.springtransaction;

import java.util.List;

import org.springframework.beans.factory.annotation.Autowired;
import org.springframework.stereotype.Service;
import org.springframework.transaction.annotation.Propagation;
import org.springframework.transaction.annotation.Transactional;
@Service("cashier")
public class CashirImpl implements Cashir{

	@Autowired
	private BookShopService bookShopService;

     @Transactional(propagation=Propagation.REQUIRES_NEW)
	@Override
	public void checkout(String username, List<Integer> list) {
		for(Integer i:list){
			bookShopService.purchase(username, i);
		}

	}

}
测试:
public class SpringTest {
ClassPathXmlApplicationContext app=new ClassPathXmlApplicationContext("applicationContext.xml");
@Test
public void test(){
Cashir bookShopServices=(Cashir) app.getBean("cashier");
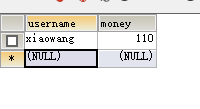
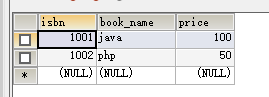
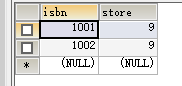
bookShopServices.checkout("xiaowang", Arrays.asList(1001,1002));
}
}
数据表:
account 表(存放 用户名和用户的可用余额) book表(存放书的信息) book_store 库存表
在下面这段代码中我们开启了一个事务 保证在购买一本书的时候 会同时更新三张表 要么同时成功要么同时失败
     @Transactional(propagation=Propagation.REQUIRES_NEW)
	@Override
	public void purchase(String username, int isbn) {  }
在cashir.java中 我创建了一个checkout 的方法 并调用了事务(”购买“ 事务方法) 因此 如果我在cashir.java中的heckout 的方法上加一个事务就会造成一个事务调用另一个事务的方法的现象(即事务的传播行为)。
事务的传播行为在上述已经介绍。
本实例通过模拟让money 只够买两本书中的第一本 看数据库中的变化来演示不同的数据库传播行为。得到结果如下。
假设A事务 为BookShopServicesImpl.java中的 purchase方法 B事务为cashir.java中的heckout 的方法
1 假设 A事务的传播行为为propagation=Propagation.REQUIRES_NEW B事务不论传播行为是什么均可以插入第一个数据 而第二条数据则回滚。(如果B不是事务 则按一般方法调用处理)
PROPAGATION_REQUIRES_NEW * A,B 如果A有事务,B将A的事务挂起,重新创建一个新的事务.(A,B不在一个事务中.事务互不影响.)
如果A没有事务 则AB在一个事务中 要同时成功或失败
2 假设 A事务的传播行为为propagation=Propagation.REQUIRED B事务不论传播行为是什么均不能插入数据(如果B不是事务 则按一般方法调用处理)
Propagation.REQUIRED A,B 如果A有事务,B使用A的事务,如果A没有事务,B就开启一个新的事务.(A,B是在一个事务中。 故要么两个事务一起成功或者一起回滚)
3 假设 A事务的传播行为为propagation=Propagation.SUPPORTS B事务不论传播行为是什么均不能插入数据
A,B 如果A有事务,B使用A的事务,如果A没有事务,B就不使用事务. (故 要么AB 在同一个事物中 一起成功或者一起回滚, 要么就两者都不使用事务)
XML方式配置事务
将注解改成setter方式设置属性
public class BookShopDaoImpl implements BookShopDao{

    JdbcTemplate jdbcTemplate;

    public JdbcTemplate getJdbcTemplate() {
        return jdbcTemplate;
    }
    public void setJdbcTemplate(JdbcTemplate jdbcTemplate) {
        this.jdbcTemplate = jdbcTemplate;
    }
xml配置如下
<?xml version="1.0" encoding="UTF-8"?>
<beans xmlns="http://www.springframework.org/schema/beans"
	xmlns:xsi="http://www.w3.org/2001/XMLSchema-instance"
	xmlns:context="http://www.springframework.org/schema/context"
	xmlns:tx="http://www.springframework.org/schema/tx"
	xmlns:aop="http://www.springframework.org/schema/aop"
	xsi:schemaLocation="http://www.springframework.org/schema/aop http://www.springframework.org/schema/aop/spring-aop-4.0.xsd
		http://www.springframework.org/schema/beans http://www.springframework.org/schema/beans/spring-beans.xsd
		http://www.springframework.org/schema/tx http://www.springframework.org/schema/tx/spring-tx-4.0.xsd
		http://www.springframework.org/schema/context http://www.springframework.org/schema/context/spring-context-4.0.xsd">

	<context:component-scan base-package="com.atguigu.spring"></context:component-scan>

	<!-- 导入资源文件 -->
	<context:property-placeholder location="classpath:db.properties"/>

	<!-- 配置 C3P0 数据源 -->
	<bean id="dataSource"
		class="com.mchange.v2.c3p0.ComboPooledDataSource">
		<property name="user" value="${jdbc.user}"></property>
		<property name="password" value="${jdbc.password}"></property>
		<property name="jdbcUrl" value="${jdbc.jdbcUrl}"></property>
		<property name="driverClass" value="${jdbc.driverClass}"></property>

		<property name="initialPoolSize" value="${jdbc.initPoolSize}"></property>
		<property name="maxPoolSize" value="${jdbc.maxPoolSize}"></property>
	</bean>

	<!-- 配置 Spirng 的 JdbcTemplate -->
	<bean id="jdbcTemplate"
		class="org.springframework.jdbc.core.JdbcTemplate">
		<property name="dataSource" ref="dataSource"></property>
	</bean>

	<!-- 配置 bean -->
	<bean id="bookShopDao" class="com.atguigu.spring.tx.xml.BookShopDaoImpl">
		<property name="jdbcTemplate" ref="jdbcTemplate"></property>
	</bean>

	<bean id="bookShopService" class="com.atguigu.spring.tx.xml.service.impl.BookShopServiceImpl">
		<property name="bookShopDao" ref="bookShopDao"></property>
	</bean>

	<bean id="cashier" class="com.atguigu.spring.tx.xml.service.impl.CashierImpl">
		<property name="bookShopService" ref="bookShopService"></property>
	</bean>

	<!-- 1. 配置事务管理器 -->
	<bean id="transactionManager" class="org.springframework.jdbc.datasource.DataSourceTransactionManager">
		<property name="dataSource" ref="dataSource"></property>
	</bean>

	<!-- 2. 配置事务属性 -->
	<tx:advice id="txAdvice" transaction-manager="transactionManager">
		<tx:attributes>
			<!-- 根据方法名指定事务的属性 -->
			<tx:method name="purchase" propagation="REQUIRES_NEW"/>
			<tx:method name="get*" read-only="true"/>
			<tx:method name="find*" read-only="true"/>
			<tx:method name="*"/>
		</tx:attributes>
	</tx:advice>

	<!-- 3. 配置事务切入点, 以及把事务切入点和事务属性关联起来 -->
	<aop:config>
		<aop:pointcut expression="execution(* com.atguigu.spring.tx.xml.service.*.*(..))"
			id="txPointCut"/>
		<aop:advisor advice-ref="txAdvice" pointcut-ref="txPointCut"/>
	</aop:config>

</beans>
<!-- 3. 配置事务属性 -->
	<tx:advice id="txAdvice" transaction-manager="transactionManager">
		<tx:attributes>
			<!-- 根据方法名指定事务的属性 -->
			<tx:method name="save*" propagation="REQUIRED" />
			<tx:method name="insert*" propagation="REQUIRED" />
			<tx:method name="add*" propagation="REQUIRED" />
			<tx:method name="create*" propagation="REQUIRED" />
			<tx:method name="delete*" propagation="REQUIRED" />
			<tx:method name="update*" propagation="REQUIRED" />
			<tx:method name="find*" propagation="SUPPORTS" read-only="true" />
			<tx:method name="select*" propagation="SUPPORTS" read-only="true" />
			<tx:method name="get*" propagation="SUPPORTS" read-only="true" />
		</tx:attributes>
	</tx:advice>
6 spring夹包
Spring导入jar包:
Spring3.2 开发最基本jar包
spring-beans-3.2.0.RELEASE.jar
spring-context-3.2.0.RELEASE.jar
spring-core-3.2.0.RELEASE.jar
spring-expression-3.2.0.RELEASE.jar
com.springsource.org.apache.commons.logging-1.1.1.jar
com.springsource.org.apache.log4j-1.2.15.jar
AOP开发
spring-aop-3.2.0.RELEASE.jar
spring-aspects-3.2.0.RELEASE.jar
com.springsource.org.aopalliance-1.0.0.jar
com.springsource.org.aspectj.weaver-1.6.8.RELEASE.jar
Spring Jdbc开发
spring-jdbc-3.2.0.RELEASE.jar
spring-tx-3.2.0.RELEASE.jar
Spring事务管理
spring-tx-3.2.0.RELEASE.jar
Spring整合其他ORM框架
spring-orm-3.2.0.RELEASE.jar
Spring在web中使用
spring-web-3.2.0.RELEASE.jar
Spring整合Junit测试
spring-test-3.2.0.RELEASE.jar
Spring集成JUnit测试:
1.程序中有Junit环境.
2.导入一个jar包.spring与junit整合jar包.
* spring-test-3.2.0.RELEASE.jar
3.测试代码:
@RunWith(SpringJUnit4ClassRunner.class)
@ContextConfiguration(locations="classpath:applicationContext.xml")
public class SpringTest {
	@Autowired
	private UserService userService;

	@Test
	public void demo1(){
		userService.sayHello();
	}
}