1 tkinter
TkInter是标准的Python GUI库。的Python与Tkinter的结合提供了一个快速和容易的方法来创建GUI应用程序。 Tkinter的提供了一个强大的面向对象的接口Tk的GUI工具包.
1.1 使用Tkinter创建一个GUI应用程序是一件容易的事。所有你需要做的是执行以下步骤:
1.1.1 导入Tkinter模块
1.1.2 创建GUI应用程序的主窗口
1.1.3 添加上述部件之一或更多的GUI应用程序
1.1.4 进入主事件循环的由用户触发每个事件响应


 1 from tkinter import * # 导入模块
 2
 3 root = Tk() # 创建主窗口对象root
 4 root.title("测试窗口") # 设定主窗口的名称
 5 root.geometry("400x400+400+100") # 设定主窗口的大小和位置
 6 root.resizable(width = False, height = False) # 设定主窗口大小是否可改变
 7
 8 label01 = Label(root, text = "我是标签") # 添加标签对象在主窗口中
 9 label01.pack() # 对label01对象进行布局
10
11 root.mainloop()
12 # 主循环 -->> 当所有对象都创建完成并且进行布局后就会进入主循环,等待事件触发
2 Label
2.1 说明:标签类
2.2 创建实例对象:label01 = Label(text = "warrior")
2.3 属性
text -->> 要显示的文本
bg -->> 背景颜色
bd -->> 外围边界宽度(相当于HTML中的marging属性)
font -->> 字体(还可以添加大小)
width -->> 宽度 宽度和高度不指定就会自动被撑开
height -->> 高度
2.4 简例
1 from tkinter import *
2 root = Tk()
3 root.geometry("400x400+400+200")
4
5 # 实例化标签对象
6 label01 = Label(text = "warrior", bg = "red", bd = "10", font = ("楷体", 10), width = 20, height = 20)
7 label01.pack() # 位标签对象布局
8
9 root.mainloop()
3 Frame
3.1 说明:作为容器力气布局窗口
3.2 创建实例对象:fra01 = Frame(root)
3.3 简例
 1 from tkinter import *
 2
 3 root = Tk()
 4 root.title("测试")
 5 root.geometry("400x400+400+200")
 6 root.resizable(width = False, height = False)
 7
 8 lab01 = Label(text = "我是标签", bg = "red", bd = "10")
 9 lab01.pack()
10
11 fra = Frame(root) # 创建一个容器对象, 根对象是root
12
13 fra_l = Frame(fra) # 创建一个容器对象,根对象是fra
14
15 # 创建两个标签对象,这俩个标签对象都在fra_l这个容器中
16 lab_l1 = Label(fra_l, text = "左上", bg = "blue").pack(side = TOP)
17 lab_l2 = Label(fra_l, text = "左下", bg = "red").pack(side = TOP)
18 fra_l.pack(side = LEFT)
19
20 fra_r = Frame(fra) # 创建一个容器对象,根对象是fra
21
22 # 创建两个标签对象,这两个标签对象都在fra_r这个容器中
23 lab_r1 = Label(fra_r, text = '右上', bg = "red").pack(side = TOP)
24 lab_r2 = Label(fra_r, text = '右下', bg = "blue").pack(side = TOP)
25 fra_r.pack(side = RIGHT)
26
27 fra.pack()
28
29 root.mainloop()
4 Entry
4.1 说明:创建单行文本框
4.2 创建实例对象:e = Entry(root, textvariable = var)
4.3 简例
 1 from tkinter import *
 2
 3 root = Tk()
 4 root.title("测试")
 5 root.geometry("400x400+400+200")
 6 root.resizable(width = False, height = False)
 7
 8 var = Variable() # 创建一个变量对象
 9 e = Entry(root, textvariable = var) # var变量对象被绑定在文本框的内容属性
10 # 改变变量对象var的值时文本框对象的内容就会相应改变
11
12 var.set("warrior") # 为变量对象var设定内容
13 e.pack()
14
15 root.mainloop()
5 Text
5.1 说明:向该空间内输入文本
5.2 创建实例对象:t = Text(root)
5.3 方法
5.3.1 t.insert(1.0, "warrior ") t.insert(END, "fury")
5.3.2 t.delete(1.0, 2.0)
5.4 简例
 1 from tkinter import *
 2
 3 root = Tk()
 4 root.title("测试")
 5 root.geometry("400x400+400+200")
 6 root.resizable(width = False, height = False)
 7
 8 t = Text(root) # 创建多行文本实例
 9 t.insert(1.0, "warrior
")
10 t.insert(END, "fury")
11 t.insert(END, "HELLO")
12 t.insert(1.0, "WORLD
")
13 t.delete(1.0, 2.0)
14 t.pack()
15
16 b = Button(root, text = "按钮")
17 b.pack()
18
19
20 root.mainloop()
6 Button
6.1 说明:按钮
6.2 实例化对象:b2 = Button(root, text = "点击退出", command = root.quit) 备注:root.quit 是退出实例 root 的意思
6.3 简例
 1 from tkinter import *
 2
 3 root = Tk()
 4 root.title("测试")
 5 root.geometry("400x400+400+200")
 6 root.resizable(width = False, height = False)
 7
 8 t = Text(root) # 创建多行文本实例
 9 t.pack()
10
11 def print_hello() :
12     t.insert(END, "重庆.足智
")
13
14 b1 = Button(root, text = "点击打印", command = print_hello)
15 b1.pack()
16
17 b2 = Button(root, text = "点击退出", command = root.quit)
18 b2.pack()
19
20
21 root.mainloop()

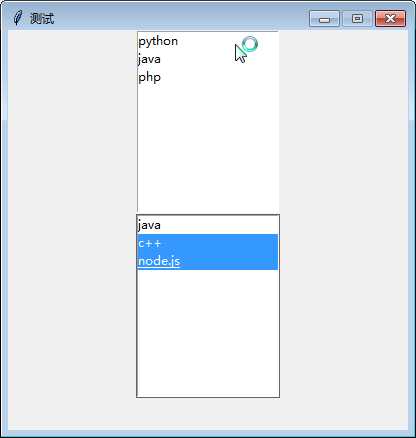
7 Listbox
7.1 说明:Listbox为列表框控件,它可以包含一个或多个文本项(text item),可以设置为单选或多选
7.2 实例化对象:lb = Listbox(root)
7.3 通过设定selectmode属性可以设定为单选或者多选(默认是单选)
7.4 简例
 1 from tkinter import *
 2
 3 root = Tk()
 4 root.title("测试")
 5 root.geometry("400x400+400+200")
 6 root.resizable(width = False, height = False)
 7
 8 lb = Listbox(root) # 创建一个列表实例对象
 9 for item in ['python', 'java', 'php']: # 向列表对象插入数据
10     lb.insert(END, item)
11
12 lb.pack()
13
14 lb01 = Listbox(root, selectmode = MULTIPLE) # 多选模式
15 for item in ['java', 'c++', 'node.js'] :
16     lb01.insert(END, item)
17 lb01.pack()
18 root.mainloop()
7.5 问题:怎么绑定事件
带更新......
8 滚动条
待更新......