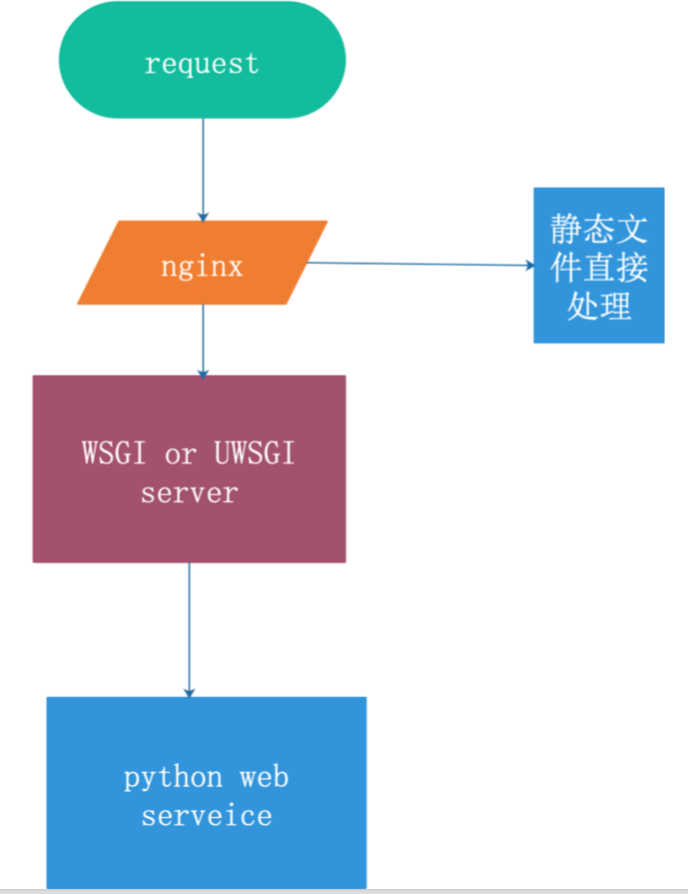
一、业务逻辑图
二、安装uwsgi
uwsgi是服务器和服务端应用程序的通信协议,规定了怎么把请求转发给应用程序和返回。
uWSGI是一个Web服务器,它实现了WSGI协议、uwsgi、http等协议。Nginx中HttpUwsgiModule的作用是与uWSGI服务器进行交换。
nginx 和 uWSGI交互就必须使用同一个协议,而上面说了uwsgi支持fastcgi、uwsgi、http协议,这些都是nginx支持的协议,只要大家沟通好使用哪个协议,就可以正常运行了。
注意安装uwsgi不需要在python的虚拟环境下
[root@web Python-3.7.1]# pwd
/usr/src/Python-3.7.1
[root@web Python-3.7.1]# ls
aclocal.m4           Include          Modules            python
build                install-sh       myweb              Python
CODE_OF_CONDUCT.rst  Lib              Objects            python-config
config.guess         libpython3.7m.a  Parser             python-config.py
config.log           LICENSE          PC                 python-gdb.py
config.status        m4               PCbuild            README.rst
config.sub           Mac              profile-run-stamp  setup.py
configure            Makefile         Programs           Tools
configure.ac         Makefile.pre     pybuilddir.txt     web
Doc                  Makefile.pre.in  pyconfig.h
Grammar              Misc             pyconfig.h.in
[root@web Python-3.7.1]# pip3 install uwsgi
Looking in indexes: https://mirrors.aliyun.com/pypi/simple/
Collecting uwsgi
  Downloading https://mirrors.aliyun.com/pypi/packages/e7/1e/3dcca007f974fe4b369bf1b8629d5e342bb3055e2001b2e5340aaefae7a/uwsgi-2.0.18.tar.gz (801 kB)
     |████████████████████████████████| 801 kB 1.2 MB/s
Installing collected packages: uwsgi
    Running setup.py install for uwsgi ... done
Successfully installed uwsgi-2.0.18
[root@web Python-3.7.1]#
1、编辑uwsgi配置文件
[root@web Python-3.7.1]# mkdir /etc/uwsgi [root@web Python-3.7.1]# vi /etc/uwsgi/uwsgi.ini [uwsgi] uid = root gid = root socket = 127.0.0.1:9090 master = true vhost = true no-site = true workers = 2 reload-mercy = 10 vacuum = true max-requests = 1000 limit-as = 512 buffer-size = 30000 pidfile = /var/run/uwsgi9090.pid daemonize = /var/log/uwsgi9090.log #保存退出,注意配置文件不要留注释,会出错,出错信息在/var/run/log里查看uwsgi9090.log #建立软连接 [root@web Python-3.7.1]# ln -s /usr/local/python3/bin/uwsgi /usr/bin/uwsgi
相关解释
[uwsgi] uid = root gid = root socket = 127.0.0.1:9090 //#配置和nginx连接的socket连接 master = true //启动主进程 vhost = true //多站模式 no-site = true //多站模式时不不设置入口模块和文件 workers = 2 //子进程数 reload-mercy = 10 //平滑的重启 vacuum = true //退出、重启时清理文件 max-requests = 1000 //开启10000个进程后, 自动respawn下 limit-as = 512 // 将进程的总内存量控制在512M buffer-size = 30000 pidfile = /var/run/uwsgi9090.pid //pid文件,用于下面的脚本启动、停止该进程 daemonize = /var/log/uwsgi9090.log #增加补充 [uwsgi] #使用nginx连接时, 监控地址 #socket=127.0.0.1:8080 #直接做web服务器时, 所监控地址 http=127.0.0.1:8080 #项目所在目录 chdir=/home/Desktop/myproject #项目中wsgi.py文件的目录,相对于项目目录, wsgi-file=myproject/wsgi.py #wsgi-file与module参数效果一致,可以写成module = myproject/wsgi.py 或者module=myproject.wsgi # Django s wsgi file module = su.wsgi #su是项目名,可以ls检查看看
#monitor uwsgi status 通过该端口可以监控 uwsgi 的负载情况
stats = 0.0.0.0:9191
# 工作进程线程 processes=4 threads=2 # 是否需要主进程 master=True # 保存主进程pid文件 pidfile=uwsgi.pid # 设置项目为守护运行, 保存运行日志文件所在位置 daemonize=uwsgi.log # 设置虚拟环境所在位置home/virtualenv都可以,都是设置虚拟环境所在位置的 virtualenv=/Users/smart/.virtualenvs/myproject #home 指明你的虚拟解释器的第一层路径
home = /root/Envs/mycrm
2、启动uwsgi
[root@web Python-3.7.1]# uwsgi --ini /etc/uwsgi/uwsgi.ini [uWSGI] getting INI configuration from /etc/uwsgi/uwsgi.ini
-
显示 [uWSGI] getting INI configuration from uwsgi.ini 表明uwsgi运行成功。
-
通过 ps -aux|grep uwsgi 查看确认是否uwsgi启动。
[root@web src]# ps aux |grep uwsgi
root     15391  0.2  0.1 160052  5868 ?        S    17:31   0:00 uwsgi --ini /etc/uwsgi/uwsgi.ini
root     15392  0.1  0.1 182492  7200 ?        S    17:31   0:00 uwsgi --ini /etc/uwsgi/uwsgi.ini
root     15393  0.1  0.1 182492  7200 ?        S    17:31   0:00 uwsgi --ini /etc/uwsgi/uwsgi.ini
root     15395  0.0  0.0 112712   964 pts/1    R+   17:31   0:00 grep --color=auto uwsgi
补充:
运行简单的uWSGI
#启动一个python
uwsgi --http :8000 --wsgi-file test.py
http :8000: 使用http协议,端口8000
wsgi-file test.py: 加载指定的文件,test.py
#test.py
def application(env, start_response):
start_response('200 OK', [('Content-Type','text/html')])
return [b"Hello World"] # python3
uWsgi热加载python程序
在启动命令后面加上参数
uwsgi --http :8088 --module mysite.wsgi --py-autoreload=1
#发布命令
command= /home/venv/bin/uwsgi --uwsgi 0.0.0.0:8000 --chdir /opt/mysite --home=/home/venv --module mysite.wsgi
#此时修改django代码,uWSGI会自动加载django程序,页面生效
运行django程序
#mysite/wsgi.py  确保找到这个文件
uwsgi --http :8000 --module mysite.wsgi
module mysite.wsgi: 加载指定的wsgi模块
#如果你已经配置了nginx(启动了nginx服务,配置了uwsgi_pass),请用这个socket连接 #socket = 0.0.0.0:8000
#如果你没用nginx,想通过uwsgi直接启动web服务,指明http协议 http = 0.0.0.0:9999
3、关闭uwsgi
[root@web Python-3.7.1]# cat /var/run/uwsgi9090.pid
15391
[root@web Python-3.7.1]# kill -9 15391
关闭方式二
pkill -f uwsgi -9
错误解决
cat /var/log/uwsgi9090.log 有错误

### WARNING: you are running uWSGI as root !!! (use the --uid flag)
意思是不建议用root启动uwsgi,使用root运行了这个程序,带来了一些安全隐患,需要处理。
解决
增加用户和组,具体命令如下:
/usr/sbin/groupadd www
/usr/sbin/useradd -g www www
增加了www的用户名和组,之后修改uWsgi配置文件:
[uwsgi]
uid = www
gid = www
三、uwsgi服务脚本管理
uwsgi 启动命令太长,用脚本进行简化
(1)定制uwsgi管理脚本
添加脚本
vi /etc/init.d/uwsgi ,init脚本内容如下所示:
#!/bin/sh
DESC="uwsgi daemon"
NAME=uwsgi
DAEMON=/usr/local/bin/uwsgi
CONFIGFILE=/etc/uwsgi/$NAME.ini
PIDFILE=/var/run/${NAME}9090.pid
SCRIPTNAME=/etc/init.d/$NAME
FIFOFILE=/tmp/uwsgififo
set -e
[ -x "$DAEMON" ] || exit 0
do_start() {
if [ ! -f $PIDFILE ];then
$DAEMON $CONFIGFILE || echo -n "uwsgi running"
else
echo "The PID is exist..."
fi
}
do_stop() {
if [ -f $PIDFILE ];then
$DAEMON --stop $PIDFILE || echo -n "uwsgi not running"
rm -f $PIDFILE
echo "$DAEMON STOPED."
else
echo "The $PIDFILE doesn't found"
fi
}
do_reload() {
if [ -p $FIFOFILE ];then
echo w > $FIFOFILE
else
$DAEMON --touch-workers-reload $PIDFILE || echo -n "uwsgi can't reload"
fi
}
do_status() {
ps aux|grep $DAEMON
}
case "$1" in
status)
echo -en "Status $NAME:
"
do_status
;;
start)
echo -en "Starting $NAME:
"
do_start
;;
stop)
echo -en "Stopping $NAME:
"
do_stop
;;
reload|graceful)
echo -en "Reloading $NAME:
"
do_reload
;;
*)
echo "Usage: $SCRIPTNAME {start|stop|reload}" >&2
exit 3
;;
esac
exit 0
DAEMON=/usr/local/bin/uwsgi #指向uwsgi的命令路径 CONFFILE=/etc/uwsgi/$NAME.ini #uwsgi.ini配置文件路径 PIDFILE=/var/run/${NAME}9090.pid #pid文件路径 SCRIPTNAME=/etc/init.d/$NAME #启动脚本路径
(2)脚本配置和使用
授权使用脚本
[root@web Python-3.7.1]# chmod 755 /etc/init.d/uwsgi
使用脚本关闭uwsgi
[root@web src]# /etc/init.d/uwsgi stop
Stopping uwsgi:
/usr/local/bin/uwsgi STOPED.
使用脚本启动uwsgi
[root@web src]# /etc/init.d/uwsgi start
Starting uwsgi:
[uWSGI] getting INI configuration from /etc/uwsgi/uwsgi.ini
查看uwsgi状态
[root@web src]# /etc/init.d/uwsgi status
Status uwsgi:
root     15770  0.0  0.0 112712   948 pts/1    R+   22:50   0:00 grep /usr/local/bin/uwsgi
[root@web src]#
查看端口是否使用
[root@web src]# netstat -ntpl
Active Internet connections (only servers)
Proto Recv-Q Send-Q Local Address           Foreign Address         State       PID/Program name
tcp        0      0 127.0.0.1:9090          0.0.0.0:*               LISTEN      15776/uwsgi
tcp        0      0 0.0.0.0:80              0.0.0.0:*               LISTEN      11223/nginx: master
tcp        0      0 0.0.0.0:22              0.0.0.0:*               LISTEN      878/sshd
tcp        0      0 127.0.0.1:25            0.0.0.0:*               LISTEN      1164/master
tcp6       0      0 :::3306                 :::*                    LISTEN      18005/mysqld
tcp6       0      0 :::22                   :::*                    LISTEN      878/sshd
tcp6       0      0 ::1:25                  :::*                    LISTEN      1164/master
(3)设置脚本开机启动
[root@web src]# chkconfig --add /etc/init.d/uwsgi service uwsgi does not support chkconfig # 'service uwsgi does not support chkconfig' 如果出现了这样的报错,是因为添加脚本用service启动,必须要脚本里面包含这2行注释: # chkconfig: - 85 15 # description: nginx is a World Wide Web server. It is used to serve
在/etc/init.d/uwsgi添加
[root@web src]# vi /etc/init.d/uwsgi
#!/bin/sh
# chkconfig: - 85 15
# description: nginx is a World Wide Web server. It is used to serve
DESC="uwsgi daemon"
NAME=uwsgi
DAEMON=/usr/local/bin/uwsgi
CONFIGFILE=/etc/uwsgi/$NAME.ini
PIDFILE=/var/run/${NAME}9090.pid
SCRIPTNAME=/etc/init.d/$NAME
FIFOFILE=/tmp/uwsgififo
set -e
[ -x "$DAEMON" ] || exit 0
-- INSERT --
....
重新添加脚本为开机启动
[root@web src]# chkconfig --add /etc/init.d/uwsgi
[root@web src]# chkconfig --level 2345 uwsgi on #指定指定读系统服务要在哪一个执行等级中开启或关毕
--level<等级代号> 指定读系统服务要在哪一个执行等级中开启或关毕。
等级0表示:表示关机
等级1表示:单用户模式
等级2表示:无网络连接的多用户命令行模式
等级3表示:有网络连接的多用户命令行模式
等级4表示:不可用
等级5表示:带图形界面的多用户模式
等级6表示:重新启动
查看开机启动的脚本列表
[root@web src]# chkconfig --list
Note: This output shows SysV services only and does not include native
systemd services. SysV configuration data might be overridden by native
systemd configuration.
If you want to list systemd services use 'systemctl list-unit-files'.
To see services enabled on particular target use
'systemctl list-dependencies [target]'.
netconsole 0:off 1:off 2:off 3:off 4:off 5:off 6:off
network 0:off 1:off 2:on 3:on 4:on 5:on 6:off
uwsgi 0:off 1:off 2:on 3:on 4:on 5:on 6:off
[root@web src]#
四、nginx服务配置
(1)修改默认配置文件:/usr/local/nginx/conf/nginx.conf
http {
...
server {
listen 8000;
server_name localhost;
location / {
include uwsgi_params;
uwsgi_pass 127.0.0.1:9090;
uwsgi_param UWSGI_SCRIPT myweb.wsgi;
uwsgi_param UWSGI_CHDIR /usr/local/nginx/website/myweb;
index index.html index.htm;
client_max_body_size 35m;
#uwsgi_cache_valid 1m;
#uwsgi_temp_file_write_size 64k;
#uwsgi_busy_buffers_size 64k;
#uwsgi_buffers 8 64k;
#uwsgi_buffer_size 64k;
#uwsgi_read_timeout 300;
#uwsgi_send_timeout 300;
#uwsgi_connect_timeout 300;
}
location /static {
alias /usr/local/website/myweb/statics;
}
}
}
注释
   uwsgi_pass 127.0.0.1:9090;                       // 必须与uwsgi配置一致
   uwsgi_param UWSGI_CHDIR /usr/local/nginx/website/myweb;    // 项目根目录
   uwsgi_param UWSGI_SCRIPT myweb.wsgi;     // 入口文件,即wsgi.py相对项目根目录的位置
针对django的静态文件设置
        location /static {
            alias /usr/local/website/myweb/statics;
        }
注意项目文件不要放在/root/目录下,root目录权限不足
测试nginx配置文件修改是否正确
[root@web ~]# /usr/local/nginx/sbin/nginx -t nginx: the configuration file /usr/local/nginx/conf/nginx.conf syntax is ok nginx: configuration file /usr/local/nginx/conf/nginx.conf test is successful [root@web ~]#
(2)启动uwsgi,启动nginx
[root@web ~]# /etc/init.d/uwsgi start #启动nginx [root@web ~]# /usr/local/nginx/sbin/nginx -s stop [root@web ~]# lsof -i :80 [root@web ~]# /usr/local/nginx/sbin/nginx [root@web ~]# lsof -i :80 COMMAND PID USER FD TYPE DEVICE SIZE/OFF NODE NAME nginx 16016 root 6u IPv4 259564 0t0 TCP *:http (LISTEN) nginx 16017 nobody 6u IPv4 259564 0t0 TCP *:http (LISTEN) [root@web ~]#
测试,出现500内部错误,一般都是项目的问题

查看错误日志
[root@web ~]# tailf /var/log/uwsgi9090.log
unable to load app 0 (mountpoint='192.168.199.169|') (callable not found or import error)
--- no python application found, check your startup logs for errors ---
192.168.199.169 [pid: 16007|app: -1|req: -1/3] 192.168.199.168 () {46 vars in 807 bytes} [Sun Feb 23 02:50:43 2020] GET / => generated 21 bytes in 1 msecs (HTTP/1.1 500) 2 headers in 83 bytes (0 switches on core 0)
Traceback (most recent call last):
File "/usr/local/website/myweb/myweb/wsgi.py", line 12, in <module>
from django.core.wsgi import get_wsgi_application
ModuleNotFoundError: No module named 'django'
unable to load app 0 (mountpoint='192.168.199.169|') (callable not found or import error)
--- no python application found, check your startup logs for errors ---
192.168.199.169 [pid: 16007|app: -1|req: -1/4] 192.168.199.168 () {46 vars in 754 bytes} [Sun Feb 23 02:50:43 2020] GET /favicon.ico => generated 21 bytes in 1 msecs (HTTP/1.1 500) 2 headers in 83 bytes (0 switches on core 0)
分析:ModuleNotFoundError: No module named 'django',
django模块没导入,由于django模块是装在虚拟环境中的,所以需要在uwsgi指定python虚拟环境的包的安装位置
[root@web python3.7]# cd site-packages/ [root@web site-packages]# ls asgiref pytz-2019.3.dist-info asgiref-3.2.3.dist-info setuptools django setuptools-45.2.0.dist-info Django-2.1.8.dist-info setuptools-45.2.0.virtualenv easy_install.py sqlparse pip sqlparse-0.3.0.dist-info pip-20.0.2.dist-info wheel pip-20.0.2.virtualenv wheel-0.34.2.dist-info pkg_resources wheel-0.34.2.virtualenv pytz [root@web site-packages]# pwd /usr/src/Python-3.7.1/web/lib/python3.7/site-packages
找到django的安装位置
修改uwsgi配置文件,增加pythonpath项,保存重启uwsgi
[root@web ~]# vi /etc/uwsgi/uwsgi.ini [uwsgi] uid = www gid = www socket = 127.0.0.1:9090 master = true vhost = true no-site = true workers = 2 reload-mercy = 10 vacuum = true max-requests = 1000 limit-as = 512 buffer-size = 30000 pidfile = /var/run/uwsgi9090.pid daemonize = /var/log/uwsgi9090.log pythonpath = /usr/src/Python-3.7.1/web/lib/python3.7/site-packages
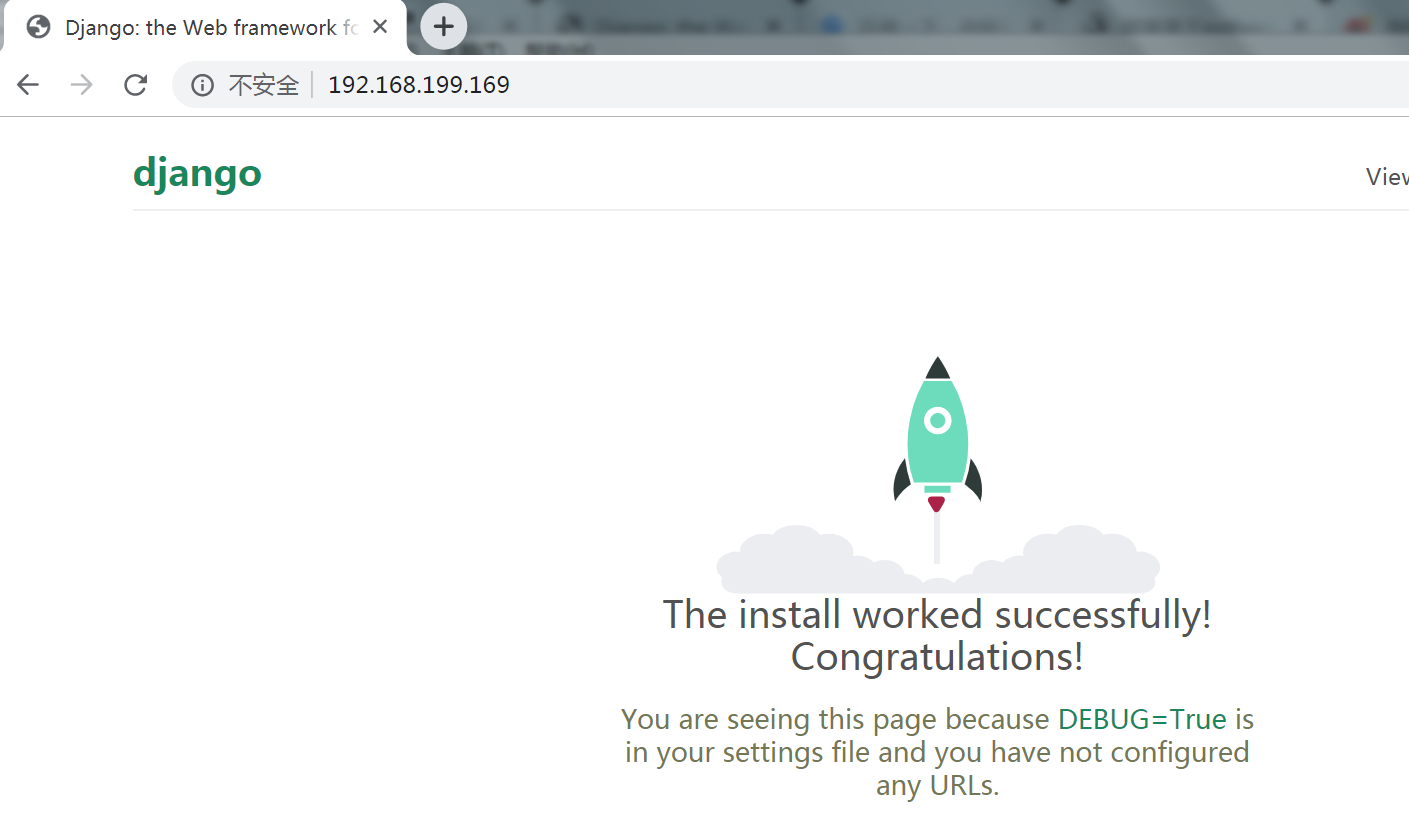
(3)测试
/etc/init.d/uwsgi stop /etc/init.d/uwsgi start netstat -ntpl # 查看服务状态 /usr/local/nginx/sbin/nginx # 启动nginxs
成功访问django的默认页
参考资料
[1]:https://uwsgi-docs-zh.readthedocs.io/zh_CN/latest/Options.html