一、进程和线程的概念
首先,引出“多任务”的概念:多任务处理是指用户可以在同一时间内运行多个应用程序,每个应用程序被称作一个任务。Linux、windows就是支持多任务的操作系统,比起单任务系统它的功能增强了许多。
例如,你一边在用浏览器上网,一边在听网易云音乐,一边在用Word赶作业,这就是多任务,至少同时有3个任务正在运行。还有很多任务悄悄地在后台同时运行着,只是桌面上没有显示而已。
但是,这些任务是同时在运行着的吗?众所周知,运行一个任务就需要cpu去处理,那同时运行多个任务就必须需要多个cpu?那如果有100个任务需要同时运行,就得买一个100核的cpu吗?显然不能!
现在,多核CPU已经非常普及了,但是,即使过去的单核CPU,也可以执行多任务。由于CPU执行代码都是顺序执行的,那么,单核CPU是怎么执行多任务的呢?
答案就是操作系统轮流让各个任务交替执行,任务1执行0.01秒,切换到任务2,任务2执行0.01秒,再切换到任务3,执行0.01秒……这样反复执行下去。表面上看,每个任务都是交替执行的,但是,由于CPU的执行速度实在是太快了,我们感觉就像所有任务都在同时执行一样。
小结:一个cpu同一时刻只能运行一个“任务”;真正的并行执行多任务只能在多核CPU上实现,但是,由于任务数量远远多于CPU的核心数量,所以,操作系统也会自动把很多任务轮流调度到每个核心上执行。
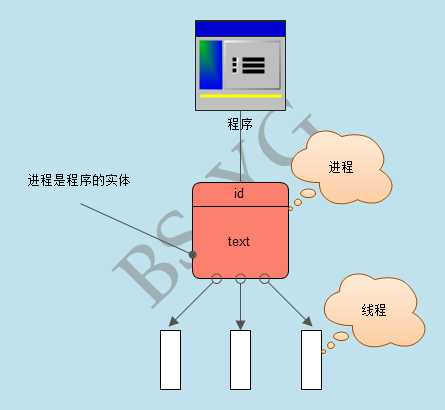
对于操作系统来说,一个任务就是一个进程(Process),比如打开一个浏览器就是启动一个浏览器进程,打开一个记事本就启动了一个记事本进程,打开两个记事本就启动了两个记事本进程,打开一个Word就启动了一个Word进程。
有些进程还不止同时干一件事,比如Word,它可以同时进行打字、拼写检查、打印等事情。在一个进程内部,要同时干多件事,就需要同时运行多个“子任务”,我们把进程内的这些“子任务”称为线程(Thread)。
由于每个进程至少要干一件事,所以,一个进程至少有一个线程。当然,像Word这种复杂的进程可以有多个线程,多个线程可以同时执行,多线程的执行方式和多进程是一样的,也是由操作系统在多个线程之间快速切换,让每个线程都短暂地交替运行,看起来就像同时执行一样。当然,真正地同时执行多线程需要多核CPU才可能实现。
小结:
- 进程就是一个程序在一个数据集上的一次动态执行过程。进程一般由程序、数据集、进程控制块三部分组成。
- 线程也叫轻量级进程,它是一个基本的CPU执行单元,也是程序执行过程中的最小单元,由线程ID、程序计数器、寄存器集合和堆栈共同组成。线程的引入减小了程序并发执行时的开销,提高了操作系统的并发性能。线程没有自己的系统资源。
二、进程和线程的关系
进程是计算机中的程序关于某数据集上的一次运行活动,是系统进行资源分配和调度的基本单位,是操作系统结构的基础。或者说进程是具有一定独立功能的程序关于某个数据集上的一次运行活动,进程是系统进行资源分配和调度的一个独立单位。
线程则是进程的一个实体,是CPU调度和分派的基本单位,它是比进程更小的能独立运行的基本单位。
小结:
-
一个线程只能属于一个进程,而一个进程可以有多个线程,但至少有一个线程。
- 资源分配给进程,同一进程的所有线程共享该进程的所有资源。
-
CPU分给线程,即真正在CPU上运行的是线程。
三、并行(xing)和并发
并行处理(Parallel Processing)是计算机系统中能同时执行两个或更多个处理的一种计算方法。并行处理可同时工作于同一程序的不同方面。并行处理的主要目的是节省大型和复杂问题的解决时间。
并发处理(concurrency Processing)指一个时间段中有几个程序都处于已启动运行到运行完毕之间,且这几个程序都是在同一个处理机(CPU)上运行,但任一个时刻点上只有一个程序在处理机(CPU)上运行。
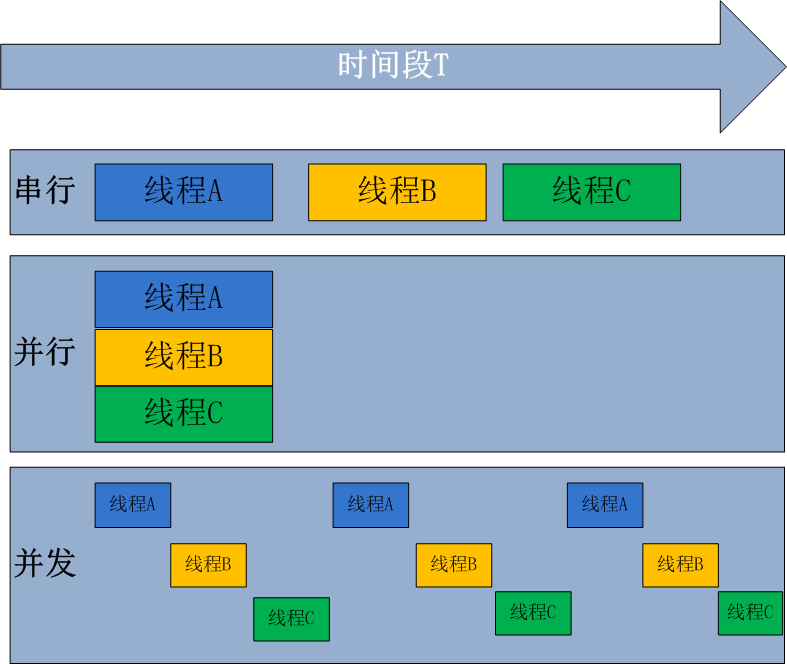
并发的关键是你有处理多个任务的能力,不一定要同时。并行的关键是你有同时处理多个任务的能力。所以说,并行是并发的子集。
四、同步与异步
在计算机领域,同步就是指一个进程在执行某个请求的时候,若该请求需要一段时间才能返回信息,那么这个进程将会一直等待下去,直到收到返回信息才继续执行下去。
异步是指进程不需要一直等下去,而是继续执行其它操作,不管其他进程的状态。当有消息返回时系统会通知进程进行处理,这样可以提高执行的效率。举个例子,打电话时就是同步通信,发短息时就是异步通信。
举个例子:
由于CPU和内存的速度远远高于外设的速度,所以,在IO编程中,就存在速度严重不匹配的问题。比如要把100M的数据写入磁盘,CPU输出100M的数据只需要0.01秒,可是磁盘要接收这100M数据可能需要10秒,有两种办法解决:
- CPU等着,也就是程序暂停执行后续代码,等100M的数据在10秒后写入磁盘,再接着往下执行,这种模式称为同步IO;
- CPU不等待,只是告诉磁盘,慢慢写不着急,写完通知我,我接着干别的事去了,于是后续代码可以接着执行,这种模式称为异步IO。
五、threading模块
线程是操作系统直接支持的执行单元,因此,高级语言通常都内置多线程的支持,Python也不例外,并且,Python的线程是真正的Posix Thread,而不是模拟出来的线程。
Python的标准库提供了两个模块:_thread和threading,_thread是低级模块,threading是高级模块,对_thread进行了封装。绝大多数情况下,我们只需要使用threading这个高级模块。
1. 调用Thread类直接创建
启动一个线程就是把一个函数传入并创建Thread实例,然后调用start()开始执行:


 1 import time, threading
 2
 3 # 新线程执行的代码:
 4 def loop():
 5     print('thread %s is running...' % threading.current_thread().name)
 6     n = 0
 7     while n < 5:
 8         n = n + 1
 9         print('thread %s >>> %s' % (threading.current_thread().name, n))
10         time.sleep(1)
11     print('thread %s ended.' % threading.current_thread().name)
12
13 print('thread %s is running...' % threading.current_thread().name)
14 t = threading.Thread(target=loop, name='LoopThread')
15 t.start()
16 t.join()
17 print('thread %s ended.' % threading.current_thread().name)
18
19
20 #运行结果:
21 #thread MainThread is running...
22 # thread LoopThread is running...
23 # thread LoopThread >>> 1
24 # thread LoopThread >>> 2
25 # thread LoopThread >>> 3
26 # thread LoopThread >>> 4
27 # thread LoopThread >>> 5
28 # thread LoopThread ended.
29 # thread MainThread ended.
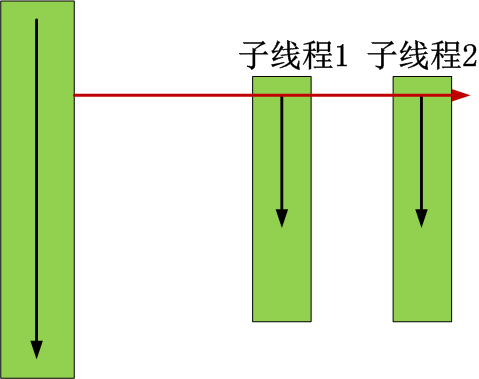
由于任何进程默认就会启动一个线程,我们把该线程称为主线程,主线程又可以启动新的线程,Python的threading模块有个current_thread()函数,它永远返回当前线程的实例。主线程实例的名字叫MainThread,子线程的名字在创建时指定,我们用LoopThread命名子线程。名字仅仅在打印时用来显示,完全没有其他意义,如果不起名字Python就自动给线程命名为Thread-1,Thread-2……
 1 import threading
 2 import time
 3
 4 def countNum(n): # 定义某个线程要运行的函数
 5
 6     print("running on number:%s" %n)
 7
 8     time.sleep(3)
 9
10 if __name__ == '__main__':
11
12     t1 = threading.Thread(target=countNum,args=(23,)) #生成一个线程实例
13     t2 = threading.Thread(target=countNum,args=(34,))
14
15     t1.start() #启动线程
16     t2.start()
17
18     print("ending!")
19
20
21 #运行结果:程序打印完“ending!”后等待3秒结束
22 #running on number:23
23 #running on number:34
24 #ending!
该实例中共有3个线程:主线程,t1和t2子线程
2. 自定义Thread类继承式创建
 1 #继承Thread式创建
 2
 3 import threading
 4 import time
 5
 6 class MyThread(threading.Thread):
 7
 8     def __init__(self,num):
 9         threading.Thread.__init__(self)    #继承父类__init__
10         self.num=num
11
12     def run(self):    #必须定义run方法
13         print("running on number:%s" %self.num)
14         time.sleep(3)
15
16 t1=MyThread(56)
17 t2=MyThread(78)
18
19 t1.start()
20 t2.start()
21 print("ending")
3. Thread类的实例方法
join和dameon
 1 import threading
 2 from time import ctime,sleep
 3
 4 def Music(name):
 5
 6         print ("Begin listening to {name}. {time}".format(name=name,time=ctime()))
 7         sleep(3)
 8         print("end listening {time}".format(time=ctime()))
 9
10 def Blog(title):
11
12         print ("Begin recording the {title}. {time}".format(title=title,time=ctime()))
13         sleep(5)
14         print('end recording {time}'.format(time=ctime()))
15
16
17 threads = []
18
19
20 t1 = threading.Thread(target=Music,args=('FILL ME',))
21 t2 = threading.Thread(target=Blog,args=('',))
22
23 threads.append(t1)
24 threads.append(t2)
25
26 if __name__ == '__main__':
27
28     #t2.setDaemon(True)
29
30     for t in threads:
31
32         #t.setDaemon(True) #注意:一定在start之前设置
33         t.start()
34
35         #t.join()
36
37     #t1.join()
38     #t2.join()    #  考虑这三种join位置下的结果?
39
40     print ("all over %s" %ctime())
其它方法:
1 Thread实例对象的方法
2   # isAlive(): 返回线程是否活动的。
3   # getName(): 返回线程名。
4   # setName(): 设置线程名。
5
6 threading模块提供的一些方法:
7   # threading.currentThread(): 返回当前的线程变量。
8   # threading.enumerate(): 返回一个包含正在运行的线程的list。正在运行指线程启动后、结束前,不包括启动前和终止后的线程。
9   # threading.activeCount(): 返回正在运行的线程数量,与len(threading.enumerate())有相同的结果。
六、GIL
'''

定义:
In CPython, the global interpreter lock, or GIL, is a mutex that prevents multiple
native threads from executing Python bytecodes at once. This lock is necessary mainly
because CPython’s memory management is not thread-safe. (However, since the GIL
exists, other features have grown to depend on the guarantees that it enforces.)

'''
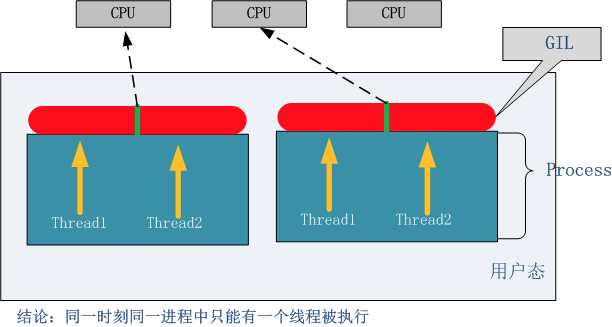
Python中的线程是操作系统的原生线程,Python虚拟机使用一个全局解释器锁(Global Interpreter Lock)来互斥线程对Python虚拟机的使用。为了支持多线程机制,一个基本的要求就是需要实现不同线程对共享资源访问的互斥,所以引入了GIL。
GIL:在一个线程拥有了解释器的访问权之后,其他的所有线程都必须等待它释放解释器的访问权,即使这些线程的下一条指令并不会互相影响。
在调用任何Python C API之前,要先获得GIL
GIL缺点:多处理器退化为单处理器;优点:避免大量的加锁解锁操作。
1. GIL的早期设计
Python支持多线程,而解决多线程之间数据完整性和状态同步的最简单方法自然就是加锁。 于是有了GIL这把超级大锁,而当越来越多的代码库开发者接受了这种设定后,他们开始大量依赖这种特性(即默认python内部对象是thread-safe的,无需在实现时考虑额外的内存锁和同步操作)。慢慢的这种实现方式被发现是蛋疼且低效的。但当大家试图去拆分和去除GIL的时候,发现大量库代码开发者已经重度依赖GIL而非常难以去除了。有多难?做个类比,像MySQL这样的“小项目”为了把Buffer Pool Mutex这把大锁拆分成各个小锁也花了从5.5到5.6再到5.7多个大版为期近5年的时间,并且仍在继续。MySQL这个背后有公司支持且有固定开发团队的产品走的如此艰难,那又更何况Python这样核心开发和代码贡献者高度社区化的团队呢?
2. GIL的影响
无论你启多少个线程,你有多少个cpu, Python在执行一个进程的时候会淡定的在同一时刻只允许一个线程运行。
所以,python是无法利用多核CPU实现多线程的。
这样,python对于计算密集型的任务开多线程的效率甚至不如串行(没有大量切换),但是,对于IO密集型的任务效率还是有显著提升的。
计算密集型实例:
 1 #coding:utf8
 2 from threading import Thread
 3 import time
 4
 5 def counter():
 6     i = 0
 7     for _ in range(100000000):
 8         i = i + 1
 9     return True
10
11
12 def main():
13     l=[]
14     start_time = time.time()
15     for i in range(2):
16
17         t = Thread(target=counter)
18         t.start()
19         l.append(t)
20         t.join()
21
22     for t in l:
23         t.join()
24     # counter()
25     # counter()
26     end_time = time.time()
27     print("Total time: {}".format(end_time - start_time))
28
29 if __name__ == '__main__':
30     main()
31
32
33 '''
34 py2.7:
35      串行:9.17599987984s
36      并发:9.26799988747s
37 py3.6:
38      串行:9.540389776229858s
39      并发:9.568442583084106s
40
41 '''
3. 解决方案
用multiprocessing替代Thread multiprocessing库的出现很大程度上是为了弥补thread库因为GIL而低效的缺陷。它完整的复制了一套thread所提供的接口方便迁移。唯一的不同就是它使用了多进程而不是多线程。每个进程有自己的独立的GIL,因此也不会出现进程之间的GIL争抢。
 1 #coding:utf8
 2 from multiprocessing import Process
 3 import time
 4
 5 def counter():
 6     i = 0
 7     for _ in range(100000000):
 8         i = i + 1
 9
10     return True
11
12 def main():
13
14     l=[]
15     start_time = time.time()
16
17     # for _ in range(2):
18     #     t=Process(target=counter)
19     #     t.start()
20     #     l.append(t)
21     #     #t.join()
22     #
23     # for t in l:
24     #    t.join()
25     counter()
26     counter()
27     end_time = time.time()
28     print("Total time: {}".format(end_time - start_time))
29
30 if __name__ == '__main__':
31     main()
32
33
34 '''
35
36 py2.7:
37      串行:8.92299985886 s
38      并行:8.19099998474 s
39
40 py3.6:
41      串行:9.963459014892578 s
42      并发:5.1366541385650635 s
43
44 '''
当然multiprocessing也不是万能良药。它的引入会增加程序实现时线程间数据通讯和同步的困难。就拿计数器来举例子,如果我们要多个线程累加同一个变量,对于thread来说,申明一个global变量,用thread.Lock的context包裹住,三行就搞定了。而multiprocessing由于进程之间无法看到对方的数据,只能通过在主线程申明一个Queue,put再get或者用share memory的方法。这个额外的实现成本使得本来就非常痛苦的多线程程序编码,变得更加痛苦了。
小结:因为GIL的存在,只有IO Bound场景下的多线程会得到较好的性能提升;如果对并行计算性能较高的程序可以考虑把核心部分变成C模块,或者索性用其他语言实现;GIL在较长一段时间内将会继续存在,但是会不断对其进行改进。
七、同步锁(lock)
多线程和多进程最大的不同在于,多进程中,同一个变量,各自有一份拷贝存在于每个进程中,互不影响,而多线程中,所有变量都由所有线程共享,所以,任何一个变量都可以被任何一个线程修改,因此,线程之间共享数据最大的危险在于多个线程同时改一个变量,把内容给改乱了。
 1 import time
 2 import threading
 3
 4 def subNum():
 5     global num #在每个线程中都获取这个全局变量
 6     temp = num
 7     time.sleep(0.1)
 8     num =temp-1  # 对此公共变量进行-1操作
 9
10 num = 100  #设定一个共享变量
11 thread_list = []
12
13 for i in range(100):
14     t = threading.Thread(target=subNum)
15     t.start()
16     thread_list.append(t)
17
18 for t in thread_list: #等待所有线程执行完毕
19     t.join()
20
21 print('Result: ', num)
22
23
24 #运行结果:
25 #Result:  99
如上实例,在一个进程内,设置共享变量num=100,然后创建100个线程,执行num-=1的操作,但是,由于在函数subNum中存在time.sleep(0.1),该语句可以等价于IO操作。于是在这短短的0.1秒的时间内,所有的线程已经创建并启动,拿到了num=100的变量,等待0.1秒过后,最终得到的num其实是99.
锁通常被用来实现对共享资源的同步访问。为每一个共享资源创建一个Lock对象,当你需要访问该资源时,调用acquire方法来获取锁对象(如果其它线程已经获得了该锁,则当前线程需等待其被释放),待资源访问完后,再调用release方法释放锁:
 1 import time
 2 import threading
 3
 4 def subNum():
 5     global num #在每个线程中都获取这个全局变量
 6     lock.acquire()
 7     temp = num
 8     time.sleep(0.1)
 9     num =temp-1  # 对此公共变量进行-1操作
10     lock.release()
11
12
13 num = 100  #设定一个共享变量
14 lock = threading.Lock()    #生成一个同步锁对象
15 thread_list = []
16
17 for i in range(100):
18     t = threading.Thread(target=subNum)
19     t.start()
20     thread_list.append(t)
21
22 for t in thread_list: #等待所有线程执行完毕
23     t.join()
24
25 print('Result: ', num)
26
27 #运行结果:
28 #Result:  0
lock.acquire()与lock.release()包起来的代码段,保证同一时刻只允许一个线程引用。
1 import threading
2
3 R=threading.Lock()
4
5 R.acquire()
6 '''
7 对公共数据的操作
8 '''
9 R.release()
八、死锁与递归锁
所谓死锁: 是指两个或两个以上的进程或线程在执行过程中,因争夺资源而造成的一种互相等待的现象,若无外力作用,它们都将无法推进下去。此时称系统处于死锁状态或系统产生了死锁,这些永远在互相等待的进程称为死锁进程。
 1 import threading
 2 import time
 3
 4 mutexA = threading.Lock()
 5 mutexB = threading.Lock()
 6
 7 class MyThread(threading.Thread):
 8
 9     def __init__(self):
10         threading.Thread.__init__(self)
11
12     def run(self):
13         self.fun1()
14         self.fun2()
15
16     def fun1(self):
17
18         mutexA.acquire()  # 如果锁被占用,则阻塞在这里,等待锁的释放
19
20         print("I am %s , get res: %s---%s" %(self.name, "ResA",time.time()))
21
22         mutexB.acquire()
23         print("I am %s , get res: %s---%s" %(self.name, "ResB",time.time()))
24         mutexB.release()
25
26         mutexA.release()
27
28
29     def fun2(self):
30
31         mutexB.acquire()
32         print("I am %s , get res: %s---%s" %(self.name, "ResB",time.time()))
33         time.sleep(0.2)
34
35         mutexA.acquire()
36         print("I am %s , get res: %s---%s" %(self.name, "ResA",time.time()))
37         mutexA.release()
38
39         mutexB.release()
40
41 if __name__ == "__main__":
42
43     print("start---------------------------%s"%time.time())
44
45     for i in range(0, 10):
46         my_thread = MyThread()
47         my_thread.start()
48
49
50
51 #运行结果:
52 #start---------------------------1494316634.4121563
53 #I am Thread-1 , get res: ResA---1494316634.4121563
54 #I am Thread-1 , get res: ResB---1494316634.4121563
55 #I am Thread-1 , get res: ResB---1494316634.4121563
56 #I am Thread-2 , get res: ResA---1494316634.4121563
在Python中为了支持在同一线程中多次请求同一资源,python提供了可重入锁RLock。这个RLock内部维护着一个Lock和一个counter变量,counter记录了acquire的次数,从而使得资源可以被多次require。直到一个线程所有的acquire都被release,其他的线程才能获得资源。上面的例子如果使用RLock代替Lock,则不会发生死锁:
 1 import threading
 2 import time
 3
 4 # mutexA = threading.Lock()
 5 # mutexB = threading.Lock()
 6 rlock = threading.RLock()
 7
 8 class MyThread(threading.Thread):
 9
10     def __init__(self):
11         threading.Thread.__init__(self)
12
13     def run(self):
14         self.fun1()
15         self.fun2()
16
17     def fun1(self):
18         rlock.acquire()  # 如果锁被占用,则阻塞在这里,等待锁的释放
19
20         print("I am %s , get res: %s---%s" %(self.name, "ResA",time.time()))
21
22         rlock.acquire()
23         print("I am %s , get res: %s---%s" %(self.name, "ResB",time.time()))
24         rlock.release()
25
26         rlock.release()
27
28
29     def fun2(self):
30         rlock.acquire()
31         print("I am %s , get res: %s---%s" %(self.name, "ResB",time.time()))
32         time.sleep(0.2)
33
34         rlock.acquire()
35         print("I am %s , get res: %s---%s" %(self.name, "ResA",time.time()))
36         rlock.release()
37
38         rlock.release()
39
40 if __name__ == "__main__":
41
42     print("start---------------------------%s"%time.time())
43
44     for i in range(0, 10):
45         my_thread = MyThread()
46         my_thread.start()
47
48
49 #运行结果:从以下结果也可以发现,线程之间是竞争关系
50 """
51 start---------------------------1494316940.0863945
52 I am Thread-1 , get res: ResA---1494316940.0873976
53 I am Thread-1 , get res: ResB---1494316940.0873976
54 I am Thread-1 , get res: ResB---1494316940.0873976
55 I am Thread-1 , get res: ResA---1494316940.287911
56 I am Thread-2 , get res: ResA---1494316940.287911
57 I am Thread-2 , get res: ResB---1494316940.287911
58 I am Thread-2 , get res: ResB---1494316940.287911
59 I am Thread-2 , get res: ResA---1494316940.4883447
60 I am Thread-4 , get res: ResA---1494316940.4883447
61 I am Thread-4 , get res: ResB---1494316940.4883447
62 I am Thread-4 , get res: ResB---1494316940.4883447
63 I am Thread-4 , get res: ResA---1494316940.6886203
64 I am Thread-6 , get res: ResA---1494316940.6886203
65 I am Thread-6 , get res: ResB---1494316940.6896234
66 I am Thread-6 , get res: ResB---1494316940.6896234
67 I am Thread-6 , get res: ResA---1494316940.890659
68 I am Thread-8 , get res: ResA---1494316940.890659
69 I am Thread-8 , get res: ResB---1494316940.890659
70 I am Thread-8 , get res: ResB---1494316940.890659
71 I am Thread-8 , get res: ResA---1494316941.0918815
72 I am Thread-10 , get res: ResA---1494316941.0918815
73 I am Thread-10 , get res: ResB---1494316941.0918815
74 I am Thread-10 , get res: ResB---1494316941.0918815
75 I am Thread-10 , get res: ResA---1494316941.2923715
76 I am Thread-5 , get res: ResA---1494316941.2923715
77 I am Thread-5 , get res: ResB---1494316941.2923715
78 I am Thread-5 , get res: ResB---1494316941.2923715
79 I am Thread-5 , get res: ResA---1494316941.493138
80 I am Thread-9 , get res: ResA---1494316941.493138
81 I am Thread-9 , get res: ResB---1494316941.493138
82 I am Thread-9 , get res: ResB---1494316941.493138
83 I am Thread-9 , get res: ResA---1494316941.6937861
84 I am Thread-7 , get res: ResA---1494316941.6937861
85 I am Thread-7 , get res: ResB---1494316941.6937861
86 I am Thread-7 , get res: ResB---1494316941.6937861
87 I am Thread-7 , get res: ResA---1494316941.8946414
88 I am Thread-3 , get res: ResA---1494316941.8946414
89 I am Thread-3 , get res: ResB---1494316941.8946414
90 I am Thread-3 , get res: ResB---1494316941.8946414
91 I am Thread-3 , get res: ResA---1494316942.0956843
92 """
九、event对象
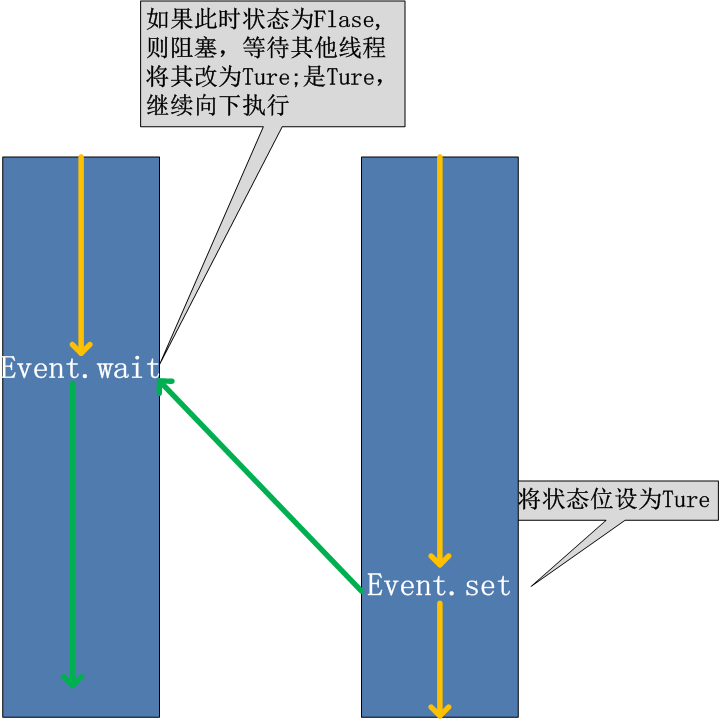
线程的一个关键特性是每个线程都是独立运行且状态不可预测。如果程序中的其他线程需要通过判断某个线程的状态来确定自己下一步的操作,这时线程同步问题就会变得非常棘手。为了解决这些问题,我们需要使用threading库中的Event对象。对象包含一个可由线程设置的信号标志,它允许线程等待某些事件的发生。在初始情况下,Event对象中的信号标志被设置为False。如果有线程等待一个Event对象, 而这个Event对象的标志为False,那么这个线程将会被一直阻塞直至该标志为True。一个线程如果将一个Event对象的信号标志设置为True,它将唤醒所有等待这个Event对象的线程。如果一个线程等待一个已经被设置为真的Event对象,那么它将忽略这个事件, 继续执行。
event.isSet():返回event的状态值;

event.wait():如果 event.isSet()==False将阻塞线程;

event.set(): 设置event的状态值为True,所有阻塞池的线程激活进入就绪状态, 等待操作系统调度;

event.clear():恢复event的状态值为False。
可以考虑一种应用场景(仅仅作为说明),例如,我们有多个线程从Redis队列中读取数据来处理,这些线程都要尝试去连接Redis的服务,一般情况下,如果Redis连接不成功,在各个线程的代码中,都会去尝试重新连接。如果我们想要在启动时确保Redis服务正常,才让那些工作线程去连接Redis服务器,那么我们就可以采用threading.Event机制来协调各个工作线程的连接操作:主线程中会去尝试连接Redis服务,如果正常的话,触发事件,各工作线程会尝试连接Redis服务。
 1 import threading
 2 import time
 3 import logging
 4
 5 logging.basicConfig(level=logging.DEBUG, format='(%(threadName)-10s) %(message)s',)
 6
 7 def worker(event):
 8     logging.debug('Waiting for redis ready...')
 9     while not event.isSet():
10         logging.debug('connect failed...')
11         event.wait(1)
12     logging.debug('redis ready, and connect to redis server and do some work [%s]', time.ctime())
13     time.sleep(1)
14
15 def main():
16     readis_ready = threading.Event()
17     t1 = threading.Thread(target=worker, args=(readis_ready,), name='t1')
18     t1.start()
19
20     t2 = threading.Thread(target=worker, args=(readis_ready,), name='t2')
21     t2.start()
22
23     logging.debug('first of all, check redis server, make sure it is OK, and then trigger the redis ready event')
24     time.sleep(3) # simulate the check progress
25     logging.debug('redis server is running')
26     readis_ready.set()
27
28 if __name__=="__main__":
29     main()
30
31
32 #运行结果:
33 (t1        ) Waiting for redis ready...
34 # (t1        ) connect failed...
35 # (t2        ) Waiting for redis ready...
36 # (t2        ) connect failed...
37 # (MainThread) first of all, check redis server, make sure it is OK, and then trigger the redis ready event
38 # (t1        ) connect failed...
39 # (t2        ) connect failed...
40 # (t2        ) connect failed...
41 # (t1        ) connect failed...
42 # (MainThread) redis server is running
43 # (t2        ) redis ready, and connect to redis server and do some work [Tue May  9 16:15:18 2017]
44 # (t1        ) redis ready, and connect to redis server and do some work [Tue May  9 16:15:18 2017]
十、Semaphore(信号量)
Semaphore管理一个内置的计数器,
每当调用acquire()时内置计数器-1;
调用release() 时内置计数器+1;
计数器不能小于0;当计数器为0时,acquire()将阻塞线程直到其他线程调用release()。
实例:(同时只有5个线程可以获得semaphore,即可以限制最大连接数为5):
 1 import threading
 2 import time
 3
 4 semaphore = threading.Semaphore(5)
 5
 6 def func():
 7     if semaphore.acquire():
 8         print (threading.currentThread().getName() + ' get semaphore')
 9         time.sleep(2)
10         semaphore.release()
11
12 for i in range(20):
13   t1 = threading.Thread(target=func)
14   t1.start()
15
16
17 #运行结果:
18 # Thread-1 get semaphore
19 # Thread-2 get semaphore
20 # Thread-3 get semaphore
21 # Thread-4 get semaphore
22 # Thread-5 get semaphore
23 # Thread-6 get semaphore#隔2秒打印
24 # Thread-7 get semaphore
25 # Thread-8 get semaphore
26 # Thread-9 get semaphore
27 # Thread-10 get semaphore
28 # Thread-11 get semaphore#隔2秒打印
29 # Thread-12 get semaphore
30 # Thread-13 get semaphore
31 # Thread-14 get semaphore
32 # Thread-15 get semaphore
33 # Thread-16 get semaphore#隔2秒打印
34 # Thread-17 get semaphore
35 # Thread-18 get semaphore
36 # Thread-20 get semaphore
37 # Thread-19 get semaphore
十一、multiprocessing
Multiprocessing is a package that supports spawning processes using an API similar to the threading module.
The multiprocessing package offers both local and remote concurrency,effectively side-stepping the Global Interpreter Lock by using subprocesses instead of threads.
Due to this, the multiprocessing module allows the programmer to fully leverage multiple processors on a given machine. It runs on both Unix and Windows.
由于GIL的存在,python中的多线程其实并不是真正的多线程,如果想要充分地使用多核CPU的资源,在python中大部分情况需要使用多进程。
multiprocessing包是python中的多进程管理包。与threading.Thread类似,它可以利用multiprocessing.Process对象来创建一个进程。该进程可以运行在Python程序内部编写的函数。该Process对象与Thread对象的用法相同,也有start(), run(), join()的方法。此外multiprocessing包中也有Lock/Event/Semaphore/Condition类 (这些对象可以像多线程那样,通过参数传递给各个进程),用以同步进程,其用法与threading包中的同名类一致。所以,multiprocessing的很大一部份与threading使用同一套API,只不过换到了多进程的情境。
 1 from multiprocessing import Process
 2 import time
 3 def f(name):
 4
 5     print('hello', name,time.ctime())
 6     time.sleep(1)
 7
 8 if __name__ == '__main__':
 9     p_list=[]
10     for i in range(3):
11         p = Process(target=f, args=('alvin:%s'%i,))
12         p_list.append(p)
13         p.start()
14     for i in p_list:
15         p.join()
16     print('end')
17
18
19 #运行结果:
20 #hello alvin:0 Tue May  9 16:41:18 2017
21 #hello alvin:1 Tue May  9 16:41:18 2017
22 #hello alvin:2 Tue May  9 16:41:18 2017
23 #end
 1 from multiprocessing import Process
 2 import time
 3
 4 class MyProcess(Process):
 5     def __init__(self):
 6         super(MyProcess, self).__init__()
 7
 8     def run(self):
 9
10         print ('hello', self.name,time.ctime())
11         time.sleep(1)
12
13
14 if __name__ == '__main__':
15     p_list=[]
16     for i in range(3):
17         p = MyProcess()
18         p.start()
19         p_list.append(p)
20
21     for p in p_list:
22         p.join()
23
24     print('end')
25
26
27 #运行结果:
28 #hello MyProcess-1 Tue May  9 16:42:46 2017
29 #hello MyProcess-2 Tue May  9 16:42:46 2017
30 #hello MyProcess-3 Tue May  9 16:42:46 2017
31 #end
process类:
构造方法:
Process([group [, target [, name [, args [, kwargs]]]]])
group: 线程组,目前还没有实现,库引用中提示必须是None;
target: 要执行的方法;
name: 进程名;
args/kwargs: 要传入方法的参数。
实例方法:
is_alive():返回进程是否在运行。
join([timeout]):阻塞当前上下文环境的进程程,直到调用此方法的进程终止或到达指定的timeout(可选参数)。
start():进程准备就绪,等待CPU调度
run():strat()调用run方法,如果实例进程时未制定传入target,这star执行t默认run()方法。
terminate():不管任务是否完成,立即停止工作进程
属性:
daemon:和线程的setDeamon功能一样
name:进程名字。
pid:进程号。
实例:
 1 from multiprocessing import Process
 2 import os
 3 import time
 4 def info(name):
 5
 6
 7     print("name:",name)
 8     print('parent process:', os.getppid())
 9     print('process id:', os.getpid())
10     print("------------------")
11     time.sleep(1)
12
13 def foo(name):
14
15     info(name)
16
17 if __name__ == '__main__':
18
19     info('main process line')
20
21
22     p1 = Process(target=info, args=('alvin',))
23     p2 = Process(target=foo, args=('egon',))
24     p1.start()
25     p2.start()
26
27     p1.join()
28     p2.join()
29
30     print("ending")
31
32
33
34 #运行结果:
35 # name: main process line
36 # parent process: 5112
37 # process id: 10808
38 # ------------------
39 # name: alvin
40 # name: egon
41 # parent process: 10808
42 # process id: 9576
43 # ------------------
44 # parent process: 10808
45 # process id: 9604
46 # ------------------
47 # ending
通过tasklist(Win)或者ps -elf |grep(linux)命令检测每一个进程号(PID)对应的进程名.
十二、协程
 1 import time
 2
 3 """
 4 传统的生产者-消费者模型是一个线程写消息,一个线程取消息,通过锁机制控制队列和等待,但一不小心就可能死锁。
 5 如果改用协程,生产者生产消息后,直接通过yield跳转到消费者开始执行,待消费者执行完毕后,切换回生产者继续生产,效率极高。
 6 """
 7 # 注意到consumer函数是一个generator(生成器):
 8 # 任何包含yield关键字的函数都会自动成为生成器(generator)对象
 9
10 def consumer():
11     r = ''
12     while True:
13         # 3、consumer通过yield拿到消息,处理,又通过yield把结果传回;
14         #    yield指令具有return关键字的作用。然后函数的堆栈会自动冻结(freeze)在这一行。
15         #    当函数调用者的下一次利用next()或generator.send()或for-in来再次调用该函数时,
16         #    就会从yield代码的下一行开始,继续执行,再返回下一次迭代结果。通过这种方式,迭代器可以实现无限序列和惰性求值。
17         n = yield r
18         if not n:
19             return
20         print('[CONSUMER] ←← Consuming %s...' % n)
21         time.sleep(1)
22         r = '200 OK'
23 def produce(c):
24     # 1、首先调用c.next()启动生成器
25     next(c)
26     n = 0
27     while n < 5:
28         n = n + 1
29         print('[PRODUCER] →→ Producing %s...' % n)
30         # 2、然后,一旦生产了东西,通过c.send(n)切换到consumer执行;
31         cr = c.send(n)
32         # 4、produce拿到consumer处理的结果,继续生产下一条消息;
33         print('[PRODUCER] Consumer return: %s' % cr)
34     # 5、produce决定不生产了,通过c.close()关闭consumer,整个过程结束。
35     c.close()
36 if __name__=='__main__':
37     # 6、整个流程无锁,由一个线程执行,produce和consumer协作完成任务,所以称为“协程”,而非线程的抢占式多任务。
38     c = consumer()
39     produce(c)
40
41
42 '''
43 result:
44
45 [PRODUCER] →→ Producing 1...
46 [CONSUMER] ←← Consuming 1...
47 [PRODUCER] Consumer return: 200 OK
48 [PRODUCER] →→ Producing 2...
49 [CONSUMER] ←← Consuming 2...
50 [PRODUCER] Consumer return: 200 OK
51 [PRODUCER] →→ Producing 3...
52 [CONSUMER] ←← Consuming 3...
53 [PRODUCER] Consumer return: 200 OK
54 [PRODUCER] →→ Producing 4...
55 [CONSUMER] ←← Consuming 4...
56 [PRODUCER] Consumer return: 200 OK
57 [PRODUCER] →→ Producing 5...
58 [CONSUMER] ←← Consuming 5...
59 [PRODUCER] Consumer return: 200 OK
60 '''
greenlet:
greenlet机制的主要思想是:生成器函数或者协程函数中的yield语句挂起函数的执行,直到稍后使用next()或send()操作进行恢复为止。可以使用一个调度器循环在一组生成器函数之间协作多个任务。greentlet是python中实现我们所谓的"Coroutine(协程)"的一个基础库.
 1 from greenlet import greenlet
 2
 3 def test1():
 4     print (12)
 5     gr2.switch()
 6     print (34)
 7     gr2.switch()
 8
 9 def test2():
10     print (56)
11     gr1.switch()
12     print (78)
13
14 gr1 = greenlet(test1)
15 gr2 = greenlet(test2)
16 gr1.switch()
17
18
19 #运行结果:
20 #12
21 #56
22 #34
23 #78
基于greenlet的框架——gevent
gevent模块实现协程:
Python通过yield提供了对协程的基本支持,但是不完全。而第三方的gevent为Python提供了比较完善的协程支持。
gevent是第三方库,通过greenlet实现协程,其基本思想是:
当一个greenlet遇到IO操作时,比如访问网络,就自动切换到其他的greenlet,等到IO操作完成,再在适当的时候切换回来继续执行。由于IO操作非常耗时,经常使程序处于等待状态,有了gevent为我们自动切换协程,就保证总有greenlet在运行,而不是等待IO。
由于切换是在IO操作时自动完成,所以gevent需要修改Python自带的一些标准库,这一过程在启动时通过monkey patch完成:
 1 from gevent import monkey
 2 monkey.patch_all()
 3 import gevent
 4 from urllib import request
 5 import time
 6
 7 def f(url):
 8     print('GET: %s' % url)
 9     resp = request.urlopen(url)
10     data = resp.read()
11     print('%d bytes received from %s.' % (len(data), url))
12
13 start=time.time()
14
15 gevent.joinall([
16         gevent.spawn(f, 'https://itk.org/'),
17         gevent.spawn(f, 'https://www.github.com/'),
18         gevent.spawn(f, 'https://zhihu.com/'),
19 ])
20
21 print(time.time()-start)
22
23
24
25 #运行结果:
26 #GET: https://itk.org/
27 #GET: https://www.github.com/
28 #GET: https://zhihu.com/
29 #9077 bytes received from https://zhihu.com/.
30 #12323 bytes received from https://itk.org/.
31 #92574 bytes received from https://www.github.com/.
32 #3.7679357528686523
 1 from gevent import monkey
 2 monkey.patch_all()
 3 import gevent
 4 from urllib import request
 5 import time
 6
 7 def f(url):
 8     print('GET: %s' % url)
 9     resp = request.urlopen(url)
10     data = resp.read()
11     print('%d bytes received from %s.' % (len(data), url))
12
13 start=time.time()
14
15 # gevent.joinall([
16 #         gevent.spawn(f, 'https://itk.org/'),
17 #         gevent.spawn(f, 'https://www.github.com/'),
18 #         gevent.spawn(f, 'https://zhihu.com/'),
19 # ])
20
21 f('https://itk.org/')
22 f('https://www.github.com/')
23 f('https://zhihu.com/')
24
25 print(time.time()-start)
26
27
28
29 #运行结果:
30 #GET: https://itk.org/
31 #12323 bytes received from https://itk.org/.
32 #GET: https://www.github.com/
33 #92572 bytes received from https://www.github.com/.
34 #GET: https://zhihu.com/
35 #8885 bytes received from https://zhihu.com/.
36 #5.089903354644775
参考资料:
1. http://www.cnblogs.com/yuanchenqi/articles/6755717.html#top