What is Middleware?
Put simply, you use middleware components to compose the functionality of your ASP.NET Core application. Anything your application does, even something as basic as serving up static files, is performed by middleware. An application without any middleware will simply return a 404 - Not Found response for every request. This gives you complete control over how requests are handled and lets you keep your application as lean as possible.
In this post, we’ll look at the following topics, which cover the basics of middleware:
- The Middleware Pipeline
- Using Standard Middleware
- Inline Middleware with Use and Run
- Branching with Map and MapWhen
- Custom Middleware
Next we’ll dive into the ASP.NET Core source code to see what is happening under the hood.
As requests are received, they are processed by each middleware component in a construct commonly called the middleware pipeline. The term “pipeline” implies that requests enter one end, are processed by each middleware component in turn, and exit the other end. In reality, the run-time behavior is a variation of the Chain of Responsibility design pattern, with each middleware component having the option of acting on the HttpContext before and after calling the next component in the list:
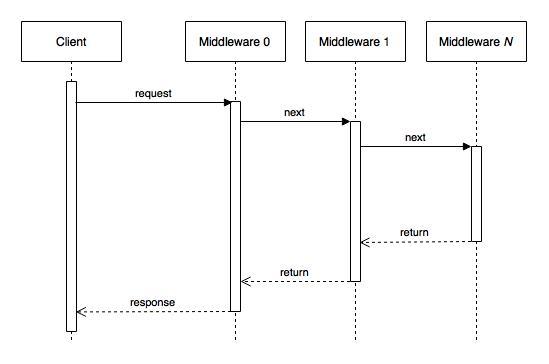
Note: there is much more going on between the Client and first Middleware, which I will cover in a future post about hosting. For this discussion, the additional detail has been omitted to focus on the immediate topic of middleware.
Middleware components may also choose not to call the following component, instead short-circuiting the rest of the chain and returning immediately.
另外,需要注意的是,每当有请求到达ASP.NET Core服务器时,虽然ASP.NET Core的中间件(Middleware)都会按照注册顺序依次执行(如上面图所示),但是ASP.NET Core的中间件只会创建一次,并不是每当有请求到达ASP.NET Core服务器时,中间件也都会被重新创建。
举个例子,假如我们有下面CustomizedMiddleware中间件类:
public class CustomizedMiddleware
{
    private readonly RequestDelegate next;

    public CustomizedMiddleware(RequestDelegate next)
    {
        this.next = next;
    }

    public async Task Invoke(Microsoft.AspNetCore.Http.HttpContext context)
    {
        //Do something...
        await next.Invoke(context);
        //Do something...
    }
}
假如现在有三个请求发送到了ASP.NET Core服务器,那么上面CustomizedMiddleware类中的Invoke方法相应地会执行三次,分别处理三个请求,但是CustomizedMiddleware类的构造函数只会执行一次,因为ASP.NET Core并不会为每次请求都重新创建CustomizedMiddleware中间件,每次请求都会复用ASP.NET Core进程中已经创建好的CustomizedMiddleware中间件对象实例。
ASP.NET Core comes with many middleware components out of the box, and you add them to your application in the Startup.Configure method as shown below:
public class Startup
{
    public void Configure(IApplicationBuilder app)
    {
        app.UseStaticFiles();
        app.UseWelcomePage();
    }
}
In this case we are using the StaticFileMiddleware and WelcomePageMiddleware. Middleware components are executed in the order that they are added to the application. In this example, requests are processed by the StaticFileMiddleware first. If a file exists that matches the request, it will be returned and no other middleware components are called. If no matching file is found, the request passes to the WelcomePageMiddleware, which returns a welcome page for all requests it receives.
The standard middleware components typically have extension methods you can use to add them to the pipeline, such as UseStaticFiles() and UseWelcomePage(), which we saw above.
There are too many standard middleware components for me to document in this post, so for now I will simply list them and the project where they can be found on github.
| Component | Project |
|---|---|
| AnalysisMiddleware | Diagnostics |
| AntiforgeryMiddleware | Antiforgery |
| AuthenticationMiddleware | Security |
| ClaimsTransformationMiddleware | Security |
| CookieAuthenticationMiddleware | Security |
| CookiePolicyMiddleware | Security |
| CorsMiddleware | CORS |
| DatabaseErrorPageMiddleware | Diagnostics |
| DefaultFilesMiddleware | StaticFiles |
| DeveloperExceptionPageMiddleware | Diagnostics |
| DirectoryBrowserMiddleware | StaticFiles |
| ElmCaptureMiddleware | Diagnostics |
| ElmPageMiddleware | Diagnostics |
| ExceptionHandlerMiddleware | Diagnostics |
| FacebookMiddleware | Security |
| ForwardedHeadersMiddleware | BasicMiddleware |
| GoogleMiddleware | Security |
| HttpMethodOverrideMiddleware | BasicMiddleware |
| IISPlatformHandlerMiddleware | IISIntegration |
| JwtBearerMiddleware | Security |
| MapMiddleware | HttpAbstractions |
| MapWhenMiddleware | HttpAbstractions |
| MicrosoftAccountMiddleware | Security |
| MigrationsEndPointMiddleware | Diagnostics |
| OAuthMiddleware | Security |
| OpenIdConnectMiddleware | Security |
| ProxyMiddleware | Proxy |
| RequestLocalizationMiddleware | Localization |
| RequestServicesContainerMiddleware | Hosting |
| ResponseBufferingMiddleware | BasicMiddleware |
| RouterMiddleware | Routing |
| RuntimeInfoMiddleware | Diagnostics |
| SessionMiddleware | Session |
| StaticFileMiddleware | StaticFiles |
| StatusCodePagesMiddleware | Diagnostics |
| TwitterMiddleware | Security |
| WebSocketMiddleware | WebSockets |
| WelcomePageMiddleware | Diagnostics |
Inline Middleware with Use and Run
In addition to using predefined middleware components, you can define middleware inline with the Use and Run extension methods.
Use adds middleware, which may call the next middleware component in the pipeline. Run adds terminating middleware, that is, middleware that will never call subsequent middleware.
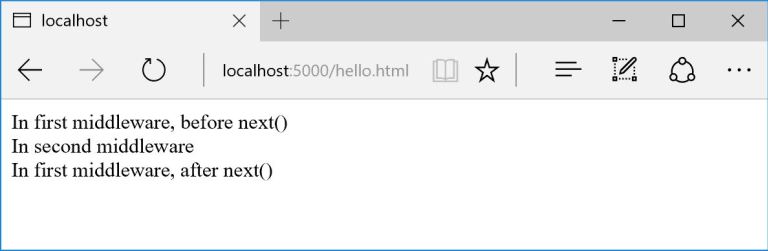
In the following example, the middleware defined inline with Use writes out a message, then calls the next middleware, and then writes out another message after the next middleware returns. The middleware defined with Run simply writes out a message and returns. If any middleware is added after Run, it will never be called.
public class Startup
{
    public void Configure(IApplicationBuilder app)
    {
        app.Use(async (context, next) =>
        {
            await context.Response.WriteAsync("<html><body>");
            await context.Response.WriteAsync("<div>In first middleware, before next()</div>");
            await next();
            await context.Response.WriteAsync("<div>In first middleware, after next()</div>");
            await context.Response.WriteAsync("</body></html>");
        });

        app.Run(async context => { await context.Response.WriteAsync("<div>In second middleware</div>"); });
    }
}
Running this application and browsing to it, we see the expected messages:
Branching with Map and MapWhen
There are two middleware components we can use to branch the pipeline: MapMiddleware and MapWhenMiddleware.
MapMiddleware lets you branch based on the route and can be added to the pipeline with the Map extension method. In the following example, “Hello… ” will always be written, then, if the first path segment is either “/foo” or “/bar”, “Foo” or “Bar” will be written respectively. If neither matches, “World” will be written. Finally, a closing exclamation point is written before the response is returned.
public class Startup
{
    public void Configure(IApplicationBuilder app)
    {
        app.Use(async (context, next) =>
        {
            await context.Response.WriteAsync("Hello... ");
            await next();
            await context.Response.WriteAsync("!");
        });

        app.Map(new PathString("/foo"), branch =>
        {
            branch.Run(async context => { await context.Response.WriteAsync("Foo"); });
        });

        app.Map(new PathString("/bar"), branch =>
        {
            branch.Run(async context => { await context.Response.WriteAsync("Bar"); });
        });

        app.Run(async context => { await context.Response.WriteAsync("World"); });
    }
}
MapWhenMiddleware lets you branch based on a predicate and can be added to the pipeline with the MapWhen extension method. In this example, we use MapWhen to implement the commonly used FizzBuzz interview question.
public class Startup
{
    public void Configure(IApplicationBuilder app)
    {
        var count = 0;
        var isFizz = false;
        var isBuzz = false;

        app.Use(async (context, next) =>
        {
            count++;
            isFizz = count % 3 == 0;
            isBuzz = count % 5 == 0;

            await context.Response.WriteAsync($"{count} -> ");
            await next();
        });

        app.MapWhen(context => isFizz, branch =>
        {
            branch.Run(async (context) =>
            {
                await context.Response.WriteAsync("Fizz");
                if (isBuzz)
                {
                    await context.Response.WriteAsync("Buzz");
                }
            });
        });

        app.MapWhen(context => isBuzz, branch =>
        {
            branch.Run(async (context) => await context.Response.WriteAsync("Buzz"));
        });

        app.Run(async (context) => await context.Response.WriteAsync($"{count}"));
    }
}
You only need to meet two requirements to create your own middleware components:
- Your middleware class must have a non-static public constructor with a RequestDelegate parameter. This will be a reference to the next component in the pipeline.
- Your middleware class must have a public method named Invoke that takes an HttpContext and returns a Task.
Let’s take a look at a simple custom middleware component. The ArnoldQuotesMiddleware writes out a random movie quote from Arnold Schwarzenegger. This is a terminating component; it does not call the next component in the pipeline because Arnold always gets the last word. I have included the code you would use to hold the reference to the next middleware component, but the actual call is commented out.
Here is the constructor for the middleware class. Note that we can include other parameters, which will be provided from the services collection (DI).
        public ArnoldQuotesMiddleware(RequestDelegate next, ILoggerFactory loggerFactory)
        {
            _next = next;
            _logger = loggerFactory.CreateLogger<ArnoldQuotesMiddleware>();
        }
And here is the Invoke method, which writes out a quote from a list. Invoke can take additional parameters in addition the the HttpContext, and they will be provided using services registered with the DI container.
        public async Task Invoke(HttpContext context)
        {
            var arnoldSays = _quotes[(int)(DateTime.Now.Ticks%_quotes.Count)];

            _logger.LogWarning(arnoldSays);

            await context.Response.WriteAsync(arnoldSays);
            //await _next(context);
        }
We’ll also create an extension method to follow convention and make it easier to use our middleware:
        public static void UseArnoldQuotes(this IApplicationBuilder app)
        {
            app.UseMiddleware<ArnoldQuotesMiddleware>();
        }
Now we can use the extension method to add our ArnoldQuotesMiddleware:
        public void Configure(IApplicationBuilder app, ILoggerFactory loggerFactory)
        {
            loggerFactory.MinimumLevel = LogLevel.Warning;
            loggerFactory.AddConsole(LogLevel.Warning);

            app.UseArnoldQuotes();
        }
You can download the code for this project here:
If you are curious about the two requirements we need to meet for our custom middleware, take a look at the implementation of the UseMiddleware<TMiddleware> method in the ASP.NET Core source code.
Configuring the Middleware Pipeline
What happens when we add middleware to the IApplicationBuilder instance in the Configure method? IApplicationBuilder defines only one method to add middleware, so whether we use an extension method or define middleware inline, all roads lead to this method:
IApplicationBuilder Use(Func<RequestDelegate, RequestDelegate> middleware);
As mentioned earlier, RequestDelegate describes a function that processes an HttpContext asynchronously:
public delegate Task RequestDelegate(HttpContext context);
A middleware component can be composed of any number of classes, but at some point, a RequestDelegate is needed to add the middleware to the application. You can think of the RequestDelegate as the entry point into the middleware component.
Going back to the IApplicationBuilder.Use method, you can think of its argument as a configuration function, which takes the entry point to the next component in the pipeline, does whatever work is needed to construct and configure the current middleware component, and returns a RequestDelegate, which will be used to access the middleware currently being configured.
Looking at the implementation of Use in ApplicationBuilder, we see it simply adds the provided configuration function to a private list:
private readonly IList<Func<RequestDelegate, RequestDelegate>> _components = new List<Func<RequestDelegate, RequestDelegate>>();

public IApplicationBuilder Use(Func<RequestDelegate, RequestDelegate> middleware)
{
    _components.Add(middleware);
    return this;
}
其实上面的Use(Func<RequestDelegate, RequestDelegate> middleware)方法在注册一个中间件的时候就会被调用到,假设现在你自己开发了个自定义中间件类CustomizedMiddleware如下所示:
class CustomizedMiddleware
{
    private readonly RequestDelegate next;

    public CustomizedMiddleware(RequestDelegate next)
    {
        this.next = next;
    }

    public async Task Invoke(Microsoft.AspNetCore.Http.HttpContext context)
    {
        //Do something...
        await next.Invoke(context);
        //Do something...
    }
}
然后当你在调用
app.UseMiddleware<CustomizedMiddleware>();
注册你的CustomizedMiddleware到ASP.NET Core时,实际上就会调用上面说的Use(Func<RequestDelegate, RequestDelegate> middleware)方法,其参数Func<RequestDelegate, RequestDelegate> middleware也是由ASP.NET Core自动构造并传入的,构造的逻辑类似如下:
//nextMiddlewareRequestDelegate是在CustomizedMiddleware中间件之后注册的中间件的Invoke方法
Func<RequestDelegate, RequestDelegate> middleware = (nextMiddlewareRequestDelegate) =>
{
    //当然实际过程中ASP.NET Core肯定是用反射来new下面的CustomizedMiddleware类,并且会在new之前构造好要传入CustomizedMiddleware构造函数的依赖注入接口参数
    var currentMiddleware = new CustomizedMiddleware(nextMiddlewareRequestDelegate);
    return currentMiddleware.Invoke;
};
Building the Middleware Pipeline
Now that we’ve seen how functions are added to configure middleware, let’s take a look at how the pipeline is built. IApplicationBuilder declares a method named Build(), which is called by the host during startup:
RequestDelegate Build();
Looking at the implementation of Build() in ApplicationBuilder we see it does the following:
- Sets up a RequestDelegate to return a 404 response. This will be the last RequestDelegate in the pipeline and explains why you get a 404 response if you don’t add any middleware to your application.
- Iterates through the middleware configuration functions in reverse order. For each configuration function, the currently referenced RequestDelegate is passed in as the next component in the pipeline. The RequestDelegate returned by the configuration function is then assigned to that reference since it is now the first in the pipeline.
- Finally, after all of the configuration functions have been processed, the first RequestDelegate is returned and this will be called to process any requests received by the application.
public RequestDelegate Build()
{
    RequestDelegate app = context =>
    {
        context.Response.StatusCode = 404;
        return Task.FromResult(0);
    };

    foreach (var component in _components.Reverse())
    {
        app = component(app);
    }

    return app;
}