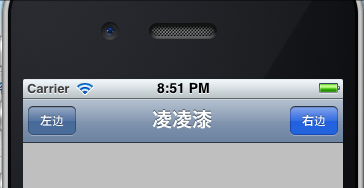
本文是使用纯代码实现一个导航栏的效果。单击按钮并且产生事件。基本思路是:
1.创建一个导航栏(UINavigationBar对象)
2.创建一个导航栏集合(UINavigationItem对象)
3.创建一个左边按钮、一个右边按钮(UIBarButtonItem对象),并实现对应的事件方法
4.将导航栏集合添加到导航栏中,设置动画关闭
5.把左右两个按钮添加到导航栏集合中去
6.在视图中显示当前创建的导航栏


具体的实现代码如下:
ViewController.h文件中的代码不用改变,如下所示:
- #import <UIKit/UIKit.h>
- @interface ViewController : UIViewController
- @end
ViewController.m文件中的代码:
- #import "ViewController.h"
- @interface ViewController ()
- @end
- @implementation ViewController
- - (void)viewDidLoad
- {
- [super viewDidLoad];
- // Do any additional setup after loading the view, typically from a nib.
- //创建一个导航栏
- UINavigationBar *navBar = [[UINavigationBar alloc] initWithFrame:CGRectMake(0, 0, 320, 44)];
- //创建一个导航栏集合
- UINavigationItem *navItem = [[UINavigationItem alloc] initWithTitle:nil];
- //在这个集合Item中添加标题,按钮
- //style:设置按钮的风格,一共有三种选择
- //action:@selector:设置按钮的点击事件
- //创建一个左边按钮
- UIBarButtonItem *leftButton = [[UIBarButtonItem alloc] initWithTitle:@"左边" style:UIBarButtonItemStyleBordered target:self action:@selector(clickLeftButton)];
- //创建一个右边按钮
- UIBarButtonItem *rightButton = [[UIBarButtonItem alloc] initWithTitle:@"右边" style:UIBarButtonItemStyleDone target:self action:@selector(clickRightButton)];
- //设置导航栏的内容
- [navItem setTitle:@"凌凌漆"];
- //把导航栏集合添加到导航栏中,设置动画关闭
- [navBar pushNavigationItem:navItem animated:NO];
- //把左右两个按钮添加到导航栏集合中去
- [navItem setLeftBarButtonItem:leftButton];
- [navItem setRightBarButtonItem:rightButton];
- //将标题栏中的内容全部添加到主视图当中
- [self.view addSubview:navBar];
- //最后将控件在内存中释放掉,以避免内存泄露
- [navItem release];
- [leftButton release];
- [rightButton release];
- }
- -(void)showDialog:(NSString *)str
- {
- UIAlertView *alert = [[UIAlertView alloc] initWithTitle:@"这是一个对话框" message:str delegate:self cancelButtonTitle:@"确定" otherButtonTitles: nil];
- [alert show];
- [alert release];
- }
- -(void) clickLeftButton
- {
- [self showDialog:@"点击了导航栏左边按钮"];
- }
- -(void) clickRightButton
- {
- [self showDialog:@"点击了导航栏右边按钮"];
- }
- - (void)viewDidUnload
- {
- [super viewDidUnload];
- // Release any retained subviews of the main view.
- }
- - (BOOL)shouldAutorotateToInterfaceOrientation:(UIInterfaceOrientation)interfaceOrientation
- {
- return (interfaceOrientation != UIInterfaceOrientationPortraitUpsideDown);
- }
- @end