组件化开发介绍
WEB中的组件是页面组成的一部分,是一个具有独立逻辑的功能或界面,同时又能根据规定的接口规则进行融合,变成一个完整的应用。比如导航,列表,弹窗等。
将一个巨大复杂的东西分成粒度合理的小东西。
优点: 提高开发效率,方便重复使用,简化调试步骤,提升整个项目的可维护性,便于协同开发。
Link : Element可以学习里面的组件开发
Vue中的组件
vue中的组件是一个自定义标签,在哪里写上这个标签就可以在这里使用即插入组件。
基本组成:样式结构,行为逻辑,数据。
注册组件
分为全局注册与局部注册。
1、全局注册
可以在任何模板中使用。
语法:使用Vue.component("组件名", 选项对象)
其中组件名命名约定:驼峰(camelCase)或 烤串(kebab-case)
使用:在html中组件时必须使用烤串命名法的标签,插入组件在该位置。
例:一个简单的下拉组件
Vue.component("pull-list",{
    template:`<section class="warp">
            <div class="searchIpt clearFix">
                <div class="clearFix">
                    <input type="text" class="keyWord" value="" />
                    <input type="button" value="查询">
                    <span></span>
                </div>
                <ul class="list">
                    <li>html+css</li>
                    <li>html5+css3</li>
                    <li>javascript</li>
                    <li>vue</li>
                    <li>jquery</li>
                </ul>
            </div>
        </section>`
});
new Vue({
    el:"#app",
});
在html中的使用:
<div id="app">
    <h2>自定义的下拉框</h2>
    <pull-list></pull-list>
</div>
受限制的元素
在某些元素中放入了自定义标签,不符合w3标准,会解析错误。可以通过使用特殊属性 is 来解决这个问题,但还是不提倡的。
2、局部注册
在组件实例vm中通过在选项对象的component中注册,只在所注册的作用域使用。
如下,将组件custom-select写在实例中,这样只能在#app中使用。如果还有一个挂载app2的实例,是不可以使用的。
new Vue({
    el:"#app",
    component:{
        "custom-select":{
            template:`<section class="warp">
                <div class="searchIpt clearFix">
                    <div class="clearFix">
                        <input type="text" class="keyWord" value="" />
                        <input type="button" value="查询">
                        <span></span>
                    </div>
                    <ul class="list">
                        <li>html+css</li>
                        <li>html5+css3</li>
                        <li>javascript</li>
                        <li>vue</li>
                        <li>jquery</li>
                    </ul>
                </div>
            </section>`
        }
    }
});
组件间的通信
为什么通信:父组件要给子组件传递数据;子组件需要将它内部发生的事情告诉父组件。

1、父组件 给 子组件 传递数据
组件实例的作用域是独立的,不能在子组件直接用父组件的数据。这里#app所在可以看做父组件,custom-select为子组件。要想自定义custom-select组件里面的一些信息,比如按钮显示 搜索 而不是 查询 ,这就需要向其传递一些数据。
<div id="app">
    <h2>自定义的下拉框1</h2>
    <custom-select></custom-select>
    <h2>自定义的下拉框2</h2>
    <custom-select></custom-select>
</div>
方法:在自定义标签上来一个自定义属性,再在子组件中用props声明这个自定义的属性名。
step1: html中使用传值:<custom-select btn-value="查询"></custom-select>
<div id="app">
    <h2>自定义的下拉框1</h2>
    <custom-select btn-value="查询"></custom-select>
    <h2>自定义的下拉框2</h2>
    <custom-select btn-value="搜索"></custom-select>
</div>
step2: 在组件props中声明自定义属性
step3: template模板中绑定属性
Vue.component("custom-select",{
            props:["btnValue"],
            template:`<section class="warp">
                <div class="searchIpt clearFix">
                    <div class="clearFix">
                        <input type="text" class="keyWord" value="" />
                        <input type="button" :value="btnValue">
                        <span></span>
                    </div>
                    <ul class="list">
                        <li>html+css</li>
                        <li>html5+css3</li>
                        <li>javascript</li>
                        <li>vue</li>
                        <li>jquery</li>
                    </ul>
                </div>
            </section>`
        })
组件选项对象的data属性
Question:让下拉列表一开始是隐藏的状态,在点击输入框时才显示?
用到组件的选项对象里的data属性,注:组件中的data必须是函数。因为每个组件都是独立的,如果他们共用一个对象,在更改一个组件数据的时候,会影响其他组件;如果是函数的话,每个组件都有自己独立的数据,相互之间不会影响。
然后通过绑定click事件来进行显隐控制,结合v-show和v-on指令实现:
data:function(){
    return {
        selectShow:false
    };
},
<input type="text" class="keyWord" value="" @click="selectShow = !selectShow" />
<custom-li v-show="selectShow"></custom-li>
上面的<custom-li>为ul列表组件,是<custom-select>的子组件。
更多层的数据传递
#app是<custom-select>的父组件,<custom-select>是<custom-li>的父组件。这样的传递是一层一层往内传递,依次进行即可。
step1:实例化对象中要有数据
data:{
    list1:["北京","上海","杭州"],
    list2:["2017-10-12","2017-10-20","2017-10-23"]
}
step2:html中使用组件并绑定属性
<custom-select btn-value="查询" :list="list1"></custom-select>
<custom-select btn-value="搜索" :list="list2"></custom-select>
step3:custom-select组件选项对象的props中添加自定义属性名
props:["btnValue","list"],
step4:子组件<custom-li>中绑定list属性
<custom-li v-show="selectShow" :list="list"></custom-li>
step5:子组件添加声明自定义属性,模板中遍历list获得li
props:["list"],
template:`<ul class="list">
                <li v-for="item of list">{{item}}</li>
            </ul>`
这样就将数据传递了下来。
2、子组件 给 父组件 传递数据
Question: 点击列表项时相应显示在输入框里?
父组件传递数据到子组件用到自定义属性,子组件传递数据到父组件需要用到自定义事件。
继续上面的例子:
step1: 在子组件的li上添加点击事件
<li v-for="item of list" @click="selectValueHandle(item)">{{item}}</li>
step2: 在子组件的methds里添加selectValueHandle函数,用来触发自定义事件
selectValueHandle:function(item){
    //告知父级,改变val的值,需要触发一个自定义事件
    this.$emit("recieve",item);
}
step3:在父组件中的 custom-li标签 上绑定自定义事件
<custom-li v-show="selectShow" :list="list" @recieve="changeValueHandle"></custom-li>
step4:在父组件的methods里添加changeValueHandle函数
changeValueHandle:function(value){
    this.val=value;
}
step5:将val双向绑定到input框。此时点击列表项就可以相应的显示到输入框了。
单向数据流
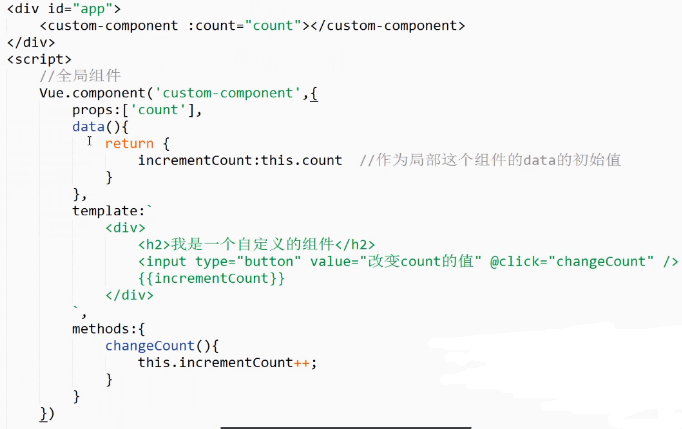
数据从父组件流向(传递给)子组件,只能单向绑定。在子组件内部不允许直接修改父组件传递过来的数据。
如果要改的话,可以:
1. 将从父组件传递来的数据 作为data中数据来使用,然后改data里的值。

2.作为子组件的computed属性
props验证
组件可以为props绑定验证要求。如果类型不对,vue会警告。
props:{
    count:{
        type:Number, //String,Number,Function,Object,Boolean,Array
        default:10, //默认值,不传参数时为这个值
        required:true, //count参数必须传,不然报错
        validator:function(value){ //自定义验证规则,传的必须大于10,否则报错
            return value>10;
        }
    }
},
内容分发
使用一种方式混合父组件的内容和子组件自己的模板,这个过程称为内容分发。在子组件中使用特殊的<slot>元素作为内容的插槽。简单来说就是定制模板,自定义子组件中的内容。
单个slot
向组件的html标签中添加内容:
<custom>
    <div>我是html标签</div>
</custom>
向组件模板中加入<slot>标签,即可将html中自定义的内容呈现在slot位置,没有内容则显示slot模板中的默认内容:
template:`
    <div>
        <slot>我是默认的结构</slot>
        <p>这是第一个提醒</p>
        <p>这是第二个提醒</p>
        <p>这是第三个提醒</p>
    </div>
`
当然,如果将slot标签包裹整个结构,则显示为父组件的内容。
具名slot
slot标签可以用name属性来配置如何分发内容:
template:`
    <div>
        <slot name="one"><p>这是第一个提醒</p></slot>
        <slot name="two"><p>这是第二个提醒</p></slot>
        <p>这是第三个提醒</p>
    </div>
在html中对应要替换的部分:
<custom>
    <div slot="one">我是html标签</div>
</custom>
这样,结果就为:
我是html标签
这是第二个提醒
这是第三个提醒
组件封装
props参数:数据传递给组件
slot定制模板:外部模板混合子组件模板
event自定义事件:监控子组件交互状态
动态组件
多个组件可以使用同一挂载点,动态的在它们之间切换。
使用<component>元素加is特性进行动态绑定,决定显示哪一个组件。
使用keep-alive把切出去的组件保存在内存中,这样再次切回来时可以保留它的状态,避免重新渲染。
    <div id="app">
            <input type="button" value="切换到第1个组件" @click="tabComponent(1)" />
            <input type="button" value="切换到第2个组件" @click="tabComponent(2)"/>
            <input type="button" value="切换到第3个组件" @click="tabComponent(3)"/>
            <keep-alive>
                <component :is="current"></component>
            </keep-alive>
        </div>
        <script>
            var custom1 = Vue.component("custom1",{
                template:`<div @click="changeDivbg">我是第1个组件</div>`,
                methods:{
                    changeDivbg(ev){
                        ev.target.style.background = "red";
                    }
                }
            });
            var custom2 = Vue.component("custom2",{
                template:`<div>我是第2个组件</div>`
            })
             var custom3  = Vue.component("custom3",{
                template:`<div>我是第3个组件</div>`
            })

            new Vue({
                el:"#app",
                data:{
                    current:custom1
                },
                methods:{
                    tabComponent(index){
                        if(index === 1){
                            this.current = custom1
                        }else if(index === 2){
                            this.current = custom2
                        }else if(index === 3){
                            this.current = custom3
                        }
                    }
                }
            })
        </script>
Demo:下拉选择列表组件

<!DOCTYPE html>
<html lang="en">
<head>

    <meta charset="UTF-8">
    <title>下拉组件</title>
    <link rel="stylesheet" type="text/css" href="style.css">
    <script type="text/javascript" src="vue.js"></script>

</head>
<body>

    <div id="app">
        <h2>自定义的下拉选择框</h2>
        <custom-select btn-value="查询" v-bind:list="list1"></custom-select>
        <h2>自定义的下拉选择框</h2>
        <custom-select btn-value="搜索" v-bind:list="list2"></custom-select>
    </div>

    <script type="text/javascript">

        Vue.component("custom-select",{
            data:function(){
                return {
                    selectShow:false,
                    val:''
                };
            },
            props:["btnValue","list"],
            template:`<section class="warp">
                    <div class="searchIpt clearFix">
                        <div class="clearFix">
                            <input type="text" class="keyWord" value="" @click="selectShow = !selectShow" v-bind:value="val"/>
                            <input type="button" v-bind:value="btnValue">
                            <span></span>
                        </div>
                        <custom-li v-show="selectShow" v-bind:list="list"
                            v-on:recieve="changeValueHandle"
                            ></custom-li>
                    </div>
                </section>`,
                methods:{
                    changeValueHandle:function(value){
                        this.val=value;
                    }
                }

        });
        //ul组件
        Vue.component("custom-li",{
            props:["list"],
            template:`<ul class="list">
                            <li v-for="item of list" @click="selectValueHandle(item)">{{item}}</li>
                        </ul>`,
            methods:{
                selectValueHandle:function(item){
                    //告知父级,改变val的值,需要触发一个自定义事件
                    this.$emit("recieve",item);
                }
            }

        });


        new Vue({
            el:"#app",
        data:{
            list1:["北京","上海","杭州"],
            list2:["2017-10-12","2017-10-20","2017-10-23"]
        }
        });
    </script>
</body>
</html>
