===========================================
原文链接: Scala对MongoDB的增删改查操作 转载请注明出处!
===========================================
依赖环境:jdk1.8、Scala 2.12、idea
mongodb Driver:3.1.1。注意,mongo for scala的驱动涉及多个jar(如下图),依赖于mongo-java-driver.jar
这里使用的sbt管理依赖,直接在build.sbt中添加依赖:libraryDependencies += "org.mongodb" %% "casbah" % "3.1.1"(强烈建议使用该方法添加依赖)
一、创建数据库连接
A:不需要用户名和密码直接获取MongoDB。
  //  无权限验证连接
  def createDatabase(url: String, port: Int, dbName: String): MongoDB = {
    MongoClient(url, port).getDB(dbName)
  }
这里需要注意一下,在导入的jar包存在两个MongoClient类,一个来自于mongo-java-driver.jar的com.mongodb.MongoClient,另一个来自于casbah-core_2.12:3.1.1.jar的com.mongodb.casbah.MongoClient.前者是用于java调用,Scala使用后者!!!
因此导入包的时候要注意为:import com.mongodb.casbah.MongoClient

B:通过权限验证进行连接
 //验证连接权限
  def createDatabase(url: String, port: Int, dbName: String, loginName: String, password: String): MongoDB = {
    var server = new ServerAddress(url, port)
    //注意:MongoCredential中有6种创建连接方式,这里使用MONGODB_CR机制进行连接。如果选择错误则会发生权限验证失败
    var credentials = MongoCredential.createCredential(loginName, dbName, password.toCharArray)
    var mongoClient = MongoClient(server, List(credentials))
    mongoClient.getDB(dbName)
  }
这里需要注意的是MongoCredential.createCredential(),在MongoCredential中存在着六种认证机制,这里使用createCredential()进行创建,使用错误则将会验证失败
com.mongodb.MongoSecurityException: Exception authenticating
Caused by: com.mongodb.MongoCommandException: Command failed with error 18: 'auth failed' on server localhost:27017. The full response is { "ok" : 0.0, "errmsg" : "auth failed", "code" : 18, "codeName" : "AuthenticationFailed" }
该方法注释如下:
/**
 * Creates a MongoCredential instance with an unspecified mechanism.  The client will negotiate the best mechanism
 * based on the version of the server that the client is authenticating to.  If the server version is 2.8 or higher,
 * the driver will authenticate using the SCRAM-SHA-1 mechanism.  Otherwise, the driver will authenticate using the
 * MONGODB_CR mechanism.
 *
 * @param userName the user name
 * @param database the database where the user is defined
 * @param password the user's password
 */

二、数据添加
  def testInsert(): Unit = {
    for (i <- 1 to 100)
      collection.insert(MongoDBObject("name" -> "Jack%d".format(i), "email" -> "jack%d@sina.com".format(i), "age" -> i % 25, "birthDay" -> new SimpleDateFormat("yyyy-MM-dd").parse("2016-03-25")))
  }
这里的collection是在下面创建的:
var collection= createDatabase("localhost", 27017, "mytest", "user", "123456").getCollection("user")
在进行数据插入的时候,如果不存在该collection则会自动创建(这里是user),如果document中不包含“_id”字段则会自动添加该字段。
DBCollection中存在一个save方法,该save方法区别于insert的地方在于当“_id”存在于集合中,save将会进行更新数据,而insert不会进行任何操作
根据需要选择适合的数据插入函数
存储之后数据如下:
{ "_id" : { "$oid" : "592ad4be45aefd09f4867f1e"} , "name" : "Jack86" , "email" : "jack86@sina.com" , "age" : 11 , "birthDay" : { "$date" : "2016-03-24T16:00:00.000Z"}}
{ "_id" : { "$oid" : "592ad4be45aefd09f4867f1f"} , "name" : "Jack87" , "email" : "jack87@sina.com" , "age" : 12 , "birthDay" : { "$date" : "2016-03-24T16:00:00.000Z"}}
{ "_id" : { "$oid" : "592ad4be45aefd09f4867f20"} , "name" : "Jack88" , "email" : "jack88@sina.com" , "age" : 13 , "birthDay" : { "$date" : "2016-03-24T16:00:00.000Z"}}
{ "_id" : { "$oid" : "592ad4be45aefd09f4867f21"} , "name" : "Jack89" , "email" : "jack89@sina.com" , "age" : 14 , "birthDay" : { "$date" : "2016-03-24T16:00:00.000Z"}}
三、数据更新修改
A:更新方式一
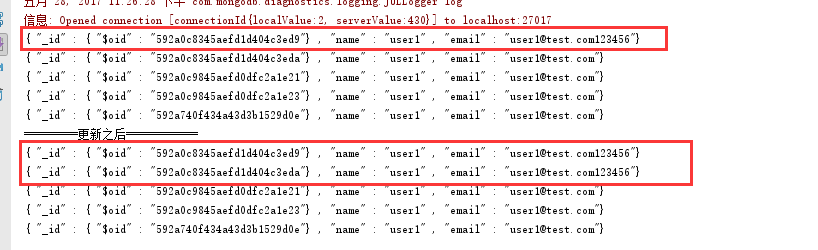
  def testUpdate(): Unit = {
    var query = MongoDBObject("name" -> "user1", "email" -> "user1@test.com")
    var value = MongoDBObject("name" -> "user1", "email" -> "user1@test.com123456")
    println("=========更新之前============")
    var query02 = MongoDBObject("name" -> "user1")
    collection.find(query02).forEach(x => println(x))
//    query:根据此条件进行查询  value:把查询出来结果集的第一条数据设置为value
    collection.update(query,value)
    println("=========更新之后============")
    collection.find(query02).forEach(x => println(x))
  }
运行结果如下:(注意这里只更新了一条记录,并不是把所有符合结果的数据都进行更新)
B:更新方式二
  def testUpdate02(): Unit = {
    var query = MongoDBObject("name" -> "user1", "email" -> "user1@test.com123456")
    var value = new BasicDBObject("$set", new BasicDBObject("email", "user1@test.com"))
    //     var value = MongoDBObject("$set",MongoDBObject("name" -> "user1", "email" -> "user1@test.com123"))
    println("=========更新之前============")
    var query02 = MongoDBObject("name" -> "user1")
    collection.find(query02).forEach(x => println(x))
    collection.update(query, value,true, true)
    println("=========更新之后============")
    collection.find(query02).forEach(x => println(x))
  }
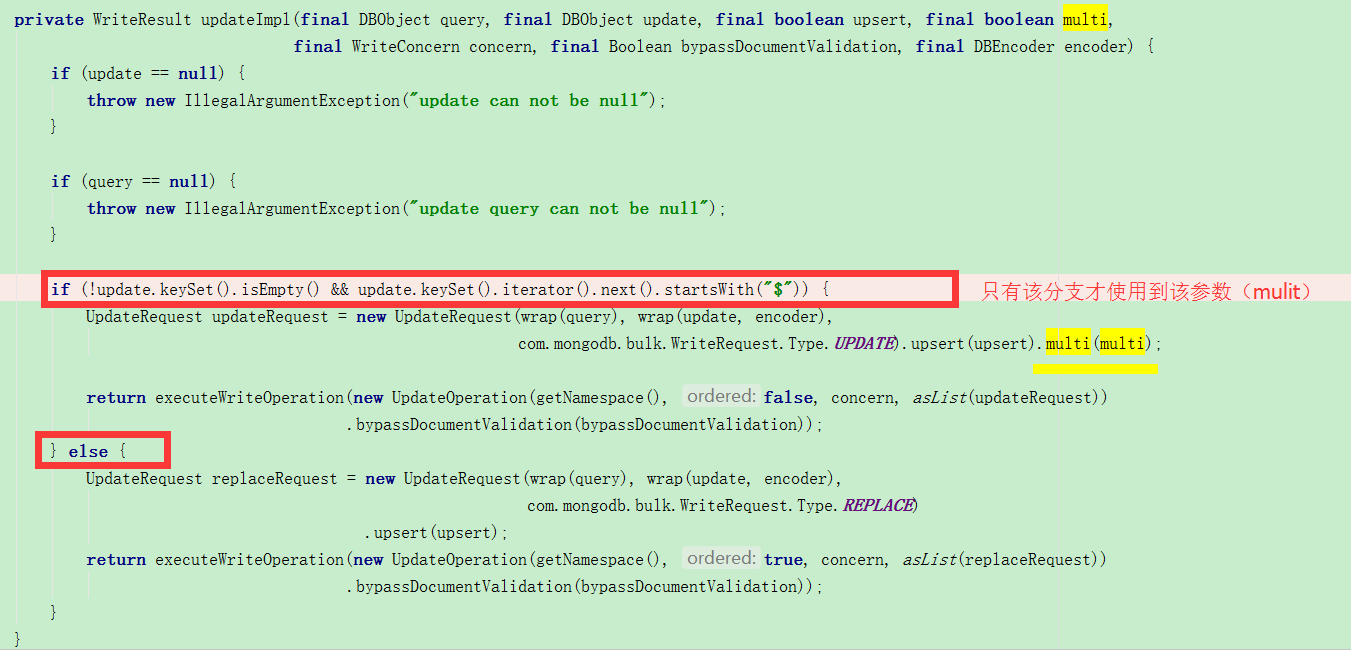
注意该方法:collection.update(query, value,true, true)。
第三个参数:when true, inserts a document if no document matches the update query criteria
第四个参数:when true, updates all documents in the collection that match the update query criteria, otherwise only updates one【当该值为true时,则更新所有的结果集数据,不过前提是value必须使用“$XXX”模式进行定义】。源码如下:
四、数据查询(建议看下这篇文章:MongoDB学习笔记(查询))
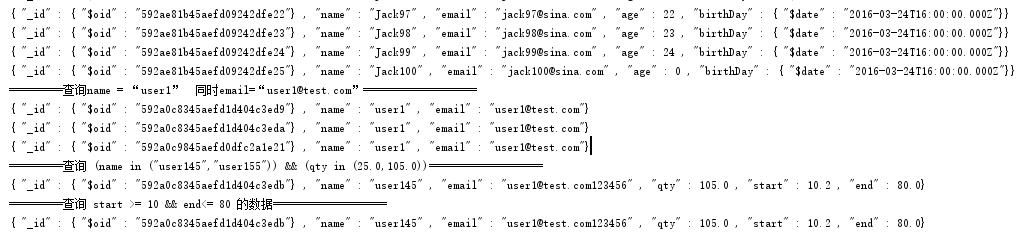
  def testSelect(): Unit ={
    println("=========查询所有数据===================")
    collection.find().forEach(x => println(x))
    println("=========查询name = “user1”  同时email=“user1@test.com”===================")
    collection.find(MongoDBObject("name" -> "user1", "email" -> "user1@test.com")).limit(3).forEach(x => println(x))
    //    注意此处不能使用put添加其他查询条件,因为put返回的是HashMap,此处应该使用append进行添加查询条件
    //  var query = new BasicDBObject("name",new BasicDBObject("$in",("user145","user155"))).put("qty",new BasicDBObject("$in",(25.0,105.0)))  该方法错误
    //    查询条件为: (name in ("user145","user155")) && (qty in (25.0,105.0))
    println("=========查询 (name in ("user145","user155")) && (qty in (25.0,105.0))===================")
    var query = new BasicDBObject("name", new BasicDBObject("$in", ("user145", "user155"))).append("qty", new BasicDBObject("$in", (25.0, 105.0)))
    collection.find(query).forEach(x => println(x))
    println("=========查询 start >= 10 && end<= 80 的数据===================")
    var query02 = new BasicDBObject("start", new BasicDBObject("$gte", 10)).append("end", new BasicDBObject("$lte", 80))
    collection.find(query02).forEach(x => println(x))
  }
查询结果如下:
五、数据删除
数据删除主要是构建一个查询条件,把符合该条件的所有数据都进行删除
  def testDelete(): Unit ={
    var query = MongoDBObject("name" -> "user1", "email" -> "user1@test.com")
    println("=========删除之前============")
    collection.find(query).forEach(x => println(x))
    //该参数只是一个查询条件,符合该条件的所有集合都将被删除。重点在于如何构建query
    collection.remove(query)
    println("=========删除之前============")
    collection.find(query).forEach(x => println(x))
  }
执行结果如下:
=========删除之前============
{ "_id" : { "$oid" : "592a0c8345aefd1d404c3ed9"} , "name" : "user1" , "email" : "user1@test.com"}
{ "_id" : { "$oid" : "592a0c8345aefd1d404c3eda"} , "name" : "user1" , "email" : "user1@test.com"}
{ "_id" : { "$oid" : "592a0c9845aefd0dfc2a1e21"} , "name" : "user1" , "email" : "user1@test.com"}
{ "_id" : { "$oid" : "592a0c9845aefd0dfc2a1e23"} , "name" : "user1" , "email" : "user1@test.com"}
{ "_id" : { "$oid" : "592a740f434a43d3b1529d0e"} , "name" : "user1" , "email" : "user1@test.com"}
=========删除之后============
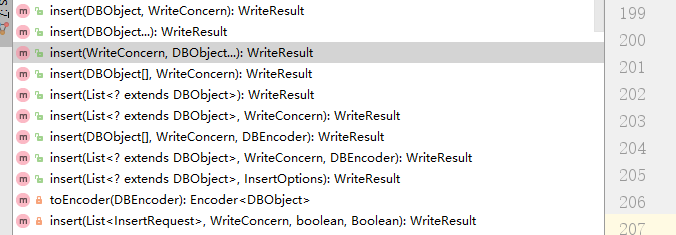
remove方法有如下四种,根据具体情况选取合适的方法:

附测试源码:
package tool

import java.text.SimpleDateFormat
import java.util
import java.util.Date

import com.mongodb.casbah.commons.MongoDBObject
import com.mongodb.{BasicDBObject, DBCollection, ServerAddress}
import com.mongodb.casbah.{MongoClient, MongoCredential, MongoDB}
import com.mongodb.client.model.Filters
import org.joda.time.DateTime

/**
  * Created with IntelliJ IDEA.
  * Description:
  * User: Perkins Zhu
  * Date: 2017-05-28
  * Time: 19:33
  */
object MongoTool {
  def main(args: Array[String]): Unit = {
//        testInsert
//    testUpdate02
//    testSelect
  testDelete
  }
  def testDelete(): Unit ={
    var query = MongoDBObject("name" -> "user1", "email" -> "user1@test.com")
    println("=========删除之前============")
    collection.find(query).forEach(x => println(x))
    //该参数只是一个查询条件,符合该条件的所有集合都将被删除
    collection.remove(query)
    collection.findAndRemove()
    println("=========删除之前============")
    collection.find(query).forEach(x => println(x))
  }


  def testUpdate01(): Unit = {
    var query = MongoDBObject("name" -> "user1", "email" -> "user1@test.com")
    var value = MongoDBObject("name" -> "user1", "email" -> "user1@test.com123456")
    println("=========更新之前============")
    var query02 = MongoDBObject("name" -> "user1")
    collection.find(query02).forEach(x => println(x))
//    query:根据此条件进行查询  value:把查询出来结果集的第一条数据设置为value
    collection.update(query,value)
    println("=========更新之后============")
    collection.find(query02).forEach(x => println(x))
  }

  def testUpdate02(): Unit = {
    var query = MongoDBObject("name" -> "user1", "email" -> "user1@test.com123456")
    var value = new BasicDBObject("$set", new BasicDBObject("email", "user1@test.com"))
    //     var value = MongoDBObject("$set",MongoDBObject("name" -> "user1", "email" -> "user1@test.com123"))
    println("=========更新之前============")
    var query02 = MongoDBObject("name" -> "user1")
    collection.find(query02).forEach(x => println(x))
    collection.update(query, value,true, true)
    println("=========更新之后============")
    collection.find(query02).forEach(x => println(x))
  }

  def testSelect(): Unit ={
    println("=========查询所有数据===================")
    collection.find().forEach(x => println(x))
    println("=========查询name = “user1”  同时email=“user1@test.com”===================")
    collection.find(MongoDBObject("name" -> "user1", "email" -> "user1@test.com")).limit(3).forEach(x => println(x))
    //    注意此处不能使用put添加其他查询条件,因为put返回的是HashMap,此处应该使用append进行添加查询条件
    //  var query = new BasicDBObject("name",new BasicDBObject("$in",("user145","user155"))).put("qty",new BasicDBObject("$in",(25.0,105.0)))  该方法错误
    //    查询条件为: (name in ("user145","user155")) && (qty in (25.0,105.0))
    println("=========查询 (name in ("user145","user155")) && (qty in (25.0,105.0))===================")
    var query = new BasicDBObject("name", new BasicDBObject("$in", ("user145", "user155"))).append("qty", new BasicDBObject("$in", (25.0, 105.0)))
    collection.find(query).forEach(x => println(x))
    println("=========查询 start >= 10 && end<= 80 的数据===================")
    var query02 = new BasicDBObject("start", new BasicDBObject("$gte", 10)).append("end", new BasicDBObject("$lte", 80))
    collection.find(query02).forEach(x => println(x))
  }

  def testInsert(): Unit = {
    for (i <- 1 to 100)
//      注意与saved的区别
      collection.insert(MongoDBObject("name" -> "Jack%d".format(i), "email" -> "jack%d@sina.com".format(i), "age" -> i % 25, "birthDay" -> new SimpleDateFormat("yyyy-MM-dd").parse("2016-03-25")))
  }

  var collection = createDatabase("localhost", 27017, "mytest", "user", "123456").getCollection("user")

  //验证连接权限
  def createDatabase(url: String, port: Int, dbName: String, loginName: String, password: String): MongoDB = {
    var server = new ServerAddress(url, port)
    //注意:MongoCredential中有6种创建连接方式,这里使用MONGODB_CR机制进行连接。如果选择错误则会发生权限验证失败
    var credentials = MongoCredential.createCredential(loginName, dbName, password.toCharArray)
    var mongoClient = MongoClient(server, List(credentials))
    mongoClient.getDB(dbName)
  }

  //  无权限验证连接
  def createDatabase(url: String, port: Int, dbName: String): MongoDB = {
    MongoClient(url, port).getDB(dbName)
  }
}
--end