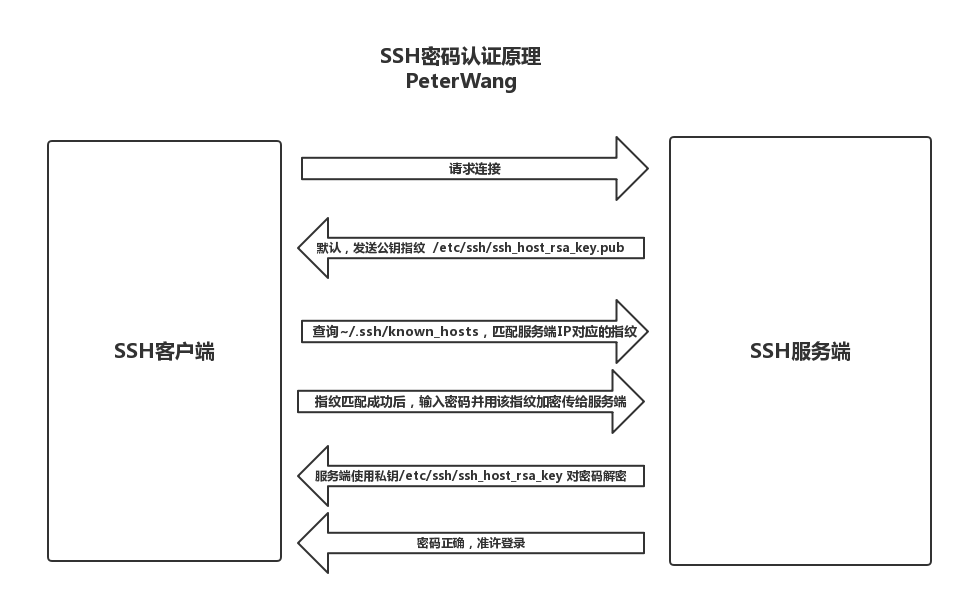
SSH密码认证原理

几点说明:
1.服务端/etc/ssh目录下有三对公钥私钥:
[root@m01 ssh]# ls
moduli  ssh_config  sshd_config  ssh_host_dsa_key  ssh_host_dsa_key.pub  ssh_host_key  ssh_host_key.pub  ssh_host_rsa_key  ssh_host_rsa_key.pub
其中,ssh_host_key和ssh_host_key.pub 用于ssh协议1版本;其它两对密钥用于ssh协议2版本,默认采用rsa密钥。
2.基于安全考虑,SSH一般禁用密码登录,同时修改SSH监听端口。
[root@m01 ssh]# cat -n sshd_config | egrep "Port|Password"
    13	Port 52113
    64	#PasswordAuthentication yes
    65	#PermitEmptyPasswords no
    66	PasswordAuthentication no
    90	# PasswordAuthentication.  Depending on your PAM configuration,
    94	# PAM authentication, then enable this but set PasswordAuthentication
    107	#GatewayPorts no
3.修改配置文件后,要使用reload重新加载,不要restart重启服务。
[root@m01 ssh]# /etc/init.d/sshd reload
Reloading sshd:                                            [  OK  ]
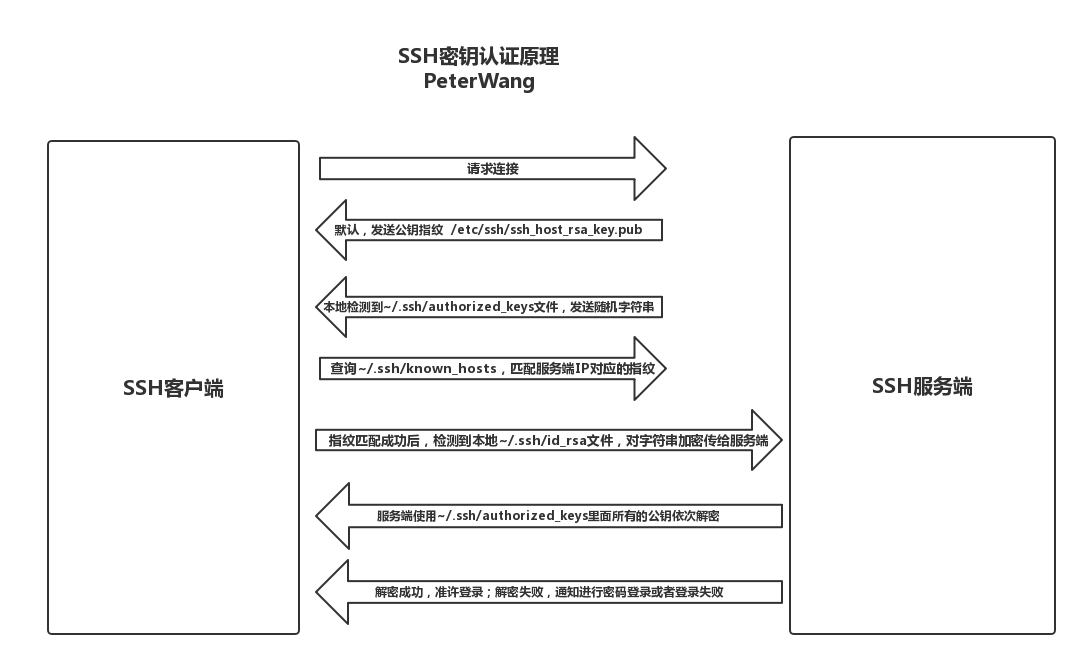
SSH密钥认证原理

几点说明:
1.客户端传输公钥需要进行ssh密码认证,所以应在密钥传输成功后再禁止密码登录和修改端口。
2.密钥创建的命令
[oldgirl@web01 ~]$ ssh-keygen
Generating public/private rsa key pair.
Enter file in which to save the key (/home/oldgirl/.ssh/id_rsa):
Enter passphrase (empty for no passphrase):   // 私钥密码不要加,见下文
Enter same passphrase again:
Your identification has been saved in /home/oldgirl/.ssh/id_rsa.
Your public key has been saved in /home/oldgirl/.ssh/id_rsa.pub.
The key fingerprint is:
93:ba:3e:8c:1c:70:28:d9:c1:5c:cc:28:f0:23:3e:33 oldgirl@web01
[oldgirl@web01 ~]$ ssh-copy-id -i .ssh/id_rsa.pub oldgirl@172.16.1.61
oldgirl@172.16.1.61's password:
Now try logging into the machine, with "ssh 'oldgirl@172.16.1.61'", and check in:

  .ssh/authorized_keys

to make sure we haven't added extra keys that you weren't expecting.
[oldgirl@web01 ~]$ ls .ssh/
authorized_keys  id_rsa  id_rsa.pub  known_hosts
3.创建密钥时,不要创建私钥密码,因为批量执行命令不能有交互。如果创建了私钥密码,则执行远程登录或远程执行时,就需要输入私钥密码。使用密钥认证一是为了防止密码泄露,二是为了方便,三是为了批量管理。
[oldgirl@web01 ~]$ ssh oldgirl@172.16.1.61
Enter passphrase for key '/home/oldgirl/.ssh/id_rsa':
Last login: Tue Aug 22 01:12:55 2017 from web01
SSH批量管理
1.SSH的三个功能
- 远程登录 ssh [-p port] user@host
- 远程传输 scp 、rsync的ssh通道模式等
- 远程执行 ssh [-p port] user@host [“command”]
2.实现原理
当我们配置好密钥认证之后,ssh的远程执行就不需要交互输入密码了,从而我们就可以将一组ssh远程执行命令写入脚本,以脚本的形式实现批量管理。ssh的远程管理和saltstack不同,前者本质上还是挨个管理,后者才是真正的批量管理。
3.脚本案例
[oldgirl@m01 shell_code]$ cat view_ip.sh
#!/bin/bash
if [ $# -ne 1 ];then       //首先判断参数的个数是否为1
   /bin/echo "USAGE:/bin/sh $0 ARG1"
   exit 1
fi
for n in 8 31 41           // for循环代替重复命令
do
/bin/echo ========172.16.1.$n=====
/usr/bin/ssh oldgirl@172.16.1.$n "$1"
done
几点说明:
1.为了脚本的通用性,我们将命令做为参数$1传入脚本,命令统一加上双引号,多条命令之间用分号隔开。同时为了避免环境变量和别名的影响,命令统一使用绝对路径。
[oldgirl@m01 shell_code]$ sh view_ip.sh "/sbin/ifconfig eth0 ; /bin/ps -ef"
2.批量管理中,为了避免代码重复,我们使用for循环来多次执行命令,for n in 后面接上待管理的主机IP,如果有变化只需修改这里的ip即可。
SSH批量分发
1.实现原理
批量分发本质上是批量执行rsync命令,将待分发的文件同步到指定的目录。但由于某些目录普通用户没有权限写入,所以对于远端用户我们需要用sudo进行提权。所以,我们将待分发的文件先传输到远端用户的家目录,然后再由远端用户sudo执行rsync命令将家目录的文件同步至最终目录。
2.脚本案例
[oldgirl@m01 shell_code]$ cat fenfa.sh
#!/bin/bash
if [ $# -ne 2 ];then
   /bin/echo "USAGE:/bin/sh $0 [file] [dir]"
   exit 1
fi
. /etc/init.d/functions
for n in 8 31 41
do
/bin/cp ~/$1 ~/$1_$(date "+%F_%T").bak >/dev/null 2>&1 &&
/usr/bin/scp ~/$1 oldgirl@172.16.1.$n:~ >/dev/null 2>&1 &&
/usr/bin/ssh -t oldgirl@172.16.1.$n "/usr/bin/sudo /usr/bin/rsync ~/$1 $2 ">/dev/null 2>&1
if [ $? -eq 0 ];then
   action "fenfa hosts 172.16.1.$n" /bin/true
else
   action "fenfa hosts 172.16.1.$n" /bin/false
fi
done

[oldgirl@m01 shell_code]$ sh fenfa.sh hosts /tmp
fenfa hosts 172.16.1.8                                     [  OK  ]
fenfa hosts 172.16.1.31                                    [  OK  ]
fenfa hosts 172.16.1.41                                    [  OK  ]
几点说明:
1.传入的两个参数分别是家目录中的文件名和最终目录的绝对路径
2.分发文件之前首先进行备份,目的是为了回滚方便。当然如果有文件版本控制系统比如git,那么这里可以省略。
3.从脚本中可以发现,SSH批量分发管理核心是远程执行和FOR循环。