版权声明:本文为博主原创文章,未经博主允许不得转载。
开发平台:Ubuntu 11.04
编译器:gcc version 4.5.2 (Ubuntu/Linaro 4.5.2-8ubuntu4)
内核源码:Linux-2.6.38.8.tar.bz2
1、如何分配struct net_device结构体以及私有数据
下面将通过实例来讲解Linux内核是如何通过alloc_netdev_mqs函数分配struct net_device结构体以及私有数据的(因为理解了这一点,就能完全理解netdev_priv函数的实现)。
首先,编写一个模块,代码如下:
- /* tanglinux.c */
- #include <linux/module.h>
- #include <linux/types.h>
- #include <linux/miscdevice.h>
- #include <linux/fs.h>
- #include <linux/netdevice.h>
- #include <linux/etherdevice.h>
- #include <linux/kernel.h>
- #include <linux/ioctl.h>
- #define TANGLINUX _IO('T', 1)
- struct net_local {
- int count;
- char ch;
- };
- static int tanglinux_open(struct inode *inode, struct file *file)
- {
- return nonseekable_open(inode, file);
- }
- static long tanglinux_ioctl(struct file *file, unsigned int cmd, unsigned long arg)
- {
- struct net_device *dev;
- size_t alloc_size;
- size_t sizeof_priv = sizeof(struct net_local);
- struct net_device *p;
- switch (cmd) {
- case TANGLINUX:
- alloc_size = sizeof(struct net_device);
- printk("first: alloc_size = %d ", alloc_size);
- alloc_size += 1; //为验证ALIGN的作用,人为制造net_device结构体的大小不是32位对齐
- if (sizeof_priv) {
- /* ensure 32-byte alignment of private area */
- alloc_size = ALIGN(alloc_size, NETDEV_ALIGN); //#define NETDEV_ALIGN 32
- printk("second: alloc_size = %d ", alloc_size);
- alloc_size += sizeof_priv;
- printk("third: alloc_size = %d ", alloc_size);
- }
- /* ensure 32-byte alignment of whole construct */
- alloc_size += NETDEV_ALIGN - 1;
- printk("fourth: alloc_size = %d ", alloc_size);
- p = kzalloc(alloc_size, GFP_KERNEL);
- if (!p) {
- printk(KERN_ERR "alloc_netdev: Unable to allocate device. ");
- return -ENOMEM;
- }
- printk("p = %p ", p);
- dev = PTR_ALIGN(p, NETDEV_ALIGN);
- printk("dev = %p ", dev);
- dev->padded = (char *)dev - (char *)p;
- printk("dev->padded = %d ", dev->padded);
- kfree(p);
- return 0;
- default:
- return -ENOTTY;
- }
- }
- static int tanglinux_release(struct inode *inode, struct file *file)
- {
- return 0;
- }
- static const struct file_operations tanglinux_fops = {
- .owner = THIS_MODULE,
- .unlocked_ioctl = tanglinux_ioctl,
- .open = tanglinux_open,
- .release = tanglinux_release,
- };
- static struct miscdevice tanglinux_miscdev = {
- .minor = WATCHDOG_MINOR,
- .name = "tanglinux",
- .fops = &tanglinux_fops,
- };
- static int __init tanglinux_init(void)
- {
- printk("tanglinux driver ");
- return misc_register(&tanglinux_miscdev);
- }
- static void __exit tanglinux_exit(void)
- {
- misc_deregister(&tanglinux_miscdev);
- }
- module_init(tanglinux_init);
- module_exit(tanglinux_exit);
- MODULE_LICENSE("GPL");
然后,编译并加载此模块:
- //获得Ubuntu 11.04正在运行的内核版本
- $ cat /proc/version
- Linux version 2.6.38-13-generic (buildd@roseapple) (gcc version 4.5.2 (Ubuntu/Linaro 4.5.2-8ubuntu4) ) #53-Ubuntu SMP Mon Nov 28 19:23:39 UTC 2011
- //根据上面获得的信息,在Makefile中指定Ubuntu 11.04的内核源码目录为/usr/src/linux-headers-2.6.38-13-generic/
- # Makefile
- KERN_DIR = /usr/src/linux-headers-2.6.38-13-generic/
- all:
- make -C $(KERN_DIR) M=`pwd` modules
- clean:
- make -C $(KERN_DIR) M=`pwd` modules clean
- obj-m += tanglinux.o
- //编译,并把编译好的模块tanglinux.ko加载到内核中
- $ make
- $ sudo insmod tanglinux.ko
最后,通过测试程序获得相关信息:
- /* test.c */
- #include <sys/types.h>
- #include <sys/stat.h>
- #include <stdio.h>
- #include <fcntl.h>
- #include <unistd.h>
- #include <sys/ioctl.h>
- #define TANGLINUX _IO('T', 1)
- int main(void)
- {
- int fd;
- fd = open("/dev/tanglinux", O_RDWR);
- if (fd < 0)
- {
- printf("can't open /dev/tanglinux ");
- return -1;
- }
- ioctl(fd, TANGLINUX);
- return 0;
- }
- //编译、执行测试程序,然后通过dmesg命令获得模块输出的信息
- $ make test
- $ sudo ./test
- $ dmesg | tail -7
- [19853.353282] first: alloc_size = 1088
- [19853.353296] second: alloc_size = 1120
- [19853.353306] third: alloc_size = 1128
- [19853.353316] fourth: alloc_size = 1159
- [19853.353348] p = cddf6000
- [19853.353358] dev = cddf6000
- [19853.353369] dev->padded = 0
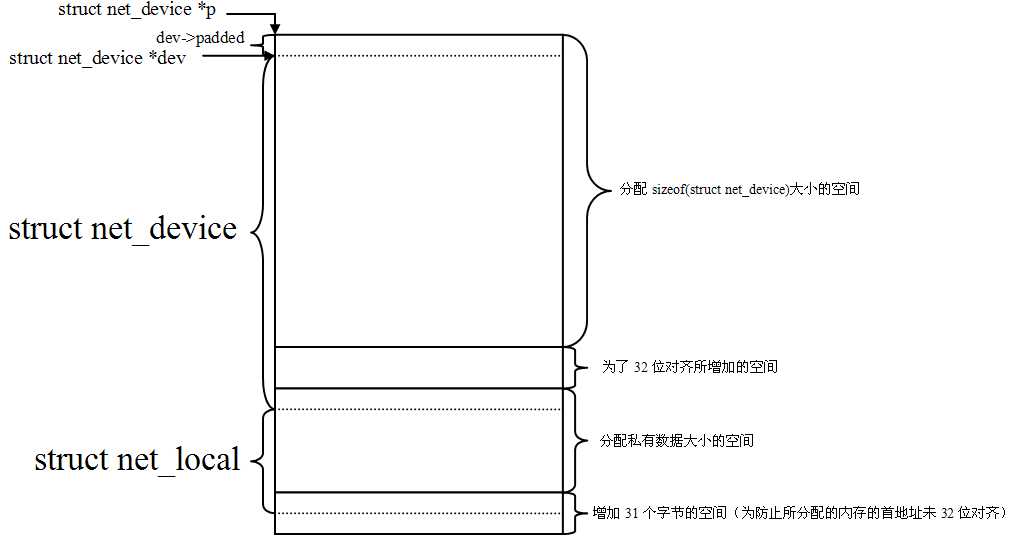
根据Ubuntu 11.04(基于X86硬件平台)中的配置,struct net_device结构体的大小为1088字节,刚好32位对齐,为了验证对齐函数ALIGN的作用,在例子中故意把struct net_device结构体的大小增加了1,所以第二次输出的alloc_size大小为1120个字节,也就是在1089个字节的基础上为了对齐增加了31个字节。
PTR_ALIGN函数的作用是为了使struct net_device *dev最终得到的内存地址也是32位对齐的。
上面所讨论的问题都可以通过下面的图示体现出来:
2、如何通过netdev_priv访问到其私有数据
netdev_priv函数的源代码如下:
- static inline void *netdev_priv(const struct net_device *dev)
- {
- return (char *)dev + ALIGN(sizeof(struct net_device), NETDEV_ALIGN);
- }
即通过struct net_device *dev首地址加对齐后的偏移量就得到了私有数据的首地址,如上图。