0.目录
1.多态
2.C++对象模型
- 2.1 使用C语言实现封装
3.继承对象模型
4.多态对象模型
- 4.1 使用C语言实现多态
5.小结
1.多态
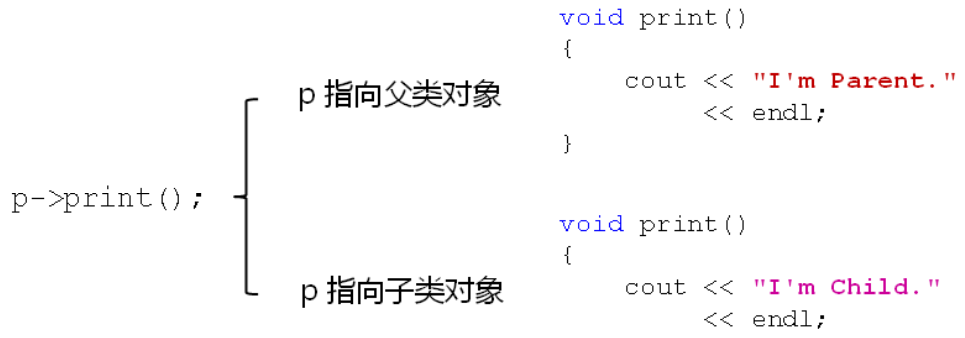
面向对象中期望的行为:
- 根据实际的对象类型判断如何调用重写函数
- 父类指针(引用)指向
- 父类对象则调用父类中定义的函数
- 子类对象则调用子类中定义的重写函数
面向对象中的多态的概念:
- 根据实际的对象类型决定函数调用的具体目标
- 同样的调用语句在实际运行时有多种不同的表现形态
C++语言直接支持多态的概念:
- 通过使用virtual关键字对多态进行支持
- 被virtual声明的函数被重写后具有多态特性
- 被virtual声明的函数叫做虚函数
示例——使用virtual实现多态:
#include <iostream>

using namespace std;

class Parent
{
public:
    virtual void print()
    {
        cout << "I'm Parent." << endl;
    }
};

class Child : public Parent
{
public:
    void print()
    {
        cout << "I'm Child." << endl;
    }
};

void how_to_print(Parent* p)
{
    p->print();     // 展现多态的行为
}

int main()
{
    Parent p;
    Child c;

    how_to_print(&p);    // Expected to print: I'm Parent.
    how_to_print(&c);    // Expected to print: I'm Child.

    return 0;
}
运行结果为:
[root@bogon Desktop]# g++ test.cpp
[root@bogon Desktop]# ./a.out
I'm Parent.
I'm Child.
多态的意义:
- 在程序运行过程中展现出动态的特性
- 函数重写必须实现多态,否则没有意义
- 多态是面向对象组件化程序设计的基础特性
理论中的概念:
- 静态联编——在程序的编译期间就能确定具体的函数调用(如:函数重载)
- 动态联编——在程序实际运行后才能确定具体的函数调用(如:函数重写)
示例——静态联编与动态联编:
#include <iostream>

using namespace std;

class Parent
{
public:
    virtual void func()
    {
        cout << "void func()" << endl;
    }

    virtual void func(int i)
    {
        cout << "void func(int i) : " << i << endl;
    }

    virtual void func(int i, int j)
    {
        cout << "void func(int i, int j) : " << "(" << i << ", " << j << ")" << endl;
    }
};

class Child : public Parent
{
public:
    void func(int i, int j)
    {
        cout << "void func(int i, int j) : " << i + j << endl;
    }

    void func(int i, int j, int k)
    {
        cout << "void func(int i, int j, int k) : " << i + j + k << endl;
    }
};

void run(Parent* p)
{
    p->func(1, 2);     // 展现多态的特性(动态联编)
}

int main()
{
    Parent p;

    p.func();         // 静态联编
    p.func(1);        // 静态联编
    p.func(1, 2);     // 静态联编

    cout << endl;

    Child c;

    c.func(1, 2);     // 静态联编

    cout << endl;

    run(&p);
    run(&c);

    return 0;
}
运行结果为:
[root@bogon Desktop]# g++ test.cpp
[root@bogon Desktop]# ./a.out
void func()
void func(int i) : 1
void func(int i, int j) : (1, 2)

void func(int i, int j) : 3

void func(int i, int j) : (1, 2)
void func(int i, int j) : 3
2.C++对象模型
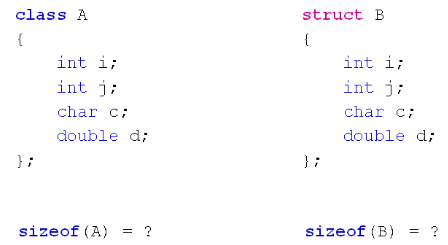
回顾本质——class是一种特殊的struct:
- 在内存中class依旧可以看作变量的集合
- class与struct遵循相同的内存对齐规则
- class中的成员函数与成员变量是分开存放的
- 每个对象有独立的成员变量
- 所有对象共享类中的成员函数
值得思考的问题:
示例——对象的内存排布与运行时访问权限:
#include <iostream>

using namespace std;

class A
{
    int i;
    int j;
    char c;
    double d;
public:
    void print()
    {
        cout << "i = " << i << ", "
             << "j = " << j << ", "
             << "c = " << c << ", "
             << "d = " << d << endl;
    }
};

struct B
{
    int i;
    int j;
    char c;
    double d;
};

int main()
{
    A a;

    cout << "sizeof(A) = " << sizeof(A) << endl;
    cout << "sizeof(a) = " << sizeof(a) << endl;
    cout << "sizeof(B) = " << sizeof(B) << endl;


    a.print();

    B* p = reinterpret_cast<B*>(&a);

    p->i = 1;
    p->j = 2;
    p->c = 'c';
    p->d = 3;

    a.print();

    p->i = 100;
    p->j = 200;
    p->c = 'b';
    p->d = 3.14;

    a.print();

    return 0;
}
运行结果为:
[root@bogon Desktop]# g++ test.cpp
[root@bogon Desktop]# ./a.out
sizeof(A) = 24
sizeof(a) = 24
sizeof(B) = 24
i = 0, j = 0, c = �, d = 6.95303e-310
i = 1, j = 2, c = c, d = 3
i = 100, j = 200, c = b, d = 3.14
运行时的对象退化为结构体的形式:
- 所有成员变量在内存中依次排布
- 成员变量间可能存在内存空隙
- 可以通过内存地址直接访问成员变量
- 访问权限关键字在运行时失效
C++对象模型分析:
- 类中的成员函数位于代码段中
- 调用成员函数时对象地址作为参数隐式传递
- 成员函数通过对象地址访问成员变量
- C++语法规则隐藏了对象地址的传递过程
示例——对象调用成员函数:
#include <iostream>

using namespace std;

class Demo
{
    int mi;
    int mj;
public:
    Demo(int i, int j)
    {
        mi = i;
        mj = j;
    }

    int getI() { return mi; }

    int getJ() { return mj; }

    int add(int value)
    {
        return mi + mj + value;
    }
};

int main()
{
    Demo d(1, 2);

    cout << "sizeof(d) = " << sizeof(d) << endl;
    cout << "d.getI() = " << d.getI() << endl;
    cout << "d.getJ() = " << d.getJ() << endl;
    cout << "d.add(3) = " << d.add(3) << endl;

    return 0;
}
运行结果为:
[root@bogon Desktop]# g++ test.cpp
[root@bogon Desktop]# ./a.out
sizeof(d) = 8
d.getI() = 1
d.getJ() = 2
d.add(3) = 6
2.1 使用C语言实现封装
使用C语言实现对象调用成员函数的过程:
// test.h
#ifndef _TEST_H_
#define _TEST_H_

typedef void Demo;

Demo* Demo_Create(int i, int j);
int Demo_GetI(Demo* pThis);
int Demo_GetJ(Demo* pThis);
int Demo_Add(Demo* pThis, int value);
void Demo_Free(Demo* pThis);

#endif
// test.c
#include "test.h"
#include "malloc.h"

struct ClassDemo
{
    int mi;
    int mj;
};

Demo* Demo_Create(int i, int j)
{
    struct ClassDemo* ret = (struct ClassDemo*)malloc(sizeof(struct ClassDemo));

    if( ret != NULL )
    {
        ret->mi = i;
        ret->mj = j;
    }

    return ret;
}

int Demo_GetI(Demo* pThis)
{
     struct ClassDemo* obj = (struct ClassDemo*)pThis;

     return obj->mi;
}

int Demo_GetJ(Demo* pThis)
{
    struct ClassDemo* obj = (struct ClassDemo*)pThis;

    return obj->mj;
}

int Demo_Add(Demo* pThis, int value)
{
    struct ClassDemo* obj = (struct ClassDemo*)pThis;

    return obj->mi + obj->mj + value;
}

void Demo_Free(Demo* pThis)
{
    free(pThis);
}
// main.c
#include <stdio.h>
#include "test.h"

int main()
{
    Demo* d = Demo_Create(1, 2);             // Demo* d = new Demo(1, 2);

    printf("d.mi = %d
", Demo_GetI(d));     // d->getI();
    printf("d.mj = %d
", Demo_GetJ(d));     // d->getJ();
    printf("Add(3) = %d
", Demo_Add(d, 3)); // d->add(3);

    // d->mi = 100; // d->mi is private

    Demo_Free(d);

    return 0;
}
运行结果为:
[root@bogon Desktop]# gcc main.c test.c
[root@bogon Desktop]# ./a.out
d.mi = 1
d.mj = 2
Add(3) = 6
面向对象不是C++的专属,依然可以用C语言写面向对象。
3.继承对象模型
- 在C++编译器的内部类可以理解为结构体
- 子类是由父类成员叠加子类新成员得到的

示例——证明class Derived与struct Test的内存排布一样:
#include <iostream>

using namespace std;

class Demo
{
protected:
    int mi;
    int mj;
};

class Derived : public Demo
{
    int mk;
public:
    Derived(int i, int j, int k)
    {
        mi = i;
        mj = j;
        mk = k;
    }

    void print()
    {
        cout << "mi = " << mi << ", "
             << "mj = " << mj << ", "
             << "mk = " << mk << endl;
    }
};

struct Test
{
    int mi;
    int mj;
    int mk;
};

int main()
{
    cout << "sizeof(Demo) = " << sizeof(Demo) << endl;
    cout << "sizeof(Derived) = " << sizeof(Derived) << endl;

    Derived d(1, 2, 3);
    Test* p = reinterpret_cast<Test*>(&d);

    cout << "Before changing ..." << endl;

    d.print();

    p->mi = 10;
    p->mj = 20;
    p->mk = 30;

    cout << "After changing ..." << endl;

    d.print();

    return 0;
}
运行结果为:
[root@bogon Desktop]# g++ test.cpp
[root@bogon Desktop]# ./a.out
sizeof(Demo) = 8
sizeof(Derived) = 12
Before changing ...
mi = 1, mj = 2, mk = 3
After changing ...
mi = 10, mj = 20, mk = 30
4.多态对象模型
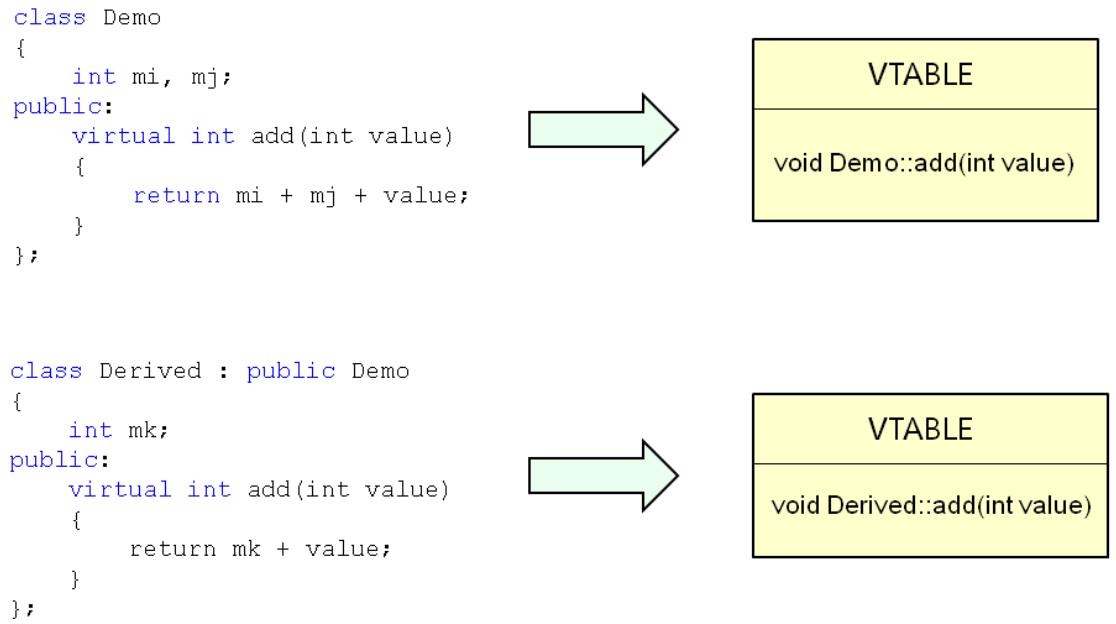
C++多态的实现原理:
- 当类中声明虚函数时,编译器会在类中生成一个虚函数表
- 虚函数表是一个存储成员函数地址的数据结构
- 虚函数表是由编译器自动生成与维护的
- virtual成员函数会被编译器放入虚函数表中
- 存在虚函数时,每个对象中都有一个指向虚函数表的指针

示例——证明存在指向虚函数表的指针:
#include <iostream>

using namespace std;

class Demo
{
protected:
    int mi;
    int mj;
public:
    virtual void print()
    {
        cout << "mi = " << mi << ", "
             << "mj = " << mj << endl;
    }
};

class Derived : public Demo
{
    int mk;
public:
    Derived(int i, int j, int k)
    {
        mi = i;
        mj = j;
        mk = k;
    }

    void print()
    {
        cout << "mi = " << mi << ", "
             << "mj = " << mj << ", "
             << "mk = " << mk << endl;
    }
};

struct Test
{
    void* p;
    int mi;
    int mj;
    int mk;
};

int main()
{
    cout << "sizeof(Demo) = " << sizeof(Demo) << endl;
    cout << "sizeof(Derived) = " << sizeof(Derived) << endl;

    Derived d(1, 2, 3);
    Test* p = reinterpret_cast<Test*>(&d);

    cout << "Before changing ..." << endl;

    d.print();

    p->mi = 10;
    p->mj = 20;
    p->mk = 30;

    cout << "After changing ..." << endl;

    d.print();

    return 0;
}
运行结果为:
[root@bogon Desktop]# g++ test.cpp
[root@bogon Desktop]# ./a.out
sizeof(Demo) = 16
sizeof(Derived) = 24
Before changing ...
mi = 1, mj = 2, mk = 3
After changing ...
mi = 10, mj = 20, mk = 30
4.1 使用C语言实现多态
使用C语言实现多态:
// test.h
#ifndef _TEST_H_
#define _TEST_H_

typedef void Demo;
typedef void Derived;

Demo* Demo_Create(int i, int j);
int Demo_GetI(Demo* pThis);
int Demo_GetJ(Demo* pThis);
int Demo_Add(Demo* pThis, int value);
void Demo_Free(Demo* pThis);

Derived* Derived_Create(int i, int j, int k);
int Derived_GetK(Derived* pThis);
int Derived_Add(Derived* pThis, int value);

#endif
// test.c
#include "test.h"
#include "malloc.h"

static int Demo_Virtual_Add(Demo* pThis, int value);
static int Derived_Virtual_Add(Demo* pThis, int value);

struct VTable     // 2. 定义虚函数表数据结构
{
    int (*pAdd)(void*, int);   // 3. 虚函数表里面存储什么???
};

struct ClassDemo
{
    struct VTable* vptr;     // 1. 定义虚函数表指针  ==》 虚函数表指针类型???
    int mi;
    int mj;
};

struct ClassDerived
{
    struct ClassDemo d;
    int mk;
};

static struct VTable g_Demo_vtbl =
{
    Demo_Virtual_Add
};

static struct VTable g_Derived_vtbl =
{
    Derived_Virtual_Add
};

Demo* Demo_Create(int i, int j)
{
    struct ClassDemo* ret = (struct ClassDemo*)malloc(sizeof(struct ClassDemo));

    if( ret != NULL )
    {
        ret->vptr = &g_Demo_vtbl;   // 4. 关联对象和虚函数表
        ret->mi = i;
        ret->mj = j;
    }

    return ret;
}

int Demo_GetI(Demo* pThis)
{
     struct ClassDemo* obj = (struct ClassDemo*)pThis;

     return obj->mi;
}

int Demo_GetJ(Demo* pThis)
{
    struct ClassDemo* obj = (struct ClassDemo*)pThis;

    return obj->mj;
}

// 6. 定义虚函数表中指针所指向的具体函数
static int Demo_Virtual_Add(Demo* pThis, int value)
{
    struct ClassDemo* obj = (struct ClassDemo*)pThis;

    return obj->mi + obj->mj + value;
}


// 5. 分析具体的虚函数!!!!
int Demo_Add(Demo* pThis, int value)
{

    struct ClassDemo* obj = (struct ClassDemo*)pThis;

    return obj->vptr->pAdd(pThis, value);
}

void Demo_Free(Demo* pThis)
{
    free(pThis);
}

Derived* Derived_Create(int i, int j, int k)
{
    struct ClassDerived* ret = (struct ClassDerived*)malloc(sizeof(struct ClassDerived));

    if( ret != NULL )
    {
        ret->d.vptr = &g_Derived_vtbl;
        ret->d.mi = i;
        ret->d.mj = j;
        ret->mk = k;
    }

    return ret;
}

int Derived_GetK(Derived* pThis)
{
    struct ClassDerived* obj = (struct ClassDerived*)pThis;

    return obj->mk;
}

static int Derived_Virtual_Add(Demo* pThis, int value)
{
    struct ClassDerived* obj = (struct ClassDerived*)pThis;

    return obj->mk + value;
}

int Derived_Add(Derived* pThis, int value)
{
    struct ClassDerived* obj = (struct ClassDerived*)pThis;

    return obj->d.vptr->pAdd(pThis, value);
}
// main.c
#include "stdio.h"
#include "test.h"

void run(Demo* p, int v)
{
    int r = Demo_Add(p, v);

    printf("r = %d
", r);
}

int main()
{
    Demo* pb = Demo_Create(1, 2);
    Derived* pd = Derived_Create(1, 22, 333);

    printf("pb->add(3) = %d
", Demo_Add(pb, 3));
    printf("pd->add(3) = %d
", Derived_Add(pd, 3));

    run(pb, 3);
    run(pd, 3);

    Demo_Free(pb);
    Demo_Free(pd);

    return 0;
}
运行结果为:
[root@bogon Desktop]# gcc main.c test.c
[root@bogon Desktop]# ./a.out
pb->add(3) = 6
pd->add(3) = 336
r = 6
r = 336
补充说明:
面向对象程序最关键的地方在于必须能够表现三大特性:封装,继承,多态!
封装指的是类中的敏感数据在外界是不能访问的;继承指的是可以对已经存在的类进行代码复用,并使得类之间存在父子关系;多态指的是相同的调用语句可以产生不同的调用结果。
因此,如果希望用 C 语言完成面向对象的程序,那么肯定的,必须实现这三个特性;否则,最多只算得上基于对象的程序( 程序中能够看到对象的影子,但是不完全具备面向对象的 3 大特性)。
代码中通过 void* 指针保证具体的结构体成员是不能在外界被访问的,以此模拟 C++ 中 private 和 protected。因此,在头文件中定义了如下的语句:
typedef void Demo;
typedef void Derived;
Demo 和 Derived 的本质依旧是 void,所以,用 Demo* 指针和 Derived* 指针指向具体的对象时,无法访问对象中的成员变量,这样就达到了“外界无法访问类中私有成员” 的封装效果!
继承的本质是父类成员与子类成员的叠加,所以在用 C 语言写面向对象程序的时候,可以直接考虑结构体成员的叠加即可。代码中的实现直接将 struct ClassDemo d 作为 struct ClassDerived 的第一个成员,以此表现两个自定义数据类型间的继承关系。因为 struct ClassDerived 变量的实际内存分布就是由 struct ClassDemo 的成员以及 struct ClassDerived 中新定义的成员组成的,这样就直接实现了继承的本质,所以说 struct ClassDerived 继承自 struct ClassDemo。
下一步要实现的就是多态了!多态在 C++ 中的实现本质是通过虚函数表完成的,而虚函数表是编译器自主产生和维护的数据结构。因此,接下来要解决的问题就是如何在 C 语言中自定义虚函数表?上述代码中认为通过结构体变量模拟 C++ 中的虚函数表是比较理想的一种选择,所以有了下面的代码:
struct VTable
{
    int (*pAdd)(void*, int);
};
有了类型后就可以定义实际的虚函数表了,在 C 语言中用具有文件作用域的全局变量表示实际的虚函数表是最合适的,因此有了下面的代码:
// 父类对象使用的虚函数表
static struct VTable g_Demo_vtbl =
{
    Demo_Virtual_Add
};

// 子类对象使用的虚函数表
static struct VTable g_Derived_vtbl =
{
    Derived_Virtual_Add
};
每个对象中都拥有一个指向虚函数表的指针,而所有父类对象都指向 g_Demo_vtbl,所以所有子类对象都指向 g_Derived_vtbl。当一切就绪后,实际调用虚函数的过程就是通过虚函数表中的对应指针来完成的。
5.小结
- 函数重写只可能发生在父类与子类之间
- 根据实际对象的类型确定调用的具体函数
- virtual关键字是C++中支持多态的唯一方式
- 被重写的虚函数可表现出多态的特性
- C++中的类对象在内存布局上与结构体相同
- 成员变量和成员函数在内存中分开存放
- 访问权限关键字在运行时失效
- 调用成员函数时对象地址作为参数隐式传递
- 继承的本质就是父子间成员变量的叠加
- C++中的多态是通过虚函数表实现的
- 虚函数表是由编译器自动生成与维护的
- 虚函数的调用效率低于普通成员函数