0.目录
1.老生常谈的两个宏(Linux)
- 1.1 offsetof
- 1.2 container_of
2.Linux内核链表剖析
3.小结
1.老生常谈的两个宏(Linux)
Linux 内核中常用的两个宏定义:
1.1 offsetof
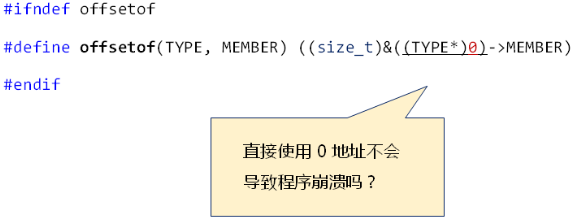
见招拆招——第一式:编译器做了什么?
- offsetof 用于计算 TYPE 结构体中 MEMBER 成员的偏移位置。
- 编译器清楚的知道结构体成员变量的偏移位置
- 通过结构体变量首地址与偏移量定位成员变量

示例——offsetof:
#include <stdio.h>

#ifndef offsetof
#define offsetof(TYPE, MEMBER) ((size_t)&((TYPE*)0)->MEMBER)
#endif

struct ST
{
    int i;   //  0
    int j;   //  4
    char c;  //  8
};

void func(struct ST* pst)
{
    int* pi = &(pst->i);   //  (unsigned int)pst + 0
    int* pj = &(pst->j);   //  (unsigned int)pst + 4
    char* pc = &(pst->c);  //  (unsigned int)pst + 8

    printf("pst = %p
", pst);
    printf("pi = %p
", pi);
    printf("pj = %p
", pj);
    printf("pc = %p
", pc);
}

int main()
{
    struct ST s = {0};

    func(&s);
    func(NULL);

    printf("offset i: %d
", offsetof(struct ST, i));
    printf("offset j: %d
", offsetof(struct ST, j));
    printf("offset c: %d
", offsetof(struct ST, c));

    return 0;
}
运行结果为:
pst = 0000008D8575FA60
pi = 0000008D8575FA60
pj = 0000008D8575FA64
pc = 0000008D8575FA68
pst = 0000000000000000
pi = 0000000000000000
pj = 0000000000000004
pc = 0000000000000008
offset i: 0
offset j: 4
offset c: 8
1.2 container_of
见招拆招——第二式:( { } )是何方神圣?
- ( { } ) 是 GNU C 编译器的语法扩展
- ( { } ) 与逗号表达式类似,结果为最后一个语句的值

示例——( { } ):
#include <stdio.h>

void method_1()
{
    int a = 0;
    int b = 0;

    int r = (
           a = 1,
           b = 2,
           a + b
                );

    printf("r = %d
", r);
}

void method_2()
{
    int r = ( {
                  int a = 1;
                  int b = 2;

                  a + b;
              } );

    printf("r = %d
", r);
}

int main()
{
    method_1();
    method_2();

    return 0;
}
运行结果为:
r = 3
r = 3
见招拆招——第三式:typeof是一个关键字吗?
- typeof 是 GNU C 编译器的特有关键字
- typeof 只在编译器生效,用于得到变量的类型

示例——typeof:
#include <stdio.h>

void type_of()
{
    int i = 100;
    typeof(i) j = i;
    const typeof(j)* p = &j;

    printf("sizeof(j) = %d
", sizeof(j));
    printf("j = %d
", j);
    printf("*p = %d
", *p);
}

int main()
{
    type_of();

    return 0;
}
运行结果为:
sizeof(j) = 4
j = 100
*p = 100
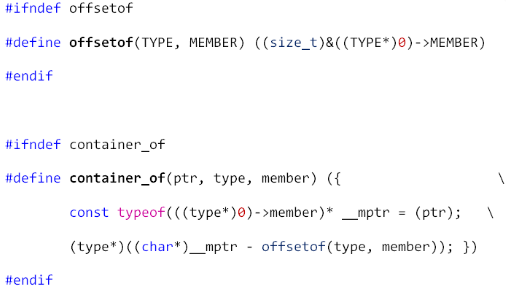
见招拆招——第四式:最后的原理

示例——container_of:
#include <stdio.h>

#ifndef offsetof
#define offsetof(TYPE, MEMBER) ((size_t)&((TYPE*)0)->MEMBER)
#endif

#ifndef container_of
#define container_of(ptr, type, member) ({
        const typeof(((type*)0)->member)* __mptr = (ptr);
        (type*)((char*)__mptr - offsetof(type, member)); })
#endif

#ifndef container_of_new
#define container_of_new(ptr, type, member) ((type*)((char*)(ptr) - offsetof(type, member)))
#endif

struct ST
{
    int i;   //  0
    int j;   //  4
    char c;  //  8
};

int main()
{
    struct ST s = {0};
    char* pc = &s.c;

    struct ST* pst = container_of(pc, struct ST, c);
    struct ST* pst_new = container_of_new(pc, struct ST, c);

    printf("&s = %p
", &s);
    printf("pst = %p
", pst);
    printf("pst_new = %p
", pst_new);

    return 0;
}
运行结果为:
&s = 0061FF14
pst = 0061FF14
pst_new = 0061FF14
(container_of与container_of_new的区别在于container_of在宏中加入了类型检查,如果传入的不是一个结构体,编译的时候就会发生一个警告!)
2.Linux内核链表剖析
本节目标:
- 移植 Linux 内核链表,使其适用于非 GNU 编译器
- 分析 Linux 内核中链表的基本实现
Linux内核链表的位置及依赖:
- 位置
{linux-2.6.39}\indudelinuxlist.h
- 依赖
#include <linux/types.h>#include <linux/stddef.h>#include <linux/poison.h>#include <linux/prefetch.h>
移植时的注意事项:
- 清除文件间的依赖
- 剥离依赖文件中与链表实现相关的代码
- 清除平台相关代码( GNU C )
( { } )typeof__builtin_prefetchstatic inline
移植后的 Linux.h(代码过长,请下载后查看):Linux.h(4KB)
Linux内核链表的实现:
- 带头节点的双向循环链表,且头节点为表中成员
- 头结点的 next 指针指向首结点
- 头节点的 prev 指针指向尾结点

Linux内核链表的结点定义:

使用 struct list_head 自定义链表结点:

Linux内核链表的创建及初始化:
Linux内核链表的插入操作:
- 在链表头部插入:list_add(new, head)
- 在链表尾部插入:list_add_tail(new, head)
next->prev = new;
new->next = next;
new->prev = prev;
prev->next = new;
Linux内核链表的删除操作:

Linux内核链表的遍历:
- 正向遍历:list_for_each(pos, head)
- 逆向遍历:list_for_each_prev(pos, head)

示例1——使用Linux内核链表测试插入删除:
#include <stdio.h>
#include "LinuxList.h"
void list_demo_1()
{
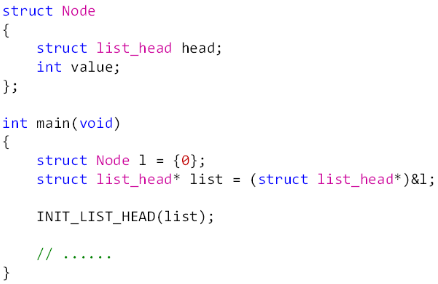
struct Node
{
struct list_head head;
int value;
};
struct Node l = {0};
struct list_head* list = (struct list_head*)&l;
struct list_head* slider = NULL;
int i = 0;
INIT_LIST_HEAD(list);
printf("Insert begin ...
");
for(i=0; i<5; i++)
{
struct Node* n = (struct Node*)malloc(sizeof(struct Node));
n->value = i;
list_add_tail((struct list_head*)n, list);
}
list_for_each(slider, list)
{
printf("%d
", ((struct Node*)slider)->value);
}
printf("Insert end ...
");
printf("Delete begin ...
");
list_for_each(slider, list)
{
if( ((struct Node*)slider)->value == 3 )
{
list_del(slider);
free(slider);
break;
}
}
list_for_each(slider, list)
{
printf("%d
", ((struct Node*)slider)->value);
}
printf("Delete end ...
");
}
int main()
{
list_demo_1();
return 0;
}
运行结果为:
Insert begin ...
0
1
2
3
4
Insert end ...
Delete begin ...
0
1
2
4
Delete end ...
示例2——改变Node结点的自定义顺序后的测试list_entry:
#include <stdio.h>
#include "LinuxList.h"

void list_demo_2()
{
    struct Node
    {
        int value;
        struct list_head head;
    };

    struct Node l = {0};
    struct list_head* list = &l.head;
    struct list_head* slider = NULL;
    int i = 0;

    INIT_LIST_HEAD(list);

    printf("Insert begin ...
");

    for(i=0; i<5; i++)
    {
        struct Node* n = (struct Node*)malloc(sizeof(struct Node));

        n->value = i;

        list_add(&n->head, list);
    }

    list_for_each(slider, list)
    {
        printf("%d
", list_entry(slider, struct Node, head)->value);
    }

    printf("Insert end ...
");


    printf("Delete begin ...
");

    list_for_each(slider, list)
    {
        struct Node* n = list_entry(slider, struct Node, head);

        if( n->value == 3 )
        {
            list_del(slider);
            free(n);
            break;
        }
    }

    list_for_each(slider, list)
    {
        printf("%d
", list_entry(slider, struct Node, head)->value);
    }

    printf("Delete end ...
");
}

int main()
{
    list_demo_2();

    return 0;
}
运行结果为:
Insert begin ...
4
3
2
1
0
Insert end ...
Delete begin ...
4
2
1
0
Delete end ...
3.小结
- 编译器清楚的知道结构体成员变量的偏移位置
- ( { } ) 与逗号表达式类似,结果为最后一个语句的值
- typeof 只在编译期生效,用于得到变量的类型
- container_of 使用 ( { } ) 进行类型安全检查
- Linux内核链表移植时需要剔除依赖以及平台相关代码
- Linux内核链表是带头节点的双向循环链表
- 使用Linux内核链表时需要自定义链表结点
- 将 struct list_head 作为结构体的第一个成员或最后一个成员
- struct list_head 作为最后一个成员时,需要使用 list_entry 宏
- list_entry 的定义中使用了 container_of 宏