rabbitmq消息队列
centos下yum安装RabbitMQ
1.安装前准备
    wget http://dl.fedoraproject.org/pub/epel/6/x86_64/epel-release-6-8.noarch.rpm
    rpm -ivh epel-release-6-8.noarch.rpm
    wget -P /etc/yum.repos.d/ http://repos.fedorapeople.org/repos/peter/erlang/epel-erlang.repo
    yum clean all
    yum -y install erlang


2.安装rabbitmq
    rpm --import http://www.rabbitmq.com/rabbitmq-signing-key-public.asc
    wget http://www.rabbitmq.com/releases/rabbitmq-server/v2.8.5/rabbitmq-server-2.8.5-1.noarch.rpm
    rpm -ivh rabbitmq-server-2.8.5-1.noarch.rpm


3.启动rabbitmq并设置开机启动
    chkconfig rabbitmq-server on
    /sbin/service rabbitmq-server start
    或者systemctl start rabbitmq-server start


4.检查rabbitmq是否启动
    ps aux|grep rabbitmq
    或者
    systemctl status rabbitmq-server
python的队列 queue
q=queue.Queue()
q.put()
q.qsize()
q.get()
先进先出
消息队列解决的问题:
- 解耦 天然的解耦
- 异步
优点:解决排队问题
缺点:不能保证任务及时执行
应用场景:飞机购票
同步:
优点:保证任务及时执行
缺点:排队问题
大并发
Web nginx 10000-20000
pv = page visit
一亿的pv用10台server 集群
pv分散到实际的用户上并不多
uv = user visit
队列的作用:
- 存储消息、数据
- 保证消息的顺序
- 保证数据的交付
引入rabbitmq的原因:
python只能在同一进程中起作用,不能跨进程
生产者消费者模型
解决了耦合性,生产者和消费者之间没有直接的联系
其中最重要的就是队列
RabbitMQ 配置
在python中安装pika,pip install pika,通过pika连接rabbitmq
远程连接rabbitmq server的话,需要配置权限
rabbitmq 创建用户和设置权限
- 首先在rabbitmq server上创建一个用户
rabbitmqctl add_user aaa 密码 - 同时还要配置权限,允许从外面访问
rabbitmqctl set_permissions -p / aaa "." "." ".*"
set_permissions [-p vhost] {user} {conf} {write} {read}

vhost
The name of the virtual host to which to grant the user access, defaulting to /. ,默认是 /

user
The name of the user to grant access to the specified virtual host.

conf
A regular expression matching resource names for which the user is granted configure permissions.

write
A regular expression matching resource names for which the user is granted write permissions.

read
A regular expression matching resource names for which the user is granted read permissions.
客户端连接的时候需要配置认证参数
credentials = pika.PlainCredentials('aaa', '密码')
connection = pika.BlockingConnection(pika.ConnectionParameters('10.211.55.5',5672,'/',credentials))
channel = connection.channel()
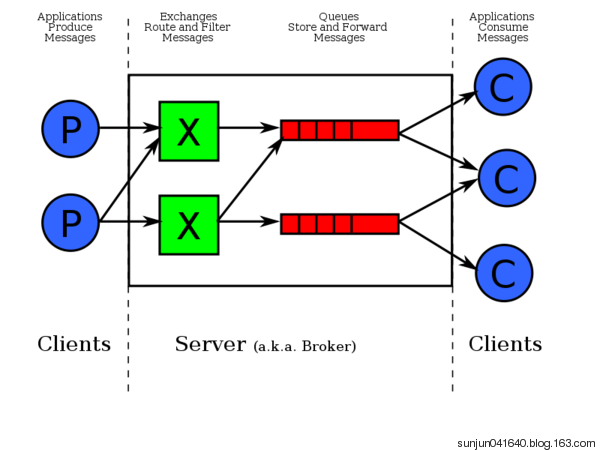
RabbitMQ 都能为程序提供队列
Exchange 负责消息过滤
RabbitMQ的默认端口是5672
rabbitmpctl list_queues 显示当前的队列列表
生产者:
端口 ip 认证信息
创建队列
向队列发送消息
消费者
端口 ip 认证信息
从指定的队列中取消息
1 rabbitmq的路由routing_key
发送消息:
routing_key = 'hello' 把消息队列转到和hello
获取消息:
callback
channel.start_consuming() # 阻塞模式
2 实现最简单的队列
生产者:
- routing_key 代表队列的名字
import pika

credentials = pika.PlainCredentials('aaa', '123')  # 配置认证的用户 密码
parameters = pika.ConnectionParameters(host="192.168.11.144", credentials=credentials)
connection = pika.BlockingConnection(parameters)  # 建立一个链接对象
channel = connection.channel()  # 队列连接通道

channel.queue_declare(queue='hello')  # 声明queue 用rabbitmqctl list_queuse 查看
channel.basic_publish(exchange='', routing_key='hello', body='server hello world')  # routing_key 代表要发送的队列 body是发送的内容
print('server send "hello world"')
connection.close()  # 关闭连接 类似socket
消费者:
- 消费者是一种阻塞模式,会一致取数据
import pika

credentials = pika.PlainCredentials('aaa', '123')  # 配置认证的用户 密码
parameters = pika.ConnectionParameters(host="192.168.11.144", credentials=credentials)
connection = pika.BlockingConnection(parameters)  # 建立一个链接对象
channel = connection.channel()  # 队列连接通道


def callback(ch, method, properties, body):
    print("Recived %r" % ch, method, properties, body)

channel.basic_consume(callback,  # 取到消息后,执行callback函数
                      queue='hello', # 从hello队列获取数据
                      no_ack=True
                      )
print("waiting for message")
channel.start_consuming()  # 进入阻塞模式
3 如何保证队列中的消息被处理完毕
没有处理完,应该返回队列,上面的代码中,如果消费者客户端挂了,或者在处理的过程中停止了,没有处理完毕,同时队列中也没有了。
3.1 消费者端:
- no_ack = True 消息处理后,不向rabbit-server确认消息已消费完毕
删除这个参数,rabbit-server的消息队列中会一致存在数据

解决rabbit-server中消息被消费后数据还存在的情况,用basic_ack(delivery_tag=method.delivery_tag)
通过这两个参数,同时保证了消费者能够消费完数据不挂,同时消费完后rabbit-server收到消费完的消息把被消费的数据删除
import pika
import time

credentials = pika.PlainCredentials('aaa', '123')  # 配置认证的用户 密码
parameters = pika.ConnectionParameters(host="192.168.11.144", credentials=credentials)
connection = pika.BlockingConnection(parameters)  # 建立一个链接对象
channel = connection.channel()  # 队列连接通道

def callback(ch, method, properties, body):
    time.sleep(10)
    print("Recived %r" % ch, method, properties, body)
    ch.basic_ack(delivery_tag=method.delivery_tag) # 这个是表示消费者处理完了


channel.basic_consume(callback,  # 取到消息后,执行callback函数
                      queue='hello',
                      # no_ack=True
                      )
print("waiting for message")
channel.start_consuming()  # 进入阻塞模式
3.2 rabbitmq-server 保持持久 durable=True
rabbitmq-server重启后,所有的消息就都丢失了
保持队列持久化 durable = True,在队列开始的时候声明,不能对已经生成的队列进行设置,重新对一个队列进行设置。
- 通过参数delivery_mode = 2 把消息变成持久化的
- 即便是rabbitmq服务重启后,也不会丢消息
import pika

credentials = pika.PlainCredentials('aaa', '123')  # 配置认证的用户 密码
parameters = pika.ConnectionParameters(host="192.168.11.144", credentials=credentials)
connection = pika.BlockingConnection(parameters)  # 建立一个链接对象
channel = connection.channel()  # 队列连接通道

channel.queue_declare(queue='hello222',durable=True)  # 声明queue 用rabbitmqctl list_queuse 查看
channel.basic_publish(exchange='',
                      routing_key='hello222',
                      body='server hello world',
                      properties=pika.BasicProperties(
                          delivery_mode=2,  # make message persistent
                      )
                      )  # routing_key 代表要发送的队列 body是发送的内容
print('server send "hello world"')
connection.close()  # 关闭连接 类似socket
4 多个消费者的时候(消费者的公平分发)

轮询获取队列中的数据,如果有一个消费者处理慢了,其他的消费者需要一直等着
解决方案,消费者先处理完,先获得数据
在消费者开始消费之前,加上perfetch_count=1
import pika
import time

credentials = pika.PlainCredentials('aaa', '123')  # 配置认证的用户 密码
parameters = pika.ConnectionParameters(host="192.168.11.144", credentials=credentials)
connection = pika.BlockingConnection(parameters)  # 建立一个链接对象
channel = connection.channel()  # 队列连接通道


def callback(ch, method, properties, body):
    time.sleep(10)
    print("Recived %r" % ch, method, properties, body)
    ch.basic_ack(delivery_tag=method.delivery_tag) # 这个是表示消费者处理完了

channel.basic_qos(prefetch_count=1) # 公平分发
channel.basic_consume(callback,  # 取到消息后,执行callback函数
                      queue='hello222',
                      # no_ack=True
                      )
print("waiting for message")
channel.start_consuming()  # 进入阻塞模式
5 消息发布订阅PublishSubscribe(消息发布订阅) rabbit广播 组播 消息过滤(exchange)
之前的消息发送都是一对一的发送和接收,如果想所有的都能接收到,类似广播的效果,用到了exchange
订阅必须绑定并在线
exchange在定义的时候是有类型的,以决定哪些queue符合条件,可以接收消息。
exchange 的消息类型:
fanout: 所有bind到此exchange的queue都可以接收消息
direct: 通过routingKey和exchange决定的那个唯一的queue可以接收消息
topic:所有符合routingKey(此时可以是一个表达式)的routingKey所bind的queue可以接收消息
- fanout 广播 所有的队列都绑定到exchange,需要声明一个名字 不需要routing_key
生产者和消费者端都要声明
生产者启动的时候,生产者没有启动的情况
自动生成队列 消费后删除
exclusive=True唯一的
rabbit 随机生成一个名字
广播:新浪微博 只有当前登录的才收到

广播发送端
运行的时候加参数 Python3 producer.py info
import pika
import sys


credentials = pika.PlainCredentials('aaa', '123')
parameters = pika.ConnectionParameters(host='192.168.43.20', credentials=credentials)
connection = pika.BlockingConnection(parameters)

channel = connection.channel() # 队列连接通道
channel.exchange_declare(exchange='logs',type='fanout') # exchange='log' 所有的队列 绑定到log 设置为广播模式

message = ' '.join(sys.argv[1:]) or "info:Hello World"
channel.basic_publish(
    exchange = 'logs', # 绑定到logs
    routing_key='',# 路由不用设置
    body = message
)
print("send %r"%message)
connection.close()
广播接收端
import pika

credentials = pika.PlainCredentials('aaa', '123')
parameters = pika.ConnectionParameters(host='192.168.43.20', credentials=credentials)
connection = pika.BlockingConnection(parameters)


channel = connection.channel()  # 队列连接通道
channel.exchange_declare(exchange='logs', type='fanout')  # exchange='log' 所有的队列 绑定到log 设置为广播模式

# 不指定queue名字,rabbit会随机分配一个名字,exclusive=True会在使用此queue的消费者断开后,自动将queue删除
queue_obj = channel.queue_declare(exclusive=True)
queue_name = queue_obj.method.queue
print('queuename',queue_name,queue_obj)
# 绑定到队列
channel.queue_bind(exchange='logs',queue=queue_name)
print("witing for logs")

def callback(ch,method,properties,body):
    print("%s"%body)
channel.basic_consume(callback,queue=queue_name,no_ack=True)

channel.start_consuming()
- direct 组播
发什么类型的,什么类型的接收,在接收端运行的时候加参数,指定接收的类型
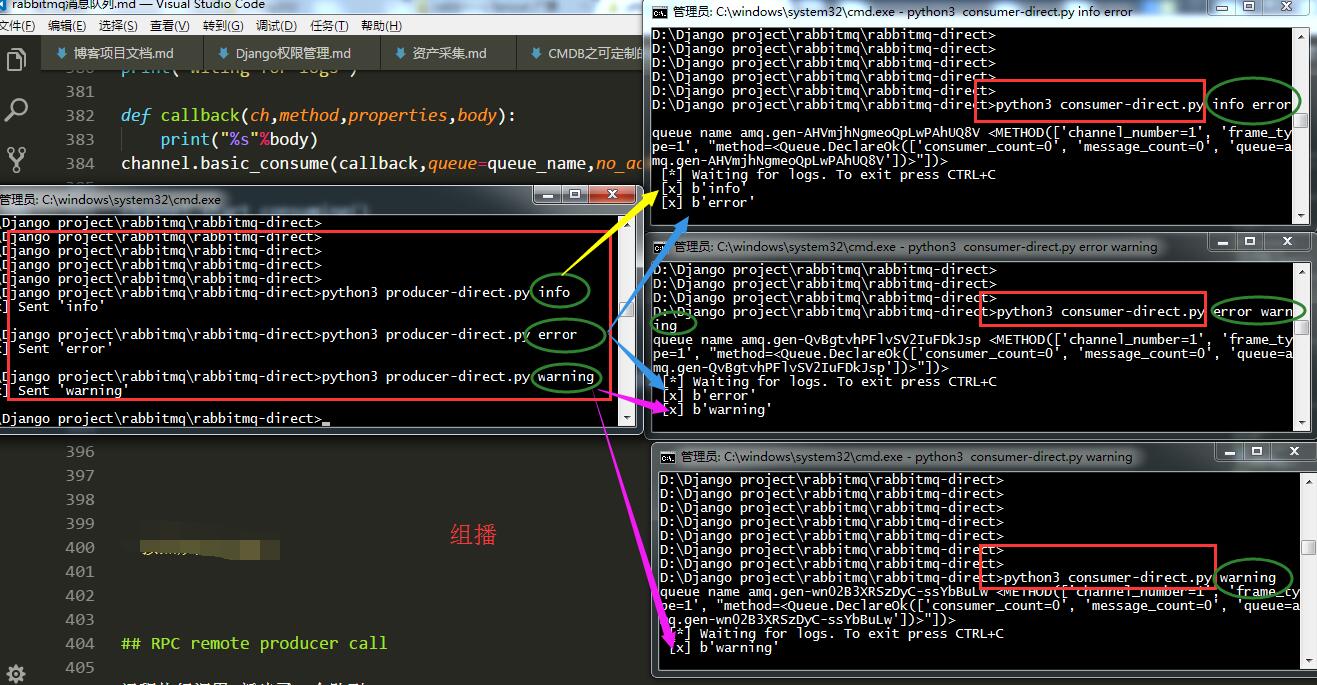
发送端
import pika
import sys


credentials = pika.PlainCredentials('aaa', '123')
parameters = pika.ConnectionParameters(host='192.168.43.20', credentials=credentials)
connection = pika.BlockingConnection(parameters)

# channel = connection.channel() # 队列连接通道
# channel.exchange_declare(exchange='direct_log',type='direct') # exchange='log' 所有的队列 绑定到log 设置为广播模式
#
# log_level = sys.argv[1] if len(sys.argv) > 1 else 'info'  # 默认是info
# message = ' '.join(sys.argv[1:]) or "info:Hello World"
# channel.basic_publish(
#     exchange = 'direct_log', # 绑定到logs
#     routing_key='log_level',
#     body = message
# )
# print("send %r"%message)
# connection.close()


channel = connection.channel() #队列连接通道

channel.exchange_declare(exchange='direct_log',type='direct')

log_level =  sys.argv[1] if len(sys.argv) > 1 else 'info'

message = ' '.join(sys.argv[1:]) or "info: Hello World!"

channel.basic_publish(exchange='direct_log',
                      routing_key=log_level,
                      body=message)
print(" [x] Sent %r" % message)
connection.close()
接收端
import pika
import sys

credentials = pika.PlainCredentials('aaa', '123')
parameters = pika.ConnectionParameters(host='192.168.43.20', credentials=credentials)
connection = pika.BlockingConnection(parameters)

channel = connection.channel()  # 队列连接通道
queue_obj = channel.queue_declare(
    exclusive=True)  # 不指定queue名字,rabbit会随机分配一个名字,exclusive=True会在使用此queue的消费者断开后,自动将queue删除
queue_name = queue_obj.method.queue
print('queue name', queue_name, queue_obj)

log_levels = sys.argv[1:]  # 参数是 info warning error
if not log_levels:
    sys.stderr.write("usage %s" % sys.argv[0])
    sys.exit(1)
for level in log_levels:
    channel.queue_bind(
        exchange='direct_log',
        queue=queue_name,
        routing_key=level
    )
print(' [*] Waiting for logs. To exit press CTRL+C')


def callback(ch, method, properties, body):
    print(" [x] %r" % body)


channel.basic_consume(callback, queue=queue_name, no_ack=True)
channel.start_consuming()
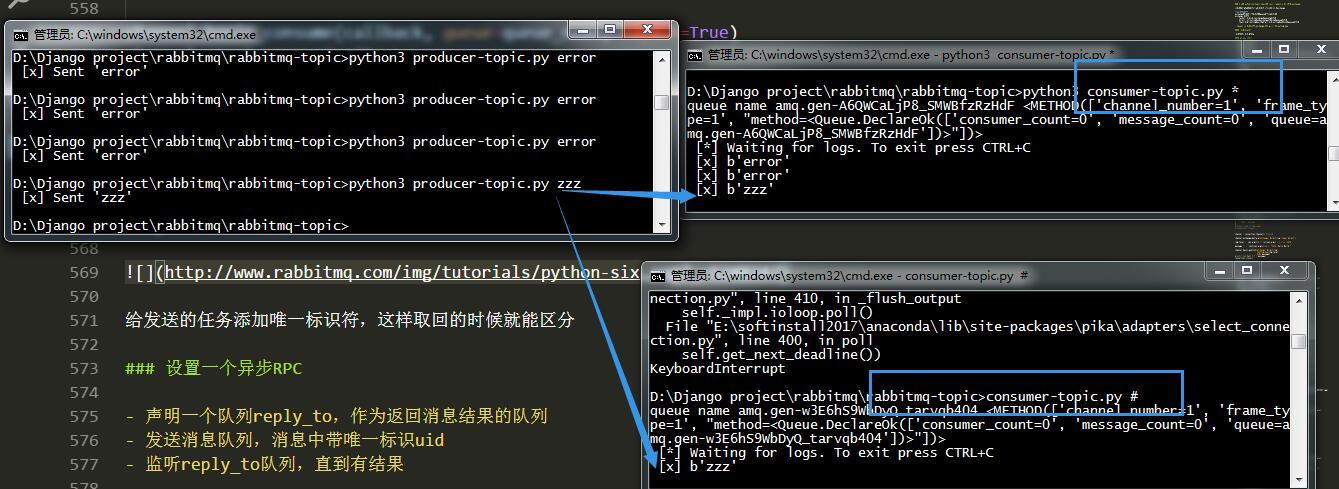
- 按照规则过滤播 topic 更细致
可以根据正则进行更精确的匹配
python topic_sonsumer.py *.info   # 接收以info结尾的数据
python topic_sonsumer.py *.error mysql.* # 接收以error结尾或者mysql开头的数据
python topic_sonsumer.py '#'  # 接收所有消息

# 接收所有的 logs run:
# python receive_logs_topic.py "#"

# To receive all logs from the facility "kern":
# python receive_logs_topic.py "kern.*"

# Or if you want to hear only about "critical" logs:
# python receive_logs_topic.py "*.critical"

# You can create multiple bindings:
# python receive_logs_topic.py "kern.*" "*.critical"

# And to emit a log with a routing key "kern.critical" type:
# python emit_log_topic.py "kern.critical" "A critical kernel error"

发送端
import pika
import sys


credentials = pika.PlainCredentials('aaa', '123')
parameters = pika.ConnectionParameters(host='192.168.11.144', credentials=credentials)
connection = pika.BlockingConnection(parameters)

channel = connection.channel() #队列连接通道

channel.exchange_declare(exchange='topic_log',type='topic') # 设置成topic模式

log_level =  sys.argv[1] if len(sys.argv) > 1 else 'info'

message = ' '.join(sys.argv[1:]) or "info: Hello World!"

channel.basic_publish(exchange='topic_log',
                      routing_key=log_level,
                      body=message)
print(" [x] Sent %r" % message)
connection.close()
接收端
import pika
import sys

credentials = pika.PlainCredentials('aaa', '123')
parameters = pika.ConnectionParameters(host='192.168.11.144', credentials=credentials)
connection = pika.BlockingConnection(parameters)

channel = connection.channel()  # 队列连接通道
queue_obj = channel.queue_declare(
    exclusive=True)  # 不指定queue名字,rabbit会随机分配一个名字,exclusive=True会在使用此queue的消费者断开后,自动将queue删除
queue_name = queue_obj.method.queue
print('queue name', queue_name, queue_obj)

log_levels = sys.argv[1:]  # 参数是 info warning error
if not log_levels:
    sys.stderr.write("usage %s" % sys.argv[0])
    sys.exit(1)
for level in log_levels:
    channel.queue_bind(
        exchange='topic_log',  # 从topic_log 队列中获取
        queue=queue_name,
        routing_key=level
    )
print(' [*] Waiting for logs. To exit press CTRL+C')


def callback(ch, method, properties, body):
    print(" [x] %r" % body)

channel.basic_consume(callback, queue=queue_name, no_ack=True)
channel.start_consuming()
RPC remote producer call
不知道你有没有发现,上面的流都是单向的,如果远程的机器执行完返回结果,就实现不了了。
如果返回,这种模式叫什么呢,RPC(远程过程调用),snmp就是典型的RPC
RabbitMQ能不能返回呢,怎么返回呢?既是发送端又是接收端。
但是接收端返回消息怎么返回?可以发送到发过来的queue里么?不可以。
返回时,再建立一个queue,把结果发送新的queue里
为了服务端返回的queue不写死,在客户端给服务端发指令的的时候,同时带一条消息说,你结果返回给哪个queue

task1,task2异步执行,但是返回的顺序是不固定的,为了区分是谁执行完的,在发送的任务添加唯一标识符,这样取回的时候就能区分
设置一个异步RPC
- 声明一个队列reply_to,作为返回消息结果的队列
- 发送消息队列,消息中带唯一标识uid
- 监听reply_to队列,直到有结果
在类中声明监听
发送端
import subprocess
import pika
import time

# 1 。 定义fib函数
# 2. 声明接收指令的队列名rpc_queue
# 3. 开始监听队列,收到消息后 调用fib函数
# 4 把fib执行结果,发送回客户端指定的reply_to 队列

credentials = pika.PlainCredentials('aaa', '123')
parameters = pika.ConnectionParameters(host='192.168.11.144', credentials=credentials)
connection = pika.BlockingConnection(parameters)

channel = connection.channel()  # 队列连接通道

channel.queue_declare(queue='rpc_queue2')


def fib(n):
    if n == 0:
        return 0
    elif n == 1:
        return 1
    else:
        return fib(n - 1) + fib(n - 2)


def run_cmd(cmd):
    cmd_obj = subprocess.Popen(cmd, shell=True, stdout=subprocess.PIPE, stderr=subprocess.PIPE)
    result = cmd_obj.stdout.read() + cmd_obj.stderr.read()

    return result


def on_request(ch, method, props, body):
    cmd = body.decode("utf-8")

    print(" [.] run (%s)" % cmd)
    response = run_cmd(cmd)

    ch.basic_publish(exchange='',
                     routing_key=props.reply_to,  # 队列
                     properties=pika.BasicProperties(correlation_id=
                                                         props.correlation_id),
                     body=response)

    ch.basic_ack(delivery_tag=method.delivery_tag)


channel.basic_consume(on_request, queue='rpc_queue2')

print(" [x] Awaiting RPC requests")
channel.start_consuming()
接收端
import queue
import pika
import uuid


# 1.声明一个队列,作为reply_to返回消息结果的队列
# 2.  发消息到队列,消息里带一个唯一标识符uid,reply_to
# 3.  监听reply_to 的队列,直到有结果

class CMDRpcClient(object):
    def __init__(self):
        credentials = pika.PlainCredentials('aaa', '123')
        parameters = pika.ConnectionParameters(host='192.168.11.144', credentials=credentials)
        self.connection = pika.BlockingConnection(parameters)
        self.channel = self.connection.channel()

        result = self.channel.queue_declare(exclusive=True)
        self.callback_queue = result.method.queue  # 命令的执行结果的queue

        # 声明要监听callback_queue
        self.channel.basic_consume(self.on_response, no_ack=True,
                                   queue=self.callback_queue)

    def on_response(self, ch, method, props, body):
        """
        收到服务器端命令结果后执行这个函数
        :param ch:
        :param method:
        :param props:
        :param body:
        :return:
        """
        if self.corr_id == props.correlation_id:
            self.response = body.decode("gbk")  # 把执行结果赋值给Response

    def call(self, n):
        self.response = None
        self.corr_id = str(uuid.uuid4())  # 唯一标识符号
        self.channel.basic_publish(exchange='',
                                   routing_key='rpc_queue2',
                                   properties=pika.BasicProperties(
                                       reply_to=self.callback_queue,
                                       correlation_id=self.corr_id,
                                   ),
                                   body=str(n))

        while self.response is None:
            self.connection.process_data_events()  # 检测监听的队列里有没有新消息,如果有,收,如果没有,返回None
            # 检测有没有要发送的新指令
        return self.response


cmd_rpc = CMDRpcClient()

print(" [x] Requesting fib(30)")
response = cmd_rpc.call('ipconfig')

print(response)
参考:
http://blog.csdn.net/fgf00/article/details/52872730
http://www.cnblogs.com/alex3714/articles/5248247.html