终于可以填上坑了。
简单回顾一下之前JS篇内容,每一次setTimeout的调用,会在一个对象中添加一个键值对,键为延迟时间,值为一个链表,将所有该时间对应的事件串起来,图如下: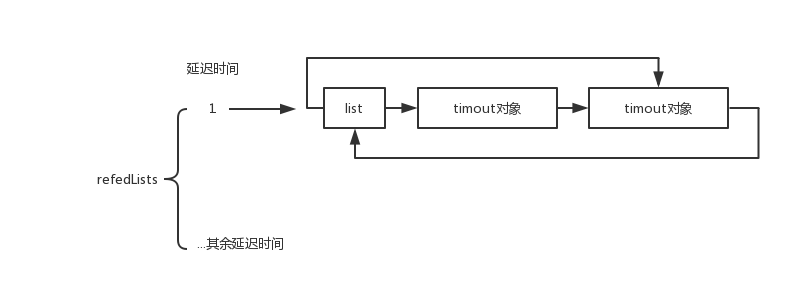
而每一个延迟键值对的触发,则是在链表头生成的时候就已经开始了,如下:
function TimersList(msecs, unrefed) {
  //...

  // 来源于C++内置模块
  const timer = this._timer = new TimerWrap();
  /// ...

  // 触发
  timer.start(msecs);
}
回顾完毕。
与JS篇一样,这一节也简单介绍libuv内部的一个数据结构:二叉树。源码来源于:uv/src/heap-inl.h。
因为二叉树的介绍网上一堆,所以这里只看一下API,首先是节点:
struct heap_node {
  struct heap_node* left;
  struct heap_node* right;
  struct heap_node* parent;
};
分别代表左右、父节点。
/* A binary min heap.  The usual properties hold: the root is the lowest
 * element in the set, the height of the tree is at most log2(nodes) and
 * it's always a complete binary tree.
 *
 * The heap function try hard to detect corrupted tree nodes at the cost
 * of a minor reduction in performance.  Compile with -DNDEBUG to disable.
 */
struct heap {
  struct heap_node* min;
  unsigned int nelts;
};
这里的注释可以看一下,这个结构体是独立的,min指向当前树的最小值。
另外还有三个操作方法:
HEAP_EXPORT(void heap_insert(struct heap* heap,
                             struct heap_node* newnode,
                             heap_compare_fn less_than));
HEAP_EXPORT(void heap_remove(struct heap* heap,
                             struct heap_node* node,
                             heap_compare_fn less_than));
HEAP_EXPORT(void heap_dequeue(struct heap* heap, heap_compare_fn less_than));
分别代表树的插入、移除,以及将小于指定值的节点移除并重新整理树,实现自己去看,懒得讲。
进入正题,从JS的触发代码开始看。
废话不多说,直接进入timer_wrapper.cc看start方法,源码如下:
static void Start(const FunctionCallbackInfo<Value>& args) {
  // 不管这3行
  TimerWrap* wrap;
  ASSIGN_OR_RETURN_UNWRAP(&wrap, args.Holder());

  CHECK(HandleWrap::IsAlive(wrap));
  // 这个args就是JS函数参数的包装 可以理解成数组
  int64_t timeout = args[0]->IntegerValue();
  // libuv的方法 第三个参数代表延迟时间
  int err = uv_timer_start(&wrap->handle_, OnTimeout, timeout, 0);
  // 设置该函数返回值
  args.GetReturnValue().Set(err);
}
可以看到,这里涉及到了libuv,继续深入,看该方法:
/*
    handle => 时间模块对象
    cb => 延迟回调函数
    timeout => 延迟时间
    repeat => 区分interval/setTimeout
*/
int uv_timer_start(uv_timer_t* handle,
    uv_timer_cb cb,
    uint64_t timeout,
    uint64_t repeat) {
    uint64_t clamped_timeout;

    if (cb == NULL)
        return UV_EINVAL;

    if (uv__is_active(handle))
        uv_timer_stop(handle);
    // 当前时间戳加上延迟的时间 也就是回调函数触发的时间戳
    clamped_timeout = handle->loop->time + timeout;
    if (clamped_timeout < timeout)
        clamped_timeout = (uint64_t)-1;

    // 对象赋值
    handle->timer_cb = cb;
    handle->timeout = clamped_timeout;
    handle->repeat = repeat;
    /* start_id is the second index to be compared in uv__timer_cmp() */
    handle->start_id = handle->loop->timer_counter++;
    // 注意这里,用了insert方法将对应的handle对象插入到了树中
    heap_insert(timer_heap(handle->loop),
        (struct heap_node*) &handle->heap_node,
        timer_less_than);
    uv__handle_start(handle);

    return 0;
}
简单说明一下,首先第一个参数可以直接当成个空对象,在一开始是啥都没有的。
然后是clamped_timeout,在上一节中讲过,libuv内部获取的是一个相对时间,所以这里用当前轮询的时间点加上延迟时间,得到的就是理论上的触发时间点。
而timer_cb就很好理解了,对应的是回调函数。
repeat这个值,如果是setInterval,那么值为interval的间隔时间,setTimeout就是0,表示是否循环触发。
最后将这几个值都挂载到handle上面,通过insert方法插入这一节一开始讲的树上。
至此,一个setTimeout方法所完成的操作已经讲完了。
显然我又错了,这个start并没有触发什么东西,最终只是把一个对象加到一个树结构上,那么又是在哪里触发的延迟调用呢?
答案就在uv_run中,因为偷懒,所以之前没有贴完整代码,在每一轮的事件轮询中,有两个首要操作,如下:
int uv_run(uv_loop_t *loop, uv_run_mode mode) {
    // ...略

    while (r != 0 && loop->stop_flag == 0) {
        // 上一节的更新时间
        uv_update_time(loop);
        // 这一节的内容
        uv__run_timers(loop);

        // ...
    }
}
第一个就是上一节讲的更新时间,第二个就涉及到延迟触发了,进入源码看一下:
void uv__run_timers(uv_loop_t* loop) {
    struct heap_node* heap_node;
    uv_timer_t* handle;

    // 死循环 保证触发所有应该触发的延迟事件
    for (;;) {
        // 该方法返回延迟事件树中最小的时间点
        heap_node = heap_min(timer_heap(loop));
        // 代表没有延迟事件
        if (heap_node == NULL)
            break;
        // 取出handle
        handle = container_of(heap_node, uv_timer_t, heap_node);
        // 比较handle的时间点与当前的时间点
        if (handle->timeout > loop->time)
            break;
        // 移除当前的handle
        uv_timer_stop(handle);
        // 如果是interval 需要重新插入一个新的handle到树中
        uv_timer_again(handle);
        // 触发延迟事件
        handle->timer_cb(handle);
    }
}
这里就把上面的树与事件轮询链接起来了,每一次轮询,首先触发的就是延迟事件,触发的方式就是去树里面找,有没有比当前时间点小的handle,取出一个,删除并触发。
下面用一个图来总结一下:

完结撒花!