前言
	NS_CLASS_AVAILABLE_IOS(2_0) @interface UILabel : UIView <NSCoding>
	@available(iOS 2.0, *) 	 public class UILabel : UIView, NSCoding
- 实际上 label 就是一个可以显示文字的视图控件。
1、Label 的创建
-
Objective-C
// 实例化 label 对象 UILabel *label = [[UILabel alloc] initWithFrame:CGRectMake(10, 40, 100, 25)]; // 将 label 加到 window 上显示出来 [self.view addSubview:label]; -
Swift
	// 实例化 label 对象
	let label:UILabel = UILabel(frame: CGRectMake(10, 40, 100, 25))

	// 将 label 加到 window 上显示出来
	self.view.addSubview(label)
2、Label 的设置
-
Objective-C
// 背景颜色 label.backgroundColor = [UIColor redColor]; // label 文字 label.text = @"LabelLabelLabelLabelLabelLabelLabelLabelLabelLabel"; // label 变属性文字 label.attributedText = mutableAttributedString; // 设置字体 // 系统样式 label.font = [UIFont systemFontOfSize:30]; // 加粗 label.font = [UIFont boldSystemFontOfSize:30]; // 倾斜 label.font = [UIFont italicSystemFontOfSize:30]; // 设置为指定字体类型的文字 label.font = [UIFont fontWithName:@"Zapfino" size:15]; // 获取系统字体库中的所有字体名称 NSArray *fontNameArray = [UIFont familyNames]; // 文字颜色 label.textColor = [UIColor blackColor]; // 文字对齐方式 label.textAlignment = NSTextAlignmentCenter; // 文字阴影 /* shadowColor:阴影颜色,shadowOffset:阴影偏移量 */ label.shadowColor = [UIColor greenColor]; label.shadowOffset = CGSizeMake(5, 5); // 文字换行方式 /* // 以单词为单位换行(最后一行显示不完以单词截断剩下的内容不显示也不会省略(没有...)) NSLineBreakByWordWrapping = 0, // Wrap at word boundaries, default // 以字符为单位换行(最后一行显示不完以字符截断剩下的内容不显示也不会省略(没有...)) NSLineBreakByCharWrapping, // Wrap at character boundaries // 以单词为单位换行(最后一行显示不完以字符截断剩下的内容不显示也不会省略(没有...)) NSLineBreakByClipping, // Simply clip // 以单词换行,最后一行以字符截断,最后一行显示不完则省略最后一行的开头,以”...”显示 NSLineBreakByTruncatingHead, // Truncate at head of line: "...wxyz" // 以单词换行,最后一行以字符截断,最后一行显示不完则省略最后一行的中间,以”...”显示 NSLineBreakByTruncatingTail, // Truncate at tail of line: "abcd..." // 以单词换行,最后一行以字符截断,最后一行显示不完则省略最后一行的最后,以”...”显示 NSLineBreakByTruncatingMiddle // Truncate middle of line: "ab...yz" */ label.lineBreakMode = NSLineBreakByWordWrapping; // 文字行数 /* 设置文字行数,0: 默认,行数不限 */ label.numberOfLines = 0; // 文字自动调整 label.adjustsFontSizeToFitWidth = YES; // 文字自适应 frame /* frame 自适配文字,宽度不变,必须要在添加了显示文字之后设置 */ [label sizeToFit]; // 设置 label 每一行文字的最大宽度 /* 在自动计算 label 高度时,为了保证计算出来的数值 跟 真正显示出来的效果 一致,若自动换行必须设置 */ label.preferredMaxLayoutWidth = [UIScreen mainScreen].bounds.size.width - 20; -
Swift
	// 背景颜色
	label.backgroundColor = UIColor.redColor()

	// label 文字
	label.text = "LabelLabelLabelLabelLabelLabelLabelLabelLabelLabel"

	// label 变属性文字
	label.attributedText = mutableAttributedString

	// 设置字体

		// 系统样式
		label.font = UIFont.systemFontOfSize(30)

		// 设置字体  加粗
		label.font = UIFont.boldSystemFontOfSize(30)

		// 设置字体  倾斜
		label.font = UIFont.italicSystemFontOfSize(30)

		// 设置为指定字体类型的文字
		label.font = UIFont(name: "Zapfino", size: 15)

	// 获取系统字体库中的所有字体名称
	let fontNameArray:NSArray = UIFont.familyNames()

	// 文字颜色
	label.textColor = UIColor.blackColor()

	// 文字对齐方式
	label.textAlignment = NSTextAlignment.Center

	// 文字阴影
	/*
		shadowColor:阴影颜色,shadowOffset:阴影偏移量
	*/
	label.shadowColor = UIColor.greenColor()
	label.shadowOffset = CGSizeMake(5, 5)

	// 文字换行方式
	/*
		// 以单词为单位换行(最后一行显示不完以单词截断剩下的内容不显示也不会省略(没有...))
		case ByWordWrapping

		// 以字符为单位换行(最后一行显示不完以字符截断剩下的内容不显示也不会省略(没有...))
		case ByCharWrapping

		// 以单词为单位换行(最后一行显示不完以字符截断剩下的内容不显示也不会省略(没有...))
		case ByClipping

		// 以单词换行,最后一行以字符截断,最后一行显示不完则省略最后一行的开头,以”...”显示
		case ByTruncatingHead

		// 以单词换行,最后一行以字符截断,最后一行显示不完则省略最后一行的中间,以”...”显示
		case ByTruncatingTail

		// 以单词换行,最后一行以字符截断,最后一行显示不完则省略最后一行的最后,以”...”显示
		case ByTruncatingMiddle
	*/
	label.lineBreakMode = .ByWordWrapping

	// 文字行数
	/*
		设置文字行数,0: 默认,行数不限
	*/
	label.numberOfLines = 0

	// 文字自动调整
	label.adjustsFontSizeToFitWidth = true

	// 文字自适应 frame
	/*
		frame 自适配文字,宽度不变,必须要在添加了显示文字之后设置
	*/
	label.sizeToFit()

	// 设置 label 每一行文字的最大宽度
	/*
		在自动计算 label 高度时,为了保证计算出来的数值 跟 真正显示出来的效果 一致,若自动换行必须设置
	*/
	label.preferredMaxLayoutWidth = UIScreen.mainScreen().bounds.size.width - 20
3、可变属性 Label 的创建
-
Objective-C
UILabel *label = [[UILabel alloc] initWithFrame:CGRectMake(10, 50, 100, 30)]; label.backgroundColor = [UIColor grayColor]; [self.view addSubview:label]; NSString *str1 = @"NSMutable"; NSString *str2 = @"Attributed"; NSString *str3 = @"String"; // 设置 range 的大小 NSRange range1 = NSMakeRange(0, str1.length); NSRange range2 = NSMakeRange(str1.length, str2.length); NSRange range3 = NSMakeRange(str1.length + str2.length, str3.length); // 实例化可变属性的字符串对象 NSMutableAttributedString *str = [[NSMutableAttributedString alloc] initWithString:[NSString stringWithFormat:@"%@%@%@", str1, str2, str3]]; // 设置文字的颜色和文字的大小 [str addAttributes:@{NSForegroundColorAttributeName:[UIColor blueColor], NSFontAttributeName:[UIFont boldSystemFontOfSize:15]} range:range1]; [str addAttributes:@{NSForegroundColorAttributeName:[UIColor brownColor], NSFontAttributeName:[UIFont systemFontOfSize:40]} range:range2]; [str addAttributes:@{NSForegroundColorAttributeName:[UIColor greenColor], NSFontAttributeName:[UIFont italicSystemFontOfSize:25]} range:range3]; // 向 label 中添加文字 label.attributedText = str; // frame 自适配文字,必须放在最后边,否则会不显示任何内容 [label sizeToFit]; -
Swift
	let label:UILabel = UILabel(frame: CGRectMake(10, 50, 100, 30))
	label.backgroundColor = UIColor.grayColor()
	self.view.addSubview(label)

	let str1:NSString = "NSMutable"
	let str2:NSString = "Attributed"
	let str3:NSString = "String"

	// 设置 range 的大小
	let range1:NSRange = NSMakeRange(0, str1.length)
	let range2:NSRange = NSMakeRange(str1.length, str2.length)
	let range3:NSRange = NSMakeRange(str1.length + str2.length, str3.length)

	// 实例化可变属性的字符串对象
	let str:NSMutableAttributedString = NSMutableAttributedString(string:
											               String(format: "%@%@%@", str1, str2, str3))

	// 设置文字的颜色和文字的大小
	str.addAttributes([NSForegroundColorAttributeName:UIColor.blueColor(),
						   		  NSFontAttributeName:UIFont.boldSystemFontOfSize(15)],
				range: range1)
	str.addAttributes([NSForegroundColorAttributeName:UIColor.brownColor(),
						   		  NSFontAttributeName:UIFont.systemFontOfSize(40)],
				range: range2)
	str.addAttributes([NSForegroundColorAttributeName:UIColor.greenColor(),
						   		  NSFontAttributeName:UIFont.italicSystemFontOfSize(25)],
				range: range3)

	// 向 label 中添加文字
	label.attributedText = str

	// frame 自适配文字,必须放在最后边,否则会不显示任何内容
	label.sizeToFit()
4、Storyboard 中设置
-
在 Storyboard 场景中设置
-
Label 设置
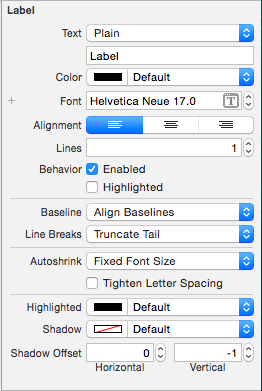
Text | 文字类型和显示的文字--------------------------------|---------------------
Color | 文字颜色
Font | 文字字体
Alignment | 文字对齐方式
Lines | 行数
Behavior |
-- Enable |
-- Highlighted |
|
Baseline |
Line Breaks | 断行方式
|
Autoshrink |
-- Tighten Letter Spacing |
|
Highlighted | 高亮颜色
Shadow | 阴影颜色
Shadow Offset | 阴影偏移量
-
5、HUD
-
其他说法:指示器、遮盖、蒙板
-
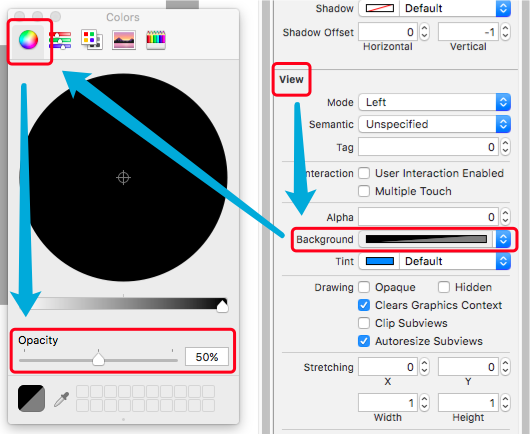
UILabel 半透明 HUD 的做法:
-
背景色设置为半透明颜色,文字颜色透明度不变。
-
1> Storyboard 中设置背景半透明颜色
-
2> 纯代码中设置背景半透明颜色
-
Objective-C
	// 设置背景颜色为半透明
	self.labelHUD.backgroundColor = [[UIColor blackColor] colorWithAlphaComponent:0.5];
-
-
-
-
显示 HUD
-
Objective-C
	// 设置显示的提示文字
	self.labelHUD.text = @"数据加载完毕";

	// 显示 HUD
	self.labelHUD.alpha = 1.0;
-
-
隐藏 HUD
-
Objective-C
-
直接隐藏
// 隐藏 HUD self.labelHUD.alpha = 0.0; -
逐渐隐藏
	// 在 1 秒中内隐藏
	[UIView animateWithDuration:1 animations:^{

		self.labelHUD.alpha = 0.0;
	}];
-
-
6、数字动态变化
-
具体实现代码见 GitHub 源码 QExtension
-
具体讲解见 iOS - Label 数字动态变化
-
效果

7、跑马灯
7.1 简单实现
-
Objective-C
UIView *backView = [[UIView alloc] initWithFrame:CGRectMake(10, 30, [[UIScreen mainScreen] bounds].size.width - 20, 50)]; backView.backgroundColor = [UIColor grayColor]; [self.view addSubview:backView]; UILabel *label = [[UILabel alloc] initWithFrame:CGRectMake(0, 10, 120, 30)]; label.backgroundColor = [UIColor yellowColor]; label.textColor = [UIColor greenColor]; label.text = @"Label Marquee"; [backView addSubview:label]; // 子视图的范围不允许超过父视图的范围 backView.clipsToBounds = YES; // 开始动画播放 // 设置 label 的起始位置 CGRect frame = label.frame; frame.origin.x = backView.frame.size.width; label.frame = frame; // 开始简单动画 [UIView beginAnimations:nil context:nil]; // 设置动画时间(开始播放动画) [UIView setAnimationDuration:5]; // 匀速 [UIView setAnimationCurve:UIViewAnimationCurveLinear]; // 无限重复 [UIView setAnimationRepeatCount:CGFLOAT_MAX]; // 设置 label 的结束位置 frame.origin.x = -frame.size.width; label.frame = frame; // 结束动画 [UIView commitAnimations]; // 一次播放动画结束 -
Swift
	let backView:UIView = UIView(frame: CGRectMake(10, 30, UIScreen.mainScreen().bounds.size.width - 20, 50))
	backView.backgroundColor = UIColor.grayColor()
	self.view.addSubview(backView)

	let label:UILabel = UILabel(frame: CGRectMake(0, 10, 120, 30))
	label.textColor = UIColor.greenColor()
	label.text = "Label Marquee"
	backView.addSubview(label)

  	// 子视图的范围不允许超过父视图的范围
	backView.clipsToBounds = true

	// 开始动画播放

		// 设置 label 的起始位置
		var frame:CGRect = label.frame
		frame.origin.x = backView.frame.size.width
		label.frame = frame

		// 开始简单动画
		UIView.beginAnimations(nil, context: nil)

		// 设置动画时间(开始播放动画)
		UIView.setAnimationDuration(5)

		// 匀速
		UIView.setAnimationCurve(UIViewAnimationCurve.Linear)

		// 无限重复
		UIView.setAnimationRepeatCount(9999999)

		// 设置 label 的结束位置
		frame.origin.x = -frame.size.width
		label.frame = frame

		// 结束动画
		UIView.commitAnimations()

	// 一次播放动画结束
7.2 跑马灯实现封装
-
具体实现代码见 GitHub 源码 QExtension
-
具体讲解见 iOS - 跑马灯、弹幕
-
效果


8、弹幕
-
具体实现代码见 GitHub 源码 QExtension
-
具体讲解见 iOS - 跑马灯、弹幕
-
效果