一、概述
本文主要记录的在使用Keras过程中,实现交通标志分类。
文本主要使用的环境为:
Python3.5.2
Tensorflow 1.7
Keras 2.1.4
win10
所有程序均亲测可以通过。文中将使用Keras对图像进行分类处理,处理过程包括了
1.图像的预处理
2.神经网络的训练,得到训练后的模型
3.使用训练后的模型,对图像进行预测。
二、图像预处理
本文获取的交通标志图片,是从德国一家交通标志数据集的站点 上获取图像,因为从网站上获取的图像是PPM格式的,所以使用Opencv将图像从PPM转换为png。具体实现代码如下:
import cv2
import os
# 训练集路径
ORIGINAL_TRAIN_PATH = 'datasets/Train'
# 测试集路径
ORIGINAL_TEST_PATH = 'datasets/Test'
# 处理训练集的图像,将其转换为同名称的PNG格式
for train_class in os.listdir(ORIGINAL_TRAIN_PATH):
    # train_class:当前文件夹的文件夹名称
    for pic in os.listdir(ORIGINAL_TRAIN_PATH + '/' + train_class):
        # pic:当前的PPM文件名称
        if not (pic.split('.')[1] == 'ppm'):
            continue
        # 读取图像文件
        im = cv2.imread(ORIGINAL_TRAIN_PATH + '/' + train_class + '/' + pic)
        # 获取文件名称
        name = pic.split('.')[0]
        # 生成新的文件名称
        new_name = name + '.png'
        print(new_name)
        # 生成图像文件
        cv2.imwrite('datasets/GTSRB_Final_Training_Images/GTSRB/Final_Training/Images/' + train_class + '/' + new_name, im)
# 注释与训练集解析相同
for test_class in os.listdir(ORIGINAL_TEST_PATH):
    for pic in os.listdir(ORIGINAL_TRAIN_PATH + '/' + test_class):
        if not (pic.split('.')[1] == 'ppm'):
            continue
        im = cv2.imread(ORIGINAL_TRAIN_PATH + '/' + test_class + '/' + pic)
        name = pic.split('.')[0]
        new_name = name + '.png'
        print(new_name)
        cv2.imwrite('datasets/GTSRB_Online-Test-Images-Sorted/GTSRB/Online-Test-sort/' + test_class + '/' + new_name, im)
三、训练神经网络
此过程使用了Keras搭建神经网络,使用的CNN是经典的LeNet,实验相对简单,适用性好。在图像的处理用,对图像分类存储的要求:
- 图像按照一个文件类型一个文件夹的形式存放
- 文件夹使用整数型表示,从0开始
完整的实现的代码如下:
# 导入必要的模块
from keras.models import Sequential
from keras.layers.convolutional import Conv2D
from keras.layers.convolutional import MaxPooling2D
from keras.layers.core import Activation
from keras.layers.core import Flatten
from keras.layers.core import Dense
from keras import backend as K
import matplotlib
matplotlib.use("Agg")
from keras.preprocessing.image import ImageDataGenerator
from keras.optimizers import Adam
from keras.preprocessing.image import img_to_array
from keras.utils import to_categorical
from imutils import paths
import matplotlib.pyplot as plt
import numpy as np
import argparse
import random
import cv2
import os
import sys
sys.path.append('..')
# matplotlib中,显示中文,置换字体
from pylab import*
mpl.rcParams['font.sans-serif'] = ['SimHei']
# 搭建的神经网络模型(LeNet)
class LeNet:
@staticmethod
def build(width, height, depth, classes):
# 初始化模型
model = Sequential()
inputShape = (height, width, depth)
# 如果使用了 "channels last", 更新输入shape
if K.image_data_format() == "channels_first": # for tensorflow
inputShape = (depth, height, width)
# 设置第一层 CONV => RELU => POOL 层
model.add(Conv2D(20, (5, 5), padding="same", input_shape=inputShape))
model.add(Activation("relu"))
model.add(MaxPooling2D(pool_size=(2, 2), strides=(2, 2)))
# 设置第二层CONV => RELU => POOL 层
model.add(Conv2D(50, (5, 5), padding="same"))
model.add(Activation("relu"))
model.add(MaxPooling2D(pool_size=(2, 2), strides=(2, 2)))
# 首先 (也是唯一设置) FC => RELU 层
model.add(Flatten())
model.add(Dense(500))
model.add(Activation("relu"))
# softmax 分类器
model.add(Dense(classes))
model.add(Activation("softmax"))
# 返回构建好的网络体系结构
return model
# 基本的参数配置信息:
#训练迭代次数
EPOCHS = 8
#
INIT_LR = 1e-3
# 一个训练batch中的训练数据个数
BS = 64
# 分类数(分类个数,此模型是按照文件夹的个数分类的)
CLASS_NUM = 43
# 图像尺寸的大小(这个需要根据实际情况进行调整,此模型均归一化成正方形)
norm_size = 64
# 加载数据信息,图像与标签信息(图像与数字标签)
def load_data(path):
print("[INFO] loading images...")
# 图像数据数组即:x
data = []
# 标签数据数组即:y
labels = []
# 获取图像路径
imagePaths = sorted(list(paths.list_images(path)))
random.seed(43)
# 对图像路径随机分配处理
random.shuffle(imagePaths)
# 循环输入图像
for imagePath in imagePaths:
# 加载图像,预处理图像,并将其存储在数据列表中
image = cv2.imread(imagePath)
image = cv2.resize(image, (norm_size, norm_size))
image = img_to_array(image)
data.append(image)
# 从图像路径中提取类标签并更新标签列表
label = int(imagePath.split(os.path.sep)[-2])
labels.append(label)
# 数据进行归一化处理 将原始像素强度缩放到范围[0,1]
data = np.array(data, dtype="float") / 255.0
labels = np.array(labels)
# 将标签从整数转换为矢量(即每个位置转换为0或1,)
# to_categorical(y, num_classes=None)
# 将类别向量(从0到nb_classes的整数向量)映射为二值类别矩阵,
# 用于应用到以categorical_crossentropy为目标函数的模型中.
# y: 类别向量
# num_classes:总共类别数
labels = to_categorical(labels, num_classes=CLASS_NUM)
return data, labels
# 训练神经网络
def train(aug, trainX, trainY, testX, testY, args):
print("[INFO] compiling model...")
# 初始化模型
model = LeNet.build(width=norm_size, height=norm_size, depth=3, classes=CLASS_NUM)
opt = Adam(lr=INIT_LR, decay=INIT_LR / EPOCHS)
model.compile(loss="categorical_crossentropy", optimizer=opt,
metrics=["accuracy"])
# 训练神经网络
print("[INFO] training network...")
H = model.fit_generator(aug.flow(trainX, trainY, batch_size=BS),
validation_data=(testX, testY), steps_per_epoch=len(trainX) // BS,
epochs=EPOCHS, verbose=1)
# 将模型保存至硬盘
print("[INFO] serializing network...")
model.save(args["model"])
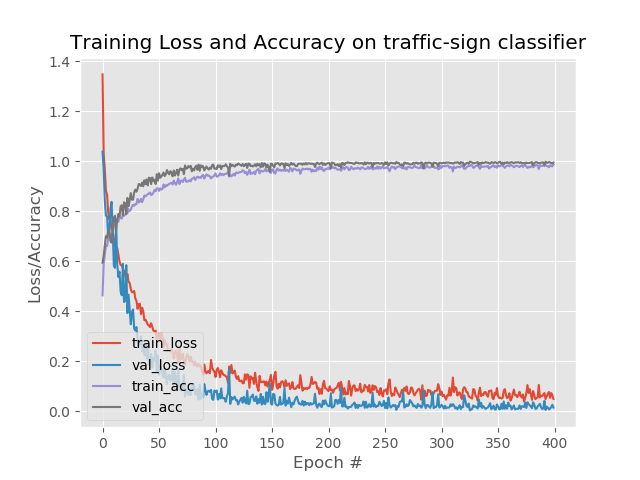
# 绘制训练损失和准确性曲线并保存
plt.style.use("ggplot")
plt.figure()
N = EPOCHS
plt.plot(np.arange(0, N), H.history["loss"], label="train_loss")
plt.plot(np.arange(0, N), H.history["val_loss"], label="val_loss")
plt.plot(np.arange(0, N), H.history["acc"], label="train_acc")
plt.plot(np.arange(0, N), H.history["val_acc"], label="val_acc")
# 标题 X轴名称 Y轴名称
plt.title("图像分类识别")
plt.xlabel("迭代步数#")
plt.ylabel("误差")
plt.legend(loc="lower left")
# 保存图像曲线
plt.savefig(args["plot"])
# 主程序入口
if __name__=='__main__':
args = {}
# 存储模型的地址
args['model'] = 'MODE/traffic_sign.model'
# 输出训练曲线的地址
args['plot'] = 'MODE/plot.png'
# 训练图像集合文件夹路径
args['dataset_train'] = "datasets/GTSRB_Final_Training_Images/GTSRB/Final_Training/Images"
# 测试图像集合文件夹路径
args['dataset_test'] = "datasets/GTSRB_Online-Test-Images-Sorted/GTSRB/Online-Test-sort"
train_file_path = args['dataset_train']
test_file_path = args['dataset_test']
# 加载训练集合的输入端数据与输出端数据
trainX,trainY = load_data(train_file_path)
# 加载测试集合的输入端数据与输出端数据
testX,testY = load_data(test_file_path)
# 构建用于数据增强的图像生成器
aug = ImageDataGenerator(rotation_range=30, width_shift_range=0.1,
height_shift_range=0.1, shear_range=0.2, zoom_range=0.2,
horizontal_flip=True, fill_mode="nearest")
# 开始训练
train(aug,trainX,trainY,testX,testY,args)
四、图像预测
预测图像时,程序执行的步骤如下:
- 加载训练好的模型
- 对输入图像进行必要的前处理,如修改尺寸,序列化;
- 将序列化的图像输入模型中
- 得到序列结果,找到最大概率与对应位置
测过程即为输入图像,得到它是哪种分类的可能性最大以及对应的概率。
具体实现代码如下:
# 加载工程中必要的库
from keras.preprocessing.image import img_to_array
from keras.models import load_model
import numpy as np
import argparse
import imutils
import cv2

# 根据使用的模型,确定图像需要resize的尺寸
norm_size = 64

# 预测函数,
# 输入: 包含配置参数的字典
def predict(args):

    # 加载训练好的卷积神经网络
    print("[INFO] loading network...")
    model = load_model(args["model"])

    # 加载图像
    image = cv2.imread(args["image"])
    # 因为对图像需要进行写入标签,影响较大所以复制一个图像
    orig = image.copy()

    # 预处理图像进行分类
    # 图像的尺寸重载
    image = cv2.resize(image, (norm_size, norm_size))
    # 图像的序列的归一化处理
    image = image.astype("float") / 255.0
    # 将图像进行序列化
    image = img_to_array(image)
    # 展开数组的形状.
    # 插入一个新的轴,该轴将出现在扩展阵列形状的轴位置
    image = np.expand_dims(image, axis=0)

    # 对输入的图像进行分类
    result = model.predict(image)[0]
    # print (result.shape)
    proba = np.max(result)
    label = str(np.where(result == proba)[0])
    label = "{}: {:.2f}%".format(label, proba * 100)
    print(label)
    # 在需要加载图像的情况下
    if args['show']:
        output = imutils.resize(orig, width=400)
        # 在图像上绘制标签字符串
        cv2.putText(output, label, (10, 25), cv2.FONT_HERSHEY_SIMPLEX,
                    0.7, (0, 255, 0), 2)
        # 显示带标签的图像
        cv2.imshow("Output", output)
        cv2.waitKey(0)


# python predict.py --model traffic_sign.model -i ../2.png -s
if __name__ == '__main__':
    args = {}
    # 模型的输入路径
    args['model'] = 'MODE/traffic_sign2.model'
    # 图像的输入路径
    args['image'] = 'predict/00000_00005.png'
    args['show'] = 'true'
    # 执行预测
    predict(args)
训练的图像如下图: