PS:Volley已经学完,可以安心的写一下博客总结一下了...
学习内容:
1.Request的完整封装...
2.RetryPolicy,DefaultRetryPolicy(请求重试策略源码解析)
3.RequestQueue(请求队列源码解析)
RequestQueue(源码解析)...
RequestQueue顾名思义,请求队列,Volley中采用请求队列来管理所有正在提交的Request,将所有封装好的Request保存在其内部,方便管理...而一个Request需要被完整的封装,才能够真正的加入到RequetQueue当中的,每一个Request都有一个重试策略,用于当一个请求提交失败的时候重试的操作,总不能一个请求失败了一次就直接把请求past掉吧...因此一个请求失败之后是否需要重试是需要经过设置的...
1.RetryPolicy.java
RetryPolicy是一个接口,前面说到Volley大多是使用接口的方式,以形成良好扩展,这个也不例外...
接口内部只有三个方法,分别表示获取超时时间,以及重试的次数,还有是否还有必要进行重试...
需要注意:这个类只是用于判断一个请求在失败之后是否需要进行重试,而没有对如何重试进行定义..
package com.android.volley;

/**
 * Retry policy for a request.
 */
public interface RetryPolicy {

    /**
     * Returns the current timeout (used for logging).
     */
    public int getCurrentTimeout();

    /**
     * Returns the current retry count (used for logging).
     */
    public int getCurrentRetryCount();

    /**
     * Prepares for the next retry by applying a backoff to the timeout.
     * @param error The error code of the last attempt.
     * @throws VolleyError In the event that the retry could not be performed (for example if we
     * ran out of attempts), the passed in error is thrown.
     */
    public void retry(VolleyError error) throws VolleyError;
}
2.DefaultRetryPolicy.java
这个类则是用于实现上面接口的类,是对重试方案的一个实现过程,这个类只是简单的获取重试的次数,判断其是否超过的允许的最大重试次数,以及重试超时的时间...并没有如何重试的具体实现过程...只是对于一个请求是否进行重试的一个判断过程...通过这个类也不难发现,请求失败之后是按照默认的方式来完成请求的重试的...
2.1 变量的定义...
 /** The current timeout in milliseconds. */
    private int mCurrentTimeoutMs;//超时时间..

    /** The current retry count. */
    private int mCurrentRetryCount; //重试次数

    /** The maximum number of attempts. */
    private final int mMaxNumRetries; //允许重试的最大次数

    /** The backoff multiplier for for the policy. */
    private final float mBackoffMultiplier; //一个乘数因子,每次超时时间的获取都需要乘上这个乘数因子...

    /** The default socket timeout in milliseconds */
    public static final int DEFAULT_TIMEOUT_MS = 2500;//定义默认的超时时间...

    /** The default number of retries */
    public static final int DEFAULT_MAX_RETRIES = 1;//定义默认的最大重试次数...

    /** The default backoff multiplier */
    public static final float DEFAULT_BACKOFF_MULT = 1f;//默认的乘数因子的定义..
2.2 DefaultRetryPolicy的构造函数..
public DefaultRetryPolicy(){}
public DefaultRetryPolicy(int initialTimeoutMs, int maxNumRetries, float backoffMultiplier){}
这两个构造函数,一个是使用系统默认构造重试方案,超时的时间(表示每一次重试耗费掉的时间的总和),重试最大次数,以及乘数因子都是使用系统默认分配的变量..而另一个则是我们人为进行指定,指定超时的时间,允许的最大次数,以及相关的乘数因子,因为客户端发出的Request是各种各样的...不可能都指定的去用一种重试方案,因此人为指定是非常重要的...
public DefaultRetryPolicy() {
        this(DEFAULT_TIMEOUT_MS, DEFAULT_MAX_RETRIES, DEFAULT_BACKOFF_MULT);
}

public DefaultRetryPolicy(int initialTimeoutMs, int maxNumRetries, float backoffMultiplier) {
        mCurrentTimeoutMs = initialTimeoutMs;
        mMaxNumRetries = maxNumRetries;
        mBackoffMultiplier = backoffMultiplier;
}
2.3 public int getCurrentTimeout(){}
对获取超时时间总和方法的实现...返回重试耗费掉的时间总和..非常的简单...
@Override
    public int getCurrentTimeout() {
        return mCurrentTimeoutMs;
    }
2.4 public int getCurrentRetryCount(){}
对重试次数获取的方法的实现...返回重试次数...
 @Override
    public int getCurrentRetryCount() {
        return mCurrentRetryCount;
    }
2.5 public void retry(VolleyError error) throws VolleyError{}
protected Boolean hasAttemptRemaining(){}
每一次请求超时的时间,以及重试的次数都需要进行相应的记录,如果重试的次数已经超过了允许的次数,则需要抛出异常..这些过程由这两个方法来实现...方法中涉及到的东西都非常的少...就不去解释每一句代码的含义了...
@Override
    public void retry(VolleyError error) throws VolleyError {
        mCurrentRetryCount++;
        mCurrentTimeoutMs += (mCurrentTimeoutMs * mBackoffMultiplier);
        if (!hasAttemptRemaining()) {
            throw error;
        }
    }

    /**
     * Returns true if this policy has attempts remaining, false otherwise.
     */
    protected boolean hasAttemptRemaining() {
        return mCurrentRetryCount <= mMaxNumRetries;
    }
这样通过这些设定,我们才能够指定当一个请求失败时,是否需要进行重试,需要设定重试的次数,以及重试过程中,所耗费掉的时间...这也符合设计的思想...不能一个请求失败时直接就past掉,同时也不能一个请求如果一直失败那就一直提交...这些都是不合理的...所以需要对每一个请求去设定一个重试方案才能使每一次请求都能够更加合理...
3.RequestQueue.java
RequestQueue请求队列...首先得先说一下,ReuqestQueue是如何对请求进行管理的...RequestQueue是对所有的请求进行保存...然后通过自身的start()方法开启一个CacheDispatcher线程用于缓存调度,开启若干个NetWorkDispatcher线程用于网络调度...那么为什么要这样设计呢?
因为一个请求如果已经提交了一次,那么就只需要处理这一次结果就可以了,对于多次重复的请求,我们完全可以使用一个缓存来进行保存..从而减少一些不必要的网络请求,减小服务器的负担...如果一个请求在缓存中没存在过,那么我们再执行网络请求就可以了...
总而言之,设计理念就是从RequestQueue取出请求,先判断缓存是否命中,如果缓存命中,则从缓存中取出数据,如果缓存没有命中,则提交网络请求,从服务器端获取数据...
3.1 变量的定义..
 /** Used for generating monotonically-increasing sequence numbers for requests. */
    private AtomicInteger mSequenceGenerator = new AtomicInteger();//自动生成序列号...

    private final Map<String, Queue<Request>> mWaitingRequests =
            new HashMap<String, Queue<Request>>();  //如果一个请求可以被缓存并且正在被执行,那么后续与之相同的url请求进入此队列...

    private final Set<Request> mCurrentRequests = new HashSet<Request>(); //用于保存尚未完成请求的集合...

    private final PriorityBlockingQueue<Request> mCacheQueue =
        new PriorityBlockingQueue<Request>(); //用于保存缓存请求,从缓存中取出数据...

    private final PriorityBlockingQueue<Request> mNetworkQueue =
        new PriorityBlockingQueue<Request>(); //用于保存网络请求,从服务器上获取数据...

    /** Number of network request dispatcher threads to start. */
    private static final int DEFAULT_NETWORK_THREAD_POOL_SIZE = 4; //默认的网络线程数量...

    /** Cache interface for retrieving and storing respones. */
    private final Cache mCache;  //缓存机制...用于保存缓存数据...

    /** Network interface for performing requests. */
    private final Network mNetwork; //用于执行网络请求...

    /** Response delivery mechanism. */
    private final ResponseDelivery mDelivery; //用于分发相应..

    /** The network dispatchers. */
    private NetworkDispatcher[] mDispatchers; //网络调度线程...

    /** The cache dispatcher. */
    private CacheDispatcher mCacheDispatcher; //缓存调度线程...
3.2 RequestQueue的构造函数
public RequestQueue(Cache cache, Network network, int threadPoolSize,ResponseDelivery delivery) {}
public RequestQueue(Cache cache, Network network, int threadPoolSize){}
public RequestQueue(Cache cache, Network network){}
三个构造函数,第一个是最后被调用的,第二个和第三个只是对数据进行一下封装..最后在第一个构造函数中进行赋值...这里需要注意的是,RequestQueue的构造函数不是用来生成RequestQueue对象的...创建一个RequestQueue并不是通过使用构造函数来实现的...它的存在是为RequestQueue添加其他属性...通过这个构造函数可以实例化缓存线程调度的缓存对象同时还定义了按照指定数量的网络请求调度线程的网络请求对象,以及请求结束后的分发响应对象...
public RequestQueue(Cache cache, Network network, int threadPoolSize,
            ResponseDelivery delivery) {
        mCache = cache;
        mNetwork = network;
        mDispatchers = new NetworkDispatcher[threadPoolSize];
        mDelivery = delivery;
}
 public RequestQueue(Cache cache, Network network, int threadPoolSize) {
        this(cache, network, threadPoolSize,
                new ExecutorDelivery(new Handler(Looper.getMainLooper())));
}
 public RequestQueue(Cache cache, Network network) {
        this(cache, network, DEFAULT_NETWORK_THREAD_POOL_SIZE);
}
那么上面既然说到创建RequestQueue对象不是通过构造函数来实现的..它创建的方式采用:
RequestQueue queue=Volley.newRequestQueue(MainActivity.this);
简单的介绍一下...后续对这个还会有解析...目的要明确RequestQueue的构造函数到底是做什么的...不能混淆了它的作用...
3.3 public void start(){}
这个方法的调用决定开启缓存请求线程调度和网络请求线程调度...使用两个异步线程来对每一个请求进行处理...
public void start() {
        stop();  // Make sure any currently running dispatchers are stopped.
        // Create the cache dispatcher and start it.
        mCacheDispatcher = new CacheDispatcher(mCacheQueue, mNetworkQueue, mCache, mDelivery); //缓存请求线程调度对象的实例化...
        mCacheDispatcher.start(); //调用start()方法开启线程..

        // Create network dispatchers (and corresponding threads) up to the pool size.
        for (int i = 0; i < mDispatchers.length; i++) {
            NetworkDispatcher networkDispatcher = new NetworkDispatcher(mNetworkQueue, mNetwork,
                    mCache, mDelivery);  //根据指定大小,实例化网络请求对象...
            mDispatchers[i] = networkDispatcher; //赋值
            networkDispatcher.start(); //开启网络线程..
        }
    }
从上面的方法发现,缓存调度线程对象的实例化需要传递mNetworkQueue和mCacheQueue...两个参数...这里可能有点费解...其实理解起来也是非常的简单的...由于缓存数据不可能一辈子都是这个缓存数据,也不可能一直停留在内存当中,必定会有过期的时间,新鲜度,以及缓存丢失等情况的发生都会导致缓存失效...那么当缓存失效的时候,我们必须要有相关的对策发出响应传递给客户端,那么就只能通过网络请求的方式从服务器上获取请求数据了...在缓存请求线程调度的时候是需要传递mNetWorkQueue的...
3.4 public Request add(Request request){}
加入请求的操作...
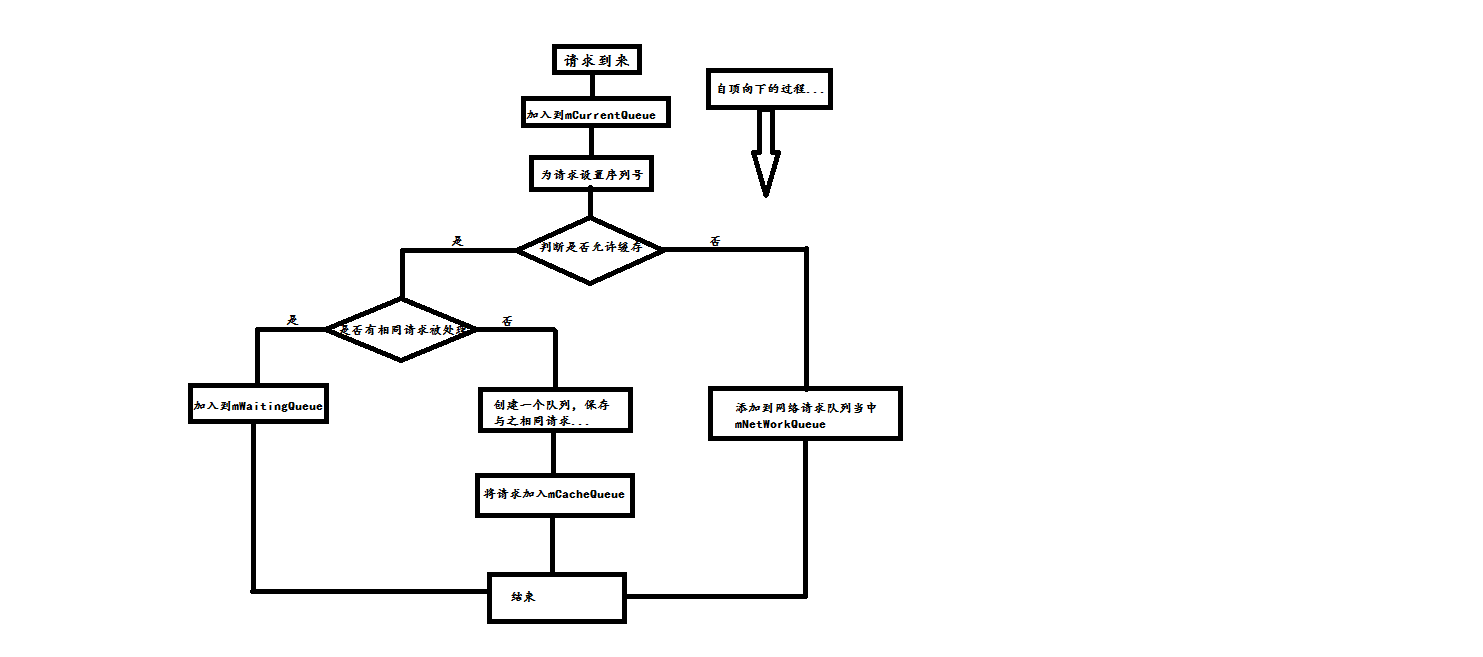
  public Request add(Request request) {
        // Tag the request as belonging to this queue and add it to the set of current requests.
        request.setRequestQueue(this);  //为Request设置请求队列...
        synchronized (mCurrentRequests) {
            mCurrentRequests.add(request);  //将请求放入到正在执行的请求队列中...
        }

        // Process requests in the order they are added.
        request.setSequence(getSequenceNumber()); //为请求设置一个唯一的序列号...
        request.addMarker("add-to-queue"); //添加标识

        // If the request is uncacheable, skip the cache queue and go straight to the network.
        if (!request.shouldCache()) { //判断请求是否允许缓存...
            mNetworkQueue.add(request); //如果不允许缓存,则直接提交网络请求...并返回...
            return request;
        }

        //如果请求允许被缓存...首先判断是否有同样的缓存请求在这个队列当中...
        synchronized (mWaitingRequests) {
            String cacheKey = request.getCacheKey();
            if (mWaitingRequests.containsKey(cacheKey)) {
                 //如果请求队列中有正在处理与之相同的请求,那么直接将其加入相同请求的等待队列当中...
                Queue<Request> stagedRequests = mWaitingRequests.get(cacheKey);
                if (stagedRequests == null) {
                    stagedRequests = new LinkedList<Request>();
                }
                stagedRequests.add(request);
                mWaitingRequests.put(cacheKey, stagedRequests);
                if (VolleyLog.DEBUG) {
                    VolleyLog.v("Request for cacheKey=%s is in flight, putting on hold.", cacheKey);
                }
            } else {
                //否则的话,新建一个与这个请求相同的等待队列,并且将这次请求放入到缓存队列当中...
                // Insert 'null' queue for this cacheKey, indicating there is now a request in
                // flight.
                mWaitingRequests.put(cacheKey, null);//这里传递空值,当再次回调这个函数的时候,就会调用if中的函数,从而完成队列的创建...
                mCacheQueue.add(request);
            }
            return request;
        }
    }
函数根据条件加入请求...我们来过一下思路...首先当一个请求到来的时候,将请求加入到正在执行的队列当中(mCurrentQueue),接着为请求设置唯一的序列号,使得不同的请求之间有区别...然后判断请求是否允许被缓存,如果请求不允许被缓存,那么我们就可以直接发送网络请求了,缓存中是一定没有数据的...但是如果允许缓存的话,那么还需要进行后续的判断.判断是否有与之相同的正在被处理的请求,如果存在,那么将这次请求放入(mWaittingQueue)等待请求队列中,这个队列用来解决发送同一种请求多次的处理...而如果不存在相同的请求被执行,那么我们需要建立一个与这个请求相同的等待队列...然后将这次请求放入到缓存队列当中...再来一张图片...方便理解...图解过程...
3.5 void finish(Request request){}
请求结束后的过程,这个函数由Request.finish()调用...还记得上一章当一个Request结束后,需要请求移出请求队列当中,那么这个函数就是将请求移出请求队列的...当一个请求执行完毕之后,不仅将这次请求移出请求队列当中,还需要判断mWaitingQueue中是否存在与之相同的请求...如果存在,那么等待队列中的所有请求全部移出等待队列...加入到缓存队列当中,直接通过缓存数据来完成这些相同请求的响应...能够使用缓存队列处理的请求前提是允许被缓存...
  void finish(Request request) {
        // Remove from the set of requests currently being processed.
        synchronized (mCurrentRequests) {
            mCurrentRequests.remove(request); //从当前请求队列中移出..
        }

        if (request.shouldCache()) { //判断是否允许缓存...
            synchronized (mWaitingRequests) {
                String cacheKey = request.getCacheKey();
                Queue<Request> waitingRequests = mWaitingRequests.remove(cacheKey); //获取所有相同的请求...
                if (waitingRequests != null) {
                    if (VolleyLog.DEBUG) {
                        VolleyLog.v("Releasing %d waiting requests for cacheKey=%s.",
                                waitingRequests.size(), cacheKey);
                    }
                    // Process all queued up requests. They won't be considered as in flight, but
                    // that's not a problem as the cache has been primed by 'request'.
                    mCacheQueue.addAll(waitingRequests); //将所有的请求放入到缓存队列当中,由缓存队列完成请求响应...
                }
            }
        }
    }
3.6 public void stop()...
停止函数,将网络请求调度的线程和缓存请求调度的线程停止...没什么可说的,非常的简单...
public void stop() {
        if (mCacheDispatcher != null) {
            mCacheDispatcher.quit();
        }
        for (int i = 0; i < mDispatchers.length; i++) {
            if (mDispatchers[i] != null) {
                mDispatchers[i].quit();
            }
        }
    }
3.7 public void cancleAll(final Object tag){}
public void cancleAll(RequestFilter filter){}
public interface RequestFilter {
public boolean apply(Request<?> request);
}
请求撤销函数...前面两个函数都是撤销请求的方式,只不过一个是通过设置过滤器来过滤掉请求,这个过滤方式需要我们人为进行重写...重写第三个函数...根据指定的过滤取消掉这一类的请求,而第二种则是通过设置标识符来过滤掉与标识符相同的一类请求...一般是设置撤销某一线程内的请求..比如说一个Activity中的所有请求...那么我们就给Activity设置上tag就行了...那么通过tag的获取,就能够撤销掉Activity的所有请求...
3.8 public int getSequenceNumber(){}
获取序列号的函数...为请求设置相应的序列号...非常的简单..
public int getSequenceNumber() {
        return mSequenceGenerator.incrementAndGet();
}
3.9 public Cache getCache(){}
获取缓存对象...用于保存缓存的数据...
 public Cache getCache() {
        return mCache;
 }
RequestQueue类中所有的东西都进行了一下解释...说了一下其中涉及的东西,以及这个类的内部原理...缓存数据的存储,缓存请求线程的调度,以及网络请求的调度也只是开了个头,是我们能有一个初步的印象...其他的东西将在后续进行记录和解析..