zoukankan      html  css  js  c++  java
  • Tensorflow2疑难问题---2、tensorflow2.3的GPU版本安装

    Tensorflow2疑难问题---2、tensorflow2.3的GPU版本安装

    一、总结

    一句话总结:

    安装tensorflow的gpu的版本的时候,要特别注意CUDA、cuDNN、tensorflow版本的一致性,在tensorflow官网可以查看对应版本关系

    二、tensorflow2.3的GPU版本安装

    博客对应课程的视频位置:

    2、tensorflow2.3的GPU版本安装(一)-范仁义-读书编程笔记

    https://www.fanrenyi.com/video/37/336

    2、tensorflow2.3的GPU版本安装(二)-范仁义-读书编程笔记

    https://www.fanrenyi.com/video/37/337

    一、准备资料

    需要显卡,还需要安装CUDA和cuDNN

    1、显卡

    比如我这台机器,显卡就是 NVIDIA GTX 1060,显存6GB


    2、CUDA(Compute Unified Device Architecture):统一计算架构

    是显卡厂商NVIDIA推出的运算平台。
    CUDA是一种由NVIDIA推出的通用并行计算架构,该架构使GPU能够解决复杂的计算问题。


    3、CUDNN:NVIDIA cuDNN是用于深度神经网络的GPU加速库。

    The NVIDIA CUDA® Deep Neural Network library (cuDNN) is a GPU-accelerated library of primitives for deep neural networks.


    4、CUDA和CUDNN的关系

    CUDA看作是一个工作台,上面配有很多工具,如锤子、螺丝刀等。
    cuDNN是基于CUDA的深度学习GPU加速库,有了它才能在GPU上完成深度学习的计算。

    二、安装CUDA和cuDNN

    特别注意:

    当配置CUDA、cuDNN、tensorflow时,要确保这三者之间的版本对应一致

    在tensorflow官网可以查看这些软件版本对应信息

    https://tensorflow.google.cn/install/source_windows

    1、安装cuda

    各个版本位置

    https://developer.nvidia.com/cuda-toolkit-archive

    2、安装cuDNN

    cuDNN各个版本的下载网址:

    https://developer.nvidia.com/rdp/cudnn-archive#a-collapse51b

    这个下载要注册,太太太麻烦,

    所以我们可以直接复制链接地址,迅雷下载即可,不要点进去,点进去要注册麻烦
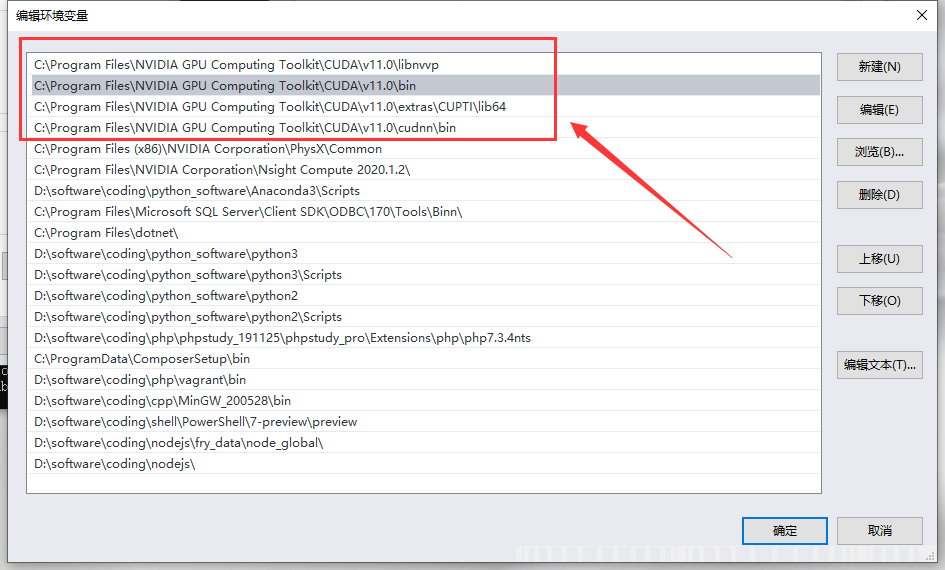
    3、配置系统变量

    4、验证是否安装成功

    配置完成后,我们可以验证是否配置成功,主要使用CUDA内置的deviceQuery.exe 和 bandwithTest.exe:

    首先win+R启动cmd,cd到安装目录下的 ...extrasdemo_suite,然后分别执行bandwidthTest.exe和deviceQuery.exe,


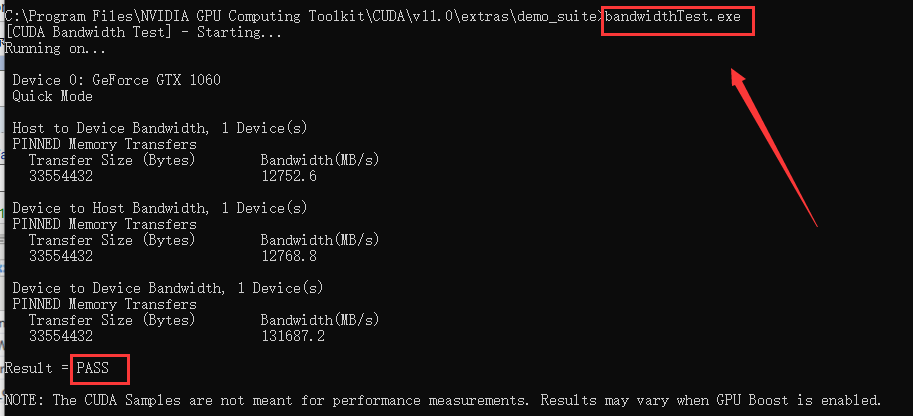
    如果以上两步都返回了Result=PASS,那么就算成功啦。

    三、安装tensorflow

    如果安装了tensorflow-cpu版本,可以先把cpu版本先卸了

    pip uninstall tensorflow-cpu


    然后再安装gpu版本

    pip install tensorflow-gpu

    四、验证tensorflow是否成功用gpu加速

    In [2]:
    import tensorflow as tf
    print("GPU:",tf.test.is_gpu_available())
    
    WARNING:tensorflow:From <ipython-input-2-ae62284c8fe5>:2: is_gpu_available (from tensorflow.python.framework.test_util) is deprecated and will be removed in a future version.
    Instructions for updating:
    Use `tf.config.list_physical_devices('GPU')` instead.
    GPU: True
    
    In [3]:
    tf.config.list_physical_devices('GPU')
    
    Out[3]:
    [PhysicalDevice(name='/physical_device:GPU:0', device_type='GPU')]

    五、卷积神经网络中GUP和CPU性能对比

    In [5]:
    import  os
    os.environ['TF_CPP_MIN_LOG_LEVEL']='2'
    
    import  tensorflow as tf
    from    tensorflow.keras import layers, optimizers, datasets, Sequential
    
    # 按需分配GPU
    # from tensorflow.compat.v1 import ConfigProto
    # from tensorflow.compat.v1 import InteractiveSession
    # config = ConfigProto()
    # config.gpu_options.allow_growth = True
    # session = InteractiveSession(config=config)
    
    
    tf.random.set_seed(2345)
    
    # 卷积层
    conv_layers = [ # 5 units of conv + max pooling
        # 5个单元
        # unit 1
        layers.Conv2D(64, kernel_size=[3, 3], padding="same", activation=tf.nn.relu),
        layers.Conv2D(64, kernel_size=[3, 3], padding="same", activation=tf.nn.relu),
        layers.MaxPool2D(pool_size=[2, 2], strides=2, padding='same'),
    
        # unit 2
        layers.Conv2D(128, kernel_size=[3, 3], padding="same", activation=tf.nn.relu),
        layers.Conv2D(128, kernel_size=[3, 3], padding="same", activation=tf.nn.relu),
        layers.MaxPool2D(pool_size=[2, 2], strides=2, padding='same'),
    
        # unit 3
        layers.Conv2D(256, kernel_size=[3, 3], padding="same", activation=tf.nn.relu),
        layers.Conv2D(256, kernel_size=[3, 3], padding="same", activation=tf.nn.relu),
        layers.MaxPool2D(pool_size=[2, 2], strides=2, padding='same'),
    
        # unit 4
        layers.Conv2D(512, kernel_size=[3, 3], padding="same", activation=tf.nn.relu),
        layers.Conv2D(512, kernel_size=[3, 3], padding="same", activation=tf.nn.relu),
        layers.MaxPool2D(pool_size=[2, 2], strides=2, padding='same'),
    
        # unit 5
        layers.Conv2D(512, kernel_size=[3, 3], padding="same", activation=tf.nn.relu),
        layers.Conv2D(512, kernel_size=[3, 3], padding="same", activation=tf.nn.relu),
        layers.MaxPool2D(pool_size=[2, 2], strides=2, padding='same')
    
    ]
    
    
    # 归一化处理
    def preprocess(x, y):
        # [0~1]
        x = tf.cast(x, dtype=tf.float32) / 255.
        y = tf.cast(y, dtype=tf.int32)
        return x,y
    
    # 加载数据
    (x,y), (x_test, y_test) = datasets.cifar100.load_data()
    # 挤压
    y = tf.squeeze(y, axis=1)
    y_test = tf.squeeze(y_test, axis=1)
    print(x.shape, y.shape, x_test.shape, y_test.shape)
    
    # 训练数据
    train_db = tf.data.Dataset.from_tensor_slices((x,y))
    train_db = train_db.shuffle(1000).map(preprocess).batch(128)
    
    # 测试数据
    test_db = tf.data.Dataset.from_tensor_slices((x_test,y_test))
    test_db = test_db.map(preprocess).batch(64)
    
    # 数据样例
    sample = next(iter(train_db))
    print('sample:', sample[0].shape, sample[1].shape,
          tf.reduce_min(sample[0]), tf.reduce_max(sample[0]))
    
    
    def main():
    
        # 卷积层
        # [b, 32, 32, 3] => [b, 1, 1, 512]
        conv_net = Sequential(conv_layers)
    
        # 全连接层
        fc_net = Sequential([
            layers.Dense(256, activation=tf.nn.relu),
            layers.Dense(128, activation=tf.nn.relu),
            # 100个分类,输出
            layers.Dense(100, activation=None),
        ])
    
        # 卷积层网络构建
        conv_net.build(input_shape=[None, 32, 32, 3])
        # 全连接网络构建
        fc_net.build(input_shape=[None, 512])
        # 优化函数
        optimizer = optimizers.Adam(lr=1e-4)
    
        # [1, 2] + [3, 4] => [1, 2, 3, 4]
        # 所有的参数就是 卷积层的参数 和 全连接层的参数
        variables = conv_net.trainable_variables + fc_net.trainable_variables
    
        for epoch in range(50):
    
            for step, (x,y) in enumerate(train_db):
    
                with tf.GradientTape() as tape:
                    # 卷积层
                    # [b, 32, 32, 3] => [b, 1, 1, 512]
                    out = conv_net(x)
                    # reshape方便全连接层用
                    # flatten, => [b, 512]
                    out = tf.reshape(out, [-1, 512])
                    # 全连接层
                    # [b, 512] => [b, 100]
                    logits = fc_net(out)
                    # [b] => [b, 100]
                    y_onehot = tf.one_hot(y, depth=100)
                    # compute loss:crossentropy
                    loss = tf.losses.categorical_crossentropy(y_onehot, logits, from_logits=True)
                    loss = tf.reduce_mean(loss)
    
                grads = tape.gradient(loss, variables)
                optimizer.apply_gradients(zip(grads, variables))
    
                if step %100 == 0:
                    print(epoch, step, 'loss:', float(loss))


            total_num = 0
            total_correct = 0
            for x,y in test_db:
    
                out = conv_net(x)
                out = tf.reshape(out, [-1, 512])
                logits = fc_net(out)
                prob = tf.nn.softmax(logits, axis=1)
                pred = tf.argmax(prob, axis=1)
                pred = tf.cast(pred, dtype=tf.int32)
    
                correct = tf.cast(tf.equal(pred, y), dtype=tf.int32)
                correct = tf.reduce_sum(correct)
    
                total_num += x.shape[0]
                total_correct += int(correct)
    
            acc = total_correct / total_num
            print(epoch, 'acc:', acc)


    if __name__ == '__main__':
        with tf.device("/cpu:0"):
            main()
    
    (50000, 32, 32, 3) (50000,) (10000, 32, 32, 3) (10000,)
    sample: (128, 32, 32, 3) (128,) tf.Tensor(0.0, shape=(), dtype=float32) tf.Tensor(1.0, shape=(), dtype=float32)
    0 0 loss: 4.605703353881836
     
  • 相关阅读:
    bootstap 折叠
    AtCoder AGC019E Shuffle and Swap (DP、FFT、多项式求逆、多项式快速幂)
    Codeforces Gym 101630J Journey from Petersburg to Moscow (最短路)
    BZOJ 4042 Luogu P4757 [CERC2014]Parades (树形DP、状压DP)
    BZOJ 2734 [HNOI2012]集合选数 (状压DP、时间复杂度分析)
    BZOJ 2759 一个动态树好题 (LCT)
    Codeforces 1205C Palindromic Paths (交互题、DP)
    getopt实现传参自动识别
    powershell笔记
    bat语法需要注意的地方
  • 原文地址:https://www.cnblogs.com/Renyi-Fan/p/13462277.html
Copyright © 2011-2022 走看看