| 阅文时长 | | 11.04分钟 | 字数统计 | | 17672.8字符 |
| 主要内容 | | 1、前言、环境说明、预备知识 2、Ocelot基本使用 3、Ocelot功能挖掘 4、Ocelot集成其他组件 5、避坑指南 6、更多的学习资料 | ||
| 『.NetCore·集成Ocelot组件之完全解决方案』 | |||
| 编写人 | | SCscHero | 编写时间 | | 2020/9/9 PM5:57 |
| 文章类型 | | 系列 | 完成度 | | 待完善 |
| 座右铭 | 每一个伟大的事业,都有一个微不足道的开始。 | ||
一、前言、环境说明、预备知识 完成度:100%
a) 开发环境
操作系统:Windows10专业版 版本1903(OS内部版本18362.1016)
开发工具:Visual Studio Enterprise 2019 版本16.4.1
开发框架:ASP.NET Core 3.1
本文相关Nuget包:
Ocelot
Ocelot.Provider.Consul
Ocelot.Provider.Polly
Ocelot.Cache.CacheManager
Microsoft.VisualStudio.Web.CodeGeneration.Design
Microsoft.Extensions.Caching.Memory(可选:Ocelot缓存)
Microsoft.Extensions.Caching.Abstractions(可选:Ocelot缓存)
IdentityServer4.AccessTokenValidation(可选:集成IDS4专用)
MMLib.SwaggerForOcelot(可选:集成下游Swagger Restful API文档专用)
b) 程序包管理器控制台CLI
Install-Package Ocelot -Version 16.0.1
Install-Package Ocelot.Provider.Consul -Version 16.0.1
Install-Package Ocelot.Provider.Polly -Version 16.0.1
Install-Package Microsoft.VisualStudio.Web.CodeGeneration.Design -Version 16.0.1
Install-Package Microsoft.Extensions.Caching.Memory -Version 3.1.6
Install-Package Microsoft.Extensions.Caching.Abstractions -Version 3.1.6
Install-Package IdentityServer4.AccessTokenValidation -Version 3.0.1
Install-Package MMLib.SwaggerForOcelot -Version 2.5.1
c) 预备知识
首先,要有.Net Core API项目的一些基础,并充分理解API网关。关于API网关,可以看下博主的这篇文章,相信可以得到不错的领悟。传送门
然后,光有了API网关的储备知识还是不够的,需要了解一下注册中心,.Neter一般都选用Consul,关于Consul的简单安装、使用,可以参考传送门,博主之后会继续写下Consul集群、配置、命令等。现在如果要研究的话,可以Google、Baidu一些资料。Ocelot一般要结合注册中心一起使用,可以实现动态拓展、服务发现等功能。
二、Ocelot基本使用 完成度:100%
a) 快速上手Ocelot
在理解了API网关之后,正式开干。快速集成主要分为几个步骤:
步骤1:网关是需要独立部署的,所以准备一个新的.Net Core3.1的WebAPI项目吧。然后上文的需要的Nuget包安装上。
步骤2:创建一个Json格式的配置文件,了解相关配置,使用相应功能。详细见下文"Ocelot基本配置"。
步骤3:配置Program.cs文件下的CreateHostBuilder方法,引入配置文件。详细见下文"Ocelot基本配置"。
步骤4:配置Startup.cs中的ConfigureServices()方法和Configure()方法,配置服务注册和中间件。详细见下文"Ocelot基本配置"。
步骤5:完成前面四步,一个最基本的Ocelot Gateway就搭建好了。
b) Ocelot基本配置
先配置Startup.cs文件。在ConfigureServices()方法中,添加代码:
services.AddOcelot().AddConsul().AddPolly();//此处是添加了Consul服务、Polly服务,如果不需要可以去掉。只需要AddOcelot()即可。
在Configure()方法中,UseRouting()中间件之前,添加Ocelot中间件:
app.UseOcelot().Wait();
Startup.cs文件配置完成。现在在项目中添加一个json文件,暂且命名为"Ocelot_Config_Origin.json"。添加内容(注释是本博主加的,以便更好的学习之用):
//无Consul配置,简单配置,包含两大配置块,转发路由和全局配置
{
  // 转发路由,数组中的每个元素都是某个服务的一组路由转发规则
  "ReRoutes": [
    {
      // 下游(服务提供方)服务路由模板
      "DownstreamPathTemplate": "/api/{path}",
      // Uri方案,http、https
      "DownstreamScheme": "https",
      // 服务地址和端口,如果是集群就设置多个
      "DownstreamHostAndPorts": [
        {
          "Host": "localhost",
          "Port": 6001
        },
        {
          "Host": "localhost",
          "Port": 6002
        }
      ],
      // 允许的HTTP请求方法,可以写多个
      "UpstreamHttpMethod": [ "Get", "Post" ],
      // 上游(客户端,服务消费方)请求路由模板
      "UpstreamPathTemplate": "/OcelotNotes/{path}",
      // 负载均衡,只有上面匹配了集群,才有效
      /*
       负载均衡算法,总共三种类型。
        LeastConnection:最小链接,将请求发往最空闲的那个服务器
        RoundRobin:轮询,轮流发送
        NoLoadBalance:无负载均衡,总是发往第一个请求或者是服务发现
        */
      "LoadBalancerOptions": {
        "Type": "RoundRobin" // 轮询
      }
    },
    {
      // 下游(服务提供方)服务路由模板
      "DownstreamPathTemplate": "/api/{path}",
      // Uri方案,http、https
      "DownstreamScheme": "http",
      // 服务地址和端口,如果是集群就设置多个
      "DownstreamHostAndPorts": [
        {
          "Host": "localhost",
          "Port": 7001
        },
        {
          "Host": "localhost",
          "Port": 7002
        }
      ],
      // 允许的HTTP请求方法,可以写多个
      "UpstreamHttpMethod": [ "Get", "Post" ],
      // 上游(客户端,服务消费方)请求路由模板
      "UpstreamPathTemplate": "/MyServiceB/{path}",
      // 负载均衡,只有上面匹配了集群,才有效
      "LoadBalancerOptions": {
        "Type": "RoundRobin" // 轮询
      }
    }
  ],
  // 全局配置,此节点的配置会覆盖Routes,可以在这里设置一些通用的配置
  "GlobalConfiguration": {
    "ReRouteIsCaseSensitive": false// 路由是否区分大小写
  }
}
添加完毕后,我们先来简单看下这段Json。可见这些内容中可分为"GlobalConfiguration"和"Routes"两大部分(Ocelot的16.0.1版本是此名,旧版本Key为ReRoutes)。Routes中可包含多个对象,以供匹配不同的路由,转发到下游。在不结合注册中心的情况下,GlobalConfiguration、Routes中的配置并不一样。GlobalConfiguration中的配置较为简单,为公共的一些属性。Routes中的内容,比如负载均衡、访问方法限制,注释已经写得很详尽了,只说下路由模板这个地方:
- 路由模板分为UpstreamPathTemplate上游模板和DownstreamHttpMethod下游模板,类似于Nginx、DNS。路由访问网关模板路径,将被转发到相应微服务的下游模板中。
- 模板中的变量可以用"{}"符号包起来,如上述代码示例中,博主使用了{path}变量,即OcelotNotes后面的内容都当作变量转发到下游模板api下,当然可以多指定几个变量,改变顺序也是可以的。
- DownstreamHostAndPorts是配置微服务集群的,在不结合注册中心Consul的前提下,微服务集群每个进程的地址和端口都需要在这里写死。
Startup.cs文件和Json文件配置完成后,我们在Program.cs文件中,将配置好的Json文件加入到配置中。修改一下CreateHostBuilder()方法:
        public static IHostBuilder CreateHostBuilder(string[] args) =>
            Host.CreateDefaultBuilder(args)
                .ConfigureAppConfiguration(c =>
                {
                    c.AddJsonFile("Ocelot_Config_Origin.json", optional: false, reloadOnChange: true);
                })

             .ConfigureWebHostDefaults(webBuilder =>
                {
                    webBuilder.UseStartup<Startup>();
                });
OK。配置完毕,启动测试吧。测试方式:网关地址:端口+上游模板。看是否跳转微服务地址。
c) Ocelot结合Consul服务
再新建一个Json文件。命名为Ocelot_Config_Consul.json,写入以下内容。与Ocelot_Config_Origin.json文件中的内容相比。GlobalConfiguration中的内容添加配置注册中心的部分。以及Routes部分取消掉写死的DownstreamHostAndPorts,使用ServiceName对应注册中心的服务集群名称。Ocelot会到注册中心服务发现。
{
  //路由配置(16.1版本将ReRoutes换成Routes)
  "Routes": [
    {
      "DownstreamPathTemplate": "/api/{url}", // 下游(服务提供方)服务路由模板
      "DownstreamScheme": "https", //下游协议
      //"DownstreamHttpMethod": [ "Get","Post", "Put", "Delete" ], //下游Http请求类型
      "DownstreamHttpMethod": "Get", //下游Http请求类型?????
      "UpstreamHttpMethod": [ "Options", "Get", "Post", "Put", "Delete" ], //上游允许的Http请求方式
      "UseServiceDiscovery": true, //启用服务发现,若Ocelot集合Consul必须配置此项
      "UpstreamPathTemplate": "/OcelotNotes/{url}", //Hero:上游路径模版
      "ServiceName": "MicroService.SCscHero.Notes", //服务名称
      /*
       负载均衡算法,总共三种类型。
        LeastConnection:最小链接,将请求发往最空闲的那个服务器
        RoundRobin:轮询,轮流发送
        NoLoadBalance:无负载均衡,总是发往第一个请求或者是服务发现
        */
      "LoadBalancerOptions": {
        "Type": "LeastConnection"
      }
      //,
      //"QoSOptions": {
      //  "ExceptionsAllowedBeforeBreaking": 3, //允许多少个异常请求
      //  "DurationOfBreak": 10000, // 熔断的时间,单位为ms
      //  "TimeoutValue": 10000 //如果下游请求的处理时间超过多少则自如将请求设置为超时 默认90秒
      //}
      //"DownstreamHttpVersion": "",
      //"AddHeadersToRequest": {},
      //"AddClaimsToRequest": {},
      //"RouteClaimsRequirement": {},
      //"AddQueriesToRequest": {},
      //"RequestIdKey": "",
      //"FileCacheOptions": {
      //  "TtlSeconds": 0,
      //  "Region": ""
      //},
      //"AuthenticationOptions": {
      //  "AuthenticationProviderKey": "",
      //  "AllowedScopes": []
      //},
      //"HttpHandlerOptions": {
      //  "AllowAutoRedirect": true,
      //  "UseCookieContainer": true,
      //  "UseTracing": true,
      //  "MaxConnectionsPerServer": 100 //这控制内部HttpClient将打开多少连接。这可以在路线或全球一级设置。
      //},
      //"DangerousAcceptAnyServerCertificateValidator": false,
      ////路由限流配置
      //"RateLimitOptions": {
      //  "ClientWhitelist": [], //白名单
      //  "EnableRateLimiting": false, //是否启用限流
      //  "Period": "5s", //统计时间段:1s,5m,1h,1d
      //  "PeriodTimespan": 10, //客户端可以重试时间,单位秒
      //  "Limit": 3 //在统计时间段内允许的最大请求数量
      //},
      ////Polly配置
      //"QoSOptions": {
      //  "ExceptionsAllowedBeforeBreaking": 3, //允许多少个异常请求
      //  "DurationOfBreak": 5, //熔断的时间,单位为秒
      //  "TimeoutValue": 6000 //如果下游请求的处理时间超过多少则自动将请求设置为超时
      //},

      //"Priority": 0 //优先权顺序
    }
  ],

  //全局配置
  "GlobalConfiguration": {
    //"BaseUrl": "http://127.0.0.1:6299", //网关对外地址
    "RequestIdKey": "OcRequestId",
    "ReRouteIsCaseSensitive": true, //是否区分路由字母大小写
    "ServiceDiscoveryProvider": { //服务发现提供者,配置Consul地址
      "Host": "localhost", //Consul主机名称
      "Port": 8501, //Consul端口号
      "Type": "Consul" //必须指定Consul服务发现类型
    }
    //,
    ////限流相关配置
    //"RateLimitOptions": {
    //  "ClientIdHeader": "ClientId",
    //  "QuotaExceededMessage": "RateLimit SCscHero", //限流响应提示
    //  "RateLimitCounterPrefix": "ocelot",
    //  "DisableRateLimitHeaders": false,
    //  "HttpStatusCode": 429
    //}
  }
}
d) 路由优先级
如果访问路由被多个上游模板匹配,则按照优先级来决定转发到哪个下游模板。优先级属性是Routes对象的Priority,数据类型是Int,数值越大,优先级越高。
e) 配置文件合并
问题1:文件合并是什么?
文件合并将多个文件合并成一个文件。在Ocelot中的文件合并,是将拆分的多个Json文件合并成一个Json文件。
问题2:为什么要进行文件拆分和合并?
随着微服务的增多,Ocelot的Routes配置变得越来越繁杂,维护起来易出错,所以将一个完整的Ocelot配置文件拆分成多个包含Routes的文件和一个包含GlobalConfiguration的文件。此举可以提高配置文件的拓展性和伸缩性;
关于文件合并,在Ocelot中,已经为我们封装好了文件合并的方法。源码如下:
        public static IConfigurationBuilder AddOcelot(
          this IConfigurationBuilder builder,
          IWebHostEnvironment env) => builder.AddOcelot(".", env);

        public static IConfigurationBuilder AddOcelot(this IConfigurationBuilder builder, string folder, IWebHostEnvironment env)
        {
            string excludeConfigName = env == null || env.EnvironmentName == null ? string.Empty : "ocelot." + env.EnvironmentName + ".json";
            Regex reg = new Regex("^ocelot\.(.*?)\.json$", RegexOptions.IgnoreCase | RegexOptions.Singleline);
            List<FileInfo> list = new DirectoryInfo(folder).EnumerateFiles().Where<FileInfo>((Func<FileInfo, bool>)(fi => reg.IsMatch(fi.Name) && fi.Name != excludeConfigName)).ToList<FileInfo>();
            FileConfiguration fileConfiguration1 = new FileConfiguration();
            foreach (FileInfo fileInfo in list)
            {
                if (list.Count <= 1 || !fileInfo.Name.Equals("ocelot.json", StringComparison.OrdinalIgnoreCase))
                {
                    FileConfiguration fileConfiguration2 = JsonConvert.DeserializeObject<FileConfiguration>(System.IO.File.ReadAllText(fileInfo.FullName));
                    if (fileInfo.Name.Equals("ocelot.global.json", StringComparison.OrdinalIgnoreCase))
                        fileConfiguration1.GlobalConfiguration = fileConfiguration2.GlobalConfiguration;
                    fileConfiguration1.Aggregates.AddRange((IEnumerable<FileAggregateRoute>)fileConfiguration2.Aggregates);
                    fileConfiguration1.Routes.AddRange((IEnumerable<FileRoute>)fileConfiguration2.Routes);
                }
            }
            System.IO.File.WriteAllText("ocelot.json", JsonConvert.SerializeObject((object)fileConfiguration1));
            builder.AddJsonFile("ocelot.json", false, false);
            return builder;
        }
看了源码之后,我们看到了此段代码主要是用正则表达式遍历符合命名条件的文件,进行内容组装。综上,为了避坑,归纳几点注意事项:
- 分拆文件命名必须为:ocelot.[XXXX].json
- 分拆文件不能命名为:ocelot.[环境变量值].json(本条中容易被忽略,也容易踩坑很久出不来)
- 分拆文件的全局配置文件须要命名为ocelot.global.json
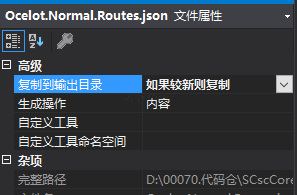
了解了文件合并的原理后,我们把原来的文件分拆成多个文件,并遵循上述命名方式。在拓展Json文件的时候,注意看下文件属性->复制到输出目录的选项,是否是"如果较新则复制"。
接着,我们需要修改Program.cs文件中文件引入方式,之前是引入方式是这样的:
                .ConfigureAppConfiguration(c =>
                {
                    c.AddJsonFile("Ocelot_Config_Consul.json", optional: false, reloadOnChange: true);
                })
现在,将原来的CreateHostBuilder()方法替换为:
        public static IHostBuilder CreateHostBuilder(string[] args) =>
            Host.CreateDefaultBuilder(args)
                .ConfigureWebHostDefaults(webBuilder =>
                {
                    webBuilder.UseStartup<Startup>();
                    webBuilder.ConfigureAppConfiguration((hostingContext, config) =>
                    {
                        config
                            .SetBasePath(hostingContext.HostingEnvironment.ContentRootPath)
                            .AddJsonFile("appsettings.json", true, true)
                            .AddJsonFile($"appsettings.{hostingContext.HostingEnvironment.EnvironmentName}.json", true,true)//引入与环境有关配置
                            .AddOcelot(hostingContext.HostingEnvironment)//调用Ocelot封装的文件合并
                            .AddEnvironmentVariables();

                    });
                });
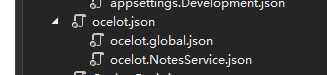
配置完成后,重新运行,会生成一个ocelot.json文件。我们之前修改命名后的文件折叠到了此文件的下面(拓展文件的名字的前缀与已存在的文件名字一致时,这两个json文件会折叠在一起)。
OK,文件合并已完成,快去检查下新生成的ocelot.json文件中的配置是否达到预期功能了呢?
f) 自定义负载均衡
在上文的配置注释中,我们发现Ocelot支持三种负载均衡策略(实际是两个参数,还有一种是无负载均衡),这显然功能有些"单薄"。
ocelot支持的负载均衡类型:
LeastConnection:最小链接,将请求发往最空闲的那个服务器
RoundRobin:轮询,轮流发送
NoLoadBalance:无负载均衡,总是发往第一个请求或者是服务发现
我们可以拓展自定义的负载均衡算法Ocelot官方文档写的很清楚了,不过貌似是旧版本的?看着接口参数变了。如下是博主写的一个"随机负载均衡"以此为例,说下如何应用。
创建一个类文件,命名为"CustomRandomLoadBalancer.cs"。
using System;
using System.Collections.Generic;
using System.Threading.Tasks;
using Microsoft.AspNetCore.Http;
using Ocelot.LoadBalancer.LoadBalancers;
using Ocelot.Responses;
using Ocelot.Values;

namespace MicroService.SCscHero.Gateway.OcelotExtension
{
    /// <summary>
    /// 自定义负载均衡策略
    /// </summary>
    public class CustomRandomLoadBalancer : ILoadBalancer
    {
        private readonly Func<Task<List<Service>>> _services;
        private readonly object _lock = new object();

        private int _index;
        public CustomRandomLoadBalancer()
        {

        }
        public CustomRandomLoadBalancer(Func<Task<List<Service>>> services)
        {
            _services = services;
        }

        public async Task<Response<ServiceHostAndPort>> Lease(HttpContext httpContext)
        {
            var serviceList = await _services();

            if (serviceList == null)
                return new ErrorResponse<ServiceHostAndPort>(new ErrorInvokingLoadBalancerCreator(new Exception("负载均衡算法错误")));

            lock (_lock)
            {
                if (serviceList.Count == 1)
                    return new OkResponse<ServiceHostAndPort>(serviceList[0].HostAndPort);
                _index = new Random().Next(serviceList.Count);
                return new OkResponse<ServiceHostAndPort>(serviceList[_index].HostAndPort);
            }
        }

        public void Release(ServiceHostAndPort hostAndPort)
        {

        }
    }
}
向Startup.cs文件中的ConfigureService()方法中的Ocelot服务后的AddCustomLoadBalancer
.AddCustomLoadBalancer<CustomRandomLoadBalancer>();//自定义负载均衡策略
修改Json配置文件中的LoadBalancerOptions对象中的Type属性为"CustomRandomLoadBalancer"。
    "LoadBalancerOptions": {
        "Type": "CustomRandomLoadBalancer"
    },
g) 更多的Ocelot配置
建议访问官方文档:传送门
三、Ocelot功能挖掘 完成度:100%
a) 缓存
安装Nuget包后,在Startup.cs文件的ConfigureService()方法中注册服务。
            services.AddOcelot().AddConsul().AddPolly()
                //Ocelot缓存
                .AddCacheManager(x =>
                {
                    x.WithDictionaryHandle(); //默认字典存储
                });
接着在Json配置文件的Routes对象中添加配置
      //缓存配置
      "FileCacheOptions": {
        "TtlSeconds": 15,//缓存更新秒数
        "Region": "UserCache" //可以调用Api清理
      }
配置完成后,就可以测试缓存是否生效,可以在接口中返回当前时间,在15秒内更新看是否有变化。
b) 自定义缓存
在某些业务场景中,可能需要我们自定义缓存逻辑。可以在Startup.cs文件的ConfigureService中将内置IOC容器中Ocelot缓存接口的实现替换掉,替换实现命名为OcelotCustomCache。
            //将IOcelotCache<CachedResponse>替换成OcelotCustomCache
            services.AddSingleton<IOcelotCache<CachedResponse>, OcelotCustomCache>();
在替换前可以下载Ocelot源码、或反编译看下缓存的源码。
然后我们在新创建的OcelotCustomCache文件中,重写一下IOcelotCache接口的方法。以下是博主的重写示例。
using System;
using System.Collections.Generic;
using System.Linq;
using System.Threading.Tasks;
using Ocelot.Cache;

namespace MicroService.SCscHero.Gateway.OcelotExtension
{

    public class OcelotCustomCache : IOcelotCache<CachedResponse>
    {
        private class CacheDataModel
        {
            public CachedResponse CachedResponse { get; set; }
            public DateTime Timeout { get; set; }
            public string Region { get; set; }
        }

        private static Dictionary<string, CacheDataModel> CustomCacheDictionary = new
             Dictionary<string, CacheDataModel>();

        public void Add(string key, CachedResponse value, TimeSpan ttl, string region)
        {
            Console.WriteLine($"This is {nameof(OcelotCustomCache)}.{nameof(Add)}");
            CustomCacheDictionary[key] = new CacheDataModel()
            {
                CachedResponse = value,
                Region = region,
                Timeout = DateTime.Now.Add(ttl)
            };
        }

        public void AddAndDelete(string key, CachedResponse value, TimeSpan ttl, string region)
        {
            Console.WriteLine($"This is {nameof(OcelotCustomCache)}.{nameof(AddAndDelete)}");
            CustomCacheDictionary[key] = new CacheDataModel()
            {
                CachedResponse = value,
                Region = region,
                Timeout = DateTime.Now.Add(ttl)
            };
        }

        public void ClearRegion(string region)
        {
            Console.WriteLine($"This is {nameof(OcelotCustomCache)}.{nameof(ClearRegion)}");
            var keyList = CustomCacheDictionary.Where(kv => kv.Value.Region.Equals(region)).Select(kv => kv.Key);
            foreach (var key in keyList)
            {
                CustomCacheDictionary.Remove(key);
            }
        }

        public CachedResponse Get(string key, string region)
        {
            Console.WriteLine($"This is {nameof(OcelotCustomCache)}.{nameof(Get)}");
            if (CustomCacheDictionary.ContainsKey(key) && CustomCacheDictionary[key] != null
                && CustomCacheDictionary[key].Timeout > DateTime.Now
                && CustomCacheDictionary[key].Region.Equals(region))
            {
                return CustomCacheDictionary[key].CachedResponse;
            }
            else
                return null;
        }
    }
}
重写完后,依照上文的配置,测试一下控制台有没有输出即可看出是否生效。
c) 熔断、超时
在安装了Nuget包之后。在Startup.cs文件中的ConfigureService()方法配置Polly服务:
.AddPolly()
在Json配置文件的Routes对象中添加配置
      "QoSOptions": { //超时、熔断
        "ExceptionsAllowedBeforeBreaking": 3, //允许多少个异常请求
        "DurationOfBreak": 10000, // 熔断的时间,单位为ms
        "TimeoutValue": 10 //超时时间,单位为ms, 默认90秒
      }
配置完成后,可修改熔断配置中的TimeoutValue属性设为10和10000,作对比,测试是否实现熔断功能。
d) 限流
令牌桶(Token Bucket)、漏桶(Leaky Bucket)、计数器算法是常用的三种限流算法,Ocelot的限流算法就是计数器算法。限流的配置,只需要在Json配置文件的Routes对象中加入如下配置。
      "RateLimitOptions": {
        "ClientWhitelist": [ "SCscHeroTokenAPI ],
        //白名单功能,在Request的Header增加名为ClientId的Key,输入白名单中的元素的Value即可访问(区分大小写)。
        "EnableRateLimiting": true,//限流是否开启
        "Period": "5m", //1s, 5m, 1h, 1d
        "PeriodTimespan": 30, //多少秒之后客户端可以重试
        "Limit": 5 //统计时间段内允许的最大请求数量
      }
在GlobalConfiguration对象中加入如下代码。
    //限流相关配置
    "RateLimitOptions": {
      "ClientIdHeader": "ClientId",//Request请求头的Key
      "QuotaExceededMessage": "RateLimit SCscHero", //限流响应的自定义提示
      "RateLimitCounterPrefix": "ocelot",//待研究,看翻译应该是限流计数器前缀
      "DisableRateLimitHeaders": false,
      "HttpStatusCode": 666
    }
配置完成后,我们看下这段配置能实现什么样的限流效果。以代码示例,效果是5min之内,最多访问5次。超过限制次数后,弹出自定义提示消息"RateLimit SCscHero",30秒后重新计算次数。如果请求头中存在键为"ClientId",值为"SCscHeroTokenAPI",则白名单通过,不进行限流。(注意理解Period和Limit,并不是"5min内访问5次满后,等5min之后才能访问")
四、Ocelot集成其他组件 完成度:10%
a) Nginx
结合Nginx或其他负载均衡服务器实现网关层的负载均衡。此部分暂时未写好,请等待更新。
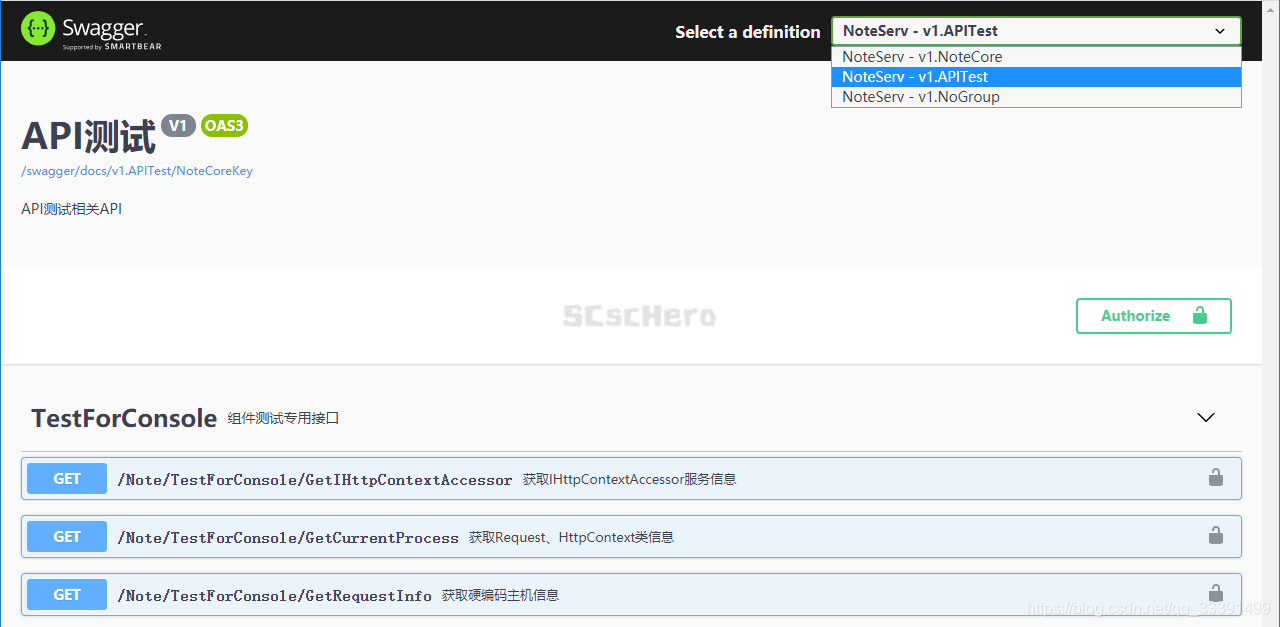
b) Swagger
与下游Swagger结合生成下游服务的API文档(可以囊括分组的Swagger文档)。效果展示图如下。此部分暂时未写好,请等待更新。
c) IdentityServer4
与IdentityServer4可以实现授权认证、权限检查、JWT、授权码认证OAuth2.0等相关功能。此部分暂时未写好,请等待更新。
五、避坑指南 完成度:100%
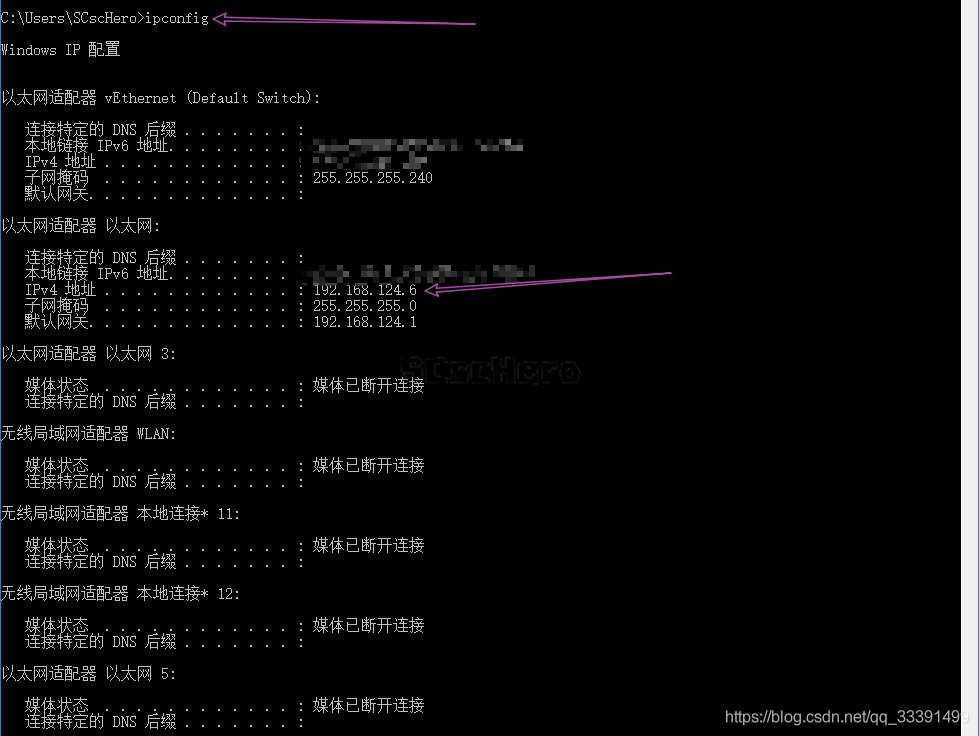
坑1:本地开发中可能会遇到。Consul和微服务部署在相同IP的服务器上,可以从源码中看出,其被翻译成了主机名:端口号。但在实际的部署中,Consul和任何一个微服务节点,都不可能在同一个服务器/容器中。他们IP不可能相同。
在本机上,有两个处理方法。第一个处理方式:Consul的node节点改成局域网IP。第二个处理方式:微服务实例注册的时候,Url将localhost更改成局域网IP。

坑2:微服务注册Consul时,如果带http/https协议头,则在使用Ocelot时候,控制器可能会打印如下日志。所以微服务在注册的时候,将Scheme可以去掉。协议头在Json配置文件的DownstreamScheme属性配置即可。
dbug: Ocelot.LoadBalancer.Middleware.LoadBalancingMiddleware[0]
	  requestId: 8000001a-0004-ff00-b63f-84710c7967bb, previousRequestId: no previous request id, message: there was an error leasing the loadbalancer, setting pipeline error

warndbug: Ocelot.LoadBalancer.Middleware.LoadBalancingMiddleware[0]
	  requestId: 8000001a-0004-ff00-b63f-84710c7967bb, previousRequestId: no previous request id, message: There were no services in NoLoadBalancer

warn: Ocelot.Responder.Middleware.ResponderMiddleware[0]
	  requestId: 8000001a-0004-ff00-b63f-84710c7967bb, previousRequestId: no previous request id, message: Error Code: ServicesAreEmptyError Message: There were no services in NoLoadBalancer errors found in ResponderMiddleware. Setting error response for request path:/api/values, request method: GET

dbugdbug: Ocelot.Errors.Middleware.ExceptionHandlerMiddleware[0]
	  requestId: 8000001a-0004-ff00-b63f-84710c7967bb, previousRequestId: no previous request id, message: ocelot pipeline finished`
坑3:在Ocelot配置文件中的Routes对象中的DownstreamHttpMethod属性,它的值是只接收一个方法。另外,博主没搞明白这个属性的用处在哪里?烦请知道的小伙伴告知一下。博主之前配置了几个方法,一直报错,类似坑2的错误,后来删掉了这个属性就OK了。所以,再三注意UpstreamHttpMethod属性接口的是个数组,DownstreamHttpMethod接收的是一个值。
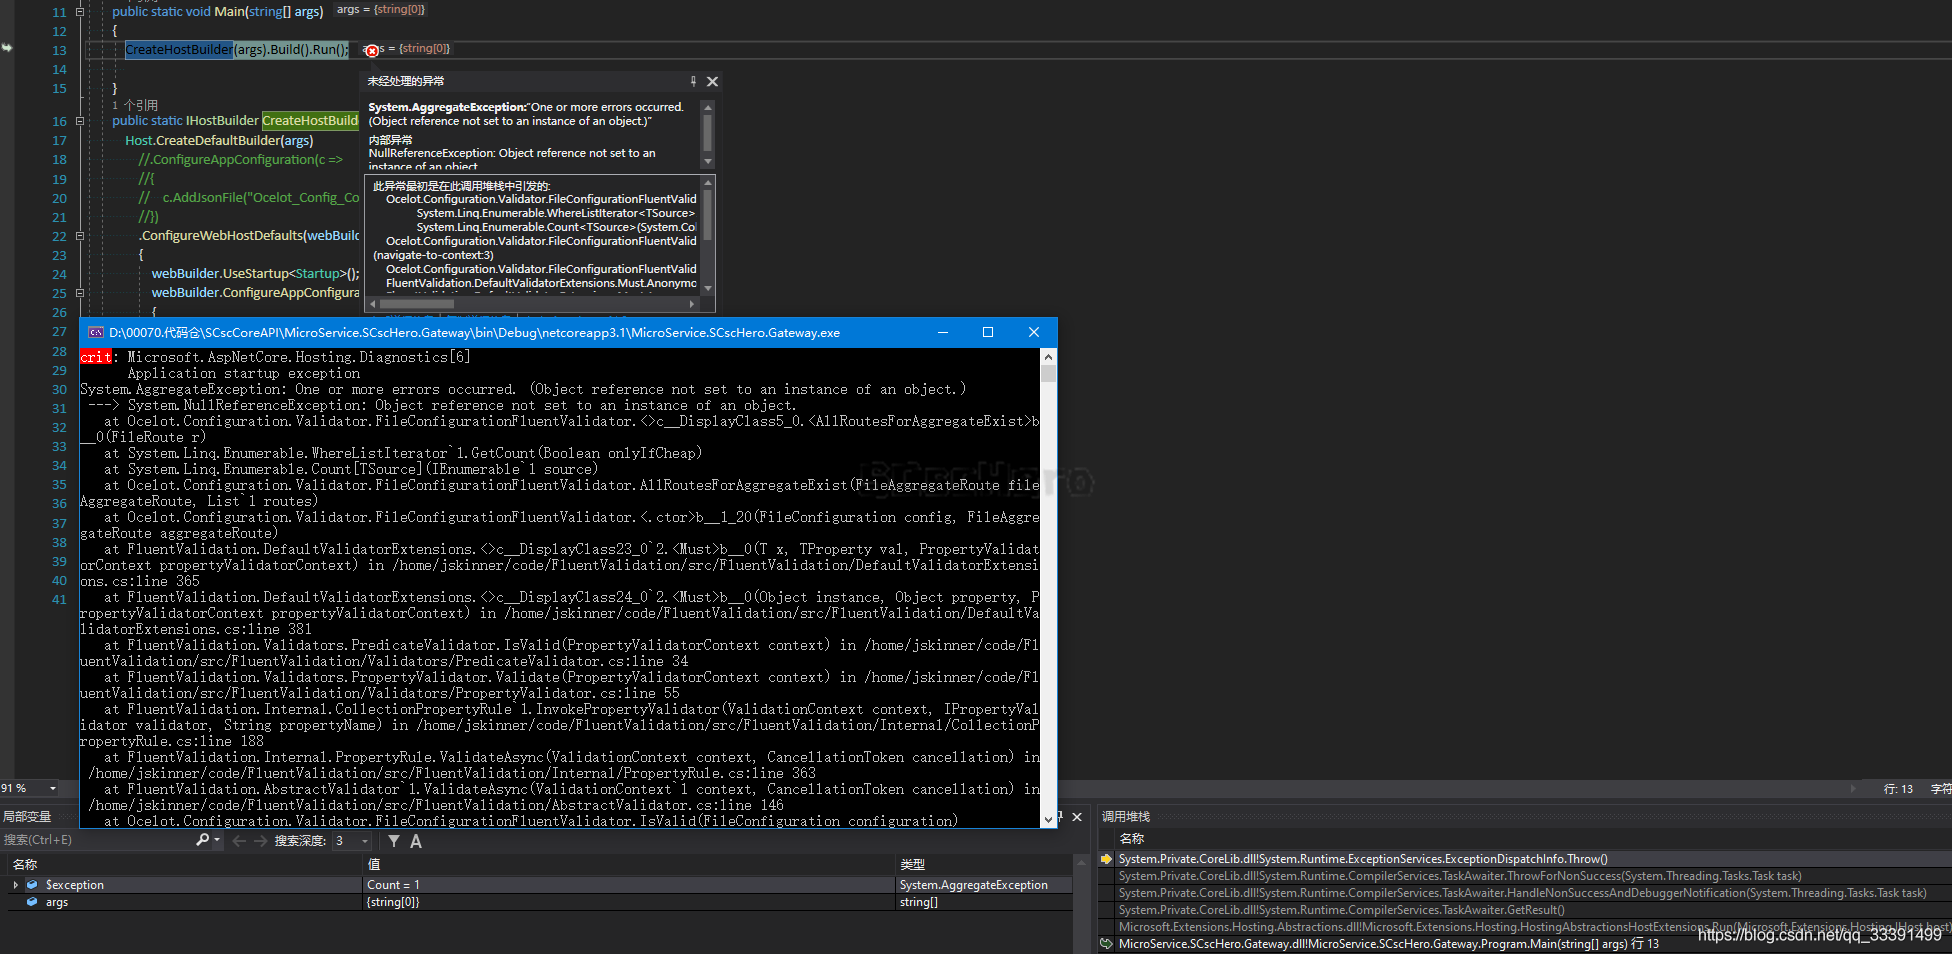
坑4:阅读其打印后的信息,发现错误信息包含两句有指向性信息。初步确定是聚合请求配置某个键异常。结合Ocelot16.0.1的Key名更改,ReRoutes更改为Routes。聚合请求配置ReRouteKeys参数也要更改成RouteKeys。再次启动,重启成功。
NullReferenceException: Object reference not set to an instance of an object.(对象为空异常)
FileAggregateRoute(聚合请求)
System.AggregateException
HResult=0x80131500
Message=One or more errors occurred. (Object reference not set to an instance of an object.)
Source=System.Private.CoreLib
StackTrace:
at System.Threading.Tasks.Task.ThrowIfExceptional(Boolean includeTaskCanceledExceptions)
at System.Threading.Tasks.Task.Wait(Int32 millisecondsTimeout, CancellationToken cancellationToken)
at System.Threading.Tasks.Task.Wait()
at MicroService.SCscHero.Gateway.Startup.Configure(IApplicationBuilder app, IWebHostEnvironment env) in [博客代码]MicroService.SCscHero.GatewayStartup.cs:line 84
at System.RuntimeMethodHandle.InvokeMethod(Object target, Object[] arguments, Signature sig, Boolean constructor, Boolean wrapExceptions)
at System.Reflection.RuntimeMethodInfo.Invoke(Object obj, BindingFlags invokeAttr, Binder binder, Object[] parameters, CultureInfo culture)
at Microsoft.AspNetCore.Hosting.ConfigureBuilder.Invoke(Object instance, IApplicationBuilder builder)
at Microsoft.AspNetCore.Hosting.ConfigureBuilder.<>c__DisplayClass4_0.b__0(IApplicationBuilder builder)
at Microsoft.AspNetCore.Hosting.GenericWebHostBuilder.<>c__DisplayClass13_0.b__2(IApplicationBuilder app)
at Microsoft.AspNetCore.MiddlewareAnalysis.AnalysisStartupFilter.<>c__DisplayClass0_0.b__0(IApplicationBuilder builder)
at Microsoft.AspNetCore.Mvc.Filters.MiddlewareFilterBuilderStartupFilter.<>c__DisplayClass0_0.g__MiddlewareFilterBuilder|0(IApplicationBuilder builder)
at Microsoft.AspNetCore.HostFilteringStartupFilter.<>c__DisplayClass0_0.b__0(IApplicationBuilder app)
at Microsoft.AspNetCore.Hosting.GenericWebHostService.d__31.MoveNext()
at System.Runtime.ExceptionServices.ExceptionDispatchInfo.Throw()
at System.Runtime.CompilerServices.TaskAwaiter.ThrowForNonSuccess(Task task)
at System.Runtime.CompilerServices.TaskAwaiter.HandleNonSuccessAndDebuggerNotification(Task task)
at System.Runtime.CompilerServices.ConfiguredTaskAwaitable.ConfiguredTaskAwaiter.GetResult()
at Microsoft.Extensions.Hosting.Internal.Host.d__9.MoveNext()
at System.Runtime.ExceptionServices.ExceptionDispatchInfo.Throw()
at System.Runtime.CompilerServices.TaskAwaiter.ThrowForNonSuccess(Task task)
at System.Runtime.CompilerServices.TaskAwaiter.HandleNonSuccessAndDebuggerNotification(Task task)
at System.Runtime.CompilerServices.TaskAwaiter.GetResult()
at Microsoft.Extensions.Hosting.HostingAbstractionsHostExtensions.d__4.MoveNext()
at System.Runtime.ExceptionServices.ExceptionDispatchInfo.Throw()
at Microsoft.Extensions.Hosting.HostingAbstractionsHostExtensions.d__4.MoveNext()
at System.Runtime.ExceptionServices.ExceptionDispatchInfo.Throw()
at System.Runtime.CompilerServices.TaskAwaiter.ThrowForNonSuccess(Task task)
at System.Runtime.CompilerServices.TaskAwaiter.HandleNonSuccessAndDebuggerNotification(Task task)
at System.Runtime.CompilerServices.TaskAwaiter.GetResult()
at Microsoft.Extensions.Hosting.HostingAbstractionsHostExtensions.Run(IHost host)
at MicroService.SCscHero.Gateway.Program.Main(String[] args) in [博客代码]MicroService.SCscHero.GatewayProgram.cs:line 13

此异常最初是在此调用堆栈中引发的:
Ocelot.Configuration.Validator.FileConfigurationFluentValidator.AllRoutesForAggregateExist.AnonymousMethod__0(Ocelot.Configuration.File.FileRoute) (位于 FileConfigurationFluentValidator.cs 中)
System.Linq.Enumerable.WhereListIterator.GetCount(bool)
System.Linq.Enumerable.Count(System.Collections.Generic.IEnumerable)
Ocelot.Configuration.Validator.FileConfigurationFluentValidator.AllRoutesForAggregateExist(Ocelot.Configuration.File.FileAggregateRoute, System.Collections.Generic.List<Ocelot.Configuration.File.FileRoute>) (位于 FileConfigurationFluentValidator.cs 中)
Ocelot.Configuration.Validator.FileConfigurationFluentValidator..ctor.AnonymousMethod__1_20(Ocelot.Configuration.File.FileConfiguration, Ocelot.Configuration.File.FileAggregateRoute) (位于 FileConfigurationFluentValidator.cs 中)
FluentValidation.DefaultValidatorExtensions.Must.AnonymousMethod__0(T, TProperty, FluentValidation.Validators.PropertyValidatorContext) (位于 DefaultValidatorExtensions.cs 中)
FluentValidation.DefaultValidatorExtensions.Must.AnonymousMethod__0(object, object, FluentValidation.Validators.PropertyValidatorContext) (位于 DefaultValidatorExtensions.cs 中)
FluentValidation.Validators.PredicateValidator.IsValid(FluentValidation.Validators.PropertyValidatorContext) (位于 PredicateValidator.cs 中)
FluentValidation.Validators.PropertyValidator.Validate(FluentValidation.Validators.PropertyValidatorContext) (位于 PropertyValidator.cs 中)
FluentValidation.Internal.CollectionPropertyRule.InvokePropertyValidator(FluentValidation.ValidationContext, FluentValidation.Validators.IPropertyValidator, string) (位于 CollectionPropertyRule.cs 中)
...
[调用堆栈已截断]
内部异常 1:
六、更多的学习资料 完成度:100%
【官方文档】https://ocelot.readthedocs.io/en/latest/index.html
【Github】待上传Github。
原创博文,未经许可请勿转载。
如有帮助,欢迎点赞、收藏、关注。如有问题,请评论留言!如需与博主联系的,直接博客私信SCscHero即可。