1 ActiveMQ是啥
ActiveMQ 就是一个消息中间件,市面上现在有很多的消息中间件开源产品,比如,RocketMQ、RabbitMQ、Kafka等。
拿一个简单的比喻来说,消息中间件就是一个中转站,在程序中加的一个中转站,有了这样一个类似快递的存储站点,可以大大的减轻物流的压力,而对应到程序中,也就是减轻了程序的压力。
另外不得不说的是,ActiveMQ是遵从 JMS 规范的消息中间件,那么什么是 JMS 规范呢?
JMS 规范
JMS是java的消息服务,JMS的客户端之间可以通过JMS服务进行异步的消息传输。
消息模型
- Point-to-Point(P2P),点对点
- P2P模式图
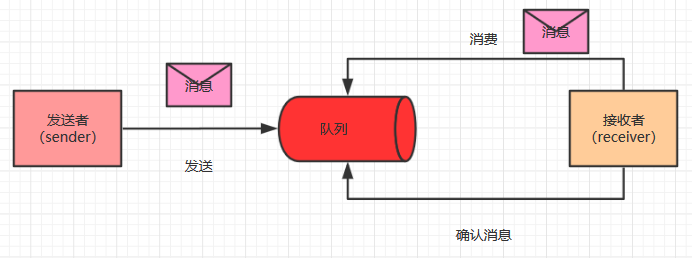
如上图,有几个需要了解的概念,发送者、接收者、消息队列。
在点对点模型中,一般消息由发送者将消息发送到消息队列中,然后,接收者从消息队列中消费消息,消息被消费者消费之后,消息就不存在了。
- Publish/Subscribe(Pub/Sub),发布订阅模型
- Pub/Sub模式图
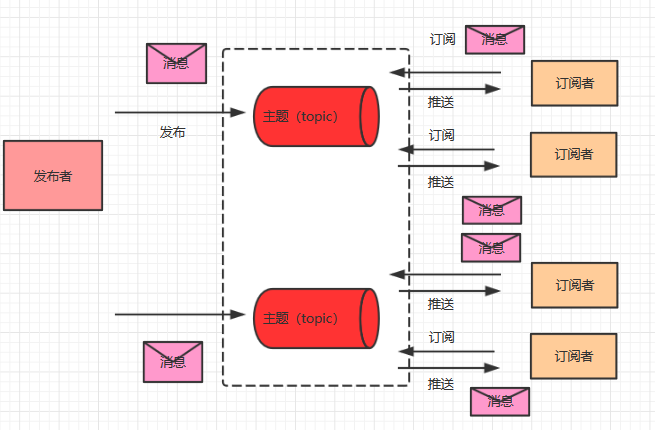
如上图,有下面几个概念,主题、发布者、订阅者。
在发布订阅模型中,发布者通常将消息发布到主题(topic)中,然后,订阅者通过订阅主题来消费消息,与 P2P 模型不同的是,发布订阅模型的消息是可以被多次消费的!
两种模式的区别
1、P2P在发送者和接收者之间没有时间上的依赖性,也就是说发送者发送了消息之后,不管接收者有没有运行,不会影响消息发送到队列,而Pub/Sub模式有时间上的依赖性,消费者必须先订阅主题,才能够消费消息。
2、P2P模式的每个消息只能有一个消费者,消费完了消息就不存在了,Pub/Sub模式可以有多个消费者。
2 为什么需要使用消息中间件
到这里我就不得不讲一个小故事了!
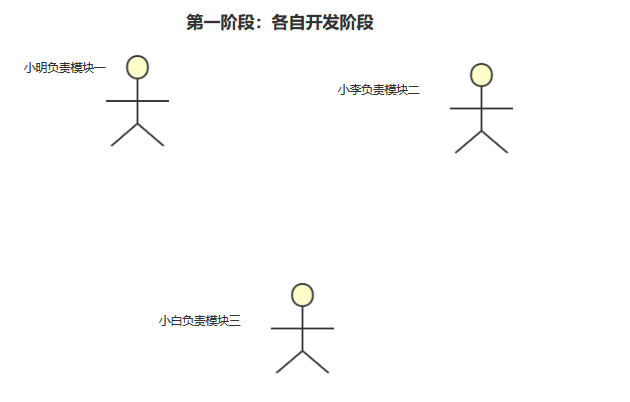
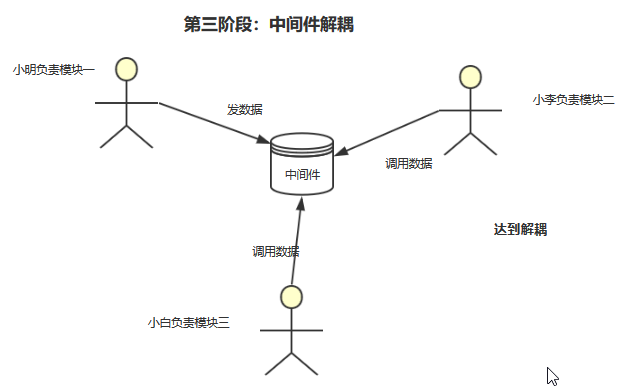
小明、小李和小白都是在一个项目组的 Java 开发人员,但是呢,他们的团队比较小,只有几个开发人员,而他们正在开发一个项目,这个项目比较庞大,所以,项目负责人就考虑到项目进度,给他们每个人都分一个模块单独开发,这样就能够加快项目的进度了。
然而,万万没有想到的是,当项目开发到一定阶段的时候,小明、小李和小白各自负责的模块都需要项目调用数据了,但是呢,现在问题来了,每次小白向小明需要数据的时候,小明总是要改接口来满足小白的需求,而且还会担心小明的系统会不会出问题,如果出了问题就调用不了怎么办?这样就总是耽误项目的进度,小李那边也是出现了这种问题!
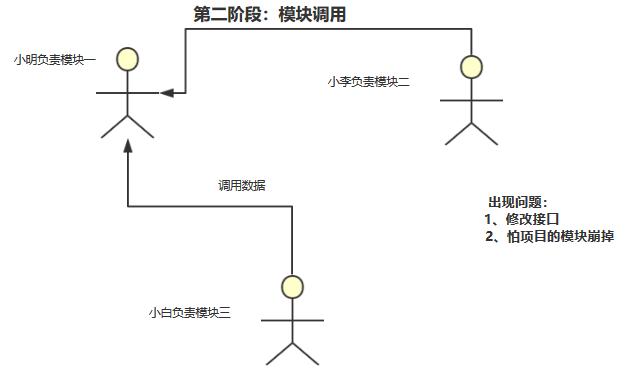
于是,小明就想了个办法,如果在各个模块之间再加一个模块,用来处理数据,比如一个队列来存数据,每次就把数据丢到那个模块中去,这样就不用担心那个问题啦。小明是不是很聪明!
其实,小明没有做足够的调查,他说的这个模块,就是 ActiveMQ 的作用所在啦。
也就是降低模块与模块之间的耦合度,达到解耦的目的!
然后,他们又遇到了一个问题,他们在开发一个用户注册模块的时候,是先注册,然后写入数据库,然后再发送邮件或者短信通知用户,但是,他们发现这样的系统速度很慢!

后来,他们发现了消息中间件后,改造了一下,变成了下面的模式。
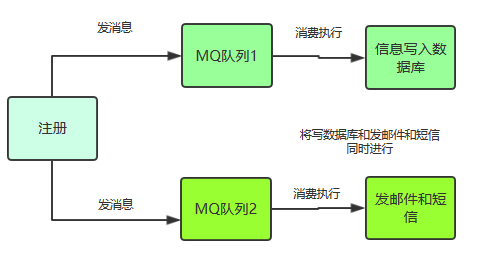
他们也发现了,这就是消息中间件带来的异步执行的优势!
系统速度杠杠的!
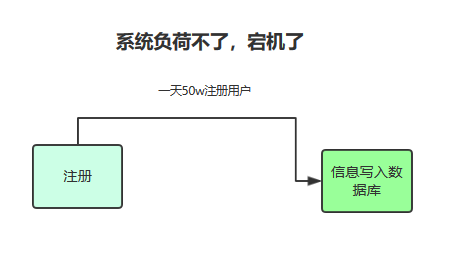
后来,小明、小李和小白开发的系统呢上线了,但是,公司业快速发展,当流量大的时候,系统的数据调用总是负荷不了,出现宕机的问题,没办法,只能再改代码了!
他们灵机一动,前面都用了消息中间件了,但是没有发现另外一个功能,我们可以加入消息中间件,控制每次消费消息的数量,保证系统不会宕机,剩下的消息在系统流量小的时候再定时执行不就可以了。简直不要太好!
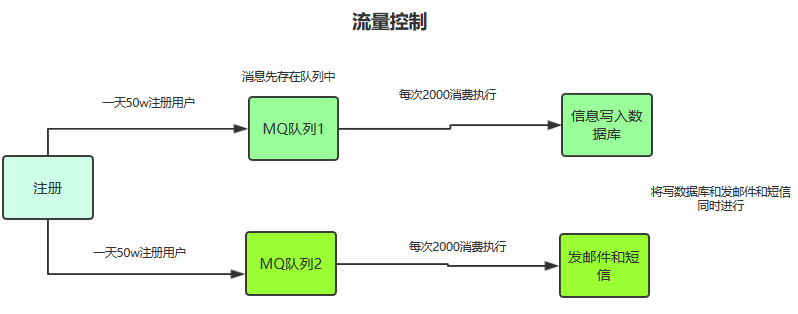
小明、小李和小白经过这个系统的开发,终于明白了消息中间件的优势了!
3 安装使用
3.1 下载
到下面的官网地址下载,包括linux和Windows的不同版本。
3.2 解压使用
windows使用方法
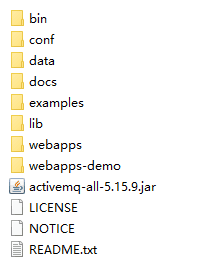
首先,解压到一个自己的目录,ActiveMQ目录如下;
进入到对应的 bin 目录;
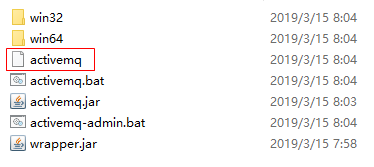
里面有一个 activemq 的可执行文件,打开 cmd,执行:activemq start

成功启动了!
关闭;
activemq stop
linux 使用方法
解压到指定目录;
sudo tar zxvf activemq-x.x.x-bin.tar.gz
进入到 bin 目录,执行下面命令;
./activemq start
关闭;
./activemq stop
后台管理界面
启动成功之后,可以输出http://localhost:8161/admin/查看 ActiveMQ 的后台管理界面,用户名和密码都为 admin。

ok,到这里,ActiveMQ的安装和基本使用应该没有问题了,接下来,我们使用 ActiveMQ 的 Java API 从一个入门实例开始讲起!
4 ActiveMQ入门程序
4.1 前提条件
在开始之前,先申明一下需要的 Java 环境的配置,相关配置自行解决哦!
- Java JDK1.7 以上
- Maven 3.0 以上
- 开发工具 IDEA
4.2 带你入门
step1:导入 Maven 相关依赖;
<build>
        <plugins>
            <plugin>
                <groupId>org.apache.maven.plugins</groupId>
                <artifactId>maven-compiler-plugin</artifactId>
                <configuration>
                    <source>8</source>
                    <target>8</target>
                </configuration>
            </plugin>
        </plugins>
    </build>

    <properties>
        <project.build.sourceEncoding>UTF-8</project.build.sourceEncoding>
        <spring.version>4.3.10.RELEASE</spring.version>
    </properties>

    <dependencies>
        <dependency>
            <groupId>org.apache.activemq</groupId>
            <artifactId>activemq-all</artifactId>
            <version>5.15.0</version>
        </dependency>
        <dependency>
            <groupId>org.springframework</groupId>
            <artifactId>spring-jms</artifactId>
            <version>${spring.version}</version>
        </dependency>
        <dependency>
            <groupId>org.apache.commons</groupId>
            <artifactId>commons-pool2</artifactId>
            <version>2.6.2</version>
        </dependency>
        <dependency>
            <groupId>junit</groupId>
            <artifactId>junit</artifactId>
            <version>4.12</version>
        </dependency>
        <dependency>
            <groupId>org.springframework</groupId>
            <artifactId>spring-test</artifactId>
            <version>4.2.5.RELEASE</version>
        </dependency>
    </dependencies>
step2:创建发送端类;
/**
 * @ClassName JmsSender
 * @Description
 * @Author 欧阳思海
 * @Date 2019/8/13 16:39
 * @Version 1.0
 **/
public class JmsSender {
    public static void main(String[] args) {
        ConnectionFactory connectionFactory = new ActiveMQConnectionFactory("tcp://localhost:61616");
        Connection connection = null;
        try {
            connection = connectionFactory.createConnection();
            connection.start();

            Session session = connection.createSession(Boolean.FALSE, Session.CLIENT_ACKNOWLEDGE);
            Destination destination = session.createQueue("queue");
            MessageProducer producer = session.createProducer(destination);
            TextMessage textMessage = session.createTextMessage("hello activemq");
            producer.send(textMessage);

            //session.commit();
            session.close();
        } catch (JMSException e) {
            e.printStackTrace();
        } finally {
            if (connection != null) {
                try {
                    connection.close();
                } catch (JMSException e) {
                    e.printStackTrace();
                }
            }
        }
    }
}
上面的代码创建了一个消息发送者,步骤如下:
1、创建ActiveMQ实现的JMS规范的实现类ActiveMQConnectionFactory的对象connectionFactory ,并且给定参数ActiveMQ的服务地址;
2、由connectionFactory调用方法createConnection创建连接connection对象;
3、由connection对象调用createSession方法创建session会话对象;
4、有了session对象之后,就可以发送者、队列或者主题了,这里创建队列,session.createQueue("queue"),并给定了队列名称为queue。
5、session对象通过方法createProducer创建生产者,并且创建消息session.createTextMessage("hello activemq");
6、生产者调用send的方法发送消息,producer.send(textMessage);
通过上面的步骤就可以将消息发送到队列中了,接着只要等待消费者消费消息即可,消息消费后,消息就消失了。
通过上面的讲解,也将JMS的主要的接口都概括了,包括:ConnectionFactory(连接工厂)、Session(会话)、Connection(连接);
step3:创建消费端类;
/**
 * @ClassName JmsReceiver
 * @Description
 * @Author 欧阳思海
 * @Date 2019/8/13 16:47
 * @Version 1.0
 **/
public class JmsReceiver {
    public static void main(String[] args) {
        ConnectionFactory connectionFactory = new ActiveMQConnectionFactory("tcp://localhost:61616");
        Connection connection = null;
        try {
            //创建连接
            connection = connectionFactory.createConnection();
            connection.start();

            Session session = connection.createSession(Boolean.TRUE, Session.AUTO_ACKNOWLEDGE);

            //创建队列(如果队列已经存在则不会创建,queue是队列名称)
            //destination表示目的地
            Destination destination = session.createQueue("queue");
            //创建消息接收者
            MessageConsumer consumer = session.createConsumer(destination);

            TextMessage textMessage = (TextMessage) consumer.receive();
            System.out.println(textMessage.getText());
            session.commit();
            session.close();
        } catch (JMSException e) {
            e.printStackTrace();
        } finally {
            if (connection != null) {
                try {
                    connection.close();
                } catch (JMSException e) {
                    e.printStackTrace();
                }
            }
        }
    }
}
消费者和生产者的差别不大,前面的创建工厂、创建连接、创建会话对象和生产者一样,区别在于,session.createConsumer(destination)通过session创建消费者,然后,调用receive方法接受消息。
运行发送端,查看后台管理界面,点击 Queues 选项,发现有一个入队的消息,并且没有出队列;

运行接收端;
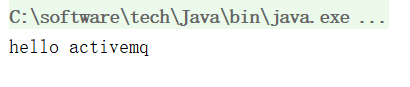
再查看后台管理界面,消息被消费了;

5 ActiveMQ整合Spring
这一部分花了挺多时间琢磨的,首先是应为在实际的开发中,我们整合Spring来开发项目是最多的一种方式,这一块如果可以学透的话,对于项目开发是非常有好处的,出于这个出发点,尽可能的把相关的知识讲解的全面一些。
首先,这一部分分为以下三个部分来讲解。
- 不使用 Spring 配置文件方式
- 使用 Spring 配置文件方式
- 注解方式(0配置)
5.1 前提条件
- JDK 1.7 以上
- Maven 3.0 以上
- Spring 4.3.1 ,或者以上版本
- ActiveMQ 5.15.9 目前最新稳定版本
项目结构
这次搭建的项目是一个子模块聚合的项目,结构如下;

这个聚合的项目分为生产者(Producer) 和消费者(Consumer)两个子模块。
导入 Maven 依赖
<properties>
        <project.build.sourceEncoding>UTF-8</project.build.sourceEncoding>
        <spring.version>4.3.10.RELEASE</spring.version>
    </properties>

    <dependencyManagement>
        <dependencies>
            <dependency>
                <groupId>org.apache.activemq</groupId>
                <artifactId>activemq-all</artifactId>
                <version>5.15.9</version>
            </dependency>
            <dependency>
                <groupId>org.springframework</groupId>
                <artifactId>spring-jms</artifactId>
                <version>${spring.version}</version>
            </dependency>
            <dependency>
                <groupId>org.apache.commons</groupId>
                <artifactId>commons-pool2</artifactId>
                <version>2.6.2</version>
            </dependency>
            <dependency>
                <groupId>junit</groupId>
                <artifactId>junit</artifactId>
                <version>4.12</version>
            </dependency>
            <dependency>
                <groupId>org.springframework</groupId>
                <artifactId>spring-test</artifactId>
                <version>4.2.5.RELEASE</version>
            </dependency>
        </dependencies>
    </dependencyManagement>
温馨提示
由于我这里使用的是子模块聚合的方式,所以,如果你不是这种方式的项目,直接给出各个依赖的版本在你的项目中即可!
5.2 不使用 Spring 配置文件方式
这一节的讲解中,我们将采用不使用 Spring 的配置文件的方式,Maven 的相关依赖在上面已经给出,请参考上一节的内容。
生产者(Producer)
首先,我们来看一下生产者端,生产者端主要负责发送消息到 Broker 中,发送的目的地(Destination)可以分为队列(Queue)和主题(Topic),下面,我们就看看如何不采用 Spring 配置文件的方式发送消息。
public static void main(String[] args) {
        ConnectionFactory cf = new ActiveMQConnectionFactory("tcp://localhost:61616");
        Connection connection = null;
        try {
            connection = cf.createConnection();
            connection.start();

            Session session = connection.createSession(Boolean.TRUE, Session.AUTO_ACKNOWLEDGE);
            Queue destination = session.createQueue("queue2");

            JmsQueueSenderWithNotXml jmsQueueSender = new JmsQueueSenderWithNotXml();
            jmsQueueSender.setConnectionFactory(cf);
            jmsQueueSender.setQueue(destination);
            jmsQueueSender.simpleSend();
            jmsQueueSender.sendWithConversion();
        } catch (JMSException e) {
            e.printStackTrace();
        }
    }

    private JmsTemplate jmsTemplate;
    private Queue queue;

    public void setConnectionFactory(ConnectionFactory cf) {
        this.jmsTemplate = new JmsTemplate(cf);
    }

    public void setQueue(Queue queue) {
        this.queue = queue;
    }

    /*
     * @Author 欧阳思海
     * @Description  发送简单消息
     * @Date 15:45 2019/8/16
     * @Param []
     * @return void
     **/
    public void simpleSend() {
        this.jmsTemplate.send(this.queue, new MessageCreator() {
            public Message createMessage(Session session) throws JMSException {
                return session.createTextMessage("hello queue world");
            }
        });
        System.out.println("发送成功!");
    }

    /*
     * @Author 欧阳思海
     * @Description  发送map类型的消息
     * @Date 15:46 2019/8/16
     * @Param []
     * @return void
     **/
    public void sendWithConversion() {
        Map map = new HashMap();
        map.put("Name", "sihai");
        map.put("Age", new Integer(18));
        jmsTemplate.convertAndSend("Queue3", map, new MessagePostProcessor() {
            public Message postProcessMessage(Message message) throws JMSException {
                message.setIntProperty("num", 189);
                message.setJMSCorrelationID("00001");
                return message;
            }
        });
        System.out.println("发送成功!");
    }
step1:上面是生产者端的所有代码示例,在这个示例中,我们首先通过下面的代码设置好ConnectionFactory 和Queue,并且调用JmsTemplateSpring提供的工具类提供两个发送消息的方法 。
    private JmsTemplate jmsTemplate;
    private Queue queue;

    public void setConnectionFactory(ConnectionFactory cf) {
        this.jmsTemplate = new JmsTemplate(cf);
    }

    public void setQueue(Queue queue) {
        this.queue = queue;
    }

    /*
     * @Author 欧阳思海
     * @Description  发送简单消息
     * @Date 15:45 2019/8/16
     * @Param []
     * @return void
     **/
    public void simpleSend() {
        this.jmsTemplate.send(this.queue, new MessageCreator() {
            public Message createMessage(Session session) throws JMSException {
                return session.createTextMessage("hello queue world");
            }
        });
        System.out.println("发送成功!");
    }

    /*
     * @Author 欧阳思海
     * @Description  发送map类型的消息
     * @Date 15:46 2019/8/16
     * @Param []
     * @return void
     **/
    public void sendWithConversion() {
        Map map = new HashMap();
        map.put("Name", "sihai");
        map.put("Age", new Integer(18));
        jmsTemplate.convertAndSend("Queue3", map, new MessagePostProcessor() {
            public Message postProcessMessage(Message message) throws JMSException {
                message.setIntProperty("num", 189);
                message.setJMSCorrelationID("00001");
                return message;
            }
        });
        System.out.println("发送成功!");
    }
step2:使用Main方法,设置ConnectionFactory和Queue对象,接着,调用发送方法发送消息。
public static void main(String[] args) {
        ConnectionFactory cf = new ActiveMQConnectionFactory("tcp://localhost:61616");
        Connection connection = null;
        try {
            connection = cf.createConnection();
            connection.start();

            Session session = connection.createSession(Boolean.TRUE, Session.AUTO_ACKNOWLEDGE);
            Queue destination = session.createQueue("queue2");

            JmsQueueSenderWithNotXml jmsQueueSender = new JmsQueueSenderWithNotXml();
            jmsQueueSender.setConnectionFactory(cf);
            jmsQueueSender.setQueue(destination);
            jmsQueueSender.simpleSend();
            jmsQueueSender.sendWithConversion();
        } catch (JMSException e) {
            e.printStackTrace();
        }
    }
step2:接着,我们运行上面的代码,输出下面结果,再看一下ActiveMQ的控制台,看看有没有消息发送成功。


发现有一条挂起的消息和入队列的消息,说明发送成功!
消费者(Consumer)
对于消费者,在这一节先不展开讲解,可以先参考上面的入门程序的消费端的代码消费消息,接下来的方式再讲解消费端的消费消息。
5.3 使用 Spring 配置文件方式
上面一节中,讲解了不使用 Spring 配置的方式如何发送消息,主要是想让大家了解一下其中的原理,这一节中,将使用 Spring 配置的方式讲解,这种方式在实际的开发中还是用的比较多的。
生产者(Producer)
既然是配置文件的方式,那么,首先,不得不讲如何进行xml配置了。
step1:xml配置文件
<?xml version="1.0" encoding="UTF-8"?>
<beans xmlns="http://www.springframework.org/schema/beans"
       xmlns:xsi="http://www.w3.org/2001/XMLSchema-instance"
       xmlns:jms="http://www.springframework.org/schema/jms"
       xsi:schemaLocation="
            http://www.springframework.org/schema/beans https://www.springframework.org/schema/beans/spring-beans.xsd
            http://www.springframework.org/schema/jms https://www.springframework.org/schema/jms/spring-jms.xsd">

    <bean id="connectionFactory" class="org.apache.activemq.pool.PooledConnectionFactory" destroy-method="stop">
        <property name="connectionFactory">
            <bean class="org.apache.activemq.ActiveMQConnectionFactory">
                <property name="brokerURL">
                    <value>tcp://localhost:61616</value>
                </property>
            </bean>
        </property>
        <property name="maxConnections" value="50"/>
    </bean>

    <bean id="destination" class="org.apache.activemq.command.ActiveMQQueue">
        <constructor-arg index="0" value="spring-queue"/>
    </bean>

    <!--<bean id="destinationTopic" class="org.apache.activemq.command.ActiveMQTopic">
        <constructor-arg index="0" value="spring-topic"/>
    </bean>-->

    <bean id="jmsTemplate" class="org.springframework.jms.core.JmsTemplate">
        <property name="connectionFactory" ref="connectionFactory"/>
        <property name="defaultDestination" ref="destination"/>
        <property name="messageConverter">
            <bean class="org.springframework.jms.support.converter.SimpleMessageConverter"/>
        </property>
    </bean>

</beans>
在上面的配置中,首先,需要配置connectionFactory(对应不使用配置的connectionFactory对象),然后,需要配置destination(对应不使用配置的destination),在这里使用的是向队列发送消息,也可以使用主题(Topic),最后,配置 Spring 提供的jmsTemplate模板类。
step2:使用Main方法运行
public static void main(String[] args) {
        ApplicationContext application = new FileSystemXmlApplicationContext("G:\ideaproject\activemq\Producer\src\main\resources\service-jms.xml");
        JmsTemplate jmsTemplate = (JmsTemplate) application.getBean("jmsTemplate");
        for (int i = 0; i < 10; i++) {
            int finalI = i;
            jmsTemplate.send((session) -> {
                TextMessage textMessage = session.createTextMessage();
                textMessage.setText("first message" + finalI);
                return textMessage;
            });
        }
    }
在上面的代码中,调用了JmsTemplate的send方法发送消息。运行之后,就成功发送消息了,这种方式还是简洁不少的。
温馨提示
上面我使用的是FileSystemXmlApplicationContext获取xml配置文件,除此之外,你也可以使用ClassPathXmlApplicationContext来获取。
消费者(Consumer)
在上一节中,没有讲解消费者,在这一节中,将重点讲解。
step1:首先,我们还是需要配置xml文件
<?xml version="1.0" encoding="UTF-8"?>
<beans xmlns="http://www.springframework.org/schema/beans"
xmlns:context="http://www.springframework.org/schema/context"
xmlns:xsi="http://www.w3.org/2001/XMLSchema-instance"
xmlns:amq="http://activemq.apache.org/schema/core"
xmlns:jms="http://www.springframework.org/schema/jms"
xsi:schemaLocation="http://www.springframework.org/schema/beans
http://www.springframework.org/schema/beans/spring-beans-4.1.xsd
http://www.springframework.org/schema/context
http://www.springframework.org/schema/context/spring-context-4.1.xsd
http://www.springframework.org/schema/jms
http://www.springframework.org/schema/jms/spring-jms-4.1.xsd
http://activemq.apache.org/schema/core
http://activemq.apache.org/schema/core/activemq-core-5.8.0.xsd">
<!--连接工厂-->
<bean id="connectionFactory" class="org.apache.activemq.pool.PooledConnectionFactory" destroy-method="stop">
<property name="connectionFactory">
<bean class="org.apache.activemq.ActiveMQConnectionFactory">
<property name="brokerURL">
<value>tcp://localhost:61616</value>
</property>
</bean>
</property>
<property name="maxConnections" value="50"/>
</bean>
<!--配置队列-->
<bean id="destination" class="org.apache.activemq.command.ActiveMQQueue">
<constructor-arg index="0" value="queue2"/>
</bean>
<!-- 配置主题(topic)-->
<!-- <bean id="destinationTopic" class="org.apache.activemq.command.ActiveMQTopic">
<constructor-arg index="0" value="spring-topic"/>
</bean>-->
<!--配置spring的jms模板-->
<bean id="jmsTemplate" class="org.springframework.jms.core.JmsTemplate">
<property name="connectionFactory" ref="connectionFactory"/>
<property name="defaultDestination" ref="destination"/>
<property name="messageConverter">
<bean class="org.springframework.jms.support.converter.SimpleMessageConverter"/>
</property>
</bean>
<!-- 消息监听器 -->
    <!--<bean id="messageListener" class="com.sihai.activemq.listener.MyMessageListener"/>-->
    <bean id="messageListener" class="com.sihai.activemq.listener.MySessionAwareMessageListener"></bean>

    <!--jta事务-->
    <!--<bean id="transactionManager" class="org.springframework.transaction.jta.JtaTransactionManager"/>-->

    <!-- 消息监听器容器 -->
    <bean id="jmsContainer" class="org.springframework.jms.listener.DefaultMessageListenerContainer">
        <property name="connectionFactory" ref="connectionFactory"/>
        <property name="destination" ref="destination"/>
        <property name="messageListener" ref="messageListener"/>
        <!--配置本地资源事务-->
        <!--<property name="sessionTransacted" value="true"/>-->
        <!--配置jta事务-->
        <!--<property name="transactionManager" ref="transactionManager"/>-->
    </bean>
<!--<!– 监听注解支持 –>
<jms:annotation-driven />-->
</beans>
最前面的配置和生产者是一样的,需要配置connectionFactory(对应不使用配置的connectionFactory对象),然后,需要配置destination(对应不使用配置的destination)。
区别在于,消费者端需要配置一个消息监听器容器,如下。
<!-- 消息监听器 -->
<!--<bean id="messageListener" class="com.sihai.activemq.listener.MyMessageListener"/>-->
<bean id="messageListener" class="com.sihai.activemq.listener.MySessionAwareMessageListener"></bean>
<!--jta事务-->
<!--<bean id="transactionManager" class="org.springframework.transaction.jta.JtaTransactionManager"/>-->
<!-- 消息监听器容器 -->
<bean id="jmsContainer" class="org.springframework.jms.listener.DefaultMessageListenerContainer">
<property name="connectionFactory" ref="connectionFactory"/>
<property name="destination" ref="destination"/>
<property name="messageListener" ref="messageListener"/>
<!--配置本地资源事务-->
<!--<property name="sessionTransacted" value="true"/>-->
<!--配置jta事务-->
<!--<property name="transactionManager" ref="transactionManager"/>-->
</bean>
那么这个怎么配置呢?请接着看。
step2:消息监听器容器配置
首先,我们需要写一个类,实现MessageListener接口,然后实现一个名为onMessage的方法,通过这个方法就可以监听是否有消息,有消息就消费。
/**
 * @ClassName MyMessageListener
 * @Description 消息消费监听器实现
 * @Author 欧阳思海
 * @Date 2019/8/13 20:39
 * @Version 1.0
 **/
@Component
public class MyMessageListener implements MessageListener {

    @Override
    public void onMessage(Message message) {
        if (message instanceof TextMessage) {
            try {
                System.out.println(((TextMessage) message).getText());
            }
            catch (JMSException ex) {
                throw new RuntimeException(ex);
            }
        }
        else {
            throw new IllegalArgumentException("Message must be of type TextMessage");
        }
    }
}
如此,配置就完成了。
step3:启动spring容器,运行。
/*
     * @Author 欧阳思海
     * @Description  xml配置方式获取消息
     * @Date 18:09 2019/8/16
     * @Param []
     * @return void
     **/
    @Test
    public void test_01() throws IOException {
        ClassPathXmlApplicationContext application = new ClassPathXmlApplicationContext("G:\ideaproject\activemq\Consumer\src\main\resources\service-jms.xml");
        /*JmsTemplate jmsTemplate = (JmsTemplate) application.getBean("jmsTemplate");
        String msg = (String) jmsTemplate.receiveAndConvert();
        System.out.println(msg);*/
        System.in.read();
    }
在上面的代码中,System.in.read(),这个作用就是一直等待,有消息就消费。

step4:开启消息监听器事务
在消息处理的过程中是可以开启事务的,如果出现处理失败的情况,就会回滚。在消息监听容器当中可以配置一个属性是sessionTransacted的本地事务,如果value为true,就代表开启本地事务。具体配置如下:
<!-- 消息监听器容器 -->
    <bean id="jmsContainer" class="org.springframework.jms.listener.DefaultMessageListenerContainer">
        <property name="connectionFactory" ref="connectionFactory"/>
        <property name="destination" ref="destination"/>
        <property name="messageListener" ref="messageListener"/>
        <!--配置本地资源事务-->
        <property name="sessionTransacted" value="true"/>
    </bean>
消息监听器容器
上面的消费者的讲解中,其实,最重要的就是消息监听器容器配置了,这一部分,我们就详细的讲解一下消息监听器容器的配置方法。
1 实现MessageListener接口
这种方式就是上面的实例使用的方式,先看看这个接口。
public interface MessageListener {
    void onMessage(Message var1);
}
这个接口很简单,只有一个方法onMessage,通过拿到Message参数读取消息,这里就不再多说了。
2 实现SessionAwareMessageListener接口
这个接口平时很少用到,但是,其实是有这个接口可以实现的,这个接口和上面的MessageListener接口有点不一样,这个接口是Spring提供的。
public interface SessionAwareMessageListener<M extends Message> {
    void onMessage(M var1, Session var2) throws JMSException;
}
另外,你可以看到,这个接口提供的是一个泛型接口,可以是M extends Message这个类型,同时,实现的方式onMessage,还多了一个Session参数,可以在获取消息的同时处理Session。
使用实例
/**
 * @ClassName MySessionAwareMessageListener
 * @Description 实现SessionAwareMessageListener的消息监听器
 * @Author 欧阳思海
 * @Date 2019/8/16 16:02
 * @Version 1.0
 **/
public class MySessionAwareMessageListener implements SessionAwareMessageListener {
    @Override
    public void onMessage(Message message, Session session) throws JMSException {
        if (message instanceof TextMessage) {
            try {
                System.out.println(((TextMessage) message).getText());
            }
            catch (JMSException ex) {
                throw new RuntimeException(ex);
            }
        }
        else {
            throw new IllegalArgumentException("Message must be of type TextMessage");
        }
    }
}
5.4 注解方式(0配置)
前面已经介绍了两种方式,分别是不使用xml配置方式和使用xml配置的方式,但是,由于现在微服务的兴起,约定优于配置是现在的一种趋势,所以,在这一节中,我们使用注解的方式来处理。
生产者(Producer)
由于使用注解的方式,所以,我们不再需要xml配置文件了,但是,我们可以参照上面的xml的配置方式来配置注解的方式。
step1:首先,我们需要一个 Java 配置类,如下;
/**
 * @ClassName ProducerConfig
 * @Description 不用xml的配置类
 * @Author 欧阳思海
 * @Date 2019/8/16 17:41
 * @Version 1.0
 **/
@Configuration
public class ProducerConfig {

    @Bean
    //配置ConnectionFactory用于生成connection
    public ActiveMQConnectionFactory connectionFactory() {
        ActiveMQConnectionFactory activeMQConnectionFactory
                = new ActiveMQConnectionFactory("tcp://localhost:61616");
        return activeMQConnectionFactory;
    }

    @Bean
    //注册SingleConnectionFactory,这个spring的一个包装工厂 用于管理真正的ConnectionFactory
    public SingleConnectionFactory singleConnectionFactory(ActiveMQConnectionFactory activeMQconnectionFactory) {
        SingleConnectionFactory connectionFactory = new SingleConnectionFactory();
        //设置目标工厂
        connectionFactory.setTargetConnectionFactory(activeMQconnectionFactory);
        return connectionFactory;
    }

    @Bean
    //配置生产者,jmsTemplate
    public JmsTemplate jmsTemplate(SingleConnectionFactory connectionFactory) {
        JmsTemplate jmsTemplate = new JmsTemplate();
        jmsTemplate.setConnectionFactory(connectionFactory);
        return jmsTemplate;
    }

    /**
     * 配置队列目的的: 根据测试需要配置其中一个
     * 1.队列  点对点 queue
     * 2.主题  一对多  topic
     */
    @Bean //
    public ActiveMQQueue queueDestination() {
        ActiveMQQueue activeMQQueue = new ActiveMQQueue("queue-anno");
        return activeMQQueue;
    }

    @Bean
    public ActiveMQTopic topicDestination() {
        ActiveMQTopic activeMQTopic = new ActiveMQTopic("topic-anno");
        return activeMQTopic;
    }
}
上面的配置的每一个方法就对应xml配置的每一个节点,对应起来配置会比较简单,每一个方法都使用了@Bean这个注解,类上使用Configuration,将这些配置加入到 spring 容器中。
step2:启动 spring 容器,发送消息;
/**
 * @ClassName JmsSenderWithAnnotation
 * @Description 注解发送方式
 * @Author 欧阳思海
 * @Date 2019/8/16 18:04
 * @Version 1.0
 **/
public class JmsSenderWithAnnotation {

    /*
     * @Author 欧阳思海
     * @Description  测试点对点
     * @Date 18:05 2019/8/16
     * @Param []
     * @return void
     **/
    @Test
    public void testActiveMqAnnotation() {
        AnnotationConfigApplicationContext aContext =
                new AnnotationConfigApplicationContext(ProducerConfig.class);

        //获得发送者的模板对象
        JmsTemplate jmsTemplate = aContext.getBean(JmsTemplate.class);
        Destination bean = (Destination) aContext.getBean("queueDestination");

        //发送消息
        jmsTemplate.send(bean, new MessageCreator() {
            @Override
            public Message createMessage(Session session) throws JMSException {
                TextMessage message = session.createTextMessage();
                message.setText("activemq message for queue");
                return message;
            }
        });
    }

    /*
     * @Author 欧阳思海
     * @Description  测试topic发送
     * @Date 18:06 2019/8/16
     * @Param []
     * @return void
     **/
    @Test
    public void testActiveMqAnnotation2() {
        AnnotationConfigApplicationContext aContext =
                new AnnotationConfigApplicationContext(ProducerConfig.class);
        //获得发送者的模板对象
        JmsTemplate jmsTemplate = aContext.getBean(JmsTemplate.class);

        Destination bean = (Destination) aContext.getBean("topicDestination");

        //发送消息
        jmsTemplate.send(bean, new MessageCreator() {
            @Override
            public Message createMessage(Session session) throws JMSException {
                TextMessage message = session.createTextMessage();
                message.setText("activemq message for topic");
                return message;
            }
        });
    }
}
分别运行这两个测试,查看ActiveMQ控制台,发现Queue和Topic都有一条消息发送成功;


消费者(Consumer)
消费者的大概也差不多,跟xml的配置一样,多的也是消息监听容器的配置,来看看;
step1:首先,Java 配置类
**
 * @ClassName ConsumerConfig
 * @Description 不用xml的配置类
 * @Author 欧阳思海
 * @Date 2019/8/16 17:44
 * @Version 1.0
 **/
@ComponentScan(basePackages = {"com.sihai"})
@EnableJms
@Configuration
public class ConsumerConfig {

    @Bean
    //配置ConnectionFactory用于生成connection
    public ActiveMQConnectionFactory connectionFactory() {
        ActiveMQConnectionFactory activeMQConnectionFactory
                = new ActiveMQConnectionFactory("tcp://localhost:61616");
        return activeMQConnectionFactory;
    }

    @Bean
    //注册SingleConnectionFactory,这个spring的一个包装工厂 用于管理真正的ConnectionFactory
    public SingleConnectionFactory singleConnectionFactory(ActiveMQConnectionFactory activeMQconnectionFactory) {
        SingleConnectionFactory connectionFactory = new SingleConnectionFactory();
        //设置目标工厂
        connectionFactory.setTargetConnectionFactory(activeMQconnectionFactory);
        return connectionFactory;
    }


    /*在xml当中的如下配置 效果相同
     * <bean class="org.springframework.jms.listener.DefaultMessageListenerContainer">
     *		<property name="connectionFactory" ref="connectionFactory" />
     *		<property name="destination" ref="topicDestination" />
     *		<property name="messageListener" ref="itemListenerMessage" />
     *	</bean>
     **/
    @Bean
    public DefaultMessageListenerContainer jmsListenerContainerFactory(SingleConnectionFactory singleConnectionFactory, MyMessageListener myMessageListener, Destination destination) {
        //创建容器
        DefaultMessageListenerContainer jmsContainer = new DefaultMessageListenerContainer();
        //设置监听器
        jmsContainer.setMessageListener(myMessageListener);
        //设置连接工厂
        jmsContainer.setConnectionFactory(singleConnectionFactory);
        //设置监听目的地的名字/也可以直接设置对象目的地
        jmsContainer.setDestination(destination);
        return jmsContainer;
    }

    /**
     * 1.队列  点对点 queue
     * 2.主题  一对多  topic
     */
    @Bean
    public ActiveMQQueue queueDestination() {
        ActiveMQQueue activeMQQueue = new ActiveMQQueue("queue-anno");
        return activeMQQueue;
    }

    /*@Bean
    public ActiveMQTopic topicDestination() {
        ActiveMQTopic activeMQTopic = new ActiveMQTopic("topic-anno");
        return activeMQTopic;
    }*/
}
其中只有一个消息监听容器的配置是和生产者的配置不同的,消息监听容器的配置需要配置消息监听器、连接工厂和目的地(Destination)。
 /*在xml当中的如下配置 效果相同
     * <bean class="org.springframework.jms.listener.DefaultMessageListenerContainer">
     *		<property name="connectionFactory" ref="connectionFactory" />
     *		<property name="destination" ref="topicDestination" />
     *		<property name="messageListener" ref="itemListenerMessage" />
     *	</bean>
     **/
    @Bean
    public DefaultMessageListenerContainer jmsListenerContainerFactory(SingleConnectionFactory singleConnectionFactory, MyMessageListener myMessageListener, Destination destination) {
        //创建容器
        DefaultMessageListenerContainer jmsContainer = new DefaultMessageListenerContainer();
        //设置监听器
        jmsContainer.setMessageListener(myMessageListener);
        //设置连接工厂
        jmsContainer.setConnectionFactory(singleConnectionFactory);
        //设置监听目的地的名字/也可以直接设置对象目的地
        jmsContainer.setDestination(destination);
        return jmsContainer;
    }
step2:消息监听器
/**
 * @ClassName MyMessageListener
 * @Description 消息消费监听器实现
 * @Author 欧阳思海
 * @Date 2019/8/13 20:39
 * @Version 1.0
 **/
@Component
public class MyMessageListener implements MessageListener {

    @Override
    public void onMessage(Message message) {
        if (message instanceof TextMessage) {
            try {
                System.out.println(((TextMessage) message).getText());
            }
            catch (JMSException ex) {
                throw new RuntimeException(ex);
            }
        }
        else {
            throw new IllegalArgumentException("Message must be of type TextMessage");
        }
    }
}
这个前面已经讲过了,这里就不再累赘了,但是,这里我需要讲的是消息监听器注解方式的配置,如下。
step3:消息监听器注解方式的配置方法
/**
 * @ClassName JmsAnnotation
 * @Description 注解方式监听
 * @Author 欧阳思海
 * @Date 2019/8/16 17:01
 * @Version 1.0
 **/
@Component
@EnableJms
public class JmsAnnotation {

    @JmsListener(destination = "queue-anno")
    public void onMessage(Message message) {
        if (message instanceof TextMessage) {
            try {
                System.out.println(((TextMessage) message).getText());
            }
            catch (JMSException ex) {
                throw new RuntimeException(ex);
            }
        }
        else {
            throw new IllegalArgumentException("Message must be of type TextMessage");
        }
    }
}
你会发现,在消息监听器的类上面需要两个配置@Component和@EnableJms,用于标记这是一个消息监听器,另外,在onMessage方法上,需要一个@JmsListener(destination = "queue-anno")注解,可以标记需要哪个destination 。
注意:如果采用注解的消息监听,那么需要修改Java类的消息监听的容器的配置,否则会出现问题
step4:消息监听容器配置更改
将
 /*在xml当中的如下配置 效果相同
     * <bean class="org.springframework.jms.listener.DefaultMessageListenerContainer">
     *		<property name="connectionFactory" ref="connectionFactory" />
     *		<property name="destination" ref="topicDestination" />
     *		<property name="messageListener" ref="itemListenerMessage" />
     *	</bean>
     **/
    @Bean
    public DefaultMessageListenerContainer jmsListenerContainerFactory(SingleConnectionFactory singleConnectionFactory, MyMessageListener myMessageListener, Destination destination) {
        //创建容器
        DefaultMessageListenerContainer jmsContainer = new DefaultMessageListenerContainer();
        //设置监听器
        jmsContainer.setMessageListener(myMessageListener);
        //设置连接工厂
        jmsContainer.setConnectionFactory(singleConnectionFactory);
        //设置监听目的地的名字/也可以直接设置对象目的地
        jmsContainer.setDestination(destination);
        return jmsContainer;
    }
改为
 @Bean
    public DefaultJmsListenerContainerFactory jmsListenerContainerFactory() {
        DefaultJmsListenerContainerFactory factory = new DefaultJmsListenerContainerFactory();
        factory.setConnectionFactory(connectionFactory());
//        factory.setDestinationResolver(destinationResolver());
        factory.setSessionTransacted(true);
        factory.setConcurrency("3-10");
        return factory;
    }
上面的修改会发现,实现接口的监听器使用的是DefaultMessageListenerContainer,而注解的方式使用的是DefaultJmsListenerContainerFactory,所以,这里需要特别注意。
此时,消息监听器是注解的方式的Java配置类就是下面这样的。
/**
 * @ClassName ConsumerConfig
 * @Description 不用xml的配置类
 * @Author 欧阳思海
 * @Date 2019/8/16 17:44
 * @Version 1.0
 **/
@ComponentScan(basePackages = {"com.sihai"})
@EnableJms
@Configuration
public class ConsumerConfig {

    @Bean
    //配置ConnectionFactory用于生成connection
    public ActiveMQConnectionFactory connectionFactory() {
        ActiveMQConnectionFactory activeMQConnectionFactory
                = new ActiveMQConnectionFactory("tcp://localhost:61616");
        return activeMQConnectionFactory;
    }

    @Bean
    //注册SingleConnectionFactory,这个spring的一个包装工厂 用于管理真正的ConnectionFactory
    public SingleConnectionFactory singleConnectionFactory(ActiveMQConnectionFactory activeMQconnectionFactory) {
        SingleConnectionFactory connectionFactory = new SingleConnectionFactory();
        //设置目标工厂
        connectionFactory.setTargetConnectionFactory(activeMQconnectionFactory);
        return connectionFactory;
    }

    @Bean
    public DefaultJmsListenerContainerFactory jmsListenerContainerFactory() {
        DefaultJmsListenerContainerFactory factory = new DefaultJmsListenerContainerFactory();
        factory.setConnectionFactory(connectionFactory());
//        factory.setDestinationResolver(destinationResolver());
        factory.setSessionTransacted(true);
        factory.setConcurrency("3-10");
        return factory;
    }

    /**
     * 1.队列  点对点 queue
     * 2.主题  一对多  topic
     */
    @Bean
    public ActiveMQQueue queueDestination() {
        ActiveMQQueue activeMQQueue = new ActiveMQQueue("queue-anno");
        return activeMQQueue;
    }

    /*@Bean
    public ActiveMQTopic topicDestination() {
        ActiveMQTopic activeMQTopic = new ActiveMQTopic("topic-anno");
        return activeMQTopic;
    }*/
}
step5:启动容器,消费消息
/**
 * @ClassName SpringSender
 * @Description
 * @Author 欧阳思海
 * @Date 2019/8/13 17:22
 * @Version 1.0
 **/
public class SpringReceiver {
    /*
     * @Author 欧阳思海
     * @Description  xml配置方式获取消息
     * @Date 18:09 2019/8/16
     * @Param []
     * @return void
     **/
    @Test
    public void test_01() throws IOException {
        ApplicationContext application = new FileSystemXmlApplicationContext("G:\ideaproject\activemq\Consumer\src\main\resources\service-jms.xml");
        /*JmsTemplate jmsTemplate = (JmsTemplate) application.getBean("jmsTemplate");
        String msg = (String) jmsTemplate.receiveAndConvert();
        System.out.println(msg);*/
        System.in.read();
    }

    /*
     * @Author 欧阳思海
     * @Description  注解方式获取消息
     * @Date 18:10 2019/8/16
     * @Param []
     * @return void
     **/
    @Test
    public void test_02() throws IOException {
        AnnotationConfigApplicationContext aContext =
                new AnnotationConfigApplicationContext(ConsumerConfig.class);
        /*JmsTemplate jmsTemplate = (JmsTemplate) application.getBean("jmsTemplate");
        String msg = (String) jmsTemplate.receiveAndConvert();
        System.out.println(msg);*/
        System.in.read();
    }
}


终于,到这里把ActiveMQ整合Spring的全部内容就讲述完结了,这一部分讲了三个部分,分别是:
- 不使用 Spring 配置文件方式
- 使用 Spring 配置文件方式
- 注解方式(0配置)
6 ActiveMQ支持的传输协议
6.1 默认协议介绍
在ActiveMQ中支持的协议还是挺多的,这也是ActiveMQ的一个特点之一,例如,默认支持AMQP、MQTT、OpenWire、STOMP、WebSocket,这些默认的协议的配置都是在activemq.xml配置文件中的。
<transportConnectors>
<!-- DOS protection, limit concurrent connections to 1000 and frame size to 100MB -->
<transportConnector name="openwire" uri="tcp://0.0.0.0:61616?maximumConnections=1000&wireFormat.maxFrameSize=104857600"/>
<transportConnector name="amqp" uri="amqp://0.0.0.0:5672?maximumConnections=1000&wireFormat.maxFrameSize=104857600"/>
<transportConnector name="stomp" uri="stomp://0.0.0.0:61613?maximumConnections=1000&wireFormat.maxFrameSize=104857600"/>
<transportConnector name="mqtt" uri="mqtt://0.0.0.0:1883?maximumConnections=1000&wireFormat.maxFrameSize=104857600"/>
<transportConnector name="ws" uri="ws://0.0.0.0:61614?maximumConnections=1000&wireFormat.maxFrameSize=104857600"/>
</transportConnectors>
注意:上面的每种协议的端口都必须是不一样的。
6.2 其他协议
除了上面的协议外,还支持这些协议:TCP、UDP 、NIO、SSL、Http(s)、vm
那么如何使用这些协议呢?
只需要在上面的activemq.xml配置文件中的transportConnectors节点添加就可以,例如,添加 nio协议。
<transportConnectors>
<!-- 新增协议 -->
<transportConnector name="nio" uri="nio://0.0.0.0:61619"/>
<!-- DOS protection, limit concurrent connections to 1000 and frame size to 100MB -->
<transportConnector name="openwire" uri="tcp://0.0.0.0:61616?maximumConnections=1000&wireFormat.maxFrameSize=104857600"/>
<transportConnector name="amqp" uri="amqp://0.0.0.0:5672?maximumConnections=1000&wireFormat.maxFrameSize=104857600"/>
<transportConnector name="stomp" uri="stomp://0.0.0.0:61613?maximumConnections=1000&wireFormat.maxFrameSize=104857600"/>
<transportConnector name="mqtt" uri="mqtt://0.0.0.0:1883?maximumConnections=1000&wireFormat.maxFrameSize=104857600"/>
<transportConnector name="ws" uri="ws://0.0.0.0:61614?maximumConnections=1000&wireFormat.maxFrameSize=104857600"/>
</transportConnectors>
其他协议的添加方法也是相似的!
6.3 简化配置
在ActiveMQ中还有一种更加简单的配置方法,在uri中可以使用 auto 来简化配置,ActiveMQ将监听器端口的消息自动适配相应的协议。
<transportConnector name="auto" uri="auto://0.0.0.0:61619"/>
如果需要更加安全,还可以在此基础上添加ssl协议。
<transportConnector name="auto+ssl" uri="auto+ssl://0.0.0.0:61619"/>
如果还想要提高传输的性能,可以配合上面的nio协议,提高网络性能。
<transportConnector name="auto+nio" uri="auto+nio://0.0.0.0:61619"/>
7 ActiveMQ的持久化存储机制
持久化的作用是什么呢?
作用主要是为避免系统以外宕机而导致消息丢失,在ActiveMQ中支持多种持久化机制,比如,JDBC、AMQ、KahaDB、LevelDB,下面简单介绍一下这几种机制。
- JDBC:基于数据库存储的方式,可以存储在Mysql等数据库中,这种机制的性能瓶颈在Mysql等数据库,所以其性能是不太好的。
配置方法
在activemq.xml配置文件中配置,这里我们使用Mysql进行配置。
step1:修改persistenceAdapter节点
<persistenceAdapter>
            <jdbcPersistenceAdapter dataSource="#mysqlDataSource" createTablesOnStartup="true"/>
			<!--<kahaDB directory="${activemq.data}/kahadb"/>-->
        </persistenceAdapter>
其中,dataSource="#mysqlDataSource"是数据源引用。
step2:配置Mysql数据源
<bean id="mysqlDataSource" class="org.apache.commons.dbcp.BasicDataSource" destroy-method="close">
		<property name="driverClassName" value="com.mysql.jdbc.Driver"/>
		<property name="url" value="jdbc:mysql://localhost:3306/test"/>
		<property name="username" value="root"/>
		<property name="password" value="123456"/>
	</bean>
这就是spring的配置方式。
step3:导入数据库连接池、驱动等Jar包
在ActiveMQ的目录中有一个lib目录,是存放jar包的目录。
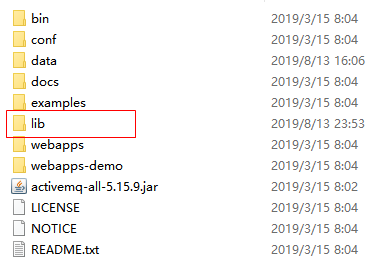
将下面几个Jar放入。

step4:启动ActiveMQ,查看结果
启动之后,打开mysql数据库,发现生成了三张数据表。

这样就成功了,每次生成消息之后,就会将消息的信息存储到这三张表中,消费之后,再删除信息。
- AMQ:基于文件存储,这种方式会把消息写入日志文件,并且是顺序存储方式,这种方式比JDBC方式要好,缺点是:会为每个Destination创建索引,占用大量磁盘空间。
配置方法
在activemq.xml配置文件中配置,更加详细参数请参考:https://activemq.apache.org/amq-message-store。
<broker brokerName="broker" persistent="true" useShutdownHook="false">
    <persistenceAdapter>
      <amqPersistenceAdapter directory="数据存储目录" maxFileLength="32mb"/>
    </persistenceAdapter>
  </broker>
- KahaDB:这个5.4版本之后出现的默认的持久化方式,与AMQ很相似,不同的是只为Destination创建一个索引。
配置方法
在activemq.xml配置文件中配置,更加详细参数请参考:https://activemq.apache.org/kahadb。
<broker brokerName="broker">
    <persistenceAdapter>
      <kahaDB directory="数据存储目录" journalMaxFileLength="32mb"/>
    </persistenceAdapter>
 </broker>
- LevelDB:5.6版本后推出的新的持久化方式。这种比KahaDB更快,跟KahaDB类似,但是不是用自定义B数实现。但是需要注意的是,目前官网已经不推荐使用这种方式,而是推荐使用KahaDB。
配置方法
在activemq.xml配置文件中配置,更加详细的参数请参考:https://activemq.apache.org/leveldb-store。
<broker brokerName="broker" ... >
    ...
    <persistenceAdapter>
      <levelDB directory="数据存储目录"/>
    </persistenceAdapter>
    ...
  </broker>
8 ActiveMQ网络连接支持
Broker的网络配置主要有三种配置方法,分别是静态配置、动态配置和主从配置。
8.1 静态配置
静态传输提供了一种硬编码机制,可以使用URI列表发现其他连接。使用此发现机制的连接将尝试连接到列表中的所有URI,直到成功为止。
在activemq.xml配置文件中配置。
<networkConnectors>
			<networkConnector uri="static:(tcp://localhoat:61616)"/>
		</networkConnectors>
配置语法
static:(uri1,uri2,uri3,…)?options
举例
static:(tcp://localhost:61616,tcp://remotehost:61617?trace=false,vm://localbroker)?initialReconnectDelay=100
uri的属性说明
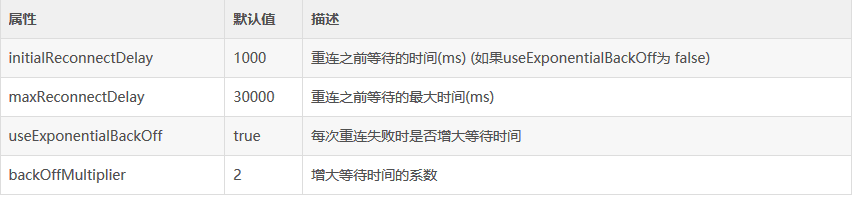
8.2 动态配置
在activemq.xml配置文件中配置。
<networkConnectors>
      <networkConnector uri="multicast://default"/>
    </networkConnectors>
8.3 主从配置
Master-Slave模型是非常常见的,主从模型主要是为了防止一个网络节点出现问题而提出的,提高了稳定性。
在ActiveMQ中也是可配置的,我们可以在activemq.xml配置文件中进行相关配置。
<networkConnectors>
  <networkConnector uri="masterslave:(tcp://host1:61616,tcp://host2:61616,tcp://..)"/>
</networkConnectors>
注意:Master-Slave方式的第一个url需要是master,其他是slave。
另外,NetworkConnector 节点还有其他属性可以配置,具体详情可以查看官网:https://activemq.apache.org/networks-of-brokers。
8.4 容错的客户端连接方法
在前面的客户端连接ActiveMQ的时候只是使用一个简单的url进行连接。
ActiveMQConnectionFactory activeMQConnectionFactory
                = new ActiveMQConnectionFactory("tcp://localhost:61616");
但是,这种方式会出现一个问题,一旦这台ActiveMQ宕机了,就连接不上了,所以,有另外一种容错的方式,当一台出现宕机,可以连接上其他的机器,这样就不会出现问题了。
ActiveMQConnectionFactory activeMQConnectionFactory
                = new ActiveMQConnectionFactory("failover:(tcp://localhost:61616,tcp://remotehost:61616)");
其他属性参数请参考:https://activemq.apache.org/failover-transport-reference。