在运维或协同的场景中,经常需要对模型或图纸进行批注,及时记录已发现的问题并交给相关负责的人员。
在开始实现功能之前,先了解一下BIMFACE中有关批注的一些概念及功能说明。
1. 基本概念
批注指的是在当前场景视角下添加“云线”、“箭头”等图元,辅助使用者进行标记的功能,它适用于所有的矢量图纸及三维模型场景。
在三维场景中,一旦开启绘制批注,则场景的视角将被固定,直到结束绘制批注。
2. 批注样式
BIMFACE中的批注样式设置分为四类,分别为批注类型、线宽、批注线颜色及填充色。
其中,批注类型有7类,分别为:
- 箭头
- 云线框
- 云线
- 折线
- 矩形
- 圆形
- 十字
- 文字
在BIMFACE官方示例Demo中 https://bimface.com/developer-jsdemo#816 提供的批注是下面的样式

通过自定义绘制方式将【批注】功能按钮添加到普通工具栏的末尾处,点击【批注】按钮,弹出批注工具栏

在批注工具栏的下方提供了 “批注描述”文本框、【保存】、【取消】按钮,该实现方式可以满足一般的批注要求,主要是提供的批注描述功能过于简单。在施工图审查系统中对模型/图纸的批注功能有更复杂的要求,这时候就需要自定义弹出一个批注面板以满足复杂的业务要求。
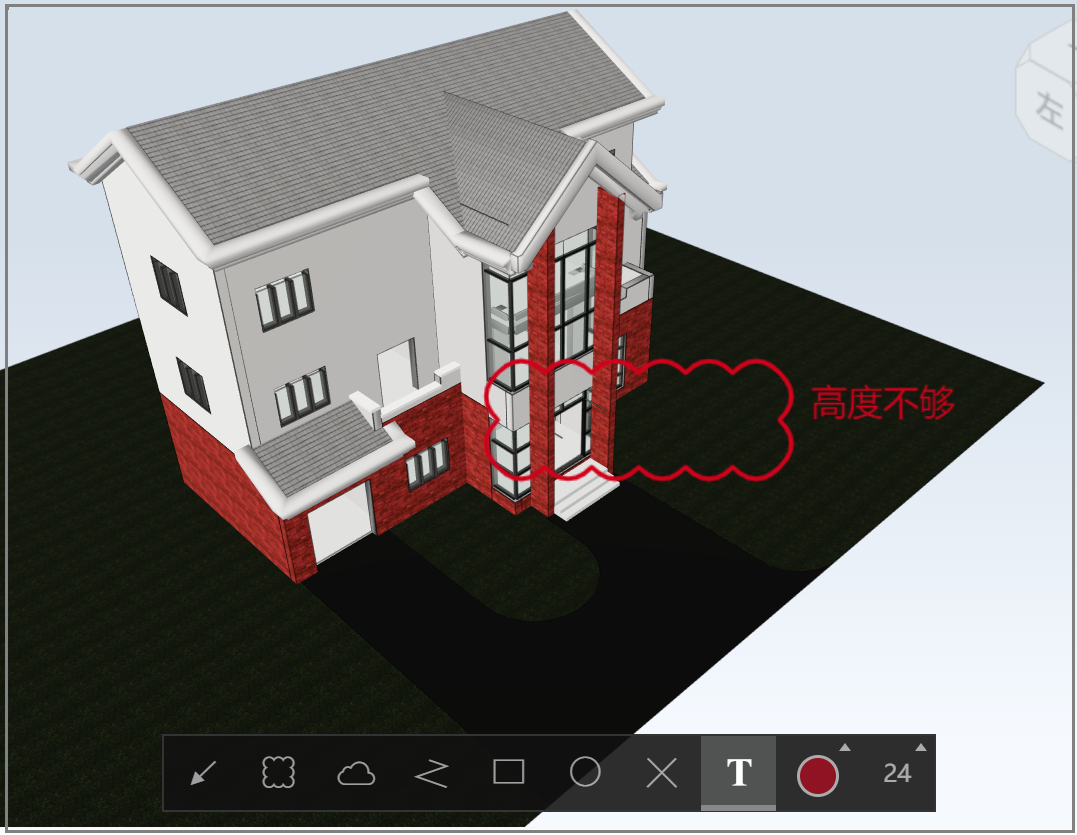
下图中是在业务复杂的施工图审查系统中实现的批注功能。

在页面顶端的按钮区域中放置了【添加批注】、【取消批注】、【新增意见】功能按钮。操作步骤如下:
(1)点击【添加批注】按钮,模型下方显示了“批注工具栏”,可以在模型上做不同需求的批注。
(2)点击【新增意见】按钮,弹出自定义的复杂审查意见面板,填写具体的审查意见,点击【保存】按钮,将模型上的批注信息与审查意见保存到数据库中。右侧审查意见区域刷新,加载所有审查意见。
(3)双击任意一条审查意见,实现2个功能。a、自动还原批注信息到模型且旋转到对应的视角上。b、自动弹出复杂审查意见面板并显示意见。
(4)如有需要,修改审查意见并保存。
下面介绍详细的实现步骤。
1 var modelViewer = {
2     toolbar: undefined,            // 普通工具条
3     annotationmanager: undefined,  // annotation的绘制管理器
4     annotationToolbar: undefined,  // 批注工具条
5     annotationControl: undefined   // 重写annotation的保存、取消
6 };
创建批注工具条
 1 // 创建批注
 2 function createAnnotation(viewer) {
 3     modelViewer.toolbar.hide(); //隐藏普通工具条
 4     if (!modelViewer.annotationmanager) {
 5         var config = new Glodon.Bimface.Plugins.Annotation.AnnotationToolbarConfig();
 6         config.viewer = viewer;
 7         var annotationToolbar = new Glodon.Bimface.Plugins.Annotation.AnnotationToolbar(config);
 8         modelViewer.annotationToolbar = annotationToolbar;
 9         modelViewer.annotationmanager = annotationToolbar.getAnnotationManager();
10         // 移除默认的annotationToolbar control
11         var control = $(modelViewer.annotationToolbar.domElement.lastElementChild);
12         var html = control[0].innerHTML;
13         modelViewer.annotationControl = $(html);
14
15         control.remove();
16         modelViewer.annotationControl.find('.bf-save').off('click').on('click', function () {
17             saveAnnotation();
18         });
19         modelViewer.annotationControl.find('.bf-cancel').off('click').on('click', function () {
20             cancelAnnotation();
21         });
22     }
23     modelViewer.annotationToolbar.show();//显示批注工具条
24 }
将此方法绑定到【添加批注】按钮的click事件,运行程序点击该按钮即可显示批注工具条。
 1 // 获取批注信息
 2 function getAnnotationInfo() {
 3     var annotInfo = "";
 4     if (modelViewer.annotationmanager) {
 5         if (modelViewer.annotationmanager.getAnnotationList().length > 0) {
 6
 7             //转换成Json字符串后就可以保存到数据库中
 8             var annotationList = modelViewer.annotationmanager.getAnnotationList();//获取批注内容,不包含视角信息
 9             var currentState = modelViewer.annotationmanager.getCurrentState();    //获取当前模型视角状态信息,包含批租内容
10             var imgStr = "";
11
12             // 批注导出快照
13             modelViewer.annotationmanager.createSnapshot(function (img) {
14                 // 异步生成截图后的回调函数,参数为base64的字符串
15                 imgStr = img;
16             });
17
18             var tempObj = {
19                 "annotationList": JSON.stringify(annotationList),
20                 "currentState": JSON.stringify(currentState)
21                 //"img": imgStr //暂时不保存这个
22             };
23
24             annotInfo = JSON.stringify(tempObj);
25         }
26     }
27
28     return annotInfo;
29 }
批注内容类似下面样式
 1 [{
 2     "rotation": 0,
 3     "markupType": "CloudRect",
 4     "drawPoints": [
 5         [-11601.953138805808, 185.67362590978166, 58720.339506105716],
 6         [-8639.776307523922, -4606.333849878425, 56890.48458357735]
 7     ],
 8     "strokeStyle": "rgba(208,2,27,1)",
 9     "lineWidth": 3,
10     "fillStyle": "rgba(255,255,255,0)",
11     "baseUnit": "30",
12     "bNeedHitByBbox": true,
13     "drawEnd": true,
14     "markupId": 1583144631002
15 }]
视角状态信息类似下面样式
 1 {
 2     "annotationList": [{
 3         "rotation": 0,
 4         "markupType": "CloudRect",
 5         "drawPoints": [
 6             [-11601.953138805808, 185.67362590978166, 58720.339506105716],
 7             [-8639.776307523922, -4606.333849878425, 56890.48458357735]
 8         ],
 9         "strokeStyle": "rgba(208,2,27,1)",
10         "lineWidth": 3,
11         "fillStyle": "rgba(255,255,255,0)",
12         "baseUnit": "30",
13         "bNeedHitByBbox": true,
14         "drawEnd": true,
15         "markupId": 1583144631002
16     }],
17     "state": {
18         "state": {
19             "isolateAction": null,
20             "actions": [],
21             "sceneState": 0,
22             "version": "1.0"
23         },
24         "camera": {
25             "name": "persp",
26             "position": {
27                 "x": -19566.07280063608,
28                 "y": -10286.284780194706,
29                 "z": 68124.8600741987
30             },
31             "target": {
32                 "x": 37799.9979859597,
33                 "y": 47079.99749213971,
34                 "z": 10758.999426902741
35             },
36             "up": {
37                 "x": 0,
38                 "y": -0.000003673205473822021,
39                 "z": 0.9999999999932538
40             },
41             "fov": 45,
42             "version": 1
43         },
44         "selection": [],
45         "axisGrid": {
46             "fileInfos": [],
47             "gridLineColor": {
48                 "red": 51,
49                 "green": 51,
50                 "blue": 51,
51                 "alpha": 1
52             },
53             "gridBubbleColor": {
54                 "red": 51,
55                 "green": 51,
56                 "blue": 51,
57                 "alpha": 1
58             },
59             "bIsBringToFront": false,
60             "bIsEnableHover": true
61         }
62     }
63 }
获取审查意见信息很简单,就是表单操作,此处不做介绍。
使用JQuery的Ajax()方法将批注信息与审查意见保存到数据库中,比较简单,此处不做介绍。
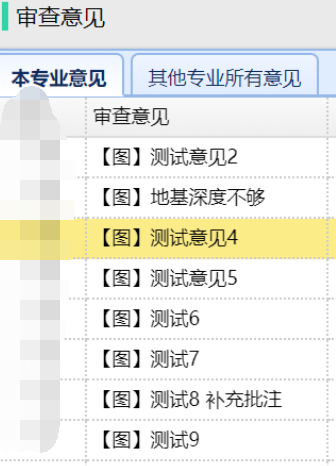
审查意见列表中加载了数据库中保存的记录。双击任一笔记录,弹出审查意见面板并赋值审查信息,比较简单,不做简介。
双击任一笔记录的同时恢复批注信息,这里需要调用BIMFACE的JavaScript API
modelViewer.annotationmanager.setState(); // 设置场景视角
modelViewer.annotationmanager.setAnnotationList(); //设置批注
 1 // 设置批注即视角
 2 function setAnnotationAndState(state, annoList) {
 3     if (modelViewer.annotationmanager) {
 4         modelViewer.annotationmanager.clear();//清除之前的批注
 5         if (state != null) {
 6             modelViewer.annotationmanager.setState(JSON.parse(state)); // 先设置场景视角
 7         }
 8         if (annoList != null) {
 9             modelViewer.annotationmanager.setAnnotationList(JSON.parse(annoList));//再设置新的批注
10         }
11     }
12 }
以上操作完成后,如果退出批注需要卸载批注
1 // 三维模型取消批注
2 function cancelAnnotation() {
3     endDrawing();
4 }
1 // 结束批注
2 function endDrawing() {
3     //卸载批注
4     if (modelViewer.annotationmanager) {
5         modelViewer.annotationmanager.endDrawing && modelViewer.annotationmanager.endDrawing();
6         $(modelViewer.annotationToolbar.domElement).addClass('bf-hide');//隐藏批注工具条
7         modelViewer.toolbar.show(); //显示普通工具条
8     }
9 }