自欺欺人的使用 NSTimer 销毁
1.NSTimer是要加到runloop中才会起作用。
常见的创建timer方式
// 第一种方式
@property (nonatomic , strong) NSTimer *timer;

// 默认加入当前runloop的NSDefaultRunLoopMode
self.timer = [NSTimer scheduledTimerWithTimeInterval:1.0 target:self selector:@selector(timerAction:) userInfo:nil repeats:NO];
// 第二种方式
self.timer = [NSTimer timerWithTimeInterval:1.0 target:self selector:@selector(timerAction:) userInfo:nil repeats:YES];
-
第一种缺陷如果当前线程就是主线程,也就是UI线程时,某些UI事件,比如UIScrollView的拖动操作,会将Run Loop切换成
NSEventTrackingRunLoopMode模式,在这个过程中,默认的NSDefaultRunLoopMode模式中注册的事件是不会被执行的。也就是说,此时使用scheduledTimerWithTimeInterval添加到Run Loop中的Timer就不会执行 -
第二种方式需要使用NSRunLoop的addTimer:forMode:方法来把Timer按照指定模式加入到Run Loop中。这里使用的模式是:
NSRunLoopCommonModes,这个模式等效于NSDefaultRunLoopMode和NSEventTrackingRunLoopMode的结合
[[NSRunLoop mainRunLoop] addTimer:self.timer forMode:NSRunLoopCommonModes];
- 以上两种方式都是在主线程上创建的,如果在子线程创建的timer,加入到runloop则需要手动开启runloop
[[NSRunLoop currentRunLoop] run];,同时也必须在子线程销毁。
2.NSTimer会强引用它的target对象。
[self.timer invalidate]是唯一的方法将定时器从循环池中移除
- (void)dealloc
{
    // 自欺欺人的写法,永远都不会执行到,除非你在外部手动invalidate这个timer
    [self.timer invalidate];
}
-
当我们在控制器中创建timer且tager设为self时。
-
会发生 timer 添加到 Runloop 的时候,且会被 Runloop 强引用,
- Note in particular that run loops maintain strong references to their timers, so you don’t have to maintain your own strong reference to a timer after you have added it to a run loop.
-
然后 Timer 又会有一个对 Target 的强引用(也就是 self )
- Target is the object to which to send the message specified by aSelector when the timer fires. The timer maintains a strong reference to target until it (the timer) is invalidated.
-
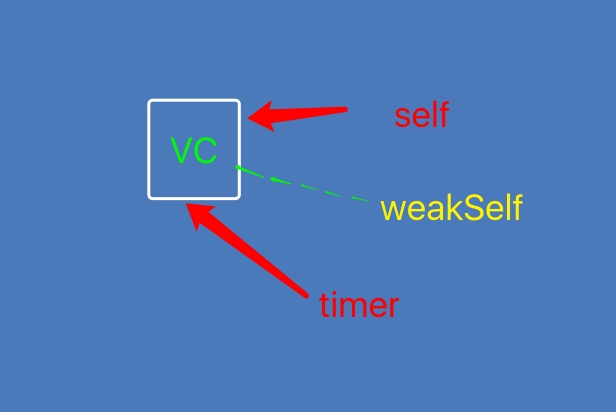
也就是说 NSTimer 强引用了 self ,self的全局变量 NSTimer 又使 self 强引用了 NSTimer,导致 self 一直不能被释放掉,所以也就走不到 self 的 dealloc 里。
-
此时我们就会想把 Target 设置为 weakSelf ,运行后也不起作用. 是由于我们的 self 和 weakSelf 都是指针指向控制器,控制器的dealloc需要timer的销毁才调用。同样造成相互强引用。
	__weak typeof(self) weakSelf = self;
self.timer = [NSTimer scheduledTimerWithTimeInterval:1.0 target:weakSelf selector:@selector(timerAction:) userInfo:nil repeats:NO];

- 此时我们又想到下面那种把timer设为weak,此时是直接运行造成坏内存访问,因为timer创建就销毁
@property (nonatomic , strong) NSTimer *timer;
self.timer = [NSTimer timerWithTimeInterval:1.0 target:self selector:@selector(timerAction:) userInfo:nil repeats:YES];
[[NSRunLoop currentRunLoop] addTimer:self.timer forMode:NSRunLoopCommonModes];
- 另一种当我们在创建完timer后 置为nil,NSTimer还会不会起作用,答案是会起作用。因为Runloop对NSTimer 有了强引用,指向NSTimer那块内存。
self.timer = [NSTimer scheduledTimerWithTimeInterval:1.0 target:self selector:@selector(timerAction) userInfo:nil repeats:YES];
self.timer = nil;
### 3.解决runloop循环引用

- iOS 10.0 以后增加两个创建方法
-
(NSTimer *)timerWithTimeInterval:(NSTimeInterval)interval repeats:(BOOL)repeats block:(void (^)(NSTimer *timer))block API_AVAILABLE(macosx(10.12), ios(10.0), watchos(3.0), tvos(10.0));
-
(NSTimer *)scheduledTimerWithTimeInterval:(NSTimeInterval)interval repeats:(BOOL)repeats block:(void (^)(NSTimer *timer))block API_AVAILABLE(macosx(10.12), ios(10.0), watchos(3.0), tvos(10.0));
##### 自定义分类创建NSTimer,适用于iOS 10以前

- 原理等同于以上方法,把 target 转换为 NSTimer 自身然后把控制器的定时器方法在block方法中保存执行。
-
(instancetype)syl_timerWithTimeInterval:(NSTimeInterval)time repeats:(BOOL)repeats block:(void (^)(NSTimer *timer))block
{
// 此时的 target 为 NSTimer
return [NSTimer timerWithTimeInterval:time target:self selector:@selector(timeAction:) userInfo:block repeats:repeats];
} -
(void)timeAction:(NSTimer *)timer {
void (^block)(NSTimer *) = [timer userInfo];
!block?:block(timer);
}
### 4.使用 GCD 定时器
// GCD 定时器
- (void)timerNine {
__weak typeof(self) weakSelf = self;
dispatch_queue_t queue = dispatch_queue_create("SYLingGCDTimer", DISPATCH_QUEUE_CONCURRENT);
dispatch_source_t timer = dispatch_source_create(DISPATCH_SOURCE_TYPE_TIMER, 0, 0, queue);
// leewayInSeconds 精准度
dispatch_source_set_timer(timer, DISPATCH_TIME_NOW, 1.0 * NSEC_PER_SEC, 0 * NSEC_PER_SEC);
dispatch_source_set_event_handler(timer, ^{
// code to be executed when timer fires
timer;
[weakSelf timerAction];
});
dispatch_resume(timer);
}
[Demo地址](https://github.com/SYLing/SYLTimer)


我的博客即将搬运同步至腾讯云+社区,邀请大家一同入驻:https://cloud.tencent.com/developer/support-plan?invite_code=1ritpp1xqps9u