一、《 安装Nginx》(原文链接)
1 安装gcc
yum -y install gcc-c++
2 安装Nginx
2.1 安装pcre-devel、gzip、openssl
yum -y install pcre-devel
yum -y install zlib-devel
yum -y install openssl-devel2.2 下载nginx、解压、进入目录
wget http://nginx.org/download/nginx-1.12.1.tar.gz
tar zxvf nginx-1.12.1.tar.gz
cd nginx-1.12.1
2.3 编译安装
./configure
make&&install
2.4 默认安装目录、启动、检查启动状态
// 默认安装路径: /usr/local/nginx

// 启动nginx 命令:
/usr/local/nginx/sbin/nginx

// 查看nginx是否启动
ps -ef|grep nginx

<完>
二、《安装PHP》(原文链接)
c
1. 下载、解压、进入目录
wget -O php-7.1.9.tar.gz http://am1.php.net/get/php-7.1.9.tar.gz/from/this/mirror

tar zxvf php-7.1.9.tar.gz

cd php-7.1.9
2. 安装依赖包
yum -y install libxml2 libxml2-devel openssl openssl-devel curl-devel libjpeg-devel libpng-devel freetype-devel libmcrypt-devel libxslt libxslt-devel


[注] 若该过程中提示无法安装libmcrypt扩展,可以使用以下方法
  sudo yum install php-mcrypt

  sudo yum install libmcrypt
sudo yum install libmcrypt-devel3. 配置、编译安装
./configure
--prefix=/usr/local/php
--with-config-file-path=/etc
--enable-fpm
--with-fpm-user=www-data
--with-fpm-group=www-data
--enable-inline-optimization
--disable-debug
--disable-rpath
--enable-shared
--enable-soap
--with-libxml-dir
--with-xmlrpc
--with-openssl
--with-mcrypt
--with-mhash
--with-pcre-regex
--with-sqlite3
--with-zlib
--enable-bcmath
--with-iconv
--with-bz2
--enable-calendar
--with-curl
--with-cdb
--enable-dom
--enable-exif
--enable-fileinfo
--enable-filter
--with-pcre-dir
--enable-ftp
--with-gd
--with-openssl-dir
--with-jpeg-dir
--with-png-dir
--with-zlib-dir
--with-freetype-dir
--enable-gd-native-ttf
--enable-gd-jis-conv
--with-gettext
--with-gmp
--with-mhash
--enable-json
--enable-mbstring
--enable-mbregex
--enable-mbregex-backtrack
--with-libmbfl
--with-onig
--enable-pdo
--with-mysqli=mysqlnd
--with-pdo-mysql=mysqlnd
--with-zlib-dir
--with-pdo-sqlite
--with-readline
--enable-session
--enable-shmop
--enable-simplexml
--enable-sockets
--enable-sysvmsg
--enable-sysvsem
--enable-sysvshm
--enable-wddx
--with-libxml-dir
--with-xsl
--enable-zip
--enable-mysqlnd-compression-support
--with-pear
--enable-opcache
make && make install
【注】 在配置PHP的时候, 可能会有报错,是因为有些依赖没有安装 , 解决方法链接
1、configure: error: No curses/termcap library found

网上有的说法是:–with-named-curses-libs=/usr/lib/libncursesw.so.5

其实是不对的,虽然能解决configure的错误,但是make的时候会提示错误,正确的做法应该是

centos: yum -y install ncurses-devel

debian: apt-get install libncurses5-dev

2、configure: error: xml2-config not found. Please check your libxml2 installation.

centos: yum -y install libxml2 libxml2-devel

debian: apt-get install libxml2-dev

3、configure: error: Cannot find OpenSSL’s

centos: yum -y install openssl-devel

4、configure: error: libjpeg.(a|so) not found

centos: yum -y install gd

centos: yum -y install gd-devel

debian: apt-get install libjpeg-dev

5、configure: error: libpng.(a|so) not found.

apt-get install libpng12-dev

6、configure: error: cannot find output from lex; giving up

yum -y install flex

7、configure: error: mod_deflate has been requested but can not be built due to prerequisite failures

centos: yum -y install zlib-devel openssl-devel

debian: apt-get install zlib1g-dev

8、configure: error: libxpm.(a|so) not found.

centos: yum -y install libxpm-dev

debian: apt-get install libxpm-dev

9、configure: error: freetype.h not found.

centos: yum install freetype-devel

debian: apt-get install libfreetype6-dev

10、configure: error: …No recognized SSL/TLS toolkit detected

centos: yum -y install libssl-dev

debian: apt-get install libssl-dev

11、Configure: error: Please reinstall the BZip2 distribution

centos: yum install bzip2 bzip2-devel

debian: apt-get install bzip2-devel

12、Configure: error: Please reinstall the libcurl distribution – easy.h should be in /include/curl/

centos: yum install curl curl-devel (For Redhat & Fedora)

# install libcurl4-gnutls-dev (For Ubuntu)

13、Configure: error: Unable to locate gmp.h

centos: yum install gmp-devel

14、Configure: error: Cannot find MySQL header files under /usr. Note that the MySQL client library is not bundled anymore!

yum install mysql-devel (For Redhat & Fedora)

# apt-get install libmysql++-dev (For Ubuntu)

15、Configure: error: Please reinstall the ncurses distribution

Solutions :

centos: yum install ncurses ncurses-devel

16、Checking for unixODBC support… configure: error: ODBC header file ‘/usr/include/sqlext.h’ not found!

Solutions :

centos: yum install unixODBC-devel

17、Configure: error: Cannot find pspell

Solutions :

centos: yum install pspell-devel

18、configure: error: mcrypt.h not found. Please reinstall libmcrypt.

Solutions :

yum install libmcrypt libmcrypt-devel (For Redhat & Fedora)

# apt-get install libmcrypt-dev

19、Configure: error: snmp.h not found. Check your SNMP installation.

Solutions :

yum install net-snmp net-snmp-devel

20、开启LDAP服务还需要

yum -y install openldap-devel openldap-servers openldap-clients

21、configure: error: cannot find output from lex; giving up

centos: yum -y install flex

22、configure: error: mod_deflate has been requested but can not be built due to prerequisite failures

centos: yum -y install zlib-devel openssl-devel

debian: apt-get install zlib1g-dev
4. 配置环境变量
vim /etc/profile

// 在该文件末尾加入:

PATH=$PATH:/usr/local/php/bin
export PATH

// 保存之后执行:

source /etc/profile
5. 查看PHP版本信息
php -v

<完>
三、 《配置Nginx 支持 PHP-FPM》(原文链接)
1. 添加用户、组
groupadd www-data
useradd -g www-data www-data
2. 复制php-fpm配置文件、找到php-fpm.d 目录
cd /usr/local/php/etc
cp php-fpm.conf.default php-fpm.conf

// 打开配置文件,可以在最后一行 看到 php-fpm.d 目录位置
vim php-fpm.conf
3. 进入php-fpm.d目录 复制默认配置文件并修改
cd php-fpm.d
cp www.conf.default  www.conf
vim www.conf

// 将
user = www
group = www
// 改为
user = www-data
group = www-data
4. 重启php-fpm服务,查看状态
/usr/local/php/sbin/php-fpm
netstat -lnt | grep 9000

5. 打开Nginx配置文件
vim /usr/local/nginx/conf/nginx.conf
6. 修改用户组
// 第一行注释去掉 nobody改为www-data
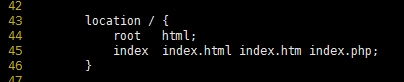
7. 添加index.php
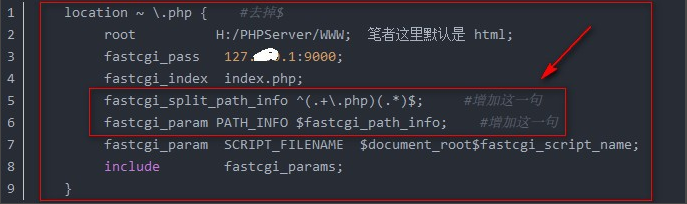
8. 配置php-fpm模块
需要修改红色框体内内容:

9. 保存退出,检查是否正确
/usr/local/nginx/sbin/nginx -t

10. 重启Nginx
/usr/local/nginx/sbin/nginx -s reload
11. 检查能否解析PHP文件
//  可以在你的根目录中放一个 index.php, 文件内容为:
<?php echo phpinfo();
// 在浏览器中, 通过访问  "服务器IP/index.php"   即可看到phpinfo页面
<完>
四、《安装Mysql》(原文链接)
c
1. 添加用户、组
groupadd mysql
useradd -r -g mysql mysql
2. 创建数据保存文件
// 在根目录 创建 /data/mysql/ 两个文件目录
3. 下载、解压、移动并重命名
// 下载
wget http://dev.mysql.com/get/Downloads/MySQL-5.7/mysql-5.7.17-linux-glibc2.5-x86_64.tar.gz
// 解压
tar -xzvf /data/software/mysql-5.7.17-linux-glibc2.5-x86_64.tar.gz
// 移动、重命名
mv mysql-5.7.17-linux-glibc2.5-x86_64 /usr/local/mysql
4. 修改目录权限
cd /usr/local/mysql
chown -R mysql .
chgrp -R mysql .
chown -R mysql /data/mysql
5. 配置参数并获取登录密码
// 找到 myqld
./mysqld --initialize --user=mysql --basedir=/usr/local/mysql --datadir=/data/mysql

// 最后一部分 为 数据库登录密码, 需保存下来,后面会用
// 找到mysql_ssl_rsa_setup 继续执行:
./mysql_ssl_rsa_setup  --datadir=/data/mysql
6. 修改系统配置文件
cd /usr/local/mysql/support-files
cp my-default.cnf /etc/my.cnf
cp mysql.server /etc/init.d/mysql
vim /etc/init.d/mysql

// 修改以下内容:
basedir=/usr/local/mysql
datadir=/data/mysql
7. 登录mysql
// 启动mysql
/etc/init.d/mysql start
// 登录
mysql -hlocalhost -uroot -p
// 输入之前保存的密码
// 修改密码为root
mysql> set password=password('root');
// 设置host地址
mysql> grant all privileges on *.* to 'root'@'%' identified by 'root';
mysql> flush privileges;

// 之后, 可以使用 Navicat 进行远程连接测试
8. 远程连接测试
9. 添加系统路径
vim /etc/profile
// 末尾添加:
export PATH=/usr/local/mysql/bin:$PATH
10. 配置自启动
chmod 755 /etc/init.d/mysql
chkconfig --add mysql
chkconfig --level 345 mysql on
<完>
五、《ThinkPHP5项目运行遇到的问题》
1.linux中找不到php.ini 问题
解决方法:在php编译目录,找一个php.ini-development或者php.ini-production复制到/usr/local/php/etc那个目录,并重命名为php.ini
2.项目根目录由 /public 转移到 / 下
c
c
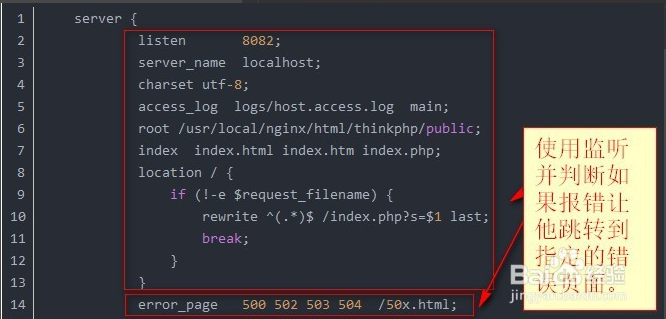
3.环境部署后,访问 www.mysite.com/admin 出现404问题 (原文链接)
修改Nginx配置文件:
<完>
4.could not find driver 问题 (原文链接)
1.原因:没有安装pdo_mysql 驱动
2.解决方法:
(1)。 在PHP压缩包解压出来的文件中找到pdo_mysql文件,并进入
// 在pdo_mysql 文件内部执行:
/usr/local/php/bin/phpize
若遇到报错:

// 则执行:
yum install m4
yum install autoconf
(2)配置、编译安装
./configure –with-php-config=/usr/local/php/bin/php-config –with-pdo-mysql=/usr/local/mysql/

make&&make install
编译安装后, 会看到:(pdo_mysql.so 在该目录下)

打印phpinfo()看一下extension_dir路径,有没有指向上面的路径
如果没有, 则在php.ini中添加:


(3)检查有无安装成功
/usr/local/php/bin/php -m

(4)重启php-fpm、 Nginx
killall php-fpm
/usr/local/php/sbin/php-fpm &
/usr/local/nginx/sbin/nginx -s reload
<完>