一、 模拟设备上报消息
设备端使用阿里云提供的 aliyun_iot_device_quickstart java包运行在Ubuntu上,模拟设备向物联网平台发送消息,运行效果如下:
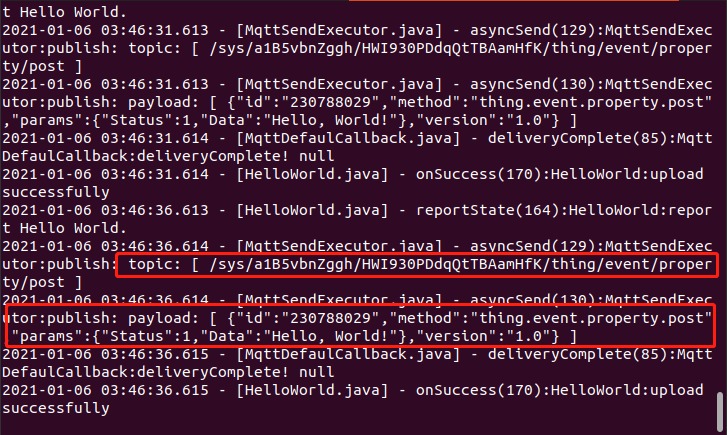
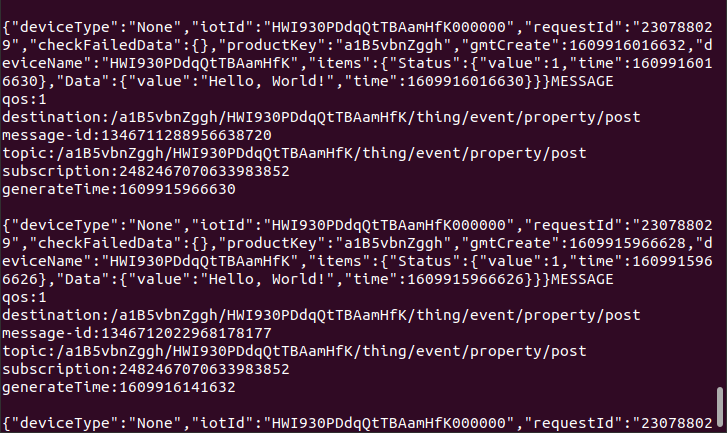
可以看到推送的topic以及推送内容 “hello world”, 物联网后台日志中也可以查看,如下:

二、 服务端订阅设备上报的消息
现在数据已经进入物联网平台, 接下来需要服务端去订阅这个消息队列。
订阅后,只要一有设备上报消息,消息就会推送到我们的服务器, 之后,就可以对消息进行判断处理、存储到数据库等操作。
服务端使用了PHP7.4(thinkPHP5.1) + Nginx , 同样运行在Ubuntu下。
1. PHP服务端安装STOMP,
PHP安装AMQP客户端基于Stomp PHP库, 使用STOMP协议和云端通信,使用composer安装:
composer require stomp-php/stomp-php
2.使用STOMP
安装后, 使用阿里云提供的示例代码,新建控制器, 如下:
<?php namespace appapicontroller; use StompClient; use StompNetworkObserverExceptionHeartbeatException; use StompNetworkObserverServerAliveObserver; use StompStatefulStomp; class Amqpgetmsg { public function start_consume() { //参数说明,请参见AMQP客户端接入说明文档。 $accessKey = config('ali.accessKeyId'); $accessSecret = config('ali.accessKeySecret'); $consumerGroupId = "DEFAULT_GROUP"; //iotInstanceId:购买的实例请填写实例ID,公共实例请填空字符串""。 $iotInstanceId = ""; $timeStamp = round(microtime(true) * 1000); //签名方法:支持hmacmd5,hmacsha1和hmacsha256。 $signMethod = "hmacsha1";
// 此处clientID 为自定义 $clientId = "waterMachine-server-amqp-client1"; //userName组装方法,请参见AMQP客户端接入说明文档。 //若使用二进制传输,则userName需要添加encode=base64参数,服务端会将消息体base64编码后再推送。具体添加方法请参见下一章节“二进制消息体说明”。 $userName = $clientId . "|authMode=aksign" . ",signMethod=" . $signMethod . ",timestamp=" . $timeStamp . ",authId=" . $accessKey . ",iotInstanceId=" . $iotInstanceId . ",consumerGroupId=" . $consumerGroupId . "|"; $signContent = "authId=" . $accessKey . "×tamp=" . $timeStamp; //计算签名,password组装方法,请参见AMQP客户端接入说明文档。 $password = base64_encode(hash_hmac("sha1", $signContent, $accessSecret, $raw_output = TRUE)); //接入域名,请参见AMQP客户端接入说明文档。下方 123456 替换为你的阿里云账号id, cn-shanghai 替换为你的地区代码 若是PHP开发,端口号是 61614 $client = new Client('ssl://123456.iot-amqp.cn-shanghai.aliyuncs.com:61614'); $sslContext = ['ssl' => ['verify_peer' => true, 'verify_peer_name' => false]]; $client->getConnection()->setContext($sslContext); //服务端心跳监听。 $observer = new ServerAliveObserver(); $client->getConnection()->getObservers()->addObserver($observer); //心跳设置,需要云端每10s发送一次心跳包。 $client->setHeartbeat(0, 10000); $client->setLogin($userName, $password); try { $client->connect(); } catch (StompException $e) { echo "failed to connect to server, msg:" . $e->getMessage(), PHP_EOL; } //无异常时继续执行。 $stomp = new StatefulStomp($client); $stomp->subscribe('/topic/#'); return $stomp; } public function index() { $stomp = $this->start_consume(); while (true) { if ($stomp == null || !$stomp->getClient()->isConnected()) { echo "connection not exists, will reconnect after 10s.", PHP_EOL; sleep(10); $stomp = $this->start_consume(); } try { //处理消息业务逻辑。 echo $stomp->read(); } catch (HeartbeatException $e) { echo 'The server failed to send us heartbeats within the defined interval.', PHP_EOL; $stomp->getClient()->disconnect(); } catch (Exception $e) { echo 'process message occurs error ' . $e->getMessage(), PHP_EOL; } } } }
上方代码若有不清楚的地方, 可以参考 → 阿里云文档 ←,非常清楚详细。
3.运行STOMP
运行时, 需要使用命令行的方式运行上面的代码, 以tp5.1为例, 代码如下:
以api模块为例,新建command文件夹,新建Stomp.php, 代码如下:
<?php
namespace appapicommand;

use thinkconsoleCommand;
use thinkconsoleInput;
use thinkconsoleOutput;
use thinkRequest;

class Stomp extends Command {
    protected function configure() {
        // 进程名,下文命令行中会体现
        $this->setName('stompsub')->setDescription('订阅打水机Stomp');
    }

    protected function execute(Input $input, Output $output) {
        $request = new Request();
        // 被执行代码所在模块
        $request->module("api");
        // 控制器和方法
        $output->writeln(controller('api/Amqpgetmsg')->index());
    }
}
在Application目录下的command.php 文件中新增刚刚新建的文件:
return [
    'appapicommandStomp',
];
至此, PHP端代码部分结束, 切换到 命令行工具, 定位到我们的项目根目录(think文件所在的目录),执行:
php think stompsub
其中, stompsub 是上文提到的 进程名, 运行效果如下:
至此, stomp已经订阅并接收到了 设备上报的消息, 可以查看物联网平台日志,如下:

【注】 以守护进程的方式运行服务端代码:
nohup php think stompsub &
此时, 即使关闭命令行窗口, 程序也会运行(接收消息)
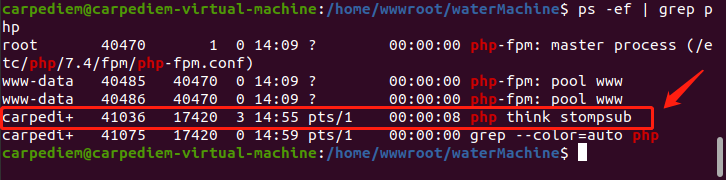
可以使用命令查看 进程:
ps -ef | grep php
如下:
至此, 服务端订阅设备消息结束。
三、服务端下发消息给设备
使用阿里云的物联网SDK下发消息给设备。
阿里云物联网sdk安装:
composer require alibabacloud/iot
下发消息可以参照 物联网平台文档, 非常详细, 也可下载示例代码 点击这里跳转
1