步骤:
-创建web project
– 加入 jar 包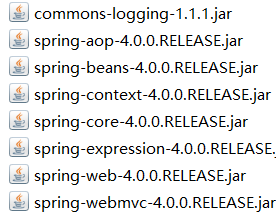
– 在 web.xml 中配置 DispatcherServlet
<?xml version="1.0" encoding="UTF-8"?>
<web-app xmlns="http://xmlns.jcp.org/xml/ns/javaee"
         xmlns:xsi="http://www.w3.org/2001/XMLSchema-instance"
         xsi:schemaLocation="http://xmlns.jcp.org/xml/ns/javaee http://xmlns.jcp.org/xml/ns/javaee/web-app_3_1.xsd"
         version="3.1">

    <!--配置 DispatcherServlet-->
    <servlet>
        <servlet-name>springDispathcerServlet</servlet-name>
        <servlet-class>org.springframework.web.servlet.DispatcherServlet</servlet-class>
        <!-- 配置 DispatcherServlet 的一个初始化参数: 配置 SpringMVC 配置文件的位置和名称 -->
        <!--
			实际上也可以不通过 contextConfigLocation 来配置 SpringMVC 的配置文件, 而使用默认的.
			默认的配置文件为: /WEB-INF/<servlet-name>-servlet.xml
		-->
        <init-param>
            <param-name>contextConfigLocation</param-name>
            <param-value>classpath:springmvc.xml</param-value>
        </init-param>
        <load-on-startup>1</load-on-startup>
    </servlet>

    <servlet-mapping>
        <servlet-name>springDispathcerServlet</servlet-name>
        <url-pattern>/</url-pattern>
    </servlet-mapping>
</web-app>
load-on-startup:表示启动容器时初始化该Servlet;
url-pattern:表示哪些请求交给Spring Web MVC处理, “/” 是用来定义默认servlet映射的。也可以如“*.html”表示拦截所有以html为扩展名的请求。
– 加入 Spring MVC 的配置文件 即上面配置的 springmvc.xml
<?xml version="1.0" encoding="UTF-8"?>
<beans xmlns="http://www.springframework.org/schema/beans"
       xmlns:xsi="http://www.w3.org/2001/XMLSchema-instance"
       xmlns:context="http://www.springframework.org/schema/context"
       xsi:schemaLocation="http://www.springframework.org/schema/beans http://www.springframework.org/schema/beans/spring-beans.xsd http://www.springframework.org/schema/context http://www.springframework.org/schema/context/spring-context.xsd">

    <!--配置自动扫描的包-->
    <context:component-scan base-package="springmvc"></context:component-scan>

    <!--配置视图解析器:如何把Handler方法返回值解析为实际的物理视图-->
    <bean class="org.springframework.web.servlet.view.InternalResourceViewResolver">
        <property name="prefix" value="/WEB-INF/views/">
        </property> <property name="suffix" value=".jsp"></property>
  </bean>
</beans>
– 编写处理请求的处理器,并标识为处理器 HelloWorld.java
1.使用@RequestMapping注解来映射请求的URL
* 2.返回值会通过视图解析器解析为实际的物理视图, 对于 InternalResourceViewResolver 视图解析器, 会做如下的解析:
* 通过 prefix + returnVal + 后缀 这样的方式得到实际的物理视图, 然会做转发操作
/WEB-INF/views/success.jsp即为要转发去的视图
package springmvc.handlers;

import org.springframework.stereotype.Controller;
import org.springframework.web.bind.annotation.RequestMapping;

@Controller
public class HelloWorld {

    /**
     * 1.使用@RequestMapping注解来映射请求的URL
     * 2.返回值会通过视图解析器解析为实际的物理视图, 对于 InternalResourceViewResolver 视图解析器, 会做如下的解析:
     * 通过 prefix + returnVal + 后缀 这样的方式得到实际的物理视图, 然会做转发操作
     *
     * /WEB-INF/views/success.jsp
     * @return
     */
    @RequestMapping("/helloworld")
    public String hello(){
        System.out.println("Hello world");
        return "success";
    }
}
– 编写视图
success.jsp